Christmas in July Card Series w/ Sunny Studio - Christmas Under The Ocean

jeudi 28 juillet 2022

 Hello there,

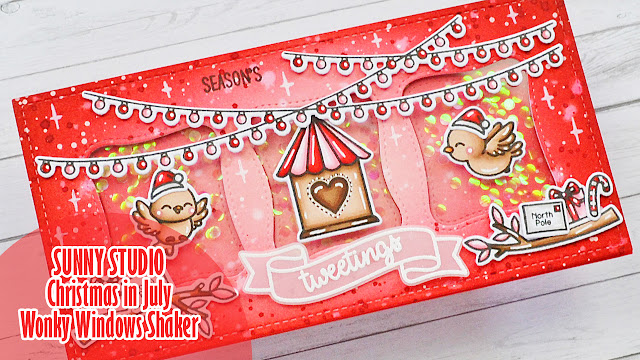
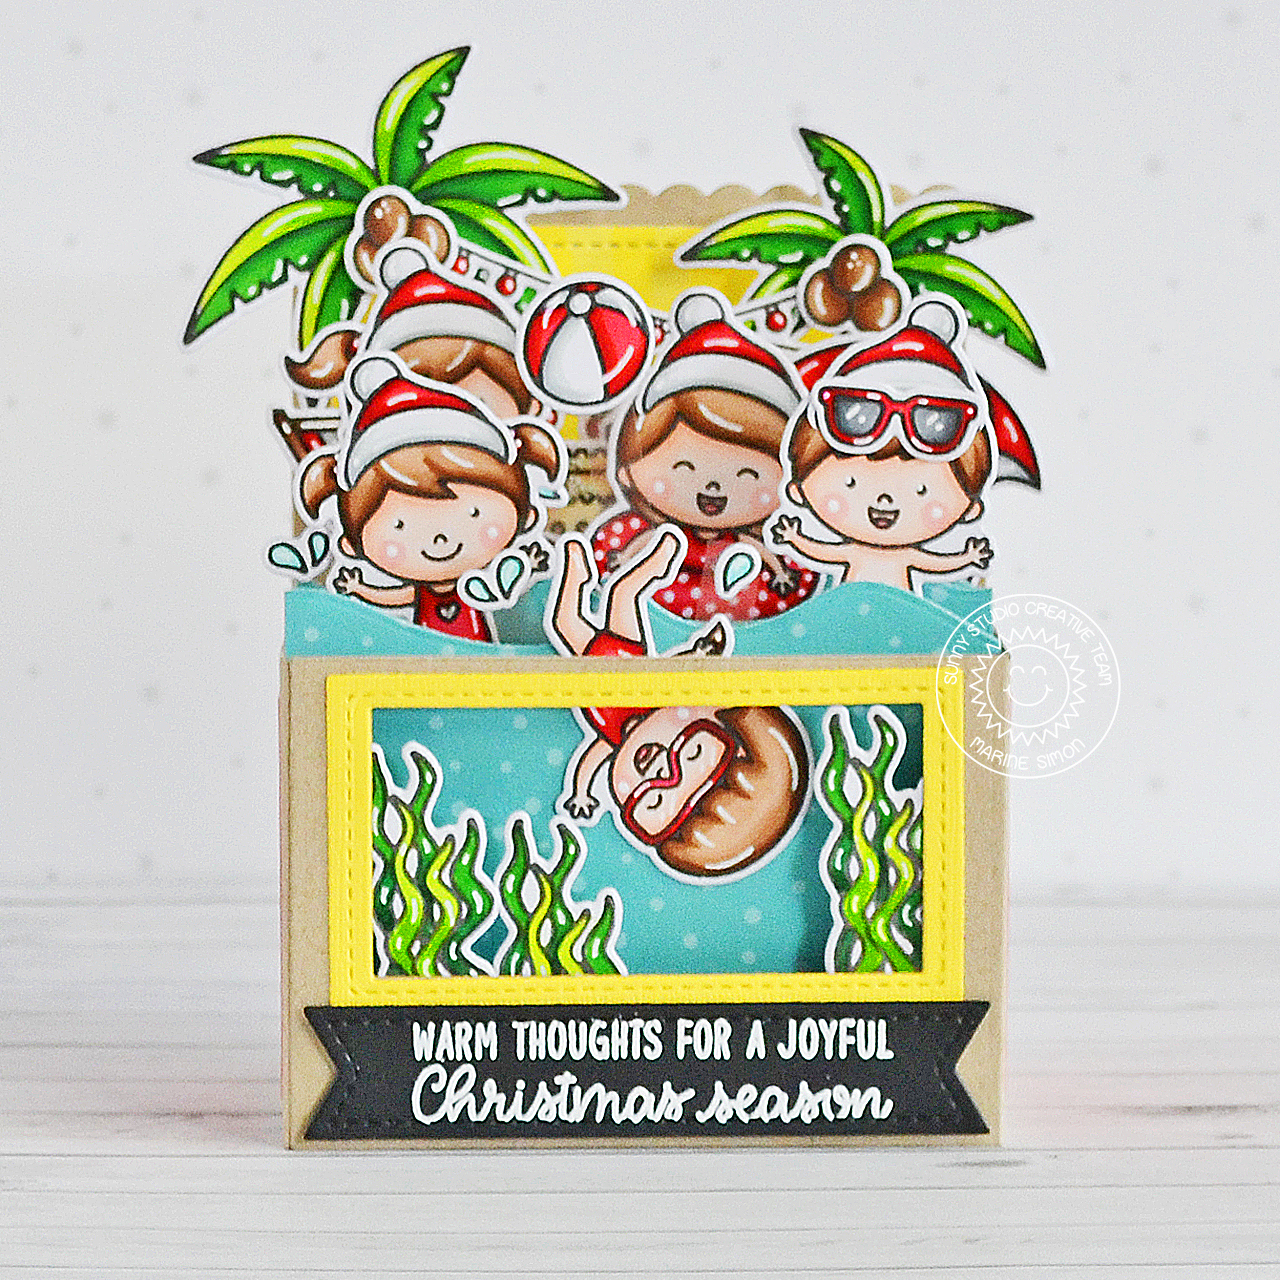
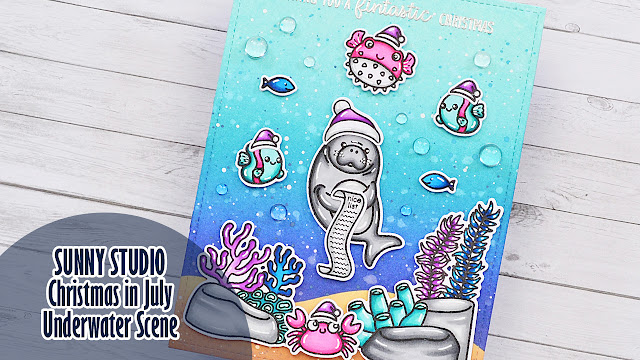
I'm super happy to be back on Sunny Studio blog with one last Christmas in July card. I had a lot of fun making this series, and I hope you appreciated it as well! Today we're going under the ocean to celebrate Christmas with some adorable Fintastic friends.

I started off with the underwater background. I cut a 5,5 x 4,25" bristol panel, and worked on the bottom part first. I created a sand border using a hill stencil, along with antique linen and vintage photo oxide inks. And once the inking was done, I added texture on that sand border: white ink + water splatters, and vintage photo oxide ink + water splatters.

Next I covered the sand border using the hill stencil, and I created the ocean on the upper part of the panel using oxide inks again. From the sand border towards the top of the panel I applied chipped sapphire, blueprint sketch, peacock feathers and salvaged patina. I also added texture: water splatters, chipped sapphire oxide ink + water splatters, and white ink + water splatters.


I set the paper aside to dry, and worked on the images. I stamped them all using an alcohol marker friendly black ink, cut them using the coordinating dies and colored everything using my alcohol markers with greys, pinks, aquas, blues and purples.

Fintastic friends: sea critters
Ocean view: crab +reef
Penguin pals: small fishes + hat
Christmas critters: small hat
North pole: nice list


After the coloring, I stamped my sentiment at the very top of the panel using clear embossing ink and silver embossing powder. I picked the words "Wishing you a" + "Christmas" from Santa Claus lane, and "Fintastic" from Fintastic friends to make the phrase "Wishing you a fintastic Christmas", and then I attached all the images on the panel using 1mm foam squares.

Finally I glued a few clear droplets here and there, and added highlights and details to the images using a white gel. And done! Super bright and so cute, I hope you like it. As always you will find more details in the process video so feel welcome to check it out! Thanks so much for stopping by, and see you next week!


VIDEO


SUNNY STUDIO SUPPLIES
- Fintastic friends stamp set
- Ocean view stamp set
- Penguin pals stamp set
- Christmas critters stamp set
- North pole stamp set
- Santa Claus lane stamp set


OTHER SUPPLIES
- Spectrum Noir markers
- Graph'it brush markers
- Oxide inks: antique linen, vintage photo, salvaged patina, peacock feathers, blueprint sketch, chipped sapphire
- Copic opaque white ink
- Sakura white gel pen
- Hill stencil by Lawn Fawn
- Extreme black ink by My Favorite Things
- Clear embossing ink by Lawn Fawn
- Silver embossing powder by Lawn Fawn
- Strathmore bristol smooth cardstock
- Clear droplets by Studio Katia

Christmas in July Card Series w/ Sunny Studio - Wonky Windows Shaker Card

jeudi 21 juillet 2022

Hello there,

I'm super happy to be back on Sunny Studio blog with more Christmas in July inspiration. Today I'm featuring the Wonky windows die again, I love this die, it's so perfect to make shaker cards!

I first started by cutting a 6 x 3" bristol panel, and created a vibrant red background using tattered rose, festive berries and aged mahogany distress inks. And I added lots of texture to give this panel more interest: water splatters, white ink splatters and aged mahogany distress ink + water splatters.

And while the panel was drying, I stamped, die cut and colored my images. I like to mix and match stamps from different sets, and this is what I did on this card:

Little birdie: the birdhouse and two birds
Scenic route: the strings of lights
Outback critters: the branch
Christmas critters: the Christmas hat
Holiday express: a present
Penguin pals: the postcard and candy canes


Next I worked on the shaker. I started by cutting three windows out of my red panel using the Wonky windows die. I cut a 6 x 3" red card base, temporarily taped the red panel to it using washi tape, and put each window back to its original spot using liquid glue.

I removed the washi tape to lift the red panel, and then attached a piece of clear acetate at the back of it. Still at the back of the red panel, I added foam strips all around each window to create room for the shaker accessories.

I rubbed the inside edges of the foam strips with my powder tool to make those edges non sticky so the confetti don't stick to the foam. I used a microfiber cloth to remove any excess of powder from the acetate, and then I added a bunch of shiny confetti inside each window. Peeled all the backing papers off the foam strips, and finally attached the card base to the foam to complete and close the shaker.


I stuck the images on the panel using foam squares and liquid glue. And next I created my "Season's Tweetings" sentiment using elements from Little birdie. I stamped "Season's" in the upper part of the panel using black ink, and I white heat embossed "Tweetings" on vellum, along with the banner, and I attached this banner below the birdhouse using clear foam squares.

Finally I added highlights and details to the images and background using a white gel pen. And that's it, super bright and very cute with those birdies wearing Christmas hats. Thanks for stopping by, and as always feel welcome to watch the process video for more details. See you next week!


VIDEO


SUNNY STUDIO SUPPLIES
- Wonky windows die
- Little birdie stamp set
- Scenic route stamp set
- Outback critters stamp set
- Christmas critters stamp set
- Holiday express stamp set
- Penguin pals stamp set


OTHER SUPPLIES
- Spectrum Noir markers
- Graph'it brush markers
- Distress inks: tattered rose, festive berries, aged mahogany
- Copic opaque white ink
- Sakura white gel pen
- Extreme black ink by MFT
- Clear embossing ink by Lawn Fawn
- Fine white embossing powder by Hero Arts
- Strathmore bristol smooth cardstock
- Vellum by Lawn Fawn
- Confetti by Studio Katia

Christmas in July Card Series w/ Lawn Fawn - Rainbow Shaker Card

 Hi there,

I'm super happy to be back on Lawn Fawn YouTube Channel to continue my Christmas in July card series! Today I'm showcasing this bright rainbow shaker card that I hope will inspire you to use non traditional colors on Christmas cards.

I started right away with the background, and cut a Stitched Snowflake panel that I colored using distress oxide inks: kitsch flamingo, squeezed lemonade, cracked pistachio, peacock feathers and wilted violet. Once my rainbow panel was done, I added a few white splatters all over it. And while it was drying, I stamped, cut and colored some images.


Next I created the shaker. I used the second Small stitched rectangle to cut an opening right in the middle of the rainbow panel. At the back of that panel I added double sided tape on the four edges and stuck a piece of vellum. Next I added two layers of foam tape at the back of the panel, all around the opening. I applied powder inside the opening on the foam edges in order to make those edges non sticky, and then added a shaker mix on the vellum. I peeled the backing off the foam tape, and attach a piece of Really Rainbow Christmas paper to totally close the shaker.

Next I decorated the front of the panel. I cut three Stitched Scalloped frames out of white cardstock, and layered those three pieces on top of each other to frame our shaker window nicely.


I cut a Sweet Scripty Word out of Gold Glitter cardstock, and I also white heat embossed the first part of my sentiment on a Black Licorice Everyday Sentiment Banner. And then I stuck all those different elements + images on my card. I attached the panel on a white card base, and as always I finished my card by adding white highlights and details to the images.


VIDEO


LAWN FAWN SUPPLIES

Stamp sets
Just add glitter
- A creature was stirring
- Unicorn picnic
- Purrfectly wicked
- Love poems
- Offset sayings Christmas

Die sets
- Stitched snowflakes backdrop
- Stitched scalloped rectangle frame
- Large stitched rectangle stackable die
- Small stitched rectangle stackable die
- Everyday sentiment banner die
- Sweet scripty word die

Misc
- Really rainbow Christmas paper pack
- Black licorice cardstock
- White cardstock
- Gold glitter cardstock
- Vellum
- Clear embossing ink
- White embossing powder


OTHER SUPPLIES
- Spectrum Noir markers
- Graph'it brush markers
- Oxide inks: kitsch flamingo, squeezed lemonade, cracked pistachio, peacock feathers, wilted violet
- Sakura white gel pen
- Copic opaque white ink
- Shaker mix by Spellbinders
- Strathmore bristol smooth cardstock

Christmas in July w/ Spellbinders - Foil & Poinsettias

samedi 16 juillet 2022

 Hi there,

I'm back with more Christmas in July inspiration. Today's cards feature some new products by Spellbinders, and for the first time I'm sharing a process video in which I use the Glimmer Hot Foil System.

I picked three colored cardstock by The Stamp Market to create three different cards using the same pattern: dark green, turquoise & white. I cut a 5,25 x 4" panel out of each colored cardstock, and started by foiling each panel using the Crossed lines card front glimmer plate. I paired each panel with a type of foil: dark green + Polished Brass Foil, turquoise + Silver Foil, and white + Matte Gold Foil. Once each panel was foiled, I attached each of them on a matching 5,5 x 4,25" card base using foam mounted tape.

I also foiled three different Merry Glimmer Sentiments on black cardstock using the same three types of foil as before, I cut them using the coordinating dies, and then stuck a sentiment in the middle of each card using foam squares.

Next I created poinsettias using the Jasmine die set to decorate each card. For the dark green card, I went with red poinsettias, for the turquoise card I went with light blue poinsettias, and for the white card I went with a rainbow set of poinsettias. I also added some shine to those flowers using mirror cardstock, and as for the center pieces, I cut them all using dies from the Simply Perfect Layered Blooms die set.

I arranged the poinsettias on each card, and glued them using foam squares again, and for the final details, I added a few jewels on each panel.


VIDEO


SPELLBINDERS SUPPLIES
- Hot foil glimmer system
- Crossed lines card front glimmer plate
- Jasmine die set
- Merry glimmer sentiments
- Simply perfect layered blooms die set
- Polished brass foil
- Matte gold foil
- Silver foil


OTHER SUPPLIES
- All colored cardstock by The Stamp Market
- All jewels by Sunny Studio
- Mirror cardstock by Lawn Fawn

Christmas in July Card Series w/ Sunny Studio - Ocean View & Sandman

jeudi 14 juillet 2022

Hey there,

I'm so happy to be back on Sunny Studio blog with more Christmas in July inspiration! Today I'm featuring the gorgeous Ocean view stamp set, and a cute snowman from Feeling frosty that I turned into a sandman.

I started off with the coloring. I stamped the Ocean view image on a large piece of cardstock, and colored it using my alcohol markers. And I picked a few additional stamps from different sets to complete my scene:

Christmas critters: the Christmas hat
Farm fresh: a crow that will become a seagull
Balloon rides: the sun
Savanna safari: the small rocks + grass


I wanted both crabs to look at the sandman. One of them was already looking in the right direction, but the other one was not. So I stamped a third crab and cut his eyes off, and I stuck those eyes on the second crab to make him look at the sandman.

I trimmed the Ocean view panel into a 5,5 x 4,25" portrait panel, and then used the coordinating die to get rid of the top of the panel. I also cut a piece of Spring sunburst pattern paper to make the sky, and I attached both pieces on a card base.

I stamped my sentiment at the bottom of the panel using words from two different sets: "Have a" + "Christmas" from Lazy Christmas, and "Clawsome" from Best fishes to get the following phrase "Have a clawsome Christmas". And next I attached all the images on the panel using foam squares.


As always I finished my card by adding highlights and details to the images using a white gel pen, I added a bunch of dots on the ocean lines to bring a reflection effect to the waves.


VIDEO


SUNNY STUDIO SUPPLIES
- Ocean view stamp set
- Christmas critters stamp set
- Farm fresh stamp set
- Balloon rides stamp set
- Savanna safari stamp set
- Lazy Christmas stamp set
- Best fishes stamp set
- Spring sunburst 6x6 paper pack


OTHER SUPPLIES
- Spectrum Noir markers
- Graph'it brush markers
- Sakura white gel pen
- Copic opaque white ink
- Black versafine ink
- Extreme black ink by MFT

Christmas in July Card Series w/ Sunny Studio - Underwater Pop-Up Box Card

jeudi 7 juillet 2022

Hey there,

I'm continuing to celebrate "Christmas in July" with this fun Christmas at the beach box card showcasing the adorable Kiddie Pool stamp set by Sunny Studio. As you can see on the pictures, my little scene is quite busy, I picked some additional images from different stamp sets:


Beach Babies - balloon, sandcastle, parasol, bag, sunscreen and bucket
Beach Buddies - sunglasses
Scenic Route - strings of lights
Penguins Pals - penguins for their hats
Fintastic Friends - seaweeds

As always I started off by stamping the images using an alcohol marker friendly black ink, cut them all using the coordinating dies and then colored everything using my alcohol markers, and to stay in the Christmas theme, I obviously used a lot of red.

Next I worked on the pop-up box card. I cut all the different elements to build it, including some panels using papers from Spring Sunburst + All Is Bright + Very Merry. Please watch the video (linked down below) to see how this pop-up box card was put together.


Once the box card was assembled, I attached all my cute images inside of it, using glue dots mostly, as well as liquid glue at some places. And to give the illusion that some of the images (balloon + water splatters) are in the air, I stuck those images on thin strips of acetate using glue dots, and then attached those strips inside the box using glue dots again.


For the final details, I cut a yellow frame that I attached around the window on the front of the box card. I also used a die from the Stitched Rectangle die set to cut a banner out of black cardstock, and white heat embossed my sentiment "Warm thoughts for a joyful Christmas season" from Foxy Christmas on it.


VIDEO


SUNNY STUDIO SUPPLIES
- Kiddie pool stamp set
- Beach babies stamp set
- Beach buddies stamp set
- Seasonal trees stamp set
- Sending sunshine stamp set
- Scenic route stamp set
- Penguin pals stamp set
- Fintastic friends stamp set
- Foxy Christmas stamp set
- Stitched rectangle die set
- Spring sunburst 6x6 paper pack
- All is bright 6x6 paper pack
- Very merry 6x6 paper pack


OTHER SUPPLIES
Spectrum Noir markers
- Graph'it brush markers
- Sakura white gel pen
- Copic opaque white ink
- Kraft cardstock by Lawn Fawn
- Black licorice cardstock by Lawn Fawn
- Clear embossing ink by Lawn Fawn
- Fine white embossing powder by Hero Arts

Christmas in July Card Series w/ Lawn Fawn - Jingle Smells Platform Pop-Up Card

Hello there,

I'm so happy to be back on Lawn Fawn channel with this new platform pop-up card. The month of July has started so it's time for some Christmas in July celebration, make this month jolly and merry, with cute cards to send to our loved ones at the end of the year.

Please watch the process video down below to see how this cute card was put together, and check the list of supplies for more information about the images featured in the scene.


VIDEO


LAWN FAWN SUPPLIES

Stamp sets
- Scent with love
- Yeti or not
- Den sweet den
- Christmas dreams
- Holiday helpers
- Riley's ABCs

Die sets
- Platform pop-up
- Henry's ABCs
- Large stitched circle stackables
- Everyday sentiment banners

Papers
- Perfectly plaid Christmas paper pack
- Into the woods remix paper pack
- Let it shine paper pack
- Woodgrain cardstock
- Black licorice cardstock

Misc
- Clear embossing ink
- White embossing powder


OTHER SUPPLIES
- Spectrum Noir markers
- Graph'it brush markers
- Sakura white gel pen