samedi 29 juin 2024

Pretty Pink Posh - Sports Card & See-Through Tag Duo

Hello there,

I'm thrilled to be back with this card + tag duo showcasing three products from the Pretty Pink Posh June 2024 release, which are the Sports stamp set, the Layered Sports Balls stencils and the Football Shaker die set. These are absolutely amazing, I'm so happy with how my projects turned out, and I hope you like them too!


I started off by cutting a Stitched Torn Rectangle kraft panel that I stenciled using the Layered Sports Balls stencils. When I stencil on kraft cardstock, I like to create a white base first, so that the colors I apply next pop on the paper. So I taped the stencil A on my panel, and used white pigment to make this white base. I kept the stencil A in place, but shifted it a little bit to the right, and used oxide inks to make the first layer of my sports balls. Next I taped the stencil B on top of my panel, and used more oxide inks to add details to my sports balls.

Here are the oxide ink combinations I used:
• Basketball - rusty hinge + vintage photo
• Football - vintage photo + ground espresso
• Soccer ball - lost shadow + black soot
• Tennis ball - squeezed lemonade + mustard seed
• Volleyball - pumice stone + hickory smoke


As always, I added texture to my panel: I mixed some ground espresso oxide ink with water, and used a small brush to add splatters to my background, and then did the same with copic opaque white ink. I set my panel aside to dry, and stamped all the Sports images on 80lb Neenah solar white cardstock using an alcohol marker friendly black ink. I cut them all using the matching dies, and colored everything using my Spectrum Noir Illustrator markers and my Graph'it brush markers.


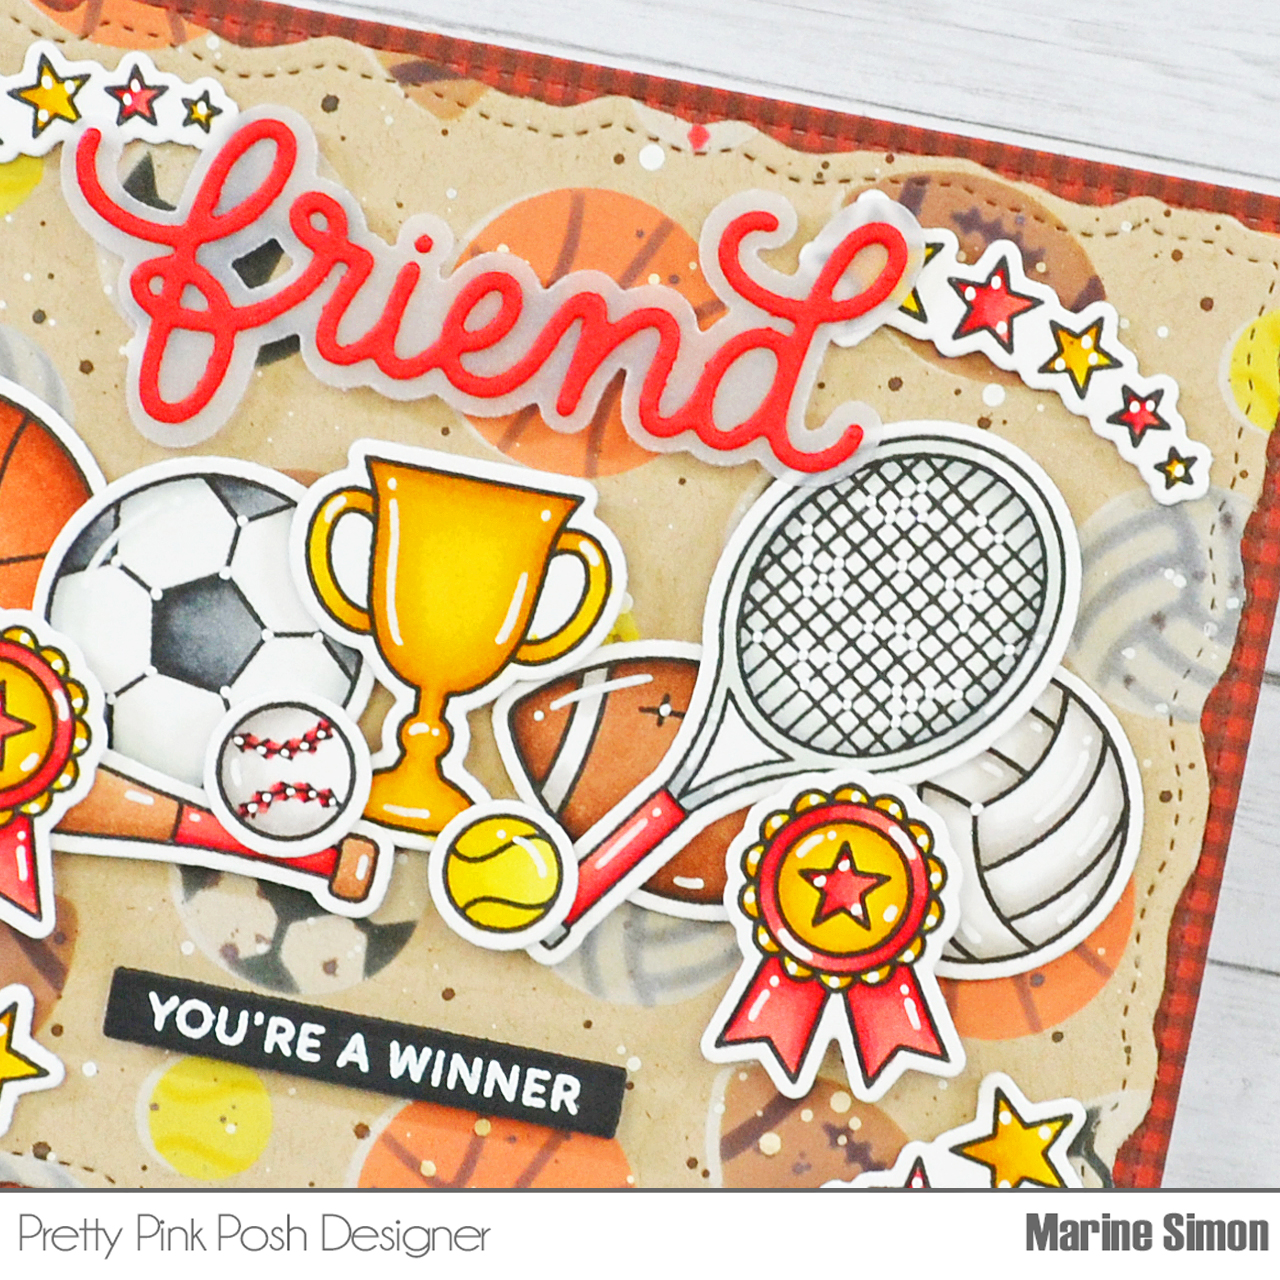
I attached the images on my Layered Sports Balls panel using 1mm and 2mm foam squares, and then added highlights and details using a white gel pen. I stamped "You're a winner" from Sports on black cardstock, and trimmed it into a slim banner using a Sentiment Strips die that I attached below the images. I also cut "Friend" out of red cardstock, as well as its shadow out of vellum, using the Friend Shadow die set. I stuck "Friend" on its shadow using liquid glue, and then attached the whole piece above the images using 2mm foam squares. To finish my card, I cut a 5,5 x 4,25 inches black and red gingham panel, attached it to a kraft card base, and then stuck my panel on top using double sided tape.

*****


Next I created my Football Shaker see-through tag, and here are the different steps to build and assemble it:
1. Cut a football frame out of brown cardstock, cut a whole football out of acetate, and attach the football frame on the acetate football using liquid glue
2. Flip the piece over, cut the tag handle using a Build A Stocking die, and attach it on one end of the football using liquid glue
3. Add foam strips behind the frame, directly on the acetate, following the shape of the football
3. Pour Gold Mini Star confetti, as well as Construction Zone shaker beads on the acetate
4. Cut another football out of acetate, and attach it to the foam strips to close the shaker
5. Cut another brown football frame, and stick it to the acetate to finish the back of the tag nicely


Once the Football Shaker base was done, I glued the white decorative pieces, added gold thread on the handle, and attached a yellow bow right below it. I also white heat embossed "You're #1" from Sports on red cardstock, trimmed it into a slim banner using a Sentiment Strips die, and stuck it to the acetate using liquid glue.


PRETTY PINK POSH SUPPLIES
- Sports stamp set
- Football shaker die set
- Layered sports balls stencils
- Stitched torn rectangle die set
- Sentiment strips die set
- Friend shadow die set
- Mini gold star confetti
- Construction zone shaker beads


OTHER SUPPLIES
- Spectrum Noir Illustrator markers
- Graph'it brush markers
- Oxide inks: rusty hinge, vintage photo, squeezed lemonade, mustard seed, ground espresso, lost shadow, hickory smoke, black soot, pumice stone
- Copic opaque white ink
- Sakura white gel pen
- Clear embossing ink by Lawn Fawn
- Fine white embossing powder by Hero Arts
- Jet black ink by Lawn Fawn
- Vellum by Lawn Fawn
- Black licorice cardstock by Lawn Fawn
- Red cardstock by The Stamp Market
- Kraft cardstock by Lawn Fawn (background)
- 80lb Neenah solar white cardstock (images)
- Red & black pattern paper from my stash

jeudi 27 juin 2024

Sunny Studio - Tropical Birds Baby Card

Hello there,

I'm so happy to be back on the Sunny Studio blog with this lovely tropical baby card showcasing Tropical Birds. As you may know, I'm a huge fan of tropical cards, it's always fun to color all the greenery, and I like to play with bright and bold colors to create my backgrounds. In case you missed them, here are a few examples of the tropical cards I've made using: • Big Panda Sliding Window Card • Juicy Watermelon Slimline Card • Tiki Bar Summer Scene • Savanna Safari Birthday Card • Panda Party Slimline Card.


I started off by stamping my images on 80lb Neenah solar white cardstock using an alcohol marker friendly black ink. I cut them all using the coordinating dies, and colored everything using my Spectrum Noir Illustrator markers and my Graph'it brush markers. Lots of green tones for all the leaves, and light orange tones for the birdies. Here is a -short- detailed list of the products I used:  Tropical Birds - cockatoos, leaves, flowers, ivy  Little Birdie - nest  Special Day - hearts  Chubby Bunny - baby bird.


Next I cut a 5,5 x 4,25 inches Strathmore bristol smooth panel, and started off by coloring it using, from top to bottom, carved pumpkin + dried marigold + scattered straw oxide inks. I added a jungle pattern to my background using tropical leaf stencils from my stash along with, from top to bottom, ripe persimmon + carved pumpkin + fossilized amber oxide inks. To bring more interest to my panel, I splattered water all over it and dried it using a paper towel. I mixed some black soot oxide ink with water, and used a small brush to add more splatters to my panel, and then did the same with copic opaque white ink.


Once my panel was dry, I attached all the images using 1mm and 2mm foam squares, and stamped my "Hello baby" greeting from Baby Elephant using black versafine ink. I also added highlights and details to the images using a white gel pen, and finished my card with some white blizzard nuvo drops on the hearts to make them sparkle.


SUNNY STUDIO SUPPLIES
- Tropical birds stamp set
- Little birdie stamp set
- Special day stamp set
- Chubby bunny stamp set
- Baby elephant stamp set


OTHER SUPPLIES
- Spectrum Noir Illustrator markers
- Graph'it brush markers
- Oxide inks: scattered straw, dried marigold, carved pumpkin, fossilized amber, ripe persimmon, black soot
- Copic opaque white ink
- Sakura white gel pen
- Black versafine ink (greeting)
- Jet black ink by Lawn Fawn (images)
- White blizzard nuvo drops
- 80lb Neenah solar white cardstock (images)
- Strathmore bristol smooth cardstock (background)

samedi 22 juin 2024

Pretty Pink Posh - Mix & Match Godzilla Themed Card

Hi there,

I'm thrilled to be back with this extra fun card featuring several items from the Pretty Pink Posh June 2024 Release, and inspired by the Godzilla movies. I love how you can mix and match Pretty Pink Posh stamps and dies to create cute little scenes!


I started off by creating my background on a 5,5 x 4,25 inches Strathmore bristol smooth panel. I divided it into two sections, and did the sky first. From top to bottom, I blended prize ribbon + salty ocean + tumbled glass oxide inks, and then created a light effect using the Starburst stencil along with white pigment ink. I splattered water droplets on my panel and dried it using a paper towel, mixed some black soot oxide ink with water, used a small brush to add more splatters on my sky, and then did the same with copic opaque white ink.

On the lower part of my panel, I created the road using hickory smoke + black soot oxide inks, and added details using one of the Layered Road stencils along with black soot oxide ink. I mixed some black soot oxide ink with water again, and used my small brush to add splatters on the bottom part of my panel.


I set my panel aside to dry, and stamped my images on 80lb Neenah solar white cardstock using an alcohol marker friendly black ink. I cut them using the matching dies, and colored everything using my Spectrum Noir Illustrator markers and my Graph'it brush markers. Here is a detailed list of the products I used:  Helper Vehicles - firetruck, police car, fire, stop sign, fire hose, water droplets, smoke  Construction Additions - work fences  Construction Trucks - pile of dirt  Dinosaur Friends - Godzilla.


Next I cut the skyline out of black cardstock, as well as the back out of yellow cardstock and out of pearlescent vellum, using City Buildings. I glued the black piece on the yellow one, and then added the pearlescent vellum piece at the back, but shifted it a little bit to create a shining border. I attached my building element on the panel using 1mm foam squares, and then added all the images using 1mm and 2mm foam squares. I white heat embossed my "Thanks for saving the day" from Helper Vehicles right above the buildings, and finally added highlights and details to the images using a white gel pen.


PRETTY PINK POSH SUPPLIES
- Helper vehicles stamp set
- Construction additions stamp set
- Construction trucks stamp set
- Dinosaur friends stamp set
- City buildings die set
- Starburst stencil
- Layered roads stencils


OTHER SUPPLIES
- Spectrum Noir Illustrator markers
- Graph'it brush markers
- Oxide inks: salty ocean, prize ribbon, black soot, hickory smoke, black soot
- White pigment ink by Simon Says Stamp
- Copic opaque white ink
- Sakura white gel pen
- Clear embossing ink by Lawn Fawn
- Fine white embossing powder by Hero Arts
- Jet black ink by Lawn Fawn
- Black cardstock by Lawn Fawn
- Yellow cardstock by The Stamp Market
- Pearlescent vellum by Lawn Fawn
- 80lb Neenah solar white cardstock (images)
- Strathmore bristol smooth cardstock (background)

jeudi 20 juin 2024

Sunny Studio - Summer Slimline Card with the Mouse Family

Hello there,

Look who's back on the Sunny Studio blog! The mouse family is up for a new adventure, and this time, they're on vacation at the beach, where there are so many cool activities to do! Once again, it was so much fun to mix and match my stamps to create this little scene.


As very often I went for a slimline style to feature as many images as I could, and started off by creating my beach scenery using stencils from my stash along with oxide inks. On the lower part, I did the ocean/sea using salvaged patina, peacock feathers and blueprint sketch oxide inks. Right above it, I did two sand borders using antique linen and vintage photo oxide inks. And at the very top of my panel, I did a cloudy sky using salvaged patina oxide ink.


Next I did the same texture routine as usual, and to give the illusion of foam on the waves, I dipped a sponge dauber into copic opaque white ink, and dabbed my panel pretty randomly to create that foam effect.

I set my panel aside to dry, and stamped my images on 80lb Neenah solar white cardstock using an alcohol marker friendly black ink. I cut them all using the coordinating dies, and colored everything using my Spectrum Noir Illustrator markers and my Graph'it brush markers.


Here is a detailed list of the products I used: • Beach Bus - van, mouse • Beach Babies - ball, bag, sunscreen, shovels, buckets • Beach Buddies - sunglasses, floaties • Merry Mice - sand mouse • Harvest Mice - mice • Garden Critters - sprigs • Kiddie Pool - snorkel, splatters • Balloon Rides - clouds, sun • Christmas Critters - mouse • Tiki Time - torch • Seasonal Trees - palm tree, coconuts.


Once the coloring was done, I attached everything on my panel using 1mm and 2mm foam squares, leaving enough space at the very bottom for my "Happy summer" greeting from Beach Babies that I heat embossed in white. I added highlights and details to the images using a white gel pen, and applied a little bit of white blizzard nuvo drops to the splatters to make them shine.


SUNNY STUDIO SUPPLIES
- Beach bus stamp set
- Beach babies stamp set
- Beach buddies stamp set
- Merry mice stamp set
- Harvest mice stamp set
- Garden critters stamp set
- Kiddie pool stamp set
- Balloon rides stamp set
- Christmas critters stamp set
- Tiki time stamp set
- Seasonal trees stamp set


OTHER SUPPLIES
- Spectrum Noir Illustrator markers
- Graph'it brush markers
- Oxide inks: salvaged patina, peacock feathers, blueprint sketch, prize ribbon, antique linen, vintage photo
- Copic opaque white ink
- Sakura white gel pen
- White blizzard nuvo drops
- Clear embossing ink by Lawn Fawn
- Fine white embossing powder by Hero Arts
- Jet black ink by Lawn Fawn
- Hillside stencil by Lawn Fawn
- Cloudy stencil by Lawn Fawn
- Ocean stencil by Lawn Fawn
- 80lb Neenah solar white cardstock (images)
- Strathmore bristol smooth cardstock (background)

mardi 18 juin 2024

Pretty Pink Posh June 2024 Release IG Hop - Outer Space Slimline Card


Hello there,

Pretty Pink Posh just released a collection of products that are perfect for creating boy-themed projects. Whether you're into sports, construction, cars, or outer space products, there are plenty of fun items for your craft projects!

Make sure to check my post on Instagram and hop along to get inspired for your baby, wedding and/or graduation projects.

*****

For this Instagram Hop, I created a colorful slimline card, and mixed & matched "old" and new products, including the Outer Space stamp set and the Layered Shooting Stars stencils, both from the Pretty Pink Posh June 2024 Release to create this fun galaxy scene.


I started off by stamping all my images on 80lb Neenah solar white cardstock using an alcohol marker friendly black ink, I cut them using the matching dies, and colored everything using my Spectrum Noir Illustrator markers and my Graph'it brush markers.

My card features most of the images from Outer Space, as well as the tennis ball from Sports that I turned into a small planet.


Next I cut the different pieces to build the Earth using Love From Afar dies. I colored the oceans using salvaged patina and peacock feathers oxide inks, and did the continents using mowed lawn and rustic wilderness oxide inks. I cut the continents a second time out of white cardstock, and attached the green ones on top of the white ones, but shifted them to create a white border and make the continents stand out on the oceans. I attached the continents to the oceans using liquid glue, and then stuck my Earth on a slightly larger pearlescent vellum circle using liquid glue again.


I cut an 8,5 x 3,5 Strathmore bristol smooth panel, and started off by covering it with blueprint sketch oxide ink to create a nice and even base. Next I made my background more interesting using the Layered Shooting Stars stencils along with chipped sapphire oxide ink, and added texture, starting with water droplets that I dried using a paper towel. Next I mixed black soot oxide ink with water and used a small brush to add more splatters to my panel, then did the same with copic opaque white ink, and finally used the stencils again with fairy dust paste to make my background more magical.

I attached everything on my panel using 1mm and 2mm foam squares, the Earth right in the center, and all the images on each side. I white heat embossed my "You are out of this world" greeting from Outer Space on dark gray cardstock, and trimmed it into a banner that I attached on my panel using 1mm foam squares. I added highlights and details to the images using a white gel pen, and finally applied white blizzard nuvo drops to the stars to make them all sparkle.


PRETTY PINK POSH SUPPLIES
- Outer space stamp set
- Layered shooting stars stencils
- Love from afar die set


OTHER SUPPLIES
- Spectrum Noir Illustrator markers
- Graph'it brush markers
- Oxide inks: salvaged patina, peacock feathers, mowed lawn, rustic wilderness, blueprint sketch, chipped sapphire, black soot
- Copic opaque white ink
- Sakura white gel pen
- Liquid stardust by Lawn Fawn
- Fairy dust paste by Lawn Fawn
- Clear embossing ink by Lawn Fawn
- Fine embossing powder by Hero Arts
- Jet black ink by Lawn Fawn
- Pearlescent vellum by Lawn Fawn
- Dark gray cardstock by Lawn Fawn
- 80lb Neenah solar white cardstock (images)
- Strathmore bristol smooth cardstock (background + Earth)

vendredi 14 juin 2024

Sunny Studio - Big Panda Sliding Window Interactive Card

Hello there,

I'm super excited to be back on the Sunny Studio blog with this bright and colorful interactive card featuring Big Panda which is an amazing addition to the large critters we already have: Big Bunny and Holiday Hugs. Tropical cards are always so fun to make, I like to use vibrant colors when I create one, and this new card makes no exception.


I started off by stamping my images on 80lb Neenah solar white cardstock using an alcohol marker friendly black ink. I used the coordinating dies to cut them all, and colored everything using my Graph'it brush markers and my Spectrum Noir Illustrator markers.

Here is a detailed list of the products I used: • Big Panda for the panda, coconut cocktail and sunglasses • Fabulous Flamingos for the tropical leaves and flowers • Panda Party for the banner • Sending Sunshine for the small palm tree • Seasonal Trees for the large palm tree and coconuts


I cut a 5 x 3,75 inches Strathmore bristol smooth panel using the largest Stitched Rectangle, and colored it using oxide inks. From top to bottom, I applied tumbled glass, squeezed lemonade and dried marigold. And I added a jungle pattern using a tropical leaves stencil from my stash along with, from top to bottom, salty ocean, mustard seed and carved pumpkin oxide inks. Next I added texture to my panel to make it even more interesting, starting with water splatters that I dried with a paper towel. I also mixed some black soot oxide ink with water and used a small brush to make more splatters, and then did the same with copic opaque white ink mixed with water.


Next I cut and colored two additional Strathmore bristol smooth panels. The first one measures 5 x 3,25 inches, and I colored it using tumbled glass oxide ink. I cut the second one using the largest Stitched Rectangle, and I colored it using squeezed lemonade oxide ink. 


Once my tropical panel was dry, I cut my Sliding Window out of it, as well as the notch at the top, folded my panel on the score lines, flipped it over, and added double sided tape on the slim bottom tab. I peeled the backing paper off this tab, flipped my additional blue panel over, and attached it at the back of my tropical panel, lining up the bottom edge of the blue panel with the slim tab. I glued the small tab piece at the top of the blue panel, pierced a hole on that tab, cut a yellow eyelet using a die from Sliding Window, attached this eyelet on the tab, and added gold thread to create a handle and be able to pull the tab.

I flipped my tropical panel over, and added foam strips along the bottom edge, on the side edges as well, but not along the top edge. I peeled all the backing papers off, and attached my tropical panel to the extra yellow panel to complete the whole interactive process. Next I cut a 5,5 x 4,25 inches light brown woodgrain panel, and attached my interactive panel to it using liquid glue.


I attached all my images on my panel using 1mm and 2mm foam squares. I also created two sentiments. I white heat embossed "Hello" and "Summer" from Big Panda on black cardstock, and cut them using the coordinating dies. I attached "Hello" at the top of the pull tab using foam squares, attached "Summer" on the inside and stamped "Happy" from Big Panda right above it in black. And finally I added highlights and details to the images using a white gel pen.


SUNNY STUDIO SUPPLIES
- Big panda stamp set
- Sending sunshine stamp set
- Seasonal trees stamp set
- Fabulous flamingos stamp set
- Panda party stamp set
- Sliding window die set
- Stitched rectangle die set


OTHER SUPPLIES
- Spectrum Noir Illustrator markers
- Graph'it brush markers
- Oxide inks: tumbled glass, salty ocean, squeezed lemonade, mustard seed, dried marigold, carved pumpkin, black soot
- Copic opaque white ink
- Sakura white gel pen
- Clear embossing ink
- Fine white embossing powder
- Jet black ink by Lawn Fawn
- Gold thread by Stampin Up
- Tropical leaves background stencils by Lawn Fawn
- Light brown woodgrain cardstock by Lawn Fawn
- Yellow cardstock by The Stamp Market
- 80lb Neenah solar white cardstock (images)
- Strathmore bristol smooth cardstock (background)

mardi 11 juin 2024

[Blog Hop] Pretty Pink Posh June 2024 Release - Out of this World Shaker Card


Hi there,

The new Pretty Pink Posh June 2024 Release is here, it's amazing, and it comes a whole bunch of super cute products: stamps, dies, stencils and shaker accessories! Yay! I can't wait to share more cards with you!

Visit each crafter along the hop, and comment on their blog post for a chance to win a prize:


Three (3) $30 gift certificates are up for grabs (one winner each day) Winners will be picked randomly along the blog hop. Comments must be left by 11:59 PM PST on June 17th. Winners will be announced on the Pretty Pink Posh blog.

*****

For this blog hop, I created a bright out of this world shaker card featuring new products from the Pretty Pink Posh June 2024 Release, which are the Stitched Stars die set, and the Rocket Ship Shaker die set. This card was so fun to make, and I hope it will inspire you to create your own far away starry galaxy scene.


I started off by cutting a 5,5 x 4,25 inches Strathmore bristol smooth panel that I colored using oxide inks, inspired by the colors of Evergreen State shaker beads. I randomly applied twisted citron, salvaged patina and salty ocean oxide inks on my panel. Next I added and blended some prize ribbon oxide ink with those colors, and then applied black soot oxide ink on the four edges to darken my panel.

I splattered water all over my panel, and dried it using a paper towel. I mixed black soot oxide ink with water, and used a small brush to add more splatters to my piece of paper, and then did the same with copic opaque white ink, and with liquid stardust.


Next I cut multiple Stitched Stars out of Strathmore bristol smooth cardstock, and colored them using oxide inks. For the green stars: twisted citron and mowed lawn oxide inks, for the light blue stars: tumbled glass and salty ocean oxide inks, and for the dark blue stars: salty ocean and prize ribbon oxide inks. I mixed some black soot oxide ink with water and used my small brush to add splatters on the stars, mostly on the edges, and then did the same with copic opaque white ink.


I also cut additional Stitched Stars out of black glitter cardstock and out of pearlescent vellum. I set all my stars aside, and moved on to my Rocket Ship Shaker element. Here are the different steps to build and assemble it:

1. Cut a Rocket Ship Shaker frame out of black cardstock, cut a whole rocket ship out of acetate, and attach the frame on the acetate using liquid glue
2. Flip the piece over, and add foam strips on the rocketship's edges
3. Pour some Evergreen State shaker beads on the acetate
4. Cut another whole rocketship out of Strathmore bristol smooth cardstock, and color it using hickory smoke and black soot oxide inks
5. Peel the backing papers off the foam strips, and attach the gray rocketship to the foam to close the shaker
6. Flip the piece over, and add the decorative elements


Next I attached all my bits and pieces, Stitched Stars and Rocket Ship Shaker, on my galaxy background using 1mm and 2mm foam squares. I white heat embossed "You are out of this world" from Outer Space on dark gray cardstock, and trimmed it into a banner that I attached on the top right hand corner of my panel using foam squares again. I added a few highlights and details here and there using a white gel pen, and finished my card by gluing some Iridescent Mini Star confetti on my panel.


PRETTY PINK POSH SUPPLIES
- Stitched stars die set
- Rocketship shaker die set
- Baby mug additions die set
- Big celebration cupcake die set
- Outer space stamp set
- Evergreen state shaker beads
- Iridescent mini star confetti


OTHER SUPPLIES
- Oxide inks: salty ocean, salvaged patina, twisted citron, prize ribbon, black soot, tumbled glass, mowed lawn, hickory smoke, mustard seed, carved pumpkin
- Copic opaque white ink
- Liquid stardust by Lawn Fawn
- Sakura white gel pen
- Clear embossing ink by Lawn Fawn
- Fine white embossing powder by Hero Arts
- Pearlescent vellum by Lawn Fawn
- Holographic cardstock by Lawn Fawn
- Black glitter cardstock by Tonic Studio
- Dark gray cardstock by Lawn Fawn
- Strathmore bristol smooth cardstock (background + stars + inside of the rocketship)