Lawn Fawn - A Picnic Scene - Magic Iris Card

jeudi 30 juillet 2020

Hi there,

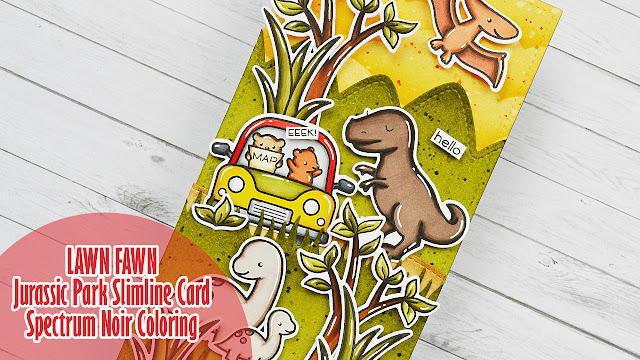
For today's card, I did my all time favorite thing: I mixed and matched a bunch of sets to create a super cute scene in the countryside. The idea here was that we get back to our mice family again, but just the parents. They dropped off the kids at the grandparents and hit the road to go camping in the countryside, just the two of them.


I first started by stamping all the images on 80lbs neenah solar white cardstock using jet black ink, I used the coordinating dies to cut them all and used my alcohol markers to color all the images.


When the coloring was done, I cut the main panel and the arrow handle out of Strathmore bristol smooth cardstock. I temporarily taped the arrow handle to the main panel using washi tape, and I created the sky using the cloudy stencil along with tumbled glass distress ink.

I created texture by adding water drops on my panel that I dried using a paper towel, and I brought a little bit of contrast by mixing salty ocean distress ink with water in order to create tiny drops using a thin brush.


I cut two grass borders out of Strathmore bristol smooth cardstock again, and colored those elements using shabby shutters and peeled paint distress inks.

Next I moved on to the magic iris and I invite you to follow the link to my video at the end of this post. It's always easier to understand with images ^^ 

When the magic iris was done, I applied double sided tape and liquid glue on the front of the ring, I lined up the main panel on top to stick everything together, and next I attached the grass borders using double sided tape.


Next I created a 5,5 x 4,25" card base using sticky note cardstock along with two pattern papers from the Spring Fling 6 x 6 paper pack and from the Perfectly Plaid Chill 6 x 6 paper pack. I placed my magic iris panel on that card base, applied liquid glue at the back of my sentiment circle and tucked that circle right in the middle. And finally I applied foam at the back of the magic iris panel and stuck it in place on the card base.


I attached the images using glue dots and foam squares to bring dimension on some parts of the scene. When everything was attached, I added white highlights on the images and finally added a yellow arrow on the handle to match the pretty yellow paper on the card base.


VIDEO
(click on the image below)


LAWN FAWN SUPPLIES

Stamp sets
- Crazy antics
- Car critters
- A bug deal
- Dandy day
- Critters down under
- Life is good
- Bicycle built for you

Die sets
- Magic iris
- Magic iris add-on
- Large stitched rectangle stackables
- Grassy borders

Misc.
- Cloudy stencil
- Jet black ink
- Perfectly plaid chill 6x6 paper pack
- Spring fling 6x6 paper pack
- Sticky note + sunflower cardstocks
- Glue dots


OTHER SUPPLIES
- Spectrum Noir markers
- Distress inks: tumbled glass, salty ocean, shabby shutters, peeled paint
- Sakura white gel pen
- Strathmore bristol smooth cardstock
- 80lbs Neenah solar white cardstock

Isabel Cristina Stamps - Mission to Mars Pop-Up Card

vendredi 24 juillet 2020

Hi there,


Today's card features a new set designed by Isabel Cristina Stamps. It's called Space bunnies and contains a bunch of cute planets and funny bunnies ready to conquer the universe!


I started by printing most of the images. I printed them on 80lbs neenah solar white cardstock, cut them all using my scan n cut and colored everything using my alcohol markers.

When the coloring was done, I cut a 5,5 x 4,25" panel and colored it using some oxide inks: blueprint sketch, chipped sapphire and black soot. Once the ink blending was done, I created texture: first some water drops to bring brightness, and next I used the liquid stardust to create a million shiny stars. And finally I added a touch of darkness by splattering drops of black soot distress ink mixed with water.


When my panel was dry, I used stitched circle dies to create lines on my galaxy background. I placed those dies right in the center on the panel and sent everything to my die cutting machine.


For the inside of my card, I cut another 5,5 x 4,25" panel and used scattered straw, dried marigold, spiced marmalade and vintage photo distress inks. Next I splattered water drops on my panel and used the same inks mixed with water to create more texture and contrast.

Next I cut a dark brown card base and attached both of my panels: the solar system one one on the outside and the planet Mars one on the inside.


To ground my scene on Mars, I cut a hillside pop-up border that I colored using vintage photo distress ink. I covered the entire element and next I used the same ink mixed with water to add a sand and rock texture to that border.

Next I attached that pop-up border inside the card, and then I stuck all the images: the planets on the outside and the bunnies + spaceship on the inside.


For my sentiment, I first white heat embossed the words 'I love you to' and 'and back' on the remaining space I had inside the card and I cut the word Mars out of a shiny orange cardstock using the Rascal Alphabetters die set by Heffy Doodle. And I attached those letters using glue dots.

Finally I came back to the outside panel and added more sparkles to it by applying white blizzard nuvo drops here and there.


VIDEO
(click on the picture below)


SUPPLIES
- Space bunnies digital stamp set by Isabel Cristina Stamps
- Large stitched rectangle stackables by Lawn Fawn
- Stitched hillside pop-up borders by Lawn Fawn
- Just stitching double circles by Lawn Fawn
- Rascal alphabetters die set by Heffy Doodle
- Spectrum Noir markers
- Oxide inks: blueprint sketch, chipped sapphire, black soot, scattered straw, dried marigold, spiced marmalade, vintage photo
- Distress ink: black soot
- Liquid stardust by Lawn Fawn
- Sakura white gel pen
- Clear embossing powder by Lawn Fawn
- White embossing powder by Lawn Fawn
- Ground espresso cardstock by Lawn Fawn
- Shimmery "tropical" cardstock by Lawn Fawn
- 80lbs Neenah solar white cardstock
- Strathmore bristol smooth cardstock
- Out of this world stamp set by Lawn Fawn

Lawn Fawn - Jurassic Park Slimline Card

mercredi 22 juillet 2020

Hey there,

Today's card was inspired by the movie Jurassic Park. It's one of my all time favorite movies so I'm very excited to share this new card with you.

Like always I started by stamping, cutting and coloring all the images.


When the coloring was done I cut several elements out of Strathmore bristol cardstock to build a background: 2 grass borders, a hill border, a mountain border and a rectangle for the sky.

I colored the grass and mountain borders using peeled paint and forest moss distress inks, and texture was created using the same inks mixed with water.

I used antique linen and gathered twigs distress ink to color the hill border.


And for the sky, I first applied scattered straw distress ink on the panel, and used the cloudy stencil along with wild honey distress ink to create clouds in the sky. And I added texture to that sky by splattering water drops first. I dried the panel using my paper towel, and next I used scattered straw, spiced marmalade and a little bit of candied apple to add texture to the sky.

Next I assembled the background on an 8,5 x 3,5" slimline noble fir card base.


I stamped the second part of my sentiment 'means you're dino-mite' at the bottom of my panel using jet black ink. And next I attached the first part of my sentiment. It was made using the Oliver's ABCs die set, I used a red pattern paper from Really Rainbow and ground coffee cardstock to create shadows.

Next I stuck all the images using a combination of foam tape and glue dots. And finally, and to make the scene a little bit more fun, I stamped the words 'hello' and 'eeek', cut them into tiny banners and attached them above the car critters and next to the t-rex.


VIDEO
(click on the picture below)


LAWN FAWN SUPPLIES

Stamp sets
- Car critters
- Rawrsome
- Gleeful gardens
- Rawr
- Critters from the past
- How you bean?
- Spooky village

Die sets
- Large stitched 4 bar rectangles
- Grassy hillside borders
- Stitched mountain borders
- Stitched hillside borders
- Oliver's ABCs

Misc.
- Jet black ink
- Cloudy stencil
- Really rainbow 6x6 paper pack
- Ground coffee + noble fir cardstocks


OTHER SUPPLIES
- Spectrum Noir markers
- Distress inks: peeled paint, forest moss, antique linen, gathered twigs, scattered straw, wild honey, spiced marmalade, candied apple
- Sakura white gel pen
- Strathmore bristol smooth cardstock
- 80lbs Neenah solar white cardstock

Lawn Fawn - Under Water Kingdom

samedi 18 juillet 2020

Hi there,


For today's card, I wanted to create a dreamworld under the sea, a kingdom that would be guarded by a giant friendly octopus. So I started by making a castle. I die cut several elements using dies from the new Build A Castle die set and I colored the pieces using distress inks: shaded lilac, picked raspberry and blueprint sketch.


I used liquid glue and foam squares to assemble all the pieces, and next I moved on to the background. I cut an 8,5 x 3,5" slimline panel and used the new Ocean Wave stencils to create beautiful lines on my paper along with some distress inks again: tumbled glass, salty ocean, shaded lilac and wilted violet.


Next I added some texture: water splatters, drops of the same inks (+ chipped sapphire) mixed with water, and finally liquid stardust to make the background super shiny and sparkly.


I stamped my images on white cardstock using jet black ink, used the coordinating dies to cut them all and then used my alcohol markers to color everything.


When the coloring was done, I stamped my sentiment, and attached the castle and all the images on my panel using foam tape and glue dots. 
Next I stuck my panel on a white card base, and added some last details: white nuvo drops on the octopus, morning dew nuvo drops all over the panel to create bubbles, and finally white blizzard nuvo drops on some seaweeds and also on the castle to bring more sparkles to it.


VIDEO
(click on the image below)


LAWN FAWN SUPPLIES

Stamp set
- Ocean shell-fie
- Keep on swimming
- Fintastic friends
- You are sublime

Die sets
- Build a castle
- Large stitched 4 bar rectangle

Misc.
- Ocean wave stencil
- Pixie dust cardstock
- Liquid stardust
- Jet black ink
- Glue tube
- Glue dots

OTHER SUPPLIES
- Spectrum Noir markers
- Distress inks: shaded lilac, picked raspberry, blueprint sketch, tumbled glass, salty ocean, wilted violet
- Sakura white gel pen
- Simply white + Morning dew + White blizzard nuvo drops by Tonic Studio
- 80lbs Neenah solar white cardstock
- Strathmore bristol smooth cardstock

Lawn Fawn - At The Aquarium

lundi 13 juillet 2020

Hi there,

Today's card was inspired by some cute penguins visiting the Shedd Aquarium in Chicago. The aquarium had just closed due to the virus and the staff let the penguins walk to go see their under water friends. I thought that was just so adorable so I recreated it.


I started with the coloring. Stamped the images using jet black ink, cut them all using the coordinating dies and used my alcohol markers to color everything.

When it was done, I moved on to the background. I cut a slimline panel out of strathmore bristol cardstock, masked the bottom using washi tape, and used the new brick stencil along with hickory smoke distress ink to create the wall of the aquarium. Next I added texture: I smooshed my hickory smoke ink pad onto my glass surface, added water and used a thin brush to create drops on the paper.

Next I moved the washi tape a little bit higher and created the floor using black soot distress ink.


I created three small aquariums. I started by tracing the shape of it on my paper, I cut that shape and next I used shades of blue to make an underwater background: tumbled glass, salty ocean, chipped sapphire and black soot distress inks.


Once I was happy with the result, I added water that I dried using my paper towel. And next I mixed water with chipped sapphire and black soot in order to add more contrast at the bottom of my panel.

I did the exact same thing on two other panels, and die cut the elements to build the aquarium: three frames out of fog cardstock and two strips out of black licorice cardstock.

I started by glueing a frame on the underwater panel. Next I put the thin strips in place. And attached two more layers to create a nice dimension.

And to totally complete this aquarium, I added the black strips at the top and bottom.

I did the same thing on the two other underwater panels, and on one of them, I white heat embossed my sentiment 'Hope your day is fintastic'.


Next I assembled everything, starting by sticking the three aquariums on the brick panel. I used double sided tape to attach those elements along with a T ruler to make sure that they're were perfectly aligned. And then I filled up the aquariums with the images using glue dots and attached the cute penguins using foam squares

Once everything was attached, I added white highlights on the images, stamped a few bubbles here and there, and finally stuck my panel on a grey cardbase.


VIDEO
(click on the picture below)


LAWN FAWN SUPPLIES

Stamp sets
- Ocean shell-fie
- Here we go a waddling
- You are sublime
- Mermaid for you
- Fintastic friends
- Keep on swimming (for the sentiment)

Die sets
- Build an aquarium
- Large stitched 4 bar rectangles

Misc.
- Brick stencil
- Fog cardstock
- Black licorice cardstock
- Clear embossing ink
- White embossing powder
- Jet black ink


OTHER SUPPLIES
- Spectrum Noir markers
- Distress inks: tumbled glass, salty ocean, chipped sapphire, black soot, hickory smoke
- Sakura white gel pen
- 80lb Neenah solar white cardstock
- Strathmore bristol smooth cardstock

Lawn Fawn - Mix & Match Of Sets

samedi 11 juillet 2020

Hi there, 

On today's card, I'm featuring some very cute succulents and cacti from the Simply Celebrate Summer. And like always I mixed and matched a bunch of images from other sets to create a super cute scene.


I started by stamping all my images on white cardstock using Jet Black ink and I used my beloved alcohol markers to color them.


When it was done, I cut two Foursquare Backdrops: one out of woodgrain cardstock and one out of a thick cardstock, and I also cut a light blue panel using a paper from the Spiffy Speckles paper pack.

I glued the thick frame on the blue panel, and attached the woodgrain frame on top to create my window. And for the floor so I used a die from the Picket Fence die set to create one that I stuck at the bottom of my panel.


Next I attached all my images using glue dots and foam squares at some places for dimension, and once everything was stuck, I finally added white highlights on the images.


VIDEO
(click on the image below)


LAWN FAWN SUPPLIES

Stamp sets
- Simply celebrate summer
- Keep on swimming
- Says what? Pets
- You're just my type
- Meow you doin'
- Some bunny
- Little bundle
- Yeti or not
- Screen time

Dies
- Foursquare backdrop: portrait
- Picket fence border

Misc.
- Jet black ink
- Woodgrain cardstock
- Spiffy Speckles 6x6 paper pack
- Chocolate bar cardstock


OTHER SUPPLIES
- Spectrum Noir markers
- Sakura white gel pen

Lawn Fawn - Summer Slimline Card

mercredi 8 juillet 2020

Hello there,

After celebrating the 4th of July in New York City, our cute mice family decided to take some days off by the ocean to build sand castles and eat ice creams of course.


I first started with the coloring. Like always I picked a bunch of stamps from different sets and I stamped everything using jet black ink on neenah solar white cardstock.

When it was done, I cut a slimline panel out of strathmore bristol cardstock using a die from the Large stitched 4 bar rectangle die set to create stitched details on the paper. And I made a pretty simple background, starting with some scattered straw oxide ink at the bottom of my panel to create a sand border. For the sky I covered the rest of the panel with tumbled glass and salty ocean oxide inks.


For the icecream booth, I used dies from the Build a house die set to create it. A house base out of woodgrain cardstock and an awning out of white cardstock. And I cut a large window out of the house element.

I added texture to the house element, and cut thin strips to create a window frame. Next I colored the awning using my alcohol markers, and it was done, I assembled the icecream booth.


Next I added white highlights on the images, and attached everything on my slimline panel using glue dots, liquid glue and foam squares to bring dimension to some parts of the scene.

I stamped my sentiment "Life is good" from the Life is good stamp set using jet black ink. And finally I attached my panel on a vanilla malt card base. 


VIDEO
(click on the image below)


LAWN FAWN SUPPLIES

Stamp sets
- Sweetest flavor
- Village shops
- Wild for you
- Coaster critters
- Critters from the past
- On the beach
- Super star
- Dandy day
- Life is good
- Smooth sailing
- Merry mice for Chibitronics
- Love poems

Die sets
- Large stitched 4 bar rectangles
- Scalloped pop-up box card
- Build a house

Misc.
- Jet black ink
- Woodgrain cardstock
- Vanilla malt cardstock

OTHER SUPPLIES
- Spectrum Noir markers
- Oxide inks: scattered straw, tumbled glass, salty ocean, vintage photo
- Distress inks: vintage photo, ground espresso
- Sakura white gel pen
- 80lb Neenah solar white cardstock
- Strathmore bristol cardstock

Timbramisu - Best Friends Reveal Summer Card

lundi 6 juillet 2020

Hello there,

Today I'm glad to be back as a guest designer for Timbramisu and I chose to color the Best Friends digital stamp because I really love those three lovely ladies.


So I printed the image on 80lb Neenah solar white cardstock, I cut it using my Scan 'n Cut machine and colored it using my alcohol markers.

When it was done, I moved on to the background. I first started by cutting a woodgrain panel and I added some darkness to it using vintage photo distress ink on the edges. And also splatters of that same ink on the edges as well.


Next I cut a reveal wheel panel out of Strathmore bristol cardstock, I die cut it with the arc shaped window stuck at the top, and I used several oxide inks to create a sunset sky: scattered straw, dried marigold, spiced marmalade, picked raspberry and wilted violet.


Once I was happy with the result I splattered water on my panel + drops of black soot oxide ink mixed with water to bring a little bit of contrast +  liquid stardust to make the scene sparkle.

Next I cut the wheel, colored it using picked raspberry oxide ink, along with water drops and black soot and liquid stardust splatters, and stamped the words 'friends', 'laughter' 'ice cream' and 'sunshine' on it.


I die cut a small circle and put a brad into its hole, and next into the wheel at the back. I opened the brad to keep the elements together and I applied foam squares at the back of the wheel on the small circle.

I removed the backing paper off the foam squares, placed the wheel behind the sunset panel and lined it up with the window, and I pressed down onto a 5,25 x 4" yellow panel to stick the wheel only. And next I attached my sunset panel on top of the wheel using foam tape.

And to match the yellow panel, I cut an arc shaped frame out of the same paper and stuck it around the window. I also cut the arrow out of black cardstock and glued it next to the wheel, with the pointy end looking down.


Next I attached my sunset panel on the woodgrain panel using double sided tape, and stuck the lady friends using foam tape. Finally I adhered my panel on a yellow card base, and added a whole bunch of morning dew nuvo drops on my panel.


VIDEO
(click on the image below)


SUPPLIES
- Reveal wheel die set by Lawn Fawn
- Reveal wheel arc shaped frame die by Lawn Fawn
- Reveal wheek friends and family sentiments stamp set by Lawn Fawn
- Woodgrain backdrop die by Lawn Fawn
- Spectrum Noir markers
- Oxide inks: scattered straw, dried marigold, spiced marmalade, picked raspberry, wilted violet
- Distress ink: vintage photo
- Sunflower + Black licorice + paper bag + shimmer yellow cardstocks by Lawn Fawn
- Liquid stardust by Lawn Fawn
- Jet black ink by Lawn Fawn
- Morning Dew nuvo drops by Tonic Studio