Hello Bluebird - By The Sea Background

vendredi 30 avril 2021

 Hi there,

I’m back to share with you a new card featuring the ByThe Sea Background stamp designed by Hello Bluebird. This stamp gave me a vintage feeling, so I thought that making a black & white card would be very nice.

I started by stamping the images on 80lbs Neenah solar white cardstock using Memento tuxedo black ink, cut them all using the coordinating dies and then used my spectrum noir markers and graph’it brush markers to color everything.

Next I stamped the By The Sea Background on Neenah cardstock as well and to emphasize the vintage look, I decided to create two polaroid pictures using that background. I took the dies from the Photo stack die set and traced the frames on my background. I did this just to know which part of the background I had to color, and then I used my grey markers again to color my two small backgrounds.

Once the coloring was done, I did the sky on each panel, and instead of using markers again, I used hickory smoke distress ink along with a cloud stencil to create a cloudy sky on each panel.

Next I attached a large polaroid frame on my small ocean background, and a smaller polaroid frame on my small lighthouse background, I trimmed the paper around the frames, and then glued two more frames on each element.

For the card base, I didn’t want it to be plain white so I used the Woven Backgroundstamp to add a subtle detail to my card base, and I used Barely Beige ink by Simon Says Stamp to match the black & white color palette.

I trimmed my Woven background into a 5,5 x 4,25" panel, and finally attached all the elements on top using a combination of liquid glue, foam squares and glue dots.


VIDEO


HELLO BLUEBIRD SUPPLIES

By The Sea Background stamp

- Woven Background stamp

- Seaside Girls stamp set

- Puddle Play stamp set

- Beach Play stamp set

- Fall Friends stamp set

- Hippos on holiday stamp set

- Photo stack die set


OTHER SUPPLIES

- Spectrum Noir markers

- Graph'it brush markers

- Hickory smoke distress ink

- Cloudy stencil by Lawn Fawn

- Sakura white gel pen

- Memento tuxedo black ink

- Barely beige ink by Simon Says Stamp

- Clear embossing ink by Lawn Fawn

- White embossing powder by Lawn Fawn

- Black licorice cardstock by Lawn Fawn

- 80lbs Neenah solar white cardstock

- Strathmore bristol smooth cardstock

Hello Bluebird - Woven Background

dimanche 25 avril 2021

 Hello there,

I'm back today with a new Hello Bluebird card and this time I'm showcasing the new Woven Background stamp that I paired with some cuties having fun under the rain.

I started by placing a large piece of strathmore bristol cardstock in my misti tool along with the woven stamp and before stamping it, I used my powder bag to apply a generous amount of powder all over the paper. Doing this extra step helps the powder to stick on the embossing ink only and this way the result is more precise.

I used clear embossing ink by Lawn Fawn to stamp the background, sprinkled white embossing powder on the entire panel, and then melted the powder using my heat tool.

From that large panel I cut a 5,5 x 4,25" panel and picked four oxide inks to color it: stormy sky, faded jeans, chipped sapphire and black soot. I applied the inks from the lightest to the darkest, the lightest part being the bottom of the card.


After the ink blending I used a cloth to remove the ink from the white lines, and then I moved on to the coloring. I stamped my images on white cardstock using memento tuxedo black ink and colored them using my alcohol markers.

Next I cut letters to create the word 'Friend'. I cut the word three times to get dimension and then attached those letters at the top of my panel using liquid glue. I stuck the second part of my sentiment right below, and then I glued the images using foam squares and glue dots. And finally once everything was attached I applied glossy accents on the letters to make them shiny and this way match the rainy theme.


VIDEO
(click on the picture below)


HELLO BLUEBIRD SUPPLIES
- Woven Background stamp
- Puddle Play stamp set
- Rainy day stamp set
- Fall friends stamp set
- Oliver alpha die set


OTHER SUPPLIES
- Spectrum Noir markers
- Graph'it brush markers
- Oxide inks: stormy sky, faded jeans, chipped sapphire, black soot
- Memento tuxedo black ink
- Clear embossing ink by Lawn Fawn
- White embossing powder by Lawn Fawn
- Glossy accents by Ranger
- Black licorice cardstock by Lawn Fawn
- Moonstone cardstock by Lawn Fawn
- Sakura white gel pen

Lawn Fawn - Spring Bunny Slider Peek-a-Boo Card

jeudi 22 avril 2021

 Hey there, I'm back with a new Lawn Fawn interactive card, and this time I used the Let's Toast Pull Tab die set to create a slider peek-a-boo mechanism. And I don't do that often, but just this once I only used die cuts to create my scene.

I die cut all my elements and colored them all just as if they were images using my alcohol markers, and next I moved on to the background. I cut a slimline panel and created a cloudy sky using a cloud stencil along with spun sugar and kitsch flamingo oxide inks to create a sweet and bright sky.

And for the bottom of my card, I used shabby shutters and mowed lawn oxide inks to create grass.

And next I added texture to my panel. On the sky section, I used spun sugar, kitsch flamingo, mustard seed and picked raspberry oxide inks, each one mixed with water, to create lots of splatters on the paper. And on the grass section I used shabby shutters and mowed lawn oxide inks mixed with water to do the same thing.


Next I created the interactive mechanism using the Let's Toast Pull Tab die set, and I invite you to watch the video below to see exactly how it was done ^^

When the mechanism was done, I assembled the basket and the flowers, as well as the bunny, using liquid glue. And then I attached those elements on my panel, and again, you can check the video below to watch the process, it's always easier to understand with images ^^

Once the basket and the bunny were glued in place, I stuck the bunny's paws to complete the basket. And then I attached the sun, the clouds and the butterfly in the top section of the panel using foam squares.


For my sentiment, I created the word Bunny using a spring plaid pattern paper along with guava letters to make the word pop on the pink cloudy background. I placed my panel in my misti tool and stamped the words 'Some' and 'loves you' using black ink, and then I attached the bunny letters to complete my sentiment.

Before attaching my panel to a card base, I needed to create a path at the back of my panel to make sure that the tab would stay straight. So I cut two thin strips of foam tape that I attached on both sides of the tab. Next I applied more foam tape all over the back of the panel, and stuck it on a slimline ballet slippers card base.


VIDEO
(click on the picture below)


LAWN FAWN SUPPLIES
- Let's toast pull tab
- Build a basket: Easter
- Tiny gift box bunny add-on
- Scalloped treat box spring house
- Finley's ABCs
- Spring showers
- Acorn house
- Little flowers
- Meadow portrait backdrop
- Meadow landscape backdrop
- Some bunny stamp set
- Push here stamp set
- Cloud stencil
- Jet black ink


OTHER SUPPLIES
- Spectrum Noir markers
- Graph'it Brush markers
- Oxide inks: spun sugar, kitsch flamingo, mustard seed, picked raspberry, shabby shutter, mowed lawn
- Sakura white gel pen
- White nuvo drops by Tonic Studio
- Strathmore bristol smooth cardstock
- 80lbs Neenah solar white cardstock

Hello Bluebird - Birch Trees Background

lundi 19 avril 2021

 Hi there,

Wht am I sharing a Halloween card in the middle of April? To show you that the new Birch Trees Background stamp by Hello Bluebird can be used all year long for many occasions and many themes. And by using different colored cardstocks and inks, I think this card can be easily mass produced.

I started with the background. I placed a large piece of purple cardstock in my misti tool and used wisteria ink by Simon Says Stamp to stamp my background and get a tone on tone effect. I stamped it multiple times to get a crisp result, and then cut a 5,5 x 4,25" panel from that large panel, and added lots of texture to my background.


I first mixed some black soot oxide ink work water and created splatters on the paper, next I mixed some liquid stardust by Lawn Fawn with water again to add some sparkles to those spooky woods, and finally I mixed white acrylic paint with water to bring light and contrast.


Next I stamped my images using the same wisteria ink by Simon Says Stamp, colored them using my alcohol markers and then cut everything using the coordinating dies.


For my sentiment, I first white heat embossed 'Be afraid be very afraid' on black cardstock, and then I cut the word 'Boo' twice: one time out of white glittery cardstock and one time out of black cardstock to highlight the first one. I stuck those two elements together using foam squares, and then attached the ghosts and the gravestone using foam squares as well. And finally I added some highlights on the images using my white gel pen.


VIDEO
(click on the picture below)


HELLO BLUEBIRD SUPPLIES
Birch Trees Background stamp
- Ghostly Greetings stamp set
- Halloween Fun stamp set
- Boo to you words die


OTHER SUPPLIES
- Graph'it brush markers
- Black soot oxide ink
- Wisteria ink by Simon Says Stamp
- Clear embossing ink by Lawn Fawn
- White embossing powder by Lawn Fawn
- Liquid stardust by Lawn Fawn
- White acrylic paint from my stash
- Black licorice cardstock by Lawn Fawn
- Pixie dust cardstock by Lawn Fawn
- Sugarplum cardstock by Lawn Fawn

Isabel Cristina Stamps - Happy Purrday

jeudi 15 avril 2021

 Hey there,

Today I'm back with a super colorful birthday or purrday card featuring a sweet kitty from the Birthday Cats digital stamp set designed by Isabel Cristina stamps.

I started with the background and cut a sunburst background that I divided into 12 sections, and I used scattered straw, tattered rose, spiced marmalade, ripe persimmon, picked raspberry, seedless preserves distress inks to color that background.


Once my panel was all covered, I splattered water droplets that I dried using a paper towel, and next to add more texture, I mixed some spiced marmalade, picked raspberry and seedless preserves distress inks with water and created a bunch of splatters on the paper using a small brush. And one last final detail, I mixed a tiny bit of white acrylic paint with water and once again I used my small brush to create a lot of dots on my panel.


Next step was to color the image. I printed the image on 80lbs neenah solar white cardstock using my Epson xp225 printer, cut it using my Scan 'n Cut and then colored it using my alcohol markers.

Once my image was done, I attached my panel on a light yellow card base, applied foam squares right in the center and then stuck a shimmery yellow circle on that middle part. I also attached the kitty cat and cake on top of that circle using foam squares again, and then for my sentiment, I cut some letters and created the words Happy Purrday. Attached those letters above and below the image, and then to make them super shiny, I applied a coat of glossy accents on top of them. Finally I glued a few clear sequins here and there for an extra touch of shine.


VIDEO
(click on the picture)


SUPPLIES
- Spectrum Noir markers
- Graph'it Brush markers
- Distress inks: scattered straw, tattered rose, spiced marmalade, ripe persimmon, picked raspberry, seedless preserves
- Sakura white gel pen
- Sunburst backdrop die by Lawn Fawn
- Oliver Alpha die set by Hello Bluebird
- Large stitched circle stackables die set by Lawn Fawn
- Clear sequins by Pretty Pink Posh
- Glossy accents by Ranger
- Guava cardstock by Lawn Fawn
- Shimmery yellow cardstock by Lawn Fawn

Hello Bluebird - Country Roads Background

samedi 10 avril 2021

 Hey there,

Today I'm showcasing the lovely Country Roads Background stamp by Hello Bluebird, and I paired it with two cuties from Besties to create a sweet little countryside scene.

I started by stamping the entire scene on white cardstock, and from that panel I cut a smaller panel to frame my scene. I used memento tuxedo black ink to stamp it and used my alcohol markers to color the scene.


For the sky, I used distress ink, just like my Mushroom House card. I used a cloud stencil along with tumbled glass distress ink to create that sky, and next I even added a tiny bit of texture by mixing some salty ocean distress ink with water and creating splatters on the clouds.


I drew a bunch of white dots on the grass section to give the illusion of daisies, and then I stuck my images on the panel using foam squares. And finally I attached my panel on a light blue panel that I stuck in a yellow pattern paper. 


VIDEO
(click on the picture below)


HELLO BLUEBIRD SUPPLIES
Country Roads Background
- Besties
- Field Mice
- Long Distance

OTHER SUPPLIES
- Spectrum Noir markers
- Graph'it brush markers
- Distress inks: tumbled glass, salty ocean
- Sakura white gel pen
- Cloud stencil by Lawn Fawn
- Memento tuxedo black ink
- Mermaid cardstock by Lawn Fawn
- Spring plaid pattern paper by Lawn Fawn

Hello Bluebird - Simple Stripes Background

mercredi 7 avril 2021

Hello there,

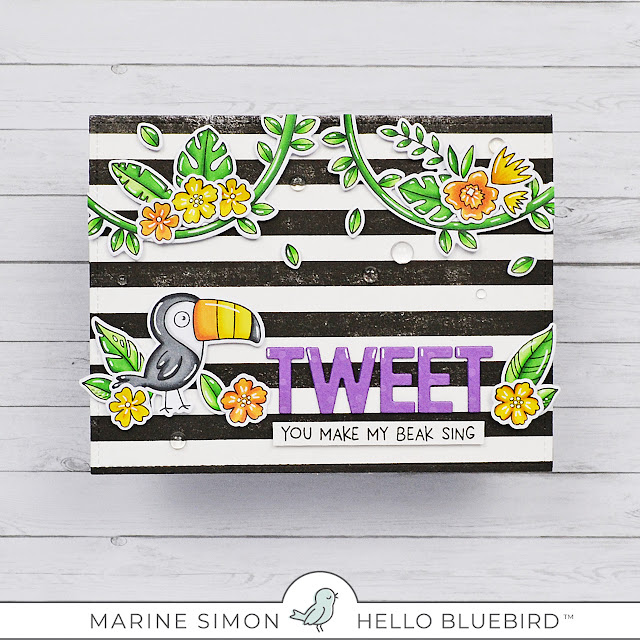
It's time for a new Hello Bluebird card, and today I'm showcasing the Simple Stripes Background stamps on a tropical themed card.


As always I started with the coloring, and stamped all the images on 80lbs Neenah solar white cardstock using memento tuxedo black ink, I used the coordinating dies to cut them all and then my alcohol markers to color everything.


Next I created the background using my misti tool along with black versafine ink to stamp the Stripe Background three times on bristol cardstock. I could've stamped it one last time to get a very crisp result but I like my backgrounds to have texture so I stopped at three stamping to get a worn out look.

From that panel I cut a 5,5 x 4,25" panel and then attached my images on it using a combination of liquid glue, foam squares and glue dots. And I also cut some letters out of a purple cardstock to create the word 'Tweet'.

Once everything was attached, I added the second part of my sentiment 'You make my beak sing' right below 'Tweet', and finally I glued a few clear droplets here and there for a extra touch of shine.


VIDEO
(click on the picture below)


HELLO BLUEBIRD SUPPLIES
Simple Stripes background stamp,
- Jungle Littles
- Portrait Pals
- More jungle Littles
- Silly Birds
- Fairy garden
- Oliver alpha die set


OTHER SUPPLIES
- Spectrum Noir markers
- Graph'it Brush markers
- Black versafine ink
- Memento tuxedo black ink
- Clear droplets by Studio Katia
- Sakura white gel pen
- Purple cardstock by Lawn Fawn
- 80lbs Neenah solar white cardstock
- Strathmore bristol smooth cardstock

Hello Bluebird - Diamond Daze Background

lundi 5 avril 2021

 Hi there,

Today I'm showcasing another brand new background stamp by Hello Bluebird, it's Diamond Daze, a gorgeous geometric design that I paired with two 'Long Distance Friends'.

Stamped my images on 80lbs Neenah solar white cardstock using memento tuxedo black ink, I used the coordinating dies to cut them all and then my alcohol markers to color everything.

Next I placed my Diamond Daze background stamp in my misti tool, cut a piece of Strathmore bristol cardstock as large as the stamp and used my powder bag to apply a generous amount of powder all over the panel. This way the embossing powder sticks on the embossing ink only and the result is more precise.

I applied clear embossing ink on the stamp and pressed firmly on the paper, and because it was a new stamp, I did the stamping three times to have a very nice impression all over the paper. I sprinkled white embossing powder on the paper, and then melted the powder using my heat tool.


From that big square panel, I cut a 5,5 x 4,25 panel that I colored using scattered straw, cracked pistachio and peacock feathers distress oxide inks.

Next I cut some photo frames: two light beige frames and four white frames. I started by layering the white frames to create two frames, and then I glued one beige frame on each white frame. And to give those two frames a back and still be able to see the Diamond Daze background, I attached the frames on vellum. I cut around the frames, and then stuck them on my panel.


I attached my cute critters and leaves inside the frames using foam squares, glue dots and liquid glue. For my sentiment, I white heat embossed the phrases 'Even though you're far away' and 'you're thought about with love today' on yellow cardstock and created two small banners that I attached on my panel above and below the frames to create a diagonal design.

And finally I added a few clear droplets to bring an extra final touch of shine.
 

VIDEO
(click on the picture below)


HELLO BLUEBIRD SUPPLIES
Diamond Daze background stamp
- Jungle Littles stamp set
- Portrait pals stamp set
- Long distance stamp set (for the sentiment)
- Photo Stack die set


OTHER SUPPLIES
- Spectrum Noir markers
- Graph'it brush markers
- Distress oxide inks: scattered straw, cracked pistachio, peacock feathers
- Sakura white gel pen
- Clear embossing ink by Lawn Fawn
- White embossing powder by Lawn Fawn
- Clear droplets by Pretty Pink Posh
- 80lbs Neenah solar white cardstock
- Strathmore bristol smooth cardstock

Lawn Fawn - Swish 'n Pop Wedding Card

jeudi 1 avril 2021

 Hello there,

Today the mouse family is back to celebrate a wedding! As always I stamped all the images using jet black ink, used the coordinating dies to cut them all and then colored everything using my alcohol markers.


Once everything was colored, I created the background on a 5,5 x 4,25" panel using antique linen and fossilized amber distress oxide inks to get a champagne color. And next I added bubbles to that background using the bubble stencils and white pigment ink.


Next I created the Swish 'n Pop mechanism. And it's always easier to understand with images so please check the video below to watch the whole interactive process.

And when everything was built up, I assembled and stuck all my cute images on my panel using a combination of foam squares, glue dots and liquid glue.

I white heat embossed my sentiment 'Congratulations - Wishing you a lifetime of happiness' on a chili pepper banner that I attached right below the mice, and also stuck two remaining hearts on both ends of the banner.


The final step was to add the decorative arrow piece at the end of the pull tab. I cut this piece two times: one time out of the same white dotted cardstock and one time out of chili pepper cardstock. I stuck the white element at the end of the tab using liquid glue, and then the small red arrow in the center, and then I added highlights on the images using a white gel pen.


VIDEO
(click on the picture below)


LAWN FAWN SUPPLIES

Stamp sets
Bubbles of joy
- Happy wedding
- Bicycle built for you
- Sweet friends
- Hay there
- Dandy day
- Wild for you
- Swan soirée

Die sets
- Swish n pop
- Large stitched rectangle stackables
- Picket fence
- Everyday sentiment banners

Misc.
- Bubble stencils
- Jet black ink
- White pigment ink
- White dotted cardstock (neutrals)
- Chili pepper cardstock
- Speckled eggshell cardstock
- Clear embossing ink
- White embossing powder


OTHER SUPPLIES
- Spectrum Noir markers
- Graph'it brush markers
- Oxide inks: antique linen, fossilized amber
- Sakura white gel pen
- 80lbs Neenah solar white cardstock
- Strathmore bristol smooth cardstock