Sunny Studio - A Cut Above Rainbow Card

jeudi 27 avril 2023

Hey there,

I'm so happy to be back on Sunny Studio's blog and to start sharing the projects I've made using the new products! So exciting! I'm starting off today with some colorful scissors from A Cut Above. I went for a simple design with the scissors all lined up on my panel, but used bright colors to create a beautiful rainbow.

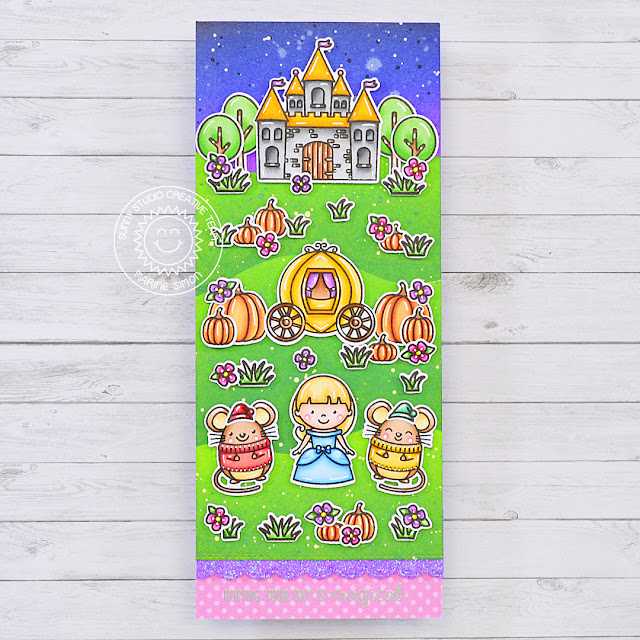
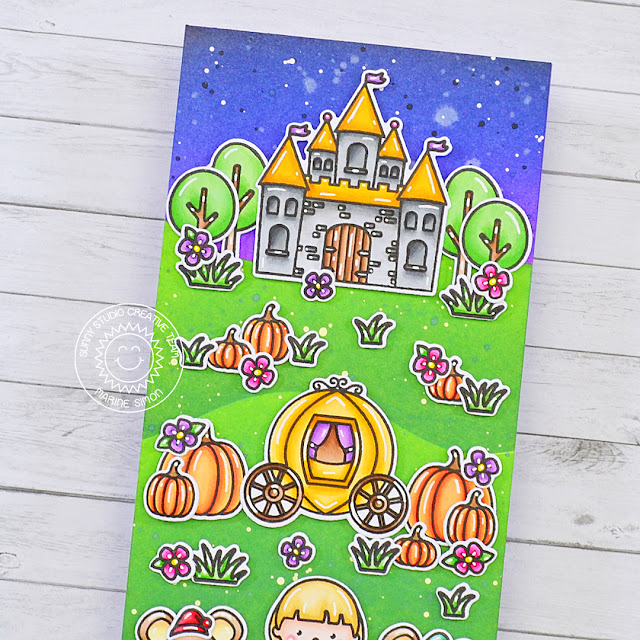
I first cut a 5,5 x 4,25 inches Strathmore bristol smooth panel, and used distress oxide inks to color it. From the left to the right: kitsch flamingo, dried marigold, squeezed lemonade, twisted citron and salvaged patina. I splattered water and white ink on the panel to make it less flat, and set it aside to dry.

Next I created the scissors using distress oxide inks again to match the background. For each scissor, I did the grey metal part using lost shadow + hickory smoke + black soot distress oxide inks. And for each colored handle part, I used:
- pink: kitsch flamingo + picked raspberry
- orange: dried marigold + spiced marmalade
- yellow: squeezed lemonade + mustard seed
- green: twisted citron + mowed lawn
- aqua: salvaged patina + peacock feathers

I used the coordinating die to cut each element, and then I attached them on my panel using 1mm foam squares.


I picked my "You're a cut above the rest" greeting from A Cut Above, and I wanted the word "cut" to pop, so I die cut the letters out of gold glitter cardstock using the Hayley Lowercase Alphabet, glued them below the scissors, and then white heat embossed the rest of the greeting. And finally I added golden heart sequins on each side.


SUNNY STUDIO SUPPLIES
- A cut above stamp set
- Hayley lowercase alphabet die set


OTHER SUPPLIES
- Distress oxide inks: lost shadow, hickory smoke, black soot, kitsch flamingo, picked raspberry, dried marigold, spiced marmalade, squeezed lemonade, mustard seed, twisted citron, mowed lawn, salvaged patina, peacock feathers
- Copic opaque white ink
- Clear embossing ink by Lawn Fawn
- Fine white embossing powder by Hero Arts
- Gold glitter cardstock by Concord & 9th
- Golden heart sequins by Pretty Pink Posh
- Strathmore bristol smooth cardstock (background)
- Transotype perfect coloring paper (scissors)

Sunny Studio - Cinderella Inspired Card

jeudi 13 avril 2023

Hello there,

I'm thrilled to be back on Sunny Studio's blog with this Cinderella inspired card. I've had this idea in mind for weeks, so I'm super happy to finally share this card with you. As very often I wanted to feature a bunch of images on my card, so once again I went for a slimline design, but used two Ribbon & Lace Borders to add an extra something else to the very bottom of my card.


So, I started off by cutting an 8,5 x 3,5 inches Strathmore bristol smooth panel, and I used the straight die from Ribbon & Lace Borders to cut an inch out of the bottom of this panel. Next I colored my panel using stencils and oxide inks: mowed lawn + rustic wilderness for the hills, and wilted violet + blueprint sketch + black soot for the night sky.


I stamped my images on Transotype perfect coloring paper using an alcohol marker friendly black ink, cut them all using the coordinating dies, and used my alcohol markers to color everything. Here are the stamps I picked:

- the castle, the coach, and a princess from Enchanted
- two mice & the pumpkins from Harvest Mice
- the tiny hat from Christmas Critters
- the flowers from Chubby Bunny + from Chickie Baby
- the trees from Spring Scenes
- the grass from Garden Critters


Once all the images were colored, I attached them all on my panel using foam squares, and next I worked on the final details. I used another die from Ribbon & Lace borders to cut a scalloped border out of some purple glitter cardstock. I embossed my "Hoping your day is magical" greeting from Garden Fairy in silver on a piece of pink dotted paper from Spring Fever, and I attached those different pieces on a purple card base. And as always I finished my card by adding highlights and details on the images using a white gel pen.


VIDEO


SUNNY STUDIO SUPPLIES
- Ribbon & lace borders die set
- Enchanted stamp set
- Harvest mice stamp set
- Christmas critters stamp set
- Chubby bunny stamp set
- Chickie baby stamp set
- Spring scenes stamp set
- Garden critters stamp set
- Garden fairy stamp set
- Spring fever paper pack


OTHER SUPPLIES
- Spectrum Noir Illustrator markers
- Graph'it brush markers
- Oxide inks: mowed lawn, rustic wilderness, wilted violet, blueprint sketch, black soot
- Copic opaque white ink
- Sakura white gel pen
- Detail black ink by Pinkfresh Studio
- Stencils by Lawn Fawn
- Clear embossing ink by Lawn Fawn
- Silver embossing powder by Lawn Fawn
- Glitter purple cardstock by Lawn Fawn
- Transotype perfect coloring paper (images)
- Strathmore bristol smooth cardstock (background)

Lawn Fawn - Elephant Parade Shutter Card

mardi 11 avril 2023

 Hello there,

I'm so happy to be back on Lawn Fawn YouTube Channel & Blog with this super cute and bright baby card showcasing a lovely elephant family welcoming a new baby into the pack. As very often, I pictured a very busy scene in my head, packed with a whole lot of images, and to make something else than the slimline design I usually go for, I created a shutter card, which allowed me to create the scene I had in mind.

I cut my shutter panel out of Strathmore bristol smooth cardstock, I trimmed the tabs at the top and bottom, and then created a lush tropical landscape using stencils + oxide inks. On the lower part, I used a Slimline hillside stencil and a Slimline grassy hillside stencil along with mowed lawn + rustic wilderness oxide inks. And on the upper part, I used a Slimline cloudy stencil along with salvaged patina + peacock feathers oxide inks.


Next I stamped all my images on Transotype perfect coloring paper using Jet black ink, I cut them all using the coordinating dies, and colored everything using my Graph'it brush markers and Spectrum Noir Illustrator markers.


I white heat embossed my "Welcome little peanut" greeting from Elephant Parade at the very bottom of the panel, folded each side panel using a bone folder, and then attached all the images on my panel using 3mm glue dots and liquid glue.


Next I worked on the outside of the card. I cut two Blue textured canvas side panels using the Shutter card die, two green Flower Market panels using another die from the Shutter card die set, and two blue belt pieces using another die from that set. I also cut a yellow Stitched scalloped square frame, and created a small cloudy panel.


I assembled and attached all those pieces on the outside of my shutter panel, and then stuck the remaining images. And as always I finished my card by adding highlights and details on the images using a white gel pen.


VIDEO


LAWN FAWN SUPPLIES

Stamp sets
- Elephant parade
- Elephant parade add-on
- Fly high
- Little bundle
- Wild for you
- A bug deal
- Eggstraordinary Easter
- Critters in the jungle
- Toucan do it

Die sets
- Shutter card
- Stitched scalloped square frame

Stencils
- Slimline grassy hillside stencil
- Slimline hillside stencil
- Slimline cloudy stencil

Cardstock & papers
- Blue textured canvas cardstock
- Yellow textured canvas cardstock
- Flower Market paper pack

Misc
- Jet black ink
- Crunchy leaf ink
- Clear embossing ink
- White embossing powder


OTHER SUPPLIES
- Spectrum Noir Illustrator markers
- Graph'it brush markers
- Oxide inks: mowed lawn, rustic wilderness, salvaged patina, peacock feathers
- Copic opaque white ink
- Sakura white gel pen
- Strathmore bristol smooth cardstock (background)
- Transotype perfect coloring paper (images)

Sunny Studio - Pandastic Slimline Card

jeudi 6 avril 2023

Hey there,

I'm so glad to be back on Sunny Studio's blog with the loveliest and sweetest pandas from Panda Party. I created a mountain scene for those cute little guys, and to help me complete my scene, I shopped my entire Sunny Studio collection to find the stamps that could fit the theme.


And just like the Garden Critters card I shared last week, I first stamped all my images on Transotype perfect coloring paper using an alcohol marker friendly black ink, and die cut them all using the coordinating dies, in order to place them on an 8,5 x 3,5 inches Strathmore bristol smooth panel and help me visualize the scene I wanted to build. I used a pencil to mark on my panel the different parts I wanted to create in my scene, from the bottom to the top : two hills, mountains and the sky, and I used stencils from my stash along with oxide inks to color the entire panel.


Once my mountain landscape was done, I colored all my images using my Spectrum Noir Illustrator markers and Graph'it brush markers. And to create a lovely habitat for my lovely pandas from Panda Party, I picked some extra stamps from different sets:

- the grass from Garden Critters
- the branch from Outback Critters
- the hot air balloon & clouds from Balloon Rides
- two leaves from Fabulous Flamingos
- the tree trunk from Seasonal Trees
- the flowers from Chickie Baby + from Chubby Bunny
- the swirling detail from Country Scenes


I white heat embossed my "Wishing you a pandastic day" from Panda Party at the bottom of the panel, I attached all the images using 1mm foam squares mostly and 3mm glue dots, and as always I finished my card by adding highlights and details to the images using a white gel pen.

And that's it! Love those cute pandas and how they pop on the green landscape, and the one in the balloon is one more proof that Sunny Studio stamp sets are totally mixable, just perfect if, just like me, you love to create stories on cards. Don't hesitate to watch the process video for more details! Thank you so much for stopping by, and see you next time!


VIDEO


SUNNY STUDIO SUPPLIES
- Panda part stamp set
- Garden critters stamp set
- Outback critters stamp set
- Balloon ride stamp set
- Fabulous flamingos stamp set
- Seasonal trees stamp set
- Chickie baby stamp set
- Chubby bunny stamp set
- Country scenes stamp set


OTHER SUPPLIES
- Spectrum Noir Illustrator markers
- Graph'it brush markers
- Oxide inks: mowed lawn, rustic wilderness, lost shadow, hickory smoke, black soot, salvaged patina, peacock feathers
- Stencils by Lawn Fawn
- Clear embossing ink by Lawn Fawn
- Fine white embossing powder by Hero Arts
- Copic opaque white ink
- Sakura white gel pen
- Transotype perfect coloring paper (images)
- Strathmore bristol smooth cardstock (background)
- Detail black ink by Pinkfresh Studio