Under The Sea Card Series || TriFold Card || Zig Coloring || Lawn Fawnatics Challenge #29

lundi 28 mai 2018

Hey there,

I've been wanting to make a trifold card for a very long time so when I received the new "You Are Sublime" stamp set by Lawn Fawn, I immediately jumped at the chance and took all my Lawn Fawn sea/ocean themed sets out to create this one layer card.

I also was inspired by this image:


I first started by cutting a long rectangle of bristol smooth cardstock (14 x 27 cm), and traced pencil lines every 9 cm on the long side, so that's 2 lines, to create three equal parts.


I stamped all the images using black waterproof ink (not Memento tuxedo black ink, as said in the video ^^), and masked everything so I can apply distress inks for my background.


So for the background... I die cut two cloud borders from masking paper and adhered them at the bottom of the trifold panel to create the ground. I used two shades of brown distress inks, and then splattered some drops of the darkest one here and there to give the illusion of sand.


Next, I die cut a wave border from masking paper and adhered it at the top of the trifold panel, I also masked the ground so I could ink the middle part of the panel. I used three shades of blue distress inks for that.

I inked up the top part of the panel using the same masking technique and some dark blue and black distress inks. Next I peeled all the masking elements, and splattered water on the whole panel to give the illusion of bubbles.


I colored everything using my zig markers, then stamped bubbles here and there around the critters, and gold heat embossed my sentiment on the top part of the panel. I added black dots to everyone's eyes, put some white highlights on them and applied clear enamel dots on the bubbles to finish the card.

VIDEO
Below or here

LAWN FAWN SUPPLIES

- You are sublime stamp set
- Mermaid for you stamp set
- Fintastic friends stamp set
- Critters in the sea stamp set
- So jelly stamp set
- Octopi my heart stamp set
- Stitched wave border die set
- Puffy cloud border die set

OTHER SUPPLIES

- Distress inks: antique linen, rusty hinge, tumbled glass, salty ocean, blueprint sketch, chipped sapphire, black soot
- Zig markers
- Strathmore bristol smooth cardstock
- Morning dew Nuvo drops
- Versamark ink
- Antique gold embossing powder from Simon Says Stamp

Craftin Desert Divas - Monochromatic Colors - Shaker Card

Hello there,

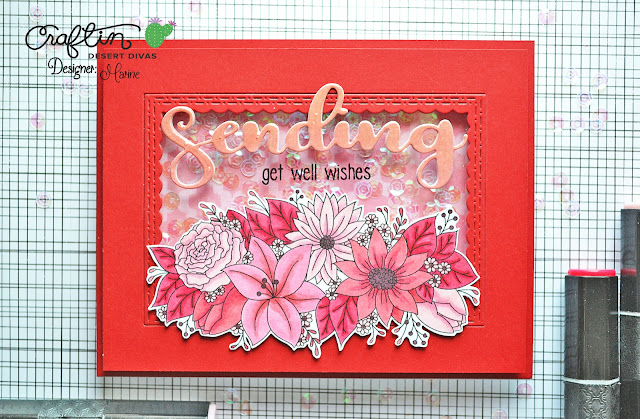
Today I'm back to share with you a monochromatic shaker card. Hope you'll like it ^^


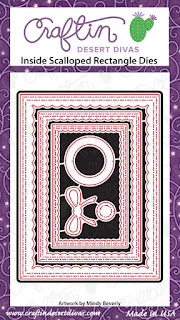
I first started by stamping the flowers on white cardstock, next I colored them using my alcohol markers, and fussy cut them. I cut two rectangles from red cardstock, one slightly smaller than the other. From this smaller rectangle, I die cut an inside scalloped frame that I kept attached by taping it at the back. And at the back of that smaller rectangle, I attached a piece of clear acetate to create the shaker window.

At the back of that window panel, I put four layers of double sided around the opening to create dimension for my sequins. Once the sequins were in the window, I closed it using a piece of pattern paper. And next I attached that shaker panel to the large red rectangle previously cut.


I attached the flowers at the bottom of the window using double sided tape. Die cut the word Sending, attached it on the window and stamped the second part of the sentiment directly on the acetate using stazon black ink (perfect to stamp on acetate or vellum)

To finish the project, I attached the window panel to a red card base, and applied glossy accents to the word Sending to add some shine.

VIDEO
Below or here

CRAFTIN DESERT DIVAS SUPPLIES

Kindness stamp set

Inside Scalloped Rectangle die set

Sending die

Wishful Thoughts stamp set

Shimmer sequins


OTHER SUPPLIES

- Spectrum Noir alcohol markers
- Red cardstock from Lawn Fawn
- Pattern paper from my stash
- Glossy accents from Ranger
- Black stazon ink
- Acetate from my stash

Stamp AnnieThing - Break in the park

vendredi 25 mai 2018

Hello there,

I'm so excited to share with you my first card using a stamp from Stamp AnnieThing. I didn't know this brand, I discovered it a few weeks ago but when I saw their gorgeous designs, I just couldn't help myself but order some supplies. So stay tuned for other projects using them! ^^

This first one is pretty simple, but when I saw this image I immediately pictures her in a park. And why not in Central Park given that I have a New York City skyline die?


So I first started by creating the background. And for that I masked three edges of a bristol panel and applied two shades of blue distress inks, making sure to put the darkest at the top. For more interest, I splattered water on top of it, and dried it with paper towel.

I attached the NYC skyline previously die cut from white cardstock using double sided foam tape for some dimension, and die cut two grass borders that I colored using green distress inks. Splattered them with water too, and attached them at the bottom of the skyline.


Stamped the image on neenah solar white cardstock using memento tuxedo black ink, fussy cut it, and colored it using my spectrum noir markers. I took a sentiment from another Stamp AnnieThing set, and stamped it directly onto the background. Then I attached the image using foam squares, applied clear glitter to her scrunchies and added some clear drops here and there for final touch.


VIDEO
Below or here


SUPPLIES

- "Kelly - Book" stamp set from Stamp AnnieThing
- "Felicity - Hello" stamp set from Stamp AnnieThing
- Grassy Border die set from Lawn Fawn
- New York Skyline die from My Favorite Things
- Distress inks: peacock feathers, tumbled glass, twisted citron, mowed lawn
- Spectrum Noir alcohol markers
- White cardstock from HobbyCraft
- Strathmore bristol smooth cardstock
- Neenah solar white cardstock
- Morning Dew Nuvo drops
- Clear glitter pen from Spectrum Noir

My Favorite Things - Sergent Pepper's Lonely Hearts Club Band

lundi 21 mai 2018

Hello there,

The other day I was browsing through my stash and I came across this stamp set. And seeing it, it hit me and I immediately saw the Beatles in their Sergent Pepper outfits. Right below is the picture I took for reference. I thought about adding hair and moustache to the critters but maybe it would have been too much LOL


So I first started by stamping my images on bristol smooth cardstock, then I colored them using my alcohol markers and fussy cut them.


Took another piece of bristol cardstock and die cut the four window front panel. Applied ink only on the small rectangles using various shades of distress inks.


On a white card base, I attached the four colores rectangles using the frame as a guide, and then attached the frame using foam squares. Next I built each little scene by gluing in place the images using glue dots.


Finally, I white heat embossed my sentiment on black cardstock and attached it in the middle of the panel.

VIDEO
Below or here

SUPPLIES

- London Mouse stamp set from My Favorite Things
- Gift box cover up die set from My Favorite Things
- Spectrum Noir alcohol markers
- Distress inks: worn lipstick, candied apple, tumbled glass, peacock feather, twisted citron, mowed lawn, tattered rose, picked raspberry
- Bristol smooth cardstocl from Strathmore
- White cardstock from HobbyCraft
- Versamark ink
- White embossing powder from Aladine

Craftin Desert Divas - Tweet Wishes

samedi 19 mai 2018

Hi there,

I'm back to showcase a card I made using an oldie but goodie stamp set called "Birds of a feather" from Craftin Desert Divas. The wreath is also from an old die set called "Stitched in circle", and I thought it was just perfect for my bird to sit on.


First step was to use washi tape to mask some parts of my panel to create thick stripes. Then I simply applied two shades of pink distress inks, going light in the middle to dark on the edges. These colors were inspired by the CDD Mood Board Challenge on Facebook.


Before removing the washi tape, I splattered silver paint on the pink stipes to add more shine and more interest.


I stamped my sentiment on the bottom left corner of my panel, and then stamped my image on white cardstock, colored it using alcohol markers and fussy cut it.

I die cut three wreaths from white cardstock, glued them together to make one entire piece, and attached it on the right side of the panel. Before it adhered completely, I tucked the bird behind so his tail could hang behind the wreath, like it would normally do ^^ And I glued the body of the bird using foam squares.


Attached the panel to a white card base, applied clear glitter to the bird's crest and added clear drops here and there to finish the project.


VIDEO
Below or here


CRAFTIN DESERT DIVAS SUPPLIES


OTHER SUPPLIES

- Spectrum Noir alcohol markers
- Distress inks: picked raspberry, spun sugar
- Strathmore bristol smooth cardstock
- White cardstock from HobbyCraft
- Morning dew Nuvo drops
- Clear glitter pen from Spectrum Noir

Craftin Desert Divas - Flowers in Display

vendredi 18 mai 2018

Hello there,

Today I'm sharing with you another card I made using the gorgeous new "Kindness" stamp set from Craftin Desert Divas, and designed by my dear friend Anna. When I saw this set, I knew I wanted to try some alcohol marker coloring on kraft cardstock, so here it is ^^


I first started by stamping the image on kraft cardstock, then I colored it using my spectrum noir markers and finally fussy cut it. Then I cut my background panel from kraft cardstock, applied brown distress ink on the edges, and did the same thing on a small rectangle of wood pattern paper.


Die cut a scalloped rectangle from vellum, attached it to the kraft background, and glued the small rectangle and flowers on top of it to create the display. To finish the card, I glued my die cut sentiment above the flowers, and attached the panel to a kraft card base.

VIDEO
Below or here
CRAFTIN DESERT DIVAS SUPPLIES


OTHER SUPPLIES

- Spectrum Noir alcohol markers
- Kraft cardstock from Neenah
- Polka dot vellum from my stash
- Distress ink from Tim Holtz: vintage photo

Summer Card - Summer Fun

mercredi 16 mai 2018

Hello there,

Spring has just arrived but isn't it nice to already think about summer and our future plans for this season? Well, mine will definitely include sun and ice cream, just like this cutie ^^


Usually I like to start with the background, but this time I knew it would be pretty simple so I went directly on coloring the images using my alcohol markers.

On a white card base, I glued pieces of colorful dot pattern paper, and then on top I attached a scalloped rectangle. I draw a shadow where I wanted to place my critter, and then glued both images using foam squares.


Stamped my sentiment on left side, added some colorful drops here and there, and applied glossy accents on the rubber ring to finish the card.

VIDEO
Below or here


CRAFTIN DESERT DIVAS SUPPLIES

- Waving Hello stamp set


- Fancy Frame die set


- Simply Said stamp set


OTHER SUPPLIES
- Spectrum Noir alcohol markers
- Pattern paper from my stash
- Glossy Accents from Ranger
- White gel pen from Uniball
- Nuvo drops

Under The Sea Card Series - Mermazing Friend - Water Shaker Card

lundi 14 mai 2018

Hey there,

I love making shaker cards, so when I saw this beautiful mermaid stamp set, I immediately thought of making one but with water. It's actually the second water shaker card I've created, the first one was done a little while ago for my crafty friend Tina (@tinneke_th on Instagram)


I first started by coloring the images using my alcohol markers. I knew I wanted a bold pink color in the background, so I colored the mermaid hair with the same color. I added white dots to her tail, clear glitter to her hair and silver gel to her diadem. Some white highlights and grey dots were also added to her friend.

The background were created using three different colors of zig markers: purple, teal and pink. I simply traced some lines on bristol smooth cardstock, and then applied water on them to mix everything. Once dry, I sprayed some water drops to add more details.

I die cut a scalloped circle from a white panel, secured the inside ring at the back using clear tape and attached four layers of double sided foam tape at the back around the circle to create room for my water shaker pouch.


To create the water shaker pouch, I took a simple binder clear sleeve and sealed three edges using my fuse tool. I did three fuse lines on each edge to make sure water would stay in place ^^ I put some little star sequins in the little pouch and added water. To make no water would spill during the closing process of the pouch, I temporary closed it using tape, and then I could close with, again, three lines of fuse. Please watch the video below if it doesn't sound clear to you ^^

I attached the window panel to the watercolored frame, and slided the water pouch between both. I gold heat embossed my sentiment on white cardstock, cut it to a banner and attached at the bottom left corner of the circle using foam squares. Attached the mermaid using the same foam squares. To finish the project, I attached the whole panel to a white card base, and added some clear dots here and there.

VIDEO
Below or here

CRAFTIN DESERT DIVAS SUPPLIES


OTHER SUPPLIES

- Fuse tool from We R Memory Keepers
- Zig markers
- Spectrum Noir alcohol markers
- Strathmore bristol smooth cardstock
- White cardstock from HobbyCraft
- Star sequins from Pretty Pink Posh
- Silver glitter pen from Uniball
- White gel pen from Uniball
- Clear glitter pen from Spectrum Noir
- Versamark ink
- Antique gold embossing powder from Simon Says Stamp
- Morning Dew Nuvo Drops

Craftin Desert Divas - Blue Flowers

mercredi 9 mai 2018

Hello there,

Today is day 3 of Sneak Peek Week for Craftin Desert Divas May Release, and one the new supplies is this gorgeous flower stamp set designed by my friend Anna. It's absolutely fabulous, and I really enjoyed coloring it with colors I'm not used to ^^


I first started by stamping, fussy cutting this big image, and coloring it using my alcohol markers. Then on a white card base, I attached a black and white diagonal background, and right on top of it I attached a scalloped frame and finally another rectangle on top using double sided foam tape.


Attached the flower element in the middle of the panel using foam squares. Stamped my sentiment on white cardstock using black ink. Cut it into a banner and attached it on the flowers using foam squares. And as a final touch I added some black enamel dots here and there.

VIDEO
Below or here

CRAFTIN DESERT DIVAS SUPPLIES


OTHER SUPPLIES
- Spectrum Noir alcohol markers
- Solar White cardstock from Neenah
- Black & white pattern paper from My Favorite Things
- Black enamel dots from Ranger

Under The Sea Card Series - Ocean of Birthday Wishes

mardi 8 mai 2018

Hey there,

It's day 2 of Sneak Peek Week for Craftin Desert Divas May Release, so today I'm sharing with you a card showcasing the new "Mermaid Trolls" stamp set. Under the sea projects are one of my favorite things to make so I was so happy to play with these cuties!


I first started by creating the background, and for that I simply made a large vertical stripe on a bristol smooth panel and blended three shades of blue distress inks. And with the help of a homemade hill stencil, I created waves using the same inks. For a final sea touch, I sprayed water on top of the ink and dried it with paper towel.


I stamped and fussy cut the images, and colored them using alcohol markers. Colored their diadems using a silver gel pen, and applied clear glitter to their hair.


Stamped the sentiments, attached the images using foam squares, applied glossy accents to the pearl and added clear drops here and there to finish the card.

VIDEO
Below or here

CRAFTIN DESERT DIVAS SUPPLIES


OTHER SUPPLIES

- Spectrum Noir alcohol markers
- Distress inks: chipped sapphire, broken china, cracked pistachio
- Strathmore bristol smooth cardstock
- Silver glitter pen from Uniball
- Clear glitter pen from Spectrum Noir
- Morning Dew Nuvo Drop

Summer Card - Fun in The Sun - CAS Card

lundi 7 mai 2018

Hello there,

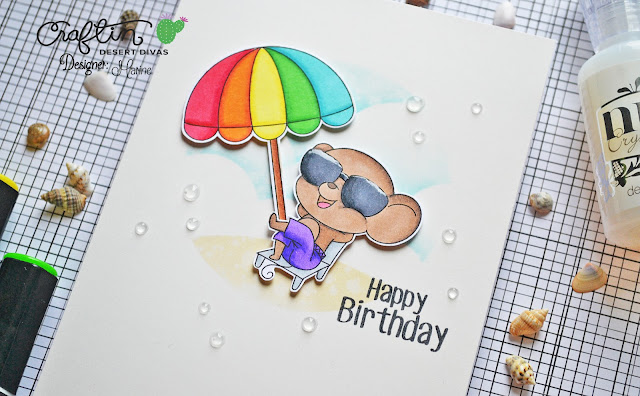
It's day 1 of Sneak Peek Week for Craftin Desert Divas May Release. I wanted to make something simpler than the projects I usually do so I went with a CAS (= clean and simple) card.


I first started by creating the background. For that I made my own circle stencil and temporary attached it to a bristol smooth panel. To create the sand, I applied light brown distress ink at the bottom of the circle using a homemade hill stencil. And using a cloud stencil (again, homemade), I applied blue distress ink to create the sky. Sprayed some water on top of all of that and dried it using paper towel.


I stamped and fussy cut my images, and colored them using my alcohol markers. I wanted bright colors so I went with rainbow colors for the parasol. Attached both images using foam squares. Stamped my sentiment, applied glossy accents on the glasses, added some clear dots here and there, and attached the panel to a white card base to finish the project.

VIDEO
Below or here

CRAFTIN DESERT DIVAS SUPPLIES


OTHER SUPPLIES
- Spectrum Noir alcohol markers
- Distress inks: scattered straw, peacock feather
- Strathmore bristol smooth cardstock
- Morning Dew Nuvo drops
- Glossy Accents from Ranger