Celebrating Jessica 10k Subscribers Video Hop

mardi 30 mars 2021

Hello there,

Today I'm super happy to celebrate my friend Jessica! She recently reached 10k subscribers on her YouTube channel so for the occasion, she organized a big video hop, with a bunch of crafters and lots of amazing prizes from different companies to win!

If you want to hop along, please check the description box below my my video on YouTube to watch everybody's videos. Please consider subscribing to those amazing YouTube channels and leave comments to show some support to those amazing people.

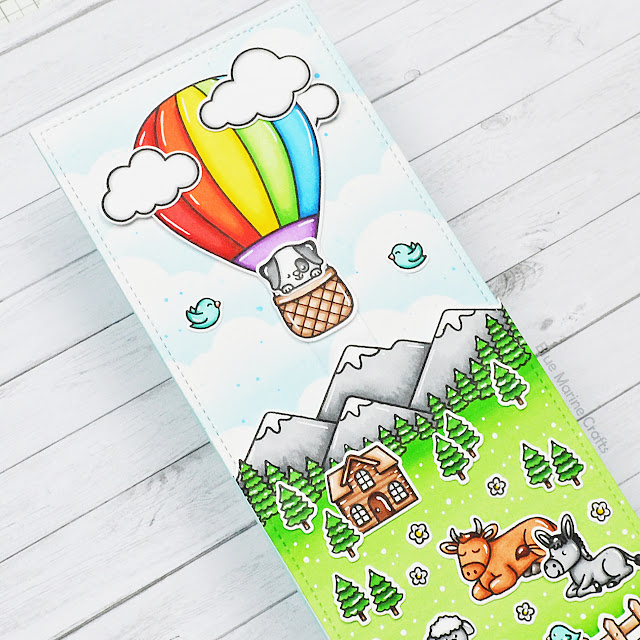
I used some Sunny Studio stamp sets to create this card. Started by stamping all the images using jet black ink by Lawn Fawn, used the coordinating dies to cut everything, and colored them all using my alcohol markers.


Next I created the background and cut an 8,5 x 3,5" Strathmore bristol smooth panel and created a very simple sky using a cloud stencil along with tumbled glass distress ink. And I also added a little bit of texture using tumbled glass and salty ocean distress inks mixed with water.


I used the same slimline die to trim the mountain border, as well as the fence border, and then moved on to the interactive part of the card. And I invite you to watch the video below to see the entire process ^^ And when it was done, I attached all my cute images on my panel using glue dots and liquid glue.


The last step was to stamp my sentiment 'Just a note to lift you up' using my misti tool. I placed the stamps directly on the balloons, and picked up the first one with the door, removed the balloon, and then stamped the three parts of my sentiment below each other using black versafine ink. And finally I added white highlights on the images as well as some dots on the green part to give the illusion of flowers.


VIDEO
(click on the picture below)


SUNNY STUDIO SUPPLIES
Balloon rides
- Country scenes
- Spring scenes
- Holy night
- Seasonal trees
- Winter scenes


OTHER SUPPLIES
- Spectrum Noir markers
- Graph'it brush markers
- Distress inks: tumbled glass, salty ocean
- Sakura white gel pen
- Let's toast pull tab die set by Lawn Fawn
- Cloud stencil by Lawn Fawn
- Slimline die by Lawn Fawn
- Jet black ink by Lawn Fawn
- 80lbs Neenah solar white cardstock
- Strathmore bristol smooth cardstock

Celebrating Art Of Albara One Year Anniversary on IG Hop

samedi 27 mars 2021

Hi there,

Today I'm celebrating my dear friend Anne-Laure, aka Art of Albara on Instagram. It's been a year since she joined this social media so to celebrate this one year anniversary, she organized a massive hop on IG with a whole bunch of crafters and a super cool giveaway.

Please check my IG page to get all the details to this hop!

The theme for this hop was 'Create a scene'. So I took one of my latest cards as an inspiration to create today's card. I went with a dinosaur theme for this room. The little girl wants to be an archeologist when she grows up, and she's busy doing her homework about the stegosaurus.

As always I stamped the images on 80lbs neenah solar white cardstock using jet black ink, cut them all using the coordinating dies and then colored everything my alcohol markers.


When everything was colored, I created the screens for the computer. I cut a wheel out of neenah cardstock, placed the rectangle template on top and marked three windows with a pencil, and then stamped additional images on each rectangle that I colored next using the same color palette as before.


Next I created the room to set my scene, and started by stamping a wood texture on a piece of peacock cardstock using a similar ink to get a tone on tone effect. Next I cut a square reveal wheel panel as well as a small rectangle out of it to create the wall of the bedroom. To ground the scene, I cut a piece of light khaki green dotted cardstock using the reveal wheel square die again, and to finish that floor nicely, I cut a strip out of the same paper.


Next I assembled the different elements: I cut a small circle using a die from the reveal wheel die set and put the brad in the center of it, placed the brad into the reveal wheel at the back of it, and opened the brad to keep those pieces together. I flipped the wheel over and attached 2mm foam squares on the small circle, removed the backing paper, and then placed the wheel behind my peacock panel, making sure to align one of the screens with the rectangle window, and pressed onto another peacock square panel to attach the wheel only on that panel. I added a bunch of 2mm foam squares all the around the wheel, and then placed my peacock wood panel on top to finally complete the interactive part of the card.

Next I attached all the pieces to compete the scene, starting with the floor, and then all my cute images using liquid glue and glue dots.


Once everything was attached, I stuck my reveal wheel panel on a dark yellow dotted panel that I stuck on a sunflower card base, and then created my sentiment with the words 'Wish Big' in capital letters. I cut the letters two times: one time out of shimmer khaki green cardstock, and one time out of noble fir cardstock. I layered the letters and then stuck the words right below my little scene.

The final step was to add an arrow on the right side to tell the recipient of the card how to use it, and I also added highlights on the images using my white gel pen.


VIDEO
(click on the picture below)


LAWN FAWN SUPPLIES

Stamp sets
Virtual friends
- Critters from the past
- Rawrsome
- Critters down under
- Hay there
- You're just my type
- Den sweet den
- On the beach
- Christmas dreams
- Meow you doin
- Bicycle built for
- Ocean shell-fie
- Dad + me
- Woodgrain backdrop

Die sets
- Reveal wheel
- Reveal wheel square add-on
- Reveal wheel rectangle window add-on
- Finley's ABCs
- Picket fence

Cardstock
- Peacock
- Sunflower
- Dotted tropical
- Dotted pastel
- Shimmer gemstone

Misc.
- Jet black ink

OTHER SUPPLIES
- Spectrum Noir markers
- Graph'it brush markers
- Sakura white gel pen
- 80lbs Neenah solar white cardstock

Waffle Flower - Birthday Cardmaking Challenge

vendredi 26 mars 2021

 Hello there,

My friend Galina is hosting a cardmaking weekly challenge at Waffle Flower and she asked me if I wanted to participate. Of course I said yes! This week the theme is Birthdays, and yes, the main stamp set I used is Christmas themed but as long as you changed the color palette, you can use it for any festive occasion.

As always I stamped all the images on 80lbs neenah solar white cardstock, and colored everything using my graphit brush markers and spectrum noir markers.

Now a short note about this super cool birthday challenge: once your Waffle Flower project is done, you can share it either on the challenge blog, the Facebook group, on Instagram, or on all those three platforms. Winners will be picked randomly and will receive a $15 gift certificate to waffleflower.com. This birthday challenge starts today on March 28 and will end next sunday on April 4. You will find a recap of all these information and details right here, so happy crafting and good luck!

Once everything was colored, I created the background and started by coloring a brick wall on an 8,5 x 3,5 inches bristol panel using a brick stencil and tumbled glass distress ink. Next I cut a slimline window trio panel out of a light blue cardstock, applied a bunch of foam squares at the back of it and attached it on my brick panel.

To ground my little scene, I used the same die to cut a light grey strip that I stuck at the bottom of my slimline panel. And using another die from the slimline window trio set, I cut a slim rectangle out of white cardstock that I attached on the middle section to give the illusion of a kitchen counter.


And then I assembled and stuck all my cute images using a combination of foam squares and glue dots to finally see the scene I had in mind coming to life.

I white heat embossed my sentiment 'Eat Cake Today' on a green banner that I stuck on the right side using foam squares and liquid and finally I added some highlights here and there using a white gel pen.


VIDEO
(click on the picture below)


WAFFLE FLOWER SUPPLIES
- Cookie time stamp set
- Eat cake stamp set
- Slimline window trio die set

OTHER SUPPLIES
- Spectrum Noir markers
- Graph'it brush markers
- Distress ink: tumbled glass
- Brick stencil by Lawn Fawn
- Clear embossing ink by Lawn Fawn
- White embossing powder by Lawn Fawn
- Colored cardstocks by Lawn Fawn
- 80lbs Neenah solar white cardstock
- Strathmore bristol smooth cardstock
- Sakura white gel pen

Hello Bluebird - Mushroom House Background

Hi there,

It's time to celebrate Hello Bluebird new release! It includes brand new background clear stamps. And the rubber background stamps previously released are back in the shop as well but as clear stamps! Yay!

My first card showcases the Mushroom House Background stamp, which the perfect image to set a lovely scene with gnomes, but also critters and why not fairies!


I started by stamping the image on a 5,5 x 4,25" panel using memento tuxedo black ink on 80lbs neenah solar white cardstock and used my alcohol markers to colors the panel.

Once it was all colored, I did the sky. I wanted it to be pretty simple to let the house be the star of the card so I just used tumbled glass and a cloud stencil to create that sky. And when it was done, I even added some texture by mixing the same ink with water and creating splatters on the sky all around the house.


My house also needed owners so I stamped and cut two cute gnomes as well as additional images to complete the scene and colored everything using the same color palette as before.


Next I attached my mushroom house panel on a card base and then stuck the images on top using foam squares. And the final step was to add my sentiment. I stamped 'From my gnome to yours' on white cardstock, and trimmed it into a slim banner that I attached in the top right hand corner.


VIDEO
(click on the picture below)


HELLO BLUEBIRD VIDEO
- Next door gnomes
- Merry mice
- Cozy Christmas
- My snowman
- Storybook friends


OTHER SUPPLIES
- Spectrum Noir markers
- Graph'it brush markers
- Distress ink: tumbled glass
- Sakura white gel pen
- Cloud stencil by Lawn Fawn
- Memento tuxedo black ink
- 80lbs neenah solar white cardstock

Isabel Cristina Stamps - Flower Shop Shutter Card

vendredi 19 mars 2021

 Hi there,

I'm back today with a cute little scene showcasing two digital stamp set designed by Isabel Cristina Stamps, the Flower Store set that includes lots of flowers and lovely bunnies, and the Vintage Store set that includes four amazing store fronts, as well as furniture and accessories to set a scene.

As always I printed all my images on 80lbs Neenah solar white cardstock using my Epson xp 225 printer, cut them all using my Scan 'n Cut and colored everything using my alcohol markers.


When everything was colored, I created the background: I cut a panel out of Strathmore Bristol Smooth cardstock using the Shutter Card die set by Lawn Fawn, taped it to my glass surface with a brick stencil on top and created a brick wall using shabby shutters distress ink.

Next I picked a stencil with a straight edge in my stash, and taped it on top of my brick panel in order to create the floor using frayed burlap distress ink.


And then I filled the card with all my cute images that I attached using glue dots. When everything was glued where I wanted, I get rid of the tabs at the top and bottom of the panel, and then folded both sides of my shutter panel.


Next step was to decorate the sides on the outside using green plaid pattern paper. To keep the card closed, I created a sleeve using a die from the Shutter Card die set and slid the closed shutter panel inside that sleeve. I applied double sided tape on the sleeve, and then attached my store front to finally totally complete my flower shop shutter card.


VIDEO
(click on the picture below)


ISABEL CRISTINA STAMPS SUPPLIES
- Flower store stamp set
- Vintage store stamp set

OTHER SUPPLIES
- Spectrum Noir markers
- Graph'it brush markers
- Distress inks: shabby shutters, frayed burlap
- Sakura white gel pen
- 80lbs Neenah solar white cardstock
- Strathmore bristol smooth cardstock
- Plaid pattern paper by Lawn Fawn
- Shutter Card die set by Lawn Fawn
- Brick stencil by Lawn Fawn

Lawn Fawn - Reveal Wheel Space Bedroom

mardi 16 mars 2021

 Hi there,

I'm back with a cute scene showcasing a little girl writing a presentation about her dream job. As always, I went through my entire Lawn Fawn collection to pick some cute images that I stamped on 80lbs neenah solar white cardstock using jet black ink, and colored using my alcohol markers.

When everything was colored, I created the screens for the computer. I cut a wheel out of the same paper cardstock, placed the rectangle template on top, and kept those pieces together using a brad. I used a pencil to draw the three rectangles and then stamped additional images in those three rectangles that I colored using my alcohol markers again.


Next I created the room to set my scene, and started by cutting a reveal wheel square panel + rectangle window out of sugarplum cardstock. And I wanted to have a starry wallpaper so I run the panel in my die cut machine along with the snowy backdrop die. I added a tiny bit of wilted violet distress ink on the edges to add some contrast, and then cut a second reveal wheel square panel + rectangle window out of shimmer blue cardstock, and I layered those two elements to get a cool starry wallpaper.

To ground the scene, I cut a piece of dark blue dotted cardstock using the reveal wheel square die again, and to finish that border nicely, I cut a strip out of the same paper and attached the elements at the bottom of my starry panel.


Next I assembled the pieces: I cut a small circle using a die from the reveal wheel die set and put the brad into the center of it, placed the brad into the reveal wheel at the back of it, and opened the brad to keep those elements together. I flipped the wheel over and attached 2mm foam squares on the white circle, removed the backing paper, and then placed the wheel behind the violet panel, making sure to align one of the screens with the window, and I pressed onto another sugarplum square panel to attach the wheel only on that panel. I added a bunch of 2mm foam squares all the around the wheel, and then placed the starry panel on top to finally complete the interactive part of the card.


Next I attached all my cute images on my sugarplum starry panel using liquid glue and glue dots.

Once everything was attached, I stuck my reveal wheel panel on a blue dotted panel that I stuck on a mermaid card base, and then created my sentiment with the word 'Believe' in big capital letters and the words 'in yourself' that I white heat embossed on black licorice cardstock.

I cut the word 'Believe' three times: one time out of shimmer navy blue cardstock, and two times out of blue jay cardstock. I stuck the blue jay letters together and then the shimmer ones on top to get nice dimension.


The final step was to add an arrow on the right side to tell the recipient of the card how to use it, and finally I added white highlights on the images using my white gel pen, and that's it, all done.


VIDEO
(click on the picture below)


LAWN FAWN SUPPLIES

Stamps sets
- Virtual friends
- Out of this world
- Beam me up
- So owlsome
- Plan on it: school
- You're just my type
- Christmas dreams
- Den sweet den
- Meow you doin
- Reveal wheel circle sentiments
- Really high five

Die sets
- Reveal wheel
- Reveal wheel rectangle window add-on
- Reveal wheel rectangle template
- Finley's ABCs
- Snowy backdrop
- Picket fence border
- Large stitched rectangle stackables
- Outside in stitched rectangle stackables

Cardstocks
- Black licorice
- Sugarplum
- Blue jay
- Mermaid
- Shimmer tropical
- Shimmer gemstone
- Dotted tropical
- Dotted gemstone

Misc.
- Jet black ink
- Glue dots
- Liquid glue
- Clear embossing ink
- White embossing powder


OTHER SUPPLIES
- Spectrum Noir & Graph'it Brush alcohol markers
- Distress ink: wilted violet
- Sakura white gel pen
- 80lbs Neenah solar white cardstock

Lawn Fawn - Swish 'n Pop Weather Card

mardi 2 mars 2021

 Hello there,

Today's video is a weather Swish 'n Pop Pull Tab card featuring some cute mallard ducks having lots of fun under the rain. As always I stamped all the images using jet black ink, colored them all using my alcohol markers, and used the coordinating dies to cut everything.

I also did a tiny bit of customization to turn the ducks into mallard ducks. I simply drew lines on their neck using a pencil first and then a black marker.

Once all my images were colored, I moved on to the background, and cut a 5,5 x 4,25" stitched panel to create the sky. And I wanted that sky to be gloomy so I used stormy sky oxide ink which is the perfect ink to get this effect. I covered the entire panel with that ink to have a nice and even base, and used chipped sapphire oxide ink along with the cloudy stencil to bring darkness to that sky.

I also added a little bit of chipped sapphire on the edges, and to emphasize the gloomy aspect of the card I splattered water droplets all over the paper and dried it using a paper towel. And then I mixed some chipped sapphire oxide ink with water and used a small brush to create a bunch of dots on my sky.


And I also wanted my cute little ducks to have fun under the rain, so I used the Rainy backdrop die to create a million raindrops all over my sky.


For the bottom of my card, I went with two simple borders: a grass border that I colored with peeled paint and forest moss oxide inks, and a wavy border with tumbled glass and stormy sky oxide inks.


Next I moved on to the interactive part of the card, and I encourage you to watch the process video at the end of this blog post because it's always easier to understand with images ^^ And when it was all built up, I assembled and stuck all my cute images on my panel using a combination of foam squares and liquid glue.

Once everything was attached, I used a white gel pen to add highlights on the images, and the final thing to do was to add a handle at the end of the pull tab.


VIDEO
(click on the picture below)


LAWN FAWN SUPPLIES

Stamp sets
- Rub a dub dub
- All the clouds
- Elphie selfie
- Toadally awesome
- Swan soirée

Die sets
- Swish 'n pop
- Large stitched rectangle stackables
- Simple stitched rectangle stackables
- Grassy border
- Rainy backdrop: landscape

Misc.
- Fog cardstock
- Moonstone cardstock
- Jet black ink


OTHER SUPPLIES
- Spectrum Noir markers
- Graph'it brush markers
- Distress oxide inks: stormy sky, chipped sapphire, tumbled glass, peeled paint, forest moss
- Sakura white gel pen
- 80lbs Neenah solar white cardstock
- Strathmore bristol smooth cardstock