Pretty Pink Posh - Big Valentine Cupcake

samedi 27 janvier 2024

Hello there,

I'm super happy to be back with this bright and colorful card showcasing the gorgeous Big Valentine Cupcake and beautiful Half Hearts stencils, both brand new from the Pretty Pink Posh January 2024 Release.


I went all rainbow with this card, and started off by creating a colorful background using the Half Hearts stencils on a 5,5 x 4,25 inches Strathmore bristol smooth panel. Along with the stencil A, I used spun sugar, dried marigold, squeezed lemonade, salvaged patina, tumbled glass and shaded lilac oxide inks. And along with the stencil B, I used kitsch flamingo, spiced marmalade, mustard seed, peacock feathers, salty ocean and wilted violet oxide inks. I mixed some copic opaque white ink with water and used a small brush to add splatters all over the panel, and then did the same with black soot oxide ink to bring a little bit of contrast.


Next I cut all the Big Valentine Cupcake pieces, and colored them using oxide inks again. Here are the colors I used for each element: • cupcake case: spun sugar + kitsch flamingo • heart: shaded lilac + wilted violet • cupcake & cookies: antique linen + vintage photo • rainbow cream: shaded lilac + tumbled glass + salvaged patina + squeezed lemonade + dried marigold + spun sugar • flag: salvaged patina + peacock feathers. I also cut the pole for the flag out of a light gray cardstock, and three small hearts out of a gold mirror cardstock.


I cut the largest Eyelet Heart out of vellum, and assembled my cupcake right on top of it using 1mm foam squares, and then I attached the vellum heart on my Half Hearts panel using liquid glue. Finally, I white heat embossed my "Hugs & kisses" greeting from Sentiment Strips: Valentine, trimmed it into a slim banner using a Sentiment Strips die, and attached it on the cupcake case using foam squares again. And that's it! Thank you so much for stopping by, and see you soon!


PRETTY PINK POSH SUPPLIES
- Big Valentine cupcake die set
- Half hearts stencils
- Eyelet heart die set
- Sentiments strips: Valentine stamp set
- Sentiment strips die set


OTHER SUPPLIES
- Oxide inks: spun sugar, kitsch flamingo, dried marigold, spiced marigold, squeezed lemonade, mustard seed, salvaged patina, peacock feathers, tumbled glass, salty ocean, shaded lilac, wilted violet, black soot
- Copic opaque white ink
- Clear embossing ink by Lawn Fawn
- Fine white embossing powder by Hero Arts
-  Gold mirror cardstock from my stash
- Fog cardstock by Lawn Fawn
- Dark gray cardstock by Lawn Fawn
- Vellum by Lawn Fawn
- Strathmore bristol smooth cardstock

Sunny Studio - Rainbow Gift Card Envelopes + Matching Mini Cards

jeudi 25 janvier 2024

Hello there,

I'm super happy to be back on Sunny Studio's blog today with this trio of colorful Gift Card Envelopes and their matching mini cards. I went for a rainbow birthday theme, and brought back the kitties from Birthday Cat for the occasion.


I started off by stamping my images on 80lb Neenah solar white cardstock using an alcohol marker friendly black ink, I cut them using the coordinating dies, and colored everything using my Graph'it brush markers and Spectrum Noir Illustrator markers.

Here is the detailed list of the stamp sets I used: ● Birthday Cat for the kitty cupcakes, cats, small cupcake and party hat ● Balloon Rides for a banner ● Special Day for the hearts.


Next I cut three gold glitter "Happy" using a Treat Bag Topper die, and white heat embossed three "purrthday" from Birthday Cat on dark grey banners. And I also cut three postage stamp frames using a Gift Card Envelope die.


I cut three envelopes out of different Spring Sunburst papers using the main Gift Card Envelope die, and because I wanted to add images on the front of the envelopes but with a muted background, I also cut three 3,25 x 2 inches vellum panels. I attached a few items on each of those vellum panels: a "happy" word + a "purrthday" banner + cupcake postage stamp + images using 1mm foam squares and liquid glue, and then I stuck a vellum panel on the front of each envelope using liquid glue.


Next I created three mini birthday cards to put inside each of my envelopes. I cut three 3,25 x 2 inches Dots & Stripes Pastels panels, and three 3 x 1,75 inches vellum panels. I white heat embossed a different greeting from Birthday Cat on each vellum panel, attached the remaining images on the vellum panels using 1mm foam squares, and then stuck the vellum panels on the bigger panels using liquid glue. As always I finished my projects by adding highlights and details to the images using a white gel pen, and I also added glitter to each heart for a sparkling touch.


SUNNY STUDIO SUPPLIES
- Gift card envelope die set
- Treat bag topper die set
- Birthday cat stamp set
- Balloon rides stamp set
- Special day stamp set
- Dots & stripes pastels 6x6 paper pack
- Spring sunburst 6x6 paper pack


OTHER SUPPLIES
- Spectrum Noir Illustrator markers
- Graph'it brush markers
- Sakura white gel pen
- Vellum by Lawn Fawn
- Jet black ink by Lawn Fawn
- Clear embossing ink by Lawn Fawn
- Fine white embossing powder by Hero Arts
- Morning dew nuvo drops
- 80lb Neenah solar white cardstock (images)
- Gold glitter cardstock by Concord & 9th
- Grey cardstock by Lawn Fawn

Pretty Pink Posh - Valentine Train

lundi 22 janvier 2024

Hello there,

I'm thrilled to be back with this Valentine card showcasing the ever so cute Valentine Train, brand new from the Pretty Pink Posh Valentine 2024 Release, it's such an amazing new stamp set, and a great addition to the Pretty Pink Posh catalog!


I started off by stamping all the images from Valentine Train on 80lb Neenah solar white cardstock using an alcohol marker friendly black ink, I cut them all using the matching dies, and colored everything using my alcohol markers using a salmon + red + brown color palette which I like a lot! And to make my card even cuter, I also stamped and colored a kitty from Cuddly Cats that I fussy cut to fit inside the empty wagon.


Next I cut a Pierced Hearts panel out of Strathmore bristol smooth cardstock, and I wanted my background to contrast with the images, so I colored the panel using tumbled glass and broken china oxide inks. I mixed some broken china oxide ink with water and used a small brush to make splatters on the paper, and then did the same with copic opaque white ink.

I white heat embossed my "I choo choo choose you" greeting from Valentine Train on black cardstock and trim it into a scalloped banner using a Sentiment Strips die, attached it in the middle of the panel using 1mm foam squares, and then stuck my images using 1mm foam squares as well.


To finish my card, I added highlights and details to the images using a white gel pen, and applied some morning dew nuvo drops on the hearts to make them sparkle.


PRETTY PINK POSH SUPPLIES
- Valentine train stamp set
- Cuddle cats stamp set
- Pierced hearts die
- Sentiment strips die set


OTHER SUPPLIES
- Spectrum Noir Illustrator markers
- Graph'it brush markers
- Sakura white gel pen
- Copic opaque white ink
- Morning dew nuvo drops
- Jet black ink by Lawn Fawn
- Clear embossing ink by Lawn Fawn
- 80lb Neenah solar white cardstock (images)
- Strathmore bristol smooth cardstock (background)
- Black licorice cardstock by Lawn Fawn

Sunny Studio - Bighearted Bears Rainbow Card + Matching Treat Bag Topper

vendredi 19 janvier 2024

Hello there,

I'm super happy to be back on Sunny Studio's blog with this lovely card and cute matching Treat Bag Topper showcasing the adorable pandas from Bighearted Bears. Love those little guys so much!


I started off by stamping all my images on 80lb Neenah solar white cardstock using an alcohol marker friendly black ink, I cut them all using the matching dies, and colored everything using my alcohol markers. And because pandas have neutral colors, I decided to go for a whole rainbow theme. Along with Bighearted Bears, here are the other stamp sets I used: ● Lovable llama - bow ● Panda Party - banners ● Special Day - hearts.


Next I worked on the card, and started by cutting several elements to build my little background. I cut a 5,5 x 4,25 inches Dots & Stripes Pastels blue polka dot panel, a Comic Strip Speech Bubble frame out of an Amazing Argyle wooden textured pattern paper, and another frame out of a Dots & Stripes Pastels green stripe paper. I kept the four inside pieces of that green stripe paper, and used the grass border die from Picket Fence to cut four small grass sections.


I attached my wooden frame on the blue polka dot panel using 1mm foam squares, and added the grass borders using the same adhesives. I white heat embossed my "Love you beary much" greeting from Bighearted Bears on the upper part of the bottom left hand square, and then attached all my images using 1mm and 2mm foam squares. Added morning dew nuvo drops on the hearts, and highlights on the images using a white gel pen, and moved on to the Treat Bag Topper. I used the Treat Bag Topper main die three times to cut the different parts of my little landscape out of the same pattern papers as before, assembled everything using liquid glue, and attached my images using 1mm foam squares.


SUNNY STUDIO SUPPLIES
- Bighearted bears stamp set
- Lovable llama stamp set
- Panda party stamp set
- Special day stamp set
- Treat bag topper die set
- Comic strip speech bubble die set
- Picket fence die set
- Dots & stripes 6x6 paper pack
- Amazing argyle 6x6 paper pack


OTHER SUPPLIES
- Spectrum Noir Illustrator markers
- Graph'it brush markers
- Sakura white gel pen
- Morning dew nuvo drops
- Clear embossing ink by Lawn Fawn
- Fine white embossing powder by Hero Arts
- 80lb Neenah solar white cardstock (images)

Lawn Fawn - Lots Of Hearts Week - Swan Soirée Ta-Da Diorama

jeudi 18 janvier 2024

Hi there,

I'm so happy to be back today on Lawn Fawn YouTube Channel & Blog for the Lots Of Hearts Week with this sweet and lovely Ta-Da Diorama featuring the cute swans from Swan Soirée, which I barely used since they were released a few years ago, so it was nice to bring them back.


I started off by cutting all the pieces I needed to build my diorama, and then assembled everything. Please watch the video down below to see the whole process.


I stamped my images on  80lb Neenah solar white cardstock using Jet Black ink, cut them all using the coordinating dies, and colored everything using my alcohol markers. Once the coloring was done, I attached some of them directly on the back using 1mm foam squares, next some images on the hills using liquid glue, and finally on the frame using foam squares again.


I die cut a Simple Wavy Banner out of Chocolate Bar cardstock, white heat embossed my "Wishing you a lifetime of happiness" greeting from Swan Soirée on top, and attached it right above the heart window using 1mm foam squares. I used a Double Slider Surprise die to cut two handles out of the same dark brown cardstock, attached them on both sides of the diorama, stuck my diorama on a card base, and then added morning dew nuvo drops to the hearts to make them sparkle.


VIDEO


LAWN FAWN SUPPLIES

Stamp sets
- Swan soirée
- Toadally awesome
- Wood you be mine
- So dam much
- Porcu-pine for you
- Porcu-pine for you add-on

Die sets
- Ta-da diorama
- Ta-da diorama hillside inserts
- Ta-da diorama heart window add-on
- Simple wavy banner
- Stitched hillside border
- Double slider surprise

Cardstock & papers
- Light brown woodgrain cardstock
- Chocolate bar cardstock
- White cardstock
- Fruit salad pattern paper
- What's sewing on pattern paper
- Spiffy speckles pattern paper

Misc
- Jet black ink
- Clear embossing ink
- White embossing powder


OTHER SUPPLIES
- Spectrum Noir Illustrator markers
- Graph'it brush markers
- Sakura white gel pen
- Morning dew nuvo drops
- 80lb Neenah solar white cardstock

Pretty Pink Posh - Heart Cover Plate Duo

lundi 15 janvier 2024

Hello there,

I'm so happy to be back with this duo of Pretty Pink Posh Heart Cover Plate cards which are totally screaming Valentine's Day. I actually had the gorgeous Cupid & Co 6x6 paper pack by Echo Park in my stash, and decided to make a good use of it by creating a set of cards.


I started off with the shaker card, and cut my Heart Cover Plate panel out of a floral pattern paper. I put the inside hearts aside for later, and only kept the panel with six heart openings. I attached an acetate panel at the back of it, added foam strips on the four edges and between the window openings as well, and poured some Valentine Hearts Confetti and 3mm Sparkling Clear Sequins inside the six windows.

I cut a 5,5 x 4,25 inches panel using a less bold pattern paper from the pack, removed the backing papers off the foam strips, and attached that panel on the foam strips to close my shaker panel.


Next I decorated the front of my panel. I first cut a frame out of kraft cardstock using a rectangle frame die from my stash, and attached it using 1mm foam squares. I also cut five tiny bows using a die from Heart Cover Plate and a bigger one using a die from Holiday Mug Additions, and I stuck those pieces to my panel using 1mm foam squares.


For my greeting, I used the Be Mine Shadow dies, and cut the words "Be mine" out of gold mirror cardstock, as well as the shadow out of vellum. I layered and glued both pieces on top of each other, and then attached my greeting in the middle of my panel using 1mm foam squares to finish my card.

*****

Next I moved on to the second card, and cut a Heart Cover Plate panel out of a light pink pattern paper from the Cupid & Co 6x6 paper pack by Echo Park. I attached that panel on a white card base using liquid glue, grabbed the remaining floral hearts from the first card, and stuck them on three of the blank heart spots using 1mm foam squares.


I used the Heart Cover Plate die again to cut three more hearts out of red cardstock that I attached on my panel on the three remaining blank heart spots. I cut another rectangle frame out of kraft cardstock that I stuck on my panel using 1mm foam squares. I did the same as before about my greeting and about the bow decorations, and then finished this second card by gluing a few 3mm Sparkling Clear Sequins and Valentine Heart Confetti here and there.


PRETTY PINK POSH SUPPLIES
- Heart cover plate die
- Valentine hearts confetti
- Be mine shadow die
- Holiday mug additions
- 3mm sparkling clear sequins


OTHER SUPPLIES
- Cupid & Co 6x6 paper pack by Echo Park
- Paper bag cardstock by Lawn Fawn
- Gold mirror cardstock from my stash
- Vellum by Lawn Fawn

Sunny Studio - Love Monkey Shaker Card + Matching Treat Bag Topper

jeudi 11 janvier 2024

Hello there,

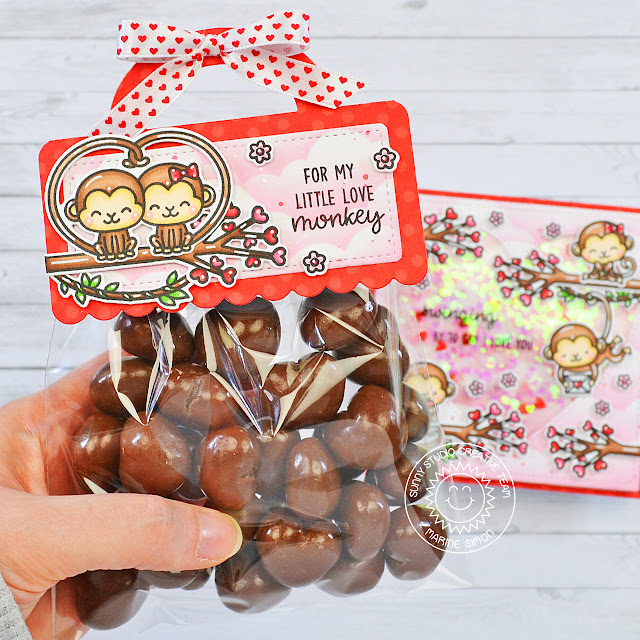
I'm so thrilled to be back on Sunny Studio's blog with my first Sunny Studio project of the year, and I'm so excited about the new items from the Spring 2024 release! As you may or may not know, I am for mixing and matching new stuff with older stuff. Here my new stuff is the Treat Bag Topper, and my older stuff is Love Monkey, which I used for the very first time, and that was so fun!


As very often, I started off with the coloring and stamped all my images on 80lb Neenah solar white cardstock using an alcohol marker friendly black ink. I cut them all using the coordinating dies, and used my Spectrum Noir Illustrator markers and Graph'it brush markers to color everything. And as you can see, I went for traditional Valentine colors ^^


Next I cut two identical Strathmore bristol smooth square panels and colored them both using a cloudy stencil along with spun sugar and worn lipstick oxide inks. I kept one of those two panels and cut a heart window out of it using the largest Stitched Heart 2, attached a piece of acetate at the back, on the front I stamped my "Swinging by to say I love you" greeting from Love Monkey on the acetate using black Stazon ink, and at the back of my panel I added foam strips all along the heart window, following its shape, and on the four sides as well. I poured some iridescent heart confetti and Red & Pink Heart Confetti on the acetate, and then stuck my second cloudy panel to the foam strips to totally close my shaker.


I attached my shaker panel on a larger red panel from Holiday Cheer, and stuck my images using 1mm foam squares. Added highlights and details to the images using a white gel pen, and then moved on to the Treat Bag Topper.

I started off by cutting the small stitched panel out of Strathmore bristol smooth cardstock and colored it the same way as my card using spun sugar and worn lipstick oxide inks. I stamped my "For my little love monkey" greeting from Love Monkey on the right side, cut the main Treat Bag Topper piece out of the same red Holiday Cheer paper as before, and attached my small stitched panel on the main piece using liquid glue. I stuck the images using 1mm foam squares, added highlights and details using a white gel pen, and finally added a cute little bow on the handle.


SUNNY STUDIO SUPPLIES
- Love monkey stamp set
- Treat bag topper die set
- Stitched heart 2 die set
- Holiday cheer 6x6 paper pack
- Red & pink heart confetti


OTHER SUPPLIES
- Spectrum Illustrator markers
- Graph'it brush markers
- Oxide inks: spun sugar, kitsch flamingo
- Copic opaque white ink
- Sakura white gel pen
- Jet black ink by Lawn Fawn
- Black stazon ink
- Iridescent heart confetti by Studio Katia
- Strathmore bristol smooth cardstock (background)
- 80lb Neenah solar white cardstock (images)

Pretty Pink Posh January 2024 Release Instagram Hop - Sweet Chocolates

mardi 9 janvier 2024


Hi there,

Join me and a bunch of amazingly talented crafters over on Instagram to celebrate the brand new Pretty Pink Posh January 2024 Release! Chocolates, cupcakes and hearts, everything you need for Valentine, and also some adorable St Patrick themed products!

Please check my post on Instagram for more details about this hop.

*****


I started off by stamping my images on 80lb Neenah solar white cardstock using an alcohol marker friendly black ink, I cut them all using the matching dies, and then colored everything using my alcohol markers. Lots of red, light pinks and browns! Along with the images from Sweet Chocolates, I picked one of the cupcakes from Valentine Cupcakes.


Once the coloring was done, I cut a 5,5 x 4,25 inches Strathmore bristol smooth panel, and colored it using tumbled glass and broken china oxide inks. And to make this background more interesting, I used the Layered Heart Lattice stencils along with broken china oxide ink again. I mixed some broken china oxide ink with water and used a small brush to add splatters to my panel, and then did the same with copic opaque white ink.

Next I created a two-part greeting using stamps from Sweet Chocolates. I white heat embossed the word "Sweet" on black cardstock, and cut it using the matching die. I also white heat embossed the words "You are" on light pink cardstock, and trimmed it into a slim banner using a Sentiment Strips die.


I attached everything on my Layered Heart Lattice panel using 1mm foam squares, added highlights and details to the images using a white gel pen, and finished the card by applying some morning dew nuvo drops on the hearts for a sparkling touch.


PRETTY PINK POSH SUPPLIES
- Sweet chocolates stamp set
- Valentine cupcakes stamp set
- Layered heart lattice stencils
- Sentiment strips die set


OTHER SUPPLIES
- Spectrum Noir Illustrator markers
- Graph'it brush markers
- Oxide inks: tumbled glass, broken china
- Sakura white gel pen
- Copic opaque white ink
- Black licorice cardstock by Lawn Fawn
- Light pink cardstock by The Stamp Market
- Morning dew nuvo drops
- 80lb Neenah solar white cardstock (images)
- Strathmore bristol smooth cardstock (background)

Lawn Fawn - Party Deer Birthday Card

samedi 6 janvier 2024

Hi there,

I'm back on Lawn Fawn YouTube Channel & Blog with my very first Lawn Fawn card of the year featuring two of my favorite things in card making which are doing a landscape using stencils, and mixing and matching a bunch of images from different sets to create a super cute scene. And I'm showcasing the super cute Party Deer, which is the exclusive free gift you can get at Lawn Fawn during the month of your birthday.


I started off by cutting a 5,5 x 4,25 inches Strathmore bristol smooth panel that I colored using stencils and oxide inks. On the lower part of the panel, I created two grass borders using a Hillside stencil along with mowed lawn and rustic wilderness oxide inks. And on the upper part, I created a forest using a Birch Tree stencil along with salvaged patina and peacock feathers oxide inks.


I stamped my images using Jet Black ink, used the matching dies to cut them all, and colored everything using my alcohol markers. I also stamped five different greetings inside the speech bubbles, and white heat embossed my "Happy birthday, my deer" greeting from Party Deer at the bottom of my panel.and I'm going to color everything using my alcohol markers.


Next I assembled and attached all the images on my panel using 1mm and 2mm foam squares, and as always finished my card by adding highlights and details to the images using a white gel pen.


VIDEO


LAWN FAWN SUPPLIES

Stamp sets
- Party deer
- Simply celebrate critters
- Simply celebrate critters add-on
- Simply celebrate winter critters
- Simply celebrate winter critters add-on
- Ocean shell-fie
- Yappy birthday
- Porcu-pine for you
- Butterfly kisses
- You goat this
- Bicycle built for you
- Oh gnome
- Toadally awesome
- Birthday before 'n afters

Die sets
- Large stitched rectangle stackables

Misc
- Birch tree stencil
- Hillside stencils
- Jet black ink
- Clear embossing ink
- White embossing powder


OTHER SUPPLIES
- Spectrum Noir Illustrator markers
- Graph'it brush markers
- Oxide inks: mowed lawn, rustic wilderness, salvaged patina, peacock feathers - Sakura white gel pen - Copic opaque white ink - 80lb Neenah solar white cardstock (images) - Strathmore bristol smooth cardstock (background)