Sunny Studio - A Garden Scene With Build A Bowl

jeudi 30 mai 2024

Hello there,

I'm thrilled to be back on the Sunny Studio blog with this lovely card featuring Build A Bowl. As very often I mixed and matched items from different sets, and instead of using the bowl with fruits (which I'll certainly do in the coming weeks ^^), I turned it into a planter to create a sweet garden scene.


The first thing I did was create a stenciled background that would match my garden theme nicely. I cut a kraft panel using the largest Stitched Square die, and used a stencil from my stash along with white pigment ink, and shabby shutters, mowed lawn, spun sugar and worn lipstick oxide inks to make a pretty lattice. I mixed some vintage photo oxide ink with water and used a small brush to add splatters to my panel, and then did the same with copic opaque white ink.


Next I cut a scalloped square out of light brown woodgrain cardstock using the second largest Scalloped Square 1 Large die, and turned it into a frame by cutting an opening out of it using the third largest Stitched Square die. I applied a little bit of vintage photo oxide inks on the edges, and attached my scalloped frame on the stenciled panel using 1mm foam squares.

I picked all the bits and pieces from different die sets, cut them out of colored cardstock, and used oxide inks to add shadows and more interest to each element. Here is a detailed list of the products I used: • Build A Bowl for the planter • Mini Grass Border for the grass • Build A Birdhouse for the birdhouse, birds, pole • Spring Garden for the tulips • Winter Greenery for the tall leaves. I attached everything on my panel, starting with the bowl and grass, and then added all the remaining pieces using 1mm and 2mm foam squares, as well as liquid glue.


For my greeting, I started off by cutting the different Brilliant Banner 1 components out of dark gray cardstock and black cardstock. I white embossed "For my tweet friend" from Little Birdie on the front piece, assembled the whole banner using 1mm foam squares and liquid glue, and attached it below the planter using 1mm foam squares again. Finally I added a black dot to each bird's eye, and highlights and details to most of the elements using a white gel pen.


SUNNY STUDIO SUPPLIES
- Build a bowl die set
- Stitched square die set
- Scalloped square 1 large die set
- Mini grass border die set
- Build a birdhouse die set
- Spring garden die set
- Brilliant banner 1 die set
- Little birdie stamp set


OTHER SUPPLIES
- Oxide inks: shabby shutters, mowed lawn, spun sugar, worn lipstick, vintage photo
- White pigment ink by Simon Says Stamp
- Copic opaque white ink
- Sakura white gel pen
- Clear embossing ink by Lawn Fawn
- Fine white embossing powder by Hero Arts
- Layered floral vines stencils by Pretty Pink Posh
- Colored cardstock by The Stamp Market + Lawn Fawn
- Kraft cardstock by Lawn Fawn

Pretty Pink Posh - Big 4th of July Celebration Cupcake

lundi 27 mai 2024


Hello there,

I'm so happy to share with you this bright and bold 4th of July card showcasing the amazing Big Celebration Cupcake die set from the Pretty Pink Posh May 2024 Release. I usually don't make many of those cards when that time of the year comes, so I decided to go for a whole traditional red, white and blue color palette, I added holographic and sparkling details, and had the most fun!


I started off by cutting a Stitched Torn Rectangle panel out of Strathmore bristol smooth cardstock, and colored it using three shades of blue oxide inks. I first applied tumbled glass right in the center of my panel, next I added salty ocean on the edges and blended it into the tumbled glass section, and I added a little bit of prize ribbon on the edges that I blended into the salty ocean section.


I splattered water on my panel, and dried it using a paper towel. I also mixed some prize ribbon oxide ink with water, used a small brush to add more splatters on my panel, and then did the same with copic opaque white ink. And finally I used the starry stencil from the Spooky Sky stencil pack along with white stenciling paste to add an extra USA touch to my panel.


Next I cut all the bits and pieces out of colored cardstock. As I was saying, I used a red, white and blue color palette to totally embrace this 4th of July theme, and added holographic details on the fireworks and rockets' tails. And for some variation, I brought some light blue accents with the banners and stars on the cupcake wrapper. I used most of the Big Celebration Cupcake dies, as well as the cake, banner and "Celebrate" dies from Big Birthday Cupcake.


I assembled the fireworks and rockets using liquid glue, and attached everything on my panel using 1mm and 2 foam squares. Next I cut a 5,5 x 4,25 inches red and white stripe pattern paper, attached it to a white card base, and then stuck my cupcake panel on top using liquid glue again. As always I added highlights and details to my die-cut pieces using a white gel pen, and next added the last final details: a bunch of Iridescent Mini Star Confetti all around the cupcake, sprinkles on the whipped cream from the Bright Rainbow Clay Confetti pack, and white blizzard nuvo drops on the fireworks and rockets' stars.


PRETTY PINK POSH SUPPLIES
- Big celebration cupcake die set
- Stitched torn rectangle die set
- Big birthday cupcake die set
- Spooky sky starry stencil
- Iridescent mini star confetti
- Bright rainbow clay confetti


OTHER SUPPLIES
- Oxide inks: tumbled glass, salty ocean, prize ribbon
- Colored cardstock by The Stamp Market
- Holographic cardstock by Lawn Fawn
- White cardstock by Lawn Fawn
- Let It Shine Red & white stripe pattern paper by Lawn Fawn
- Sakura white gel pen
- White blizzard nuvo drops
- Strathmore bristol smooth cardstock (background)

Pretty Pink Posh - Decorative Hexagons Layering Stamps + Bee Friends

samedi 25 mai 2024

Hi there,

I'm super happy to be back with this fun and bright friendship card showcasing two new products from the Pretty Pink Posh May 2024 Release: the Decorative Hexagons stamp set and the Fancy Lattice stencil. And those beautiful hexagons definitely reminded me of bees, so I brought the Bee Friends back!


I started off by creating my background on a 5,5 x 4,25 inches Strathmore bristol smooth panel. I first covered the entire panel with salvaged patina oxide ink to get a nice aqua base, and then I used the Fancy Lattice stencil along with peacock feathers oxide ink to create a beautiful pattern on my piece of paper. I also added a little bit of peacock feathers oxide ink on the four edges of my panel, and then added texture. I first splattered water that I dried using a paper towel, next I mixed some peacock feathers oxide with water and used a small brush to add more splatters, and I did the same with black soot oxide ink and with copic opaque white ink.


I set my panel aside to dry, and stamped three Bee Friends on 80lb Neenah solar white cardstock using an alcohol marker friendly black ink. I cut them using the matching dies, and colored them using my alcohol markers. I used a white gel pen to add highlights and details to my three little bees, and applied white blizzard nuvo drops on their wings to make them sparkle. And I also white heat embossed three trails on vellum, cut them using the matching dies, and set those pieces aside for later.

Next I stamped multiple Decorative Hexagons outlines on 80lb Neenah solar white cardstock using the same black ink as the bees, and started off by "coloring" those hexagons using the solid images along with Lawn Fawn Merman dye ink, and I stamped the patterns using Lawn Fawn Peacock dye ink. I cut my hexagons using the matching dies, attached them all on my Fancy Lattice panel using 1mm foam squares, along with the bees and trails, leaving enough space for my greeting.


Speaking of which, I started off by cutting the Friend Shadow word out of gold glitter cardstock. Next I white heat embossed "Love you bunches" from Hedgehog Friends on black cardstock, trimmed it into a slim banner using a Sentiment Strips die, and then attached both pieces on my panel using 1mm foam squares. I finished my card by adding Onyx Black Pearls here and there, as well as a red heart from the Valentine Hearts clay confetti pack right above the "i" in "Friend".


PRETTY PINK POSH SUPPLIES
- Decorative hexagons stamp set
- Bee friends stamp set
- Hedgehog friends stamp set
- Friend shadow die
- Sentiment strips die set
- Fancy lattice stencil
- Black onyx pearls
- Valentine hearts clay confetti


OTHER SUPPLIES
- Spectrum Noir Illustrator markers
- Graph'it brush markers
- Oxide inks: salvaged patina, peacock feathers, black soot
- Copic opaque white ink
- Sakura white gel pen
- White blizzard nuvo drops
- Jet black ink by Lawn Fawn
- Clear embossing ink by Lawn Fawn
- Fine white embossing powder by Hero Arts
- Gold glitter cardstock by Concord & 9th
- Black licorice cardstock by Lawn Fawn
- Vellum by Lawn Fawn
- 80lb Neenah solar white cardstock (images + hexagons)
- Strathmore bristol smooth cardstock (background)

Sunny Studio - Mermaid Kisses Underwater Rainbow Shaker Card

jeudi 23 mai 2024

Hello there,

I'm so happy to be back on Sunny Studio's blog with this bright underwater card featuring the amazing Summer Jar Mug that I paired with the gorgeous mermaid from Mermaid Kisses. When I first saw those mermaids, I knew I'd be rainbow coloring them at some point, so here we are!


As very often, I stamped my images on 80lb Neenah solar white cardstock using an alcohol marker friendly black ink, I cut them using the matching dies, and colored everything using my Spectrum Noir Illustrator markers and my Graph'it brush markers using my favorite rainbow combo: pink, orange, yellow, lime, aqua, purple.

Here is a detailed list of the stamp sets I used:  Mermaid Kisses: mermaids, seaweeds, starfish, stars and shells  Magical Mermaids: bubbles, seaweeds, small fish  Best Fishes: clown fish, seaweeds


Next I created a Summer Jar Mug shaker, and here are the different steps to build it:
1. Cut a jar frame out of holographic cardstock, cut a whole jar out of acetate, and stick the holographic frame on the acetate jar using liquid glue
2. Cut more jar frames, and attach them on the acetate (the number of extra frames depends on the thickness of the shaker accessories, for my seed beads and confetti, I cut and attached five extra jar frames)
3. Cut a whole jar out of pearlescent vellum, and stick a mermaid as well as a couple of seaweeds on the vellum using liquid glue
4. Pour shaker accessories on the acetate
5. Attach the pearlescent vellum jar to the jar frame to totally close the shaker


For my background, I went for an underwater rainbow background to match the mermaids and fish. I cut a 5,5 x 4,25 inches Strathmore bristol smooth panel, and started off by creating a sand border at the bottom using a hillside stencil from my stash along with antique linen and vintage photo oxide inks. I mixed some vintage photo oxide ink with water and used a small brush to make splatters on the sand border, and then I colored the upper part of my panel using, from top to bottom, kitsch flamingo, dried marigold, squeezed lemonade, twisted citron and salvaged patina oxide inks.


Next I used a wavy stencil from my stash along with, from top to bottom, picked raspberry, carved pumpkin, mustard seed, mowed lawn, peacock feathers oxide inks to make my rainbow background more interesting. I mixed some wilted violet oxide ink with water, and then some black soot oxide ink, and used a small brush to make more splatters on my panel. And then I did the same with copic opaque white ink to add more brightness.


Once my panel was dry, I white heat embossed my "You mermaid to be awesome" greeting from Mermaid Kisses, and attached everything (images and shaker jar) using 1mm and 2mm foam squares. I added white blizzard nuvo drops on the bubbles to make them sparkle, and finished my card by adding highlights and details to the images using a white gel pen.


SUNNY STUDIO SUPPLIES
- Mermaid kisses stamp set
- Magical mermaids stamp set
- Best fishes stamp set
- Summer jar mug die set


OTHER SUPPLIES
- Spectrum Noir Illustrator markers
- Graph'it brush markers
- Oxide inks: kitsch flamingo, picked raspberry, dried marigold, carved pumpkin, squeezed lemonade, mustard seed, twisted citron, mowed lawn, salvaged patina, peacock feathers, wilted violet, black soot
- Copic opaque white ink
- Sakura white gel pen
- White blizzard nuvo drops
- Jet black ink by Lawn Fawn
- Clear embossing ink by Lawn Fawn
- Fine white embossing ink by Hero Arts
- Hillside stencil by Lawn Fawn
- Wavy lines stencil by My Favorite Things
- Iridescent confetti by Studio Katia
- Seed beads by Pretty Pink Posh
- Holographic cardstock by Lawn Fawn
- Pearlescent vellum by Lawn Fawn
- 80lb Neenah solar white cardstock (images)
- Strathmore bristol smooth cardstock (background)

Lawn Fawn - Double Slider Surprise Birthday Card

mardi 21 mai 2024

Hello there,

I'm thrilled to be back on the Lawn Fawn YouTube Channel & Blog with this Double Slider Surprise card showcasing two of my favorite new products from the Summer 2024 Release: the Treat Cart stamp set, and the Pint-Sized Patterns Summertime 6x6 Papers. The Double Slider Surprise used to be my favorite interactive die (it's been dethroned by the Ta-Da Diorama die set and the Platform Pop-Up die set since then ^^), so I had a lot of fun making this new interactive scene.


I started off by stamping all the images on 80lb Neenah solar white cardstock using Jet Black ink, I cut them all using the matching dies, and colored everything using my alcohol markers, using the beautiful diagonal stripe paper from the Pint-Sized Patterns Summertime 6x6 paper pack as an inspiration.

Here is a detailed list of the stamp sets I used:  Treat Cart + Treat Cart Add-On for most of the images  Coaster Critters + Coaster Critters Flip-Flop for the roller-coaster, train, critters, booth, balloon  All The Speech Bubbles for the speech bubbles and greetings  All The Clouds for the clouds and sun


Once the coloring was done, I stamped the greetings inside the speech bubbles, as well as the flavors on the shop signs, and then I cut and assembled my Double Slider Surprise pieces. I invite you to watch the process video down below for more details.

Before closing the pocket, I attached images on both side panels using liquid glue to keep everything as flat as possible. Next I closed the pocket, and stuck images on the middle panel using 1mm and 2mm foam squares.


Next I cut a Large Stitched Rectangle Stackable panel out of the Pint-Sized Patterns Summertime 12x12 diagonal stripe paper, a Scalloped Rectangle Stackable panel out of a Pint-Sized Patterns Summertime 6x6 paper, and a white panel using the second Large Stitched Rectangle Stackables die. I layered and attached them on a white card base, and then stuck my Double Slider Surprise panel on top using 1mm foam squares.


I cut a Simple Wavy Banner out of another Pint-Sized Patterns Summertime paper, white heat embossed my "Have the happiest birthday ever" greeting from Treat Cart on top, and attached it below my interactive panel. And as always I finished my card by adding highlights and details to the images using a white gel pen.


VIDEO


LAWN FAWN SUPPLIES

Stamp sets
- Treat cart
- Treat cart add-on
- Coaster critters
- Coaster critters flip-flop
- All the speech bubbles
- All the clouds

Die sets
- Double slider surprise
- Stitched wavy border
- Large stitched rectangle stackables
- Scalloped rectangle stackables
- Simple wavy banner

Misc
- White cardstock
- Pint-sized patterns summertime petite papers
- Pint-sized patterns summertime 12x12 paper
- Jet black ink
- Clear embossing ink
- White embossing powder


OTHER SUPPLIES
- Spectrum Noir Illustrator markers
- Graph'it brush markers
- Sakura white gel pen
- 80lb Neenah solar white cardstock (images)

Pretty Pink Posh - Baby Animals Meadow Scalloped Box Card

dimanche 19 mai 2024

Hello there,

Most of the time, when I make a card, I like to go through my stash to pick a stamp here and another one there to create a cool mix & match of images. This is what I did for today's card. The focus here is on the cute bunnies from Baby Animals from the Pretty Pink Posh May 2024 Release, and I gathered images from different stamp sets (listed down below) to create a lovely meadow scene.


I started off by stamping the images on 80lb Neenah solar white cardstock using an alcohol marker friendly black ink, I cut them all using the matching dies, and colored everything using my Spectrum Noir Illustrator markers and my Graph'it brush markers. Once the coloring was done, I added highlights and details to the images using a white gel pen, and applied white blizzard nuvo drops on the bees wings to make them super shiny.

Here is a detailed list of the stamp sets I used:  Baby Animals for the bunnies  Woodland Critters for the deer, hedgehogs and mushrooms  Bee Friends for the bees  Easter Wreath for the flowers  Spring Flowers for the greenery


Next I built my Scalloped Box Card using kraft cardstock for the base, and pattern papers from the Fun On The Farm 6x6 paper pack by Echo Park for the inserts and decorative pieces. I attached the images inside the box card using liquid glue, and the ones on the sides using liquid glue and foam squares.

To make the bees fly, I started off by cutting three long and slim strips of acetate. I stuck a strip on each insert using 3mm glue dots, and attached a bee on the strip using 3mm glue dots again. And I trimmed the excess of acetate above each bee.


For my sentiment, I first white heat embossed "Baby" from Baby Animals on dark brown cardstock, cut it using the matching die and attached it on the front of the card using 1mm foam squares. I also white heat embossed "Welcome little one" from Sentiment Strips: Occasions on yellow cardstock, trimmed it into a slim banner using a Sentiment Strips die that I finally stuck below "Baby" using foam squares again.


PRETTY PINK POSH SUPPLIES
- Baby animals stamp set
- Bee friends stamp set
- Spring flowers stamp set
- Easter wreath stamp set
- Woodland critters stamp set
- Sentiment strips: occasions stamp set
- Sentiment strips die set
- Scalloped box card die set


OTHER SUPPLIES
- Spectrum Noir Illustrator markers
- Graph'it brush markers
- Sakura white gel pen
- Clear embossing ink by Lawn Fawn
- Fine white embossing powder by Hero Arts
- Fun on the farm 6x6 paper pack by Echo Park
- 80lb Neenah solar white cardstock (images)
- Kraft cardstock by Lawn Fawn (card base)

Sunny Studio - Summer Jar Mug & Ladybug Fairies

jeudi 16 mai 2024

Hello there,

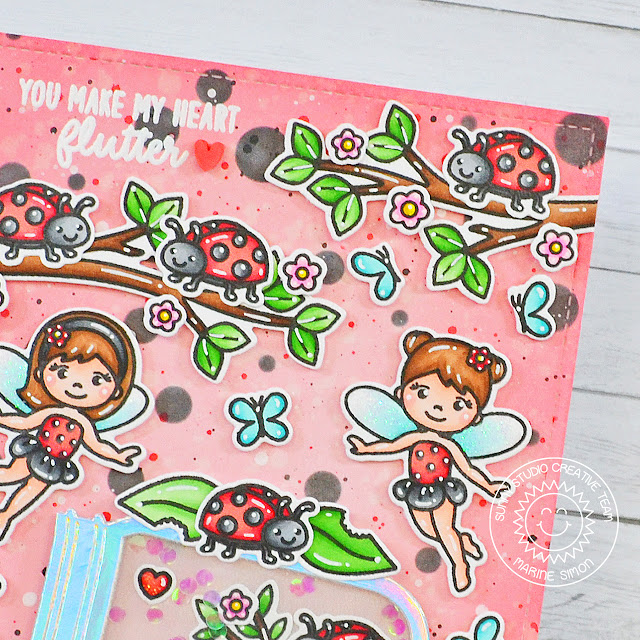
I'm thrilled to be back on Sunny Studio's blog with this lovely card featuring the jar from the Summer Jar Mug die set from the Summer 2024 release. I have so many ideas of cards to make with this new die set, and the first that came to my mind was this ladybug themed card with ladybug fairies, because I like to use them for all the seasons and for any theme. If you missed them, here are the previous Garden Fairy cards I made: Bee FairiesHalloween FairiesNight FairiesHoliday Fairies.


I started off by cutting a 5,5 x 4,25 inches Strathmore bristol smooth panel that I entirely covered with saltwater taffy oxide inks, with a little bit of festive berries oxide ink on the edges. To create a ladybug pattern, I used a bubble stencil from my stash along with black soot oxide ink to make black dots all over my panel. I splattered water on my piece of paper and dried it using a paper towel, mixed some festive berries oxide ink with water and added more splatters on my panel using a small brush, and then did the same with black soot oxide ink and with copic opaque white ink.


Next I cut another 5,5 x 4,25 inches bristol panel, cut two grass borders out of it using a Picket Fence die, and colored both of them using shabby shutters and mowed lawn oxide inks. I mixed some rustic wilderness oxide ink with water, and used my small brush again to make splatters on the grass borders, and did the same with copic opaque white ink.


I stamped all my images on 80lb Neenah solar white cardstock using an alcohol marker friendly black ink, cut them using the coordinating dies, and colored everything using my Spectrum Noir Illustrator markers and Graph'it brush markers. 

Here is a detailed list of the stamp sets I used: • Garden Fairy - two fairies • Garden Critters - ladybugs and leaves • Special Day - heart • Love Birds - flowers • Little Birdie - branches • Bunnyville - grass, butterflies, tulips • Outback Critters - small branch • Seasonal Trees - log


Next I worked on my Shaker Jar Mug, and started off by cutting the different pieces: one holographic jar frame for the front, one whole acetate jar, one whole pearlescent vellum jar for the back, and two white jar frames to create dimension inside the jar. I first attached some images directly on the pearlescent jar using liquid glue, making sure to leave enough space on the edges to attach the jar later on. I attached the acetate jar at the back of the holographic jar frame using liquid glue. Next I stuck both white jar frames to the acetate using liquid glue again. Poured some iridescent confetti inside the jar, and finally glued the pearlescent jar to close my shaker jar.


I attached everything on my ladybug panel, starting with the grass borders using 1mm foam squares. Next I stuck the jar using liquid glue at the bottom and 1mm foam squares at the top. And then I attached all the images using 1mm and 2mm foam squares, leaving enough space on the top left hand corner for my white heat embossed "You make my heart flutter" greeting from Garden Critters.

Finally I added highlights and details to the images using a white gel pen, applied white blizzard nuvo drops to the fairies wings to make them shine, and glued a tiny red clay heart next to my greeting for a last touch of cuteness.


SUNNY STUDIO SUPPLIES
- Shaker jar mug die set
- Picket fence die set
- Garden fairy stamp set
- Garden critters stamp set
- Special day stamp set
- Love birds stamp set
- Little birdie stamp set
- Bunnyville stamp set
- Outback critters stamp set
- Seasonal trees stamp set


OTHER SUPPLIES
- Spectrum Noir Illustrator markers
- Graph'it brush markers
- Oxide inks: saltwater taffy, festive berries, black soot, shabby shutters, mowed lawn, rustic wilderness
- Bubble background stencils by Lawn Fawn
- Copic opaque white ink
- Sakura white gel pen
- Red polymer clay heart by Dress My Craft
- Iridescent confetti by Studio Katia
- White blizzard nuvo drops
- Jet black ink by Lawn Fawn
- Clear embossing ink by Lawn Fawn
- Fine white embossing powder by Hero Arts
- Pearlescent vellum by Lawn Fawn
- Holographic cardstock by Lawn Fawn
- 80lb Neenah solar white cardstock (images)
- Strathmore bristol smooth cardstock (background)