Hello Bluebird - A Canadian Landscape

vendredi 28 février 2020

Hey there,


You know that I like to use my supplies for multiple purposes and the Ocean Scene die I used on this card is just perfect for this. I've already created a lagoon and a savannah in the past, and today, I hope you will like the Canadian landscape I've made.


I started by die cutting the background elements using the Ocean Scene die, as well as the Glacier Peaks die set to create a mountain border.


I colored the mountain border using weathered wood, faded jeans and chipped sapphire distress inks to color this element. Weathered wood has a subtle touch of blue in it so it blended very well with the two other colors.


Next I kept only one element from the Ocean Scene elements, and colored it using peeled paint and forest moss distress inks to create a grass border.

For the sky, I cut a bristol panel, and used a cloud stencil and tumbled glass distress ink. And for the lake, I used tumbled glass and peacock feather distress inks.


Next I attached the mountain border and grass border using foam tape to bring dimension to the scene.


Like always, all my images were stamped on Neenah solar white cardstock using memento tuxedo black ink. I cut them using the coordinating dies and colored them using my spectrum noir markers.


Finally, when everything was colored, I stamped my sentiment "Dropping you a line" on the cloud section using black versafine ink, and glued the mountain tops.


VIDEO
Below or here


HELLO BLUEBIRD SUPPLIES
- Ocean Scene die

- Glacier Peaks die set
- Fishin' Hole stamp + die sets
- Frosty Littles stamp + die sets


OTHER SUPPLIES
- Spectrum Noir markers
- Distress inks: weathered wood, faded jeans, peeled paint, forest moss, tumbled glass, peacock feathers
- Cloudy stencil by Lawn Fawn
- Strathmore bristol smooth cardstock (for the background elements)
- Neenah solar white cardstock (for the images)
- Sakura white gel pen
- Memento tuxedo black ink
- Black versafine ink

Lawn Fawn - Dandy Day Pull Tab Card

jeudi 27 février 2020

Hello there,

Today I'm sharing with you a pull tab card showcasing the brand new Dandy Day stamp set. This set is super cute with those sweet little mice and beautiful dandelions, and I also used some additional stamps to help me complete my scene so make sure to check the list of supplies at the end of this post if you need more details.


I cut a 5,5 x 4,25" stitched rectangle using a die from the Large Stitched Rectangle Stackables die set, and used tumbled glass distress ink and the new Cloudy stencil to create a soft sky. And I added texture by splattering the same ink on the paper using a thin brush.

To ground my scene, I cut a grass border using a die from the Simple Grassy Hillside die set and used shabby shutters and peeled paint distress inks to color it.


I stamped my images using Jet Black Ink and cut them using the coordinating dies. Images from the new Dandy Day stamp set, from the Tree Before n Afters stamp set, and from the Elphie Selfie stamp set.


I stamped my sentiment "I think you're dandy, and I'm not lion" on the grass border using Jet Black ink.


5. Next I created the pull tab mechanism using the Let's Toast Pull Tab Add-on die set. This process is easier to understand with the video so I encourage you to scroll down this post and to watch the video :-)

6. When it was done, I applied two layers of foam tape at the bottom of the panel, making sure not to touch the mouse, and I attached the grass border. Next I applied two layers of foam tape again but this time at the back of my panel that I stuck to a white card base.

7. Next I attached all the images using a combination of foam squares, Glue Dots and Liquid Glue.


8. I didn't want the mouse to go too high so I just attached dandelion sprigs right above the slit using a tiny piece of foam square.

9. Next I cut an arrow out of Sunflower cardstock and stuck at the top of the pull tab.

10. Finally, I added white nuvo drops in the center of each dandelion and flower.


VIDEO
Below or here

LAWN FAWN SUPPLIES

OTHER SUPPLIES
- Spectrum Noir markers
- Distress Inks: tumbled glass, shabby shutters, peeled paint
- Sakura white gel pen

Lawn Fawn - Magic Iris Space Card

mardi 25 février 2020

Hey there,

I'm back today with a new interactive card featuring the brand new Magic Iris die set and add-on, as well as some cute aliens. Like always you will find a list of the supplies below the video at the end of this post.


I started by cutting the main panel out of Strathmore bristol cardstock using the cover plate die from the Magic Iris add-on set. And to create the galaxy background, I used blueprint sketch, salty ocean, wilted violet and picked raspberry distress inks. Next I added texture on my panel: drops of water, drops of chipped sapphire distress ink to darken the panel a little bit, and finally drops of Liquid Stardust because every galaxy background needs shiny stars.


Next I created the Magis Iris mechanism and I highly encourage you to watch the video below to see the process, it's easier to understand with images ^^

When it was done, I applied double sided tape on the front of the Magic Iris ring, as well as liquid glue, I kept the iris closed, place it behind the galaxy panel making sure to align it with both of the circle in the middle and the tab at the top right hand corner. And I pressed down to attach the pieces together.


To ground my scene, I die cut a hill border using the cover plate die from the Magic Iris add-on and a Simple Stitched Hillside Border die and used hickory smoke and black soot distress ink to colors this element.


I did my sentiment in two steps. First, "Happy Birthday" (from the Birthday Before 'n Afters stamp set) that I white heat embossed on the border, and second "To my favorite earthling" (from the Beam Me Up stamp set) that I stamped using Jet Black ink below the first part.

The images I stamped using Jet Black ink and cut using the coordinating dies. They are from three different stamp sets: Super Star stamp set, Beam me up and Out of this world. And like always I colored everything using my alcohol markers.


When the coloring was done, I attached everything using foam squares and Liquid Glue.

For the last final touches, I added white highlights on the images, clear shimmer on all the stars, and next glossy accents on the spaceship as well as on the aliens eyes to make them glow.

VIDEO
Below or here

LAWN FAWN SUPPLIES

OTHER SUPPLIES
- Spectrum Noir markers
- Distress Inks: blueprint sketch, salty ocean, wilted violet, picked raspberry, hickory smoke, black soot
- Sakura white gel pen
- Clear shimmer pen by Spectrum Noir

Lawn Fawn - Magic Iris Baby Card

jeudi 20 février 2020

Hey there,

I'm so happy to be back with a new interactive card featuring the brand new Magic Iris die set as well as some cute images from previous releases.

(like always, all the supplies I will use in this video are listed at the end of the article)


I started by die cutting all my pieces: three rings, three sausage or balloon pieces that I cut out of vellum, three stabilizers, and one tab. For the entire Magic Iris mechanism, I encourage you to watch the video down below to see how it's done. It's way easier to understand how it works with images than a text ^^

Once the Magic Iris was done, I created the inside of the washing machine. And to do so, I simply traced the inside circle of the Magic Iris on a Neenah solar white panel using a pencil. I stamped some cute images from the Little Bundle stamp set using jet black ink inside the circle, I erased the pencil line, and colored the images and background using my alcohol markers in blue shades.


When the coloring was done, I used a white gel pen to add some details such as white highlights on the images and white dots on the blue background to give the illusion of tiny soap bubbles.

Next I placed the Magic Iris ring on my colored panel and traced all around it. I cut the circle, and stuck the ring on the circle by applying double sided tape on the three stabilizers.

 Next I cut a 5,5 x 4,25 inches stitched dark blue panel, as well as a light blue panel that I cut using the cover plate die from the Magic Iris add-on die set. I applied liquid glue at the back of the circle, I put this circle behind the light blue panel, making sure to align both the circle in the middle and the tab at the top right hand corner, and next I pressed down onto the dark blue panel to adhere my circle.


I also cut some extra piece: the floor out of white woodgrain cardstock and the baseboard out of Fog cardstock using a die from the Picket Fence Border die set. And I attach those two pieces at the bottom of my light blue panel to have a nice and clean floor.

Next I applied foam tape around the magic iris ring, making sure not to touch it and adhered the front panel to hide the mechanism. And to totally complete the Magic Iris, I cut the arrow out of Fog cardstock using a die from Magic Iris main die set and I glued this piece on the tab.


I stamped and colored additional images from the Loads of fun stamp set, and I created an opening on the washing machine using a circle die from my stash. And I cut a Stitched Circle Frame out of silver mirror cardstock that I glued on the washing machine to frame the door. Next I stuck the images using foam squares.


I split my sentiment in two part. The first part "A Little Bundle..." was stamped using Jet Black ink and the second part "In On The Way" was white heat embossed on Mermaid cardstock. I cut this second part of the sentiment using a die from the Everyday Sentiment Banner die set and attached it on my panel using foam squares.

And finally, for a last touch of cuteness, I added a few iridescent drops here and there to give the illusion of soap bubbles floating in the air.

VIDEO
Below or here

LAWN FAWN SUPPLIES

OTHER SUPPLIES
- Spectrum Noir markers - Iridescent Bubbles by Studio Katia - Sakura white gel pen - Silver mirror cardstock from my stash

Hello Bluebird - An African Savannah Safari

dimanche 16 février 2020

Hey there, 


Today's card features some cuties from the More Jungle Littles stamp set, as well as a few other stamp and die sets that helped me to create this lovely savannah scene.


I started by cutting a bristol panel measuring 8,5 x 4,5 inches. I created the sky using a homemade cloud stencil and tumbled glass distress ink.

Next I die cut my background elements using the Ocean Scene die, but kept only three pieces to build my scene. I colored the bottom piece using shabby shutters and peeled paint distress inks to get a faded green grass, and colored the two other elements using antique linen and gathered twigs to get sand/dirt borders.

I also cut a mountain border using a die from the Glacier Peaks die set that I colored using shabby shutters and peeled paint distress inks as well.


I wanted to have a river or a pond on my card so I colored a piece of bristol cardstock using broken China distress ink.


Once all my background elements were colored, I stuck them on my panel using double sided tape for the river/pond element, and foam tape for the other pieces.

And when the background was complete, I cut my sentiment Wild About You out of pattern paper, and also out of black cardstock. I attached the black sentiment under the patterned one to get a nice and thin shadow, and I stuck this whole element above my savannah scene using foam squares.


Next I moved on to the coloring part. I stamped and cut my images, and colored them using my alcohol markers, like always.

We can find baobab trees in the savannah and I wanted to have some on my card. So I searched my Hello Bluebird collection, looking for something that could work and thought that the trees from the Skating Pond die set would be perfect. I just had to cut one in half to get two small baobab tree trunks. And for the foliage, I cut two clouds using coordinating dies from the Fall Friends stamp set and Puddle Play stamp set.


Next I assembled the trees, and attached all the images using a combination of foam squares, liquid glue and glue dots. And finally I added a few clear sequins around the sentiment to fill the space.

VIDEO
Below or here

HELLO BLUEBIRD SUPPLIES
- Wild about you words die
- Ocean scene die
- Glacier peaks die set
- Skating pond die set
- More jungle littles stamp + die sets
- Portrait pals stamp + die sets
- Fishin' hole stamp + die sets
- Fall friends stamp + die sets
- Puddle play stamp + die sets

OTHER SUPPLIES
- Spectrum Noir markers
- Distress inks: antique linen, gathered twigs, shabby shutters, peeled paint, tumbled glass, broken china
- Sakura white gel pen
- Black cardstock by Lawn Fawn
- Pattern paper by American Crafts
- Neenah solar white cardstock
- Strathmore bristol smooth cardstock
- Sequins by Pretty Pink Posh

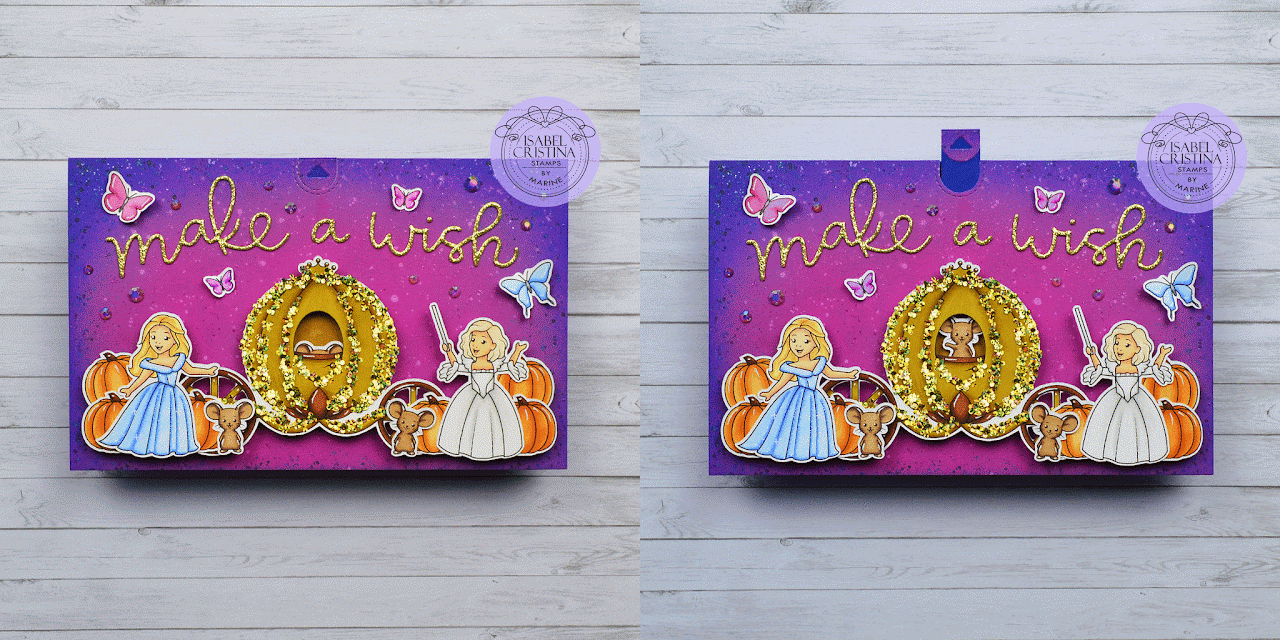
Isabel Cristina Stamps - Cinderbella - Pull Tab Card

mardi 11 février 2020

Hello there, 

Today's card features the gorgeous new Cinderbella digital stamp set designed by Isabel Cristina Stamps.I've made a magical interactive card and I hope you'll like it.


I started by created the background using seedless preserves, wilted violet and chipped sapphire oxide inks. I also splattered water on the panel, as well as a bunch a sparkly drops using liquid stardust by Lawn Fawn.


Like always, the images were printed on Neenah solar white cardstock and cut using my Scan 'n Cut machine. And my reference to color these images was the latest Cinderella movie with Lily James and Cate Blanchett.


To see how I created the entire pull tab mechanism, I invite you to watch the video below, it will be it's easier to understand ^^ When it was all done,  I used the arrow die to cut an arrow out of the remaining piece of purple sky and attached it at the very top of the pull tab. I applied foam squares at the back of the carriage and attached it on my panel. And then I applied foam tape at the back of the panel, making sure not to touch the pull tab mechanism, and I adhered the panel on a dark blue card base.


I attached my sentiment Make a wish above the carriage, and then I played with glitter. I applied liquid glue on the carriage where I wanted to have sparkles and I sprinkled the gold glitter on the glue.


When the messy glitter part was done, I adhered the other images, and finally I glued some crystal gems on the panel.

VIDEO
Below or here

SUPPLIES
- Let's toast pull tab add-on die set by Lawn Fawn
- Make a wish words die by Hello Bluebird
- Spectrum Noir markers
- Oxide inks: seedless preserves, wilted violet, chipped sapphire
- Liquid stardust by Lawn Fawn
- Gold glitter from my stash
- Iridescent crystals by Studio Katia
- Sakura white gel pen
- Gold glitter cardstock from my stash
- Neenah solar white cardstock (for the images)
- Strathmore bristol smooth cardstock (for the background)
- Blue jay cardstock by Lawn Fawn

Hello Bluebird - A Fairy House

vendredi 7 février 2020

Hello there,

For today's card, I've made a fairy house, an underground house like a hobbit house, with cute windows and flowers. Kind of a foretaste of Spring ^^


I first started by building the house. I used dies from the Grassy Knoll die set to cut two green grass borders but the color was a little bit to light to me so I applied a coat of mowed lawn oxide ink on the pieces. I also added shadows and contrast by applying vintage photo oxide inks at the top of the borders. And I created texture by splattering drops of vintage photo on the borders.


Next I die cut some elements to continue building the house: a door and its frame, two windows and their frames as well, four shutters and two window boxes. All those elements were cut using the Treehouse scene die set. And to make those pieces less flat, I used distress inks: vintage photo for the window boxes, and ground espresso for the door, windows and shutters.


I attached the door frame on the door base, did the same for the windows, and I also glued the window boxes at the bottom of each window.


For the background, I cut a 6 x 5 inches bristol panel, and applied tumbled glass oxide ink using a homemade cloud stencil. Next I stuck the bigger grass border using double sided tape, and the other border using foam tape in order to bring a little bit of dimension to the house.


I backed the door and windows using cream cardstock and then I attached those elements to finally create my fairy house. I applied tiny pieces of foam squares at the back of each shutter to give them dimension, and I used liquid glue to attach them against the window frames.


I stamped all my images off screen, using memento tuxedo black ink and colored them using my alcohol markers. When it was done, I still needed to color the fairies dresses, but I wanted to try something different than usual. So to create their dresses, I stamped the images again on three different pattern papers, fussy cut the dresses only and glued them on the matching fairy. And next I attached all the images using foam squares, glue dots and liquid glue.

I stamped my sentiment "Hello Spring" right in the middle of my sky background using black versafine ink. I added white highlights on the images, as well as white nuvo drops in the center of each flower, and also white blizzard nuvo drops on the fairies wings to make them shine and sparkle. And the last final step was to add grass details to the bottom border using mowed lawn oxide ink.


VIDEO
Below or here


HELLO BLUEBIRD SUPPLIES
- Treehouse scene die set

- Grassy Knoll die set

- Fairy garden stamp + die sets
- Storybook friends stamp + die sets
- Spring gatherings stamp + die sets
- Banner buddies stamp + die sets
- Strawberry jam stamp + die sets

OTHER SUPPLIES

- Spectrum Noir markers
- Oxide inks: tumbled glass, mowed lawn, vintage photo
- Distress inks: vintage photo, ground espresso
- Memento tuxedo black ink
- White nuvo drops by Tonic Studio
- White blizzard nuvo drops by Tonic Studio
- Sakura white gel pen
- Neenah solar white cardstock (for the images)
- Strathmore bristol smooth cardstock (for the background panel)
- Cilantro + Paper bag + Chocolat bar cardstocks by Lawn Fawn
- Yellow pattern paper from the Spring Fling 6x6 paper pack by Lawn Fawn