Sunny Studio - Tiki Bar Summer Scene

jeudi 29 février 2024

Hello there,

I'm so happy to be back on Sunny Studio's blog with this early taste of summer and lovely scene showcasing multiple items (listed down below), including the wooden flooring from Sprawling Surfaces that I used as a deck to ground my little scene.


I started off by stamping all my images on 80lb Neenah solar white cardstock using an alcohol marker friendly black ink, as always I used the coordinating dies to cut them all, and colored everything using my Spectrum Noir Illustrator markers and my Graph'it brush markers. I had so much fun going through my Sunny Studio collection to pick my stamps.

Here is a detailed list of what I used:  Sprawling Surfaces: wooden floor  Panda Party: pandas  Seasonal Trees: large palm tree, coconuts  Bunnyville: grass  Fabulous Flamingos: tropical leaves  Tiki Time: bar, toucans, torches, cocktails, greeting  Sending Sunshine: small palm tree


When the coloring was done, I cut a 4,5 x 4,5 inches Strathmore bristol smooth panel, and did a sunset scenery using stencils and oxide inks. On the bottom half of the panel, I created a sand border using a hillside stencil along with antique linen and vintage photo oxide inks. And on the upper part, I created a sunset sky. I first blended, from the top to the bottom, kitsch flamingo + dried marigold + squeezed lemonade oxide inks, and to make this part of the panel more interesting, I stenciled a tropical pattern on top using, from the top to the bottom, picked raspberry + carved pumpkin + mustard seed oxide inks.

As always, I added texture to my background. I started off by mixing some vintage photo oxide with water and used a small brush to make splatters on the sand border. Next I mixed some black soot oxide ink with water and added splatters on the tropical sky. And then I did the same with copic opaque white ink that I splattered all over the panel.


I set my panel aside for a few minutes, and once it was totally dry, I white heat embossed my "Aloha" greeting from Tiki Time at the very top of the panel, and then I attached all my images using a combination of 1mm + 2mm foam squares, liquid glue and 3mm glue dots. I finished my card by adding highlights and details to the images using a white gel pen.


SUNNY STUDIO SUPPLIES
- Sprawling surfaces stamp set
- Panda party stamp set
- Seasonal trees stamp set
- Bunnyville stamp set
- Fabulous flamingos stamp set
- Tiki time stamp set
- Sending sunshine stamp set


OTHER SUPPLIES
- Spectrum Noir Illustrator markers
- Graph'it brush markers
- Oxide inks: kitsch flamingo, picked raspberry, dried marigold, carved pumpkin, squeezed lemonade, mustard seed, black soot
- Tropical leaves background stencils by Lawn Fawn
- Hillside stencil by Lawn Fawn
- Sakura white gel pen
- Copic opaque white ink
- Jet black ink by Lawn Fawn
- Clear embossing ink by Lawn Faw,
- Fine white embossing powder by Hero Arts
- 80lb Neenah solar white cardstock (images)
- Strathmore bristol smooth cardstock (background)

Pretty Pink Posh - Lucky Set of Cards & Tag

mardi 27 février 2024

Hello there,

I'm thrilled to share with you this set of St Patrick's Day cards & tag showcasing several items from the Pretty Pink Posh January 2024 Release. I didn't get the chance to play with those products at the time, so I'm really happy to be back with this set I had so much fun to create.


So, let's start with the "You're so lucky" card, shall we? The first thing I did was to stamp all the images on 80lb Neenah solar white cardstock using an alcohol marker friendly black ink, as always I used the matching dies to cut them all, and colored everything using my Spectrum Noir Illustrator markers and Graph'it brush markers in a green + yellow + grey color palette to match the St Patrick's Day theme. All the images are from Lucky, except for the hearts that are from Valentine Train.


I cut a 5,25 x 4 inches Strathmore bristol smooth panel that I covered with twisted citron (all over the panel) and mowed lawn (on the edges) oxide inks. And next I created a fun background using the Layered Argyle stencils. With the first stencil I used mowed lawn and rustic wilderness oxide inks, and with the second and third stencils I only used rustic wilderness oxide ink. And next I added texture: I mixed some copic opaque white ink with water and used a small brush to make splatters all over the panel, and did the same with rustic wilderness oxide ink mixed with water.

I cut a 5,5 x 4,25 inches panel out of a shamrock pattern paper from the St Patrick's Day 6x6 paper pack by Echo Park, stuck it to a white card base, attached my Layered Argyle panel on top using liquid glue, and then all the images using 1mm and 2mm foam squares.


For my greeting, I started off by white heat embossing "You're so" from Lucky on green cardstock, and trimmed it into a slim banner using a Sentiment Strips die. I also gold heat embossed "Lucky" on a lighter green cardstock, cut it using the matching die, and then attached both pieces on my panel using foam squares. And I finished my card with some morning dew nuvo drops on the hearts to make them shine, and highlights and details on the images using a white gel.

*****

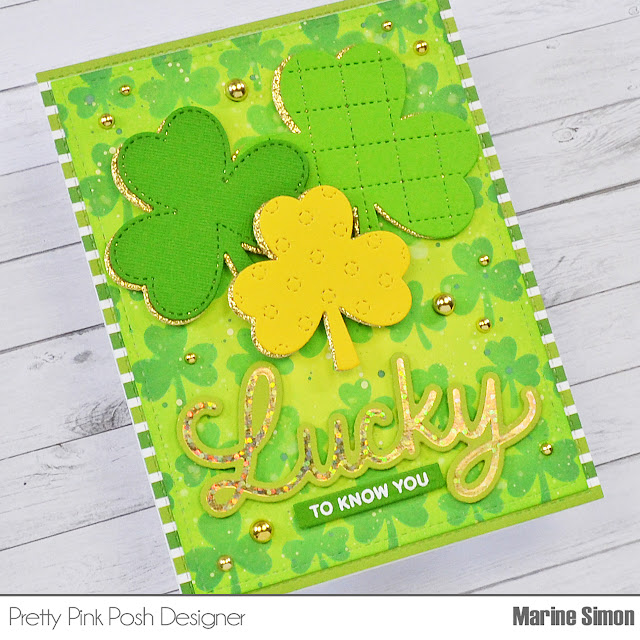
Now to the second card! I started off by cutting a 5,25 x 4 inches Strathmore bristol smooth panel, and just like my first card, I covered it with oxide inks: twisted citron all over the panel, and mowed lawn on the edges. And then I used the Layered Shamrocks stencils along with mowed lawn and rustic wilderness oxide inks to create a beautiful pattern on my piece of paper. And I added the same texture as the one on the first card.


I cut three Stitched Shamrocks out of different colored cardstock and three matching ones out of gold glitter cardstock. I attached the colored shamrocks on the gold glitter ones using liquid glue, but shifted them a little bit to create a sparkling border.

For my greeting, I started off by hot foiling the Hot Foil Lucky plate on a light green cardstock using speckled aura foil by Spellbinders, and I cut it using the Lucky Shadow Script die. I also white heat embossed "To know you" from Lucky on green cardstock, trimmed it into a slim banner using a Sentiment Strips die, and then attached both pieces, along with the Stitched Shamrocks on my panel using 1mm and 2mm foam squares.


I cut a 5,5 x 4,25 inches panel out of a stripy pattern paper from the Happy St Patrick's Day 6x6 paper pack by Echo Park, stuck it to a white card base, attached my panel on it using liquid glue, and finished my card by adding a few Gold Metallic Pearls here and there.

*****

And let's end this blog post with the see-through tag, shall we? I started of by cutting one Shamrock Shaker frame out of a clover pattern paper from the Happy St Patrick's Day 6x6 paper pack by Echo Park, and one plain shamrock out of acetate that I attached at the back of the first one using liquid glue. I also cut a green handle using a die from Build A Stocking, stuck it at the top back of the shamrock frame, and still at the back, I added 3mm foam strips all along the edges of the frame. I poured some St Patrick's Day confetti and some Lucky Day shaker beads inside the window, peeled the backing papers off the foam strips, and set the whole piece aside.


Next I cut another Shamrock Shaker frame out of green cardstock, as well as another plain acetate shamrock that I glued on top of the shamrock frame using liquid glue. And I attached this second piece to the first one to totally close my shaker tag.

For my greeting, I used the Lucky Shadow Script dies. I cut "Lucky" out of gold glitter cardstock, and the shadow out of vellum. I attached the first element on top of the second, and then stuck the whole piece to my Shamrock Shaker tag using liquid glue on both ends of the "Lucky". And I finished my tag with gold thread on the handle.


PRETTY PINK POSH SUPPLIES
- Lucky stamp set
- Valentine train stamp set
- Layered argyle stencils
- Layered shamrocks stencils
- Stitched shamrocks die set
- Lucky shadow script die set
- Shamrock shaker die set
- Build a stocking die set
- Sentiment strips die set
- Lucky hot foil plate
- Lucky day shaker beads
- St Patrick's day confetti mix
- Gold metallic pearls


OTHER SUPPLIES
- Spectrum Noir Illustrator markers
- Graph'it brush markers
- Oxide inks: twisted citron, mowed lawn, rustic wilderness
- Sakura white gel pen
- Copic opaque white ink
- Speckled aura foil by Spellbinders
- Clear embossing ink by Lawn Fawn
- Fine embossing powder by Hero Arts
- Gold embossing powder by Lawn Fawn
- Gold thread by Stampin Up
- Vellum by Lawn Fawn
- Acetate by Lawn Fawn
- Gold glitter cardstock by Concord & 9th
- Colored cardstock by The Stamp Market + Lawn Fawn
- Pattern papers from the Happy St Patrick's day 6x6 paper pack by Echo Park
- Strathmore bristol smooth cardstock (background)
- 80lb Neenah solar white cardstock (images)

Pretty Pink Posh - Birthday Cupcakes Duo

samedi 24 février 2024

Hello there,

I'm super happy to be back with this set of birthday cards showcasing the ever so cute Pretty Pink Posh Birthday Cupcakes from their 10th Birthday Release. I absolutely adore this new stamp set and decided to make two cards to be able to feature the six cupcakes from that set.


As very often, I started off by stamping the images on 80lb Neenah solar white cardstock using an alcohol marker friendly black ink, I cut them all using the matching dies, and colored everything using my Spectrum Noir Illustrator markers and my Graph'it brush markers. When it comes to birthday cards, I like to make them extra festive using rainbow colors, and those cupcakes are just perfect to achieve that because there are several sections that just scream for rainbows, such as the candles, the polka dots or the stripes on the cupcakes cases.


Once the coloring was done, I moved on the backgrounds, and cut two 5,5 x 4,25 inches Strathmore bristol smooth panels. I covered one of them with salvaged patina oxide ink, and the other with spun sugar oxide ink, and then I created a fun background on each panel using the Layered Birthday Wreath stencils along with oxide inks: picked raspberry, spiced marmalade, mustard seed, mowed lawn, peacock feathers, wilted violet and hickory smoke.


When I was done with all the inking, I mixed some copic opaque white ink with water and used a small brush to make splatters on both panels, and then did the same with black soot oxide ink for more contrast. And once everything was dry, I attached each panel to a white card base using liquid glue.


Next I worked on my greetings from Sentiment Strips: Birthday. I white heat embossed "Sending you birthday cheer" on pink cardstock, and "Have a very happy birthday" on turquoise cardstock. I trimmed them both into slim banners using a Sentiment Strips die, and attached each banner on a larger gold glitter banner using liquid glue.


Next I cut two Stitched Torn Rectangles out of vellum using the second largest die from that set, and attached three cupcakes on each panel, as well as a greeting right below those cupcakes, using 1mm foam squares. I added liquid glue at the back of each vellum panel, but only behind the images, and attached each panel on a Layered Birthday Wreath card. To finish my cards, I added highlights and details to the images using a white gel pen, and to make them even more festively cute, I added morning dew nuvo drops at different places.


PRETTY PINK POSH SUPPLIES
- Birthday cupcakes stamp set
- Sentiment strips: birthday stamp set
- Layered birthday wreath stencils
- Sentiment strips die set


OTHER SUPPLIES
- Spectrum Noir Illustrator markers
- Graph'it brush markers
- Oxide inks: salvaged patina, spun sugar, picked raspberry, spiced marmalade, mustard see, mowed lawn, peacock feathers, wilted violet, hickory smoke, black soot
- Copic opaque white ink
- Sakura white gel pen
- Clear embossing ink by Lawn Fawn
- Fine white embossing powder by Hero Arts
- Morning dew nuvo drops
- Gold glitter cardstock by Concord & 9th
- Vellum by Lawn Fawn
- Peony cardstock by The Stamp Market
- Island cardstock by The Stamp Market
- 80lb Neenah solar white cardstock (images)
- Strathmore bristol smooth cardstock (backgrounds)

Sunny Studio - Only Die Cuts Winter Card

vendredi 23 février 2024

Hello there,

I'm back on Sunny Studio's blog with another example of how you can find inspiration among your cards/projects. Last week, I showed you that you can create the same background (or almost) on two cards but have different images and different themes on each card. Well, for today's card, I was inspired by the Winter Love Birds card I shared at the beginning of February, I really enjoyed making that card, and thought how nice it would be to recreate it using die cuts only. Challenge accepted :D


So, just like the other card, I started off by creating a cloudy snowy sky on a 5,5 x 4,25 inches Strathmore bristol smooth panel. I used lost shadow and hickory smoke oxide inks along with a cloud stencil from my stash to make that sky, and then added texture to make it less flat. I mixed some hickory smoke oxide ink with water and used a small brush to make splatters all over my panel, and then did the same with black soot oxide ink and with copic opaque white ink.


I set my panel aside to dry, and die cut all my bits and pieces out of different colored cardstock. Here is the detailed list of the die sets I used: • Tree Branch: branch, leaves • Build A Birdhouse: birdhouses, birds, pole • Botanical Backdrop: snowflakes • Sweet Treat House Add-On: bow • Little Birdie: nest coordinating die


I added a little bit of shadows on all my pieces using oxide inks, stamped my "Sending winter hugs" greeting from Holiday Hugs in black on my panel, and then assembled and stuck everything using 1mm and 2mm foam squares. Once everything was nicely arranged on my panel, I added a few details to finish my card: a Snowflake Polymer Clay Confetti in the center of each snowflake, a black pearl on each bird for the eyes, and three white dots in the center of each flower using white nuvo drops.


SUNNY STUDIO SUPPLIES
- Tree branch die set
- Build a birdhouse die set
- Botanical backdrop die set
- Sweet treat house add-on die set
- Little birdie coordinating die set
- Holiday hugs stamp set
- Snowflake confetti


OTHER SUPPLIES
- Oxide inks: lost shadow, hickory smoke, black soot, festive berries, lucky clover, vintage photo, ground espresso
- Copic opaque white ink
- Colored cardstock by The Stamp Market & Lawn Fawn
- Cloudy stencil by Lawn Fawn
- Black versafine ink (greeting)
- Strathmore bristol smooth cardstock (background)

Pretty Pink Posh - Interactive Rainbow Cake

lundi 19 février 2024

Hi there,

I'm thrilled to be sharing with you this card featuring the new Pretty Pink Posh Interactive Cake die set. I love interactive cards, they're so fun to make, so I was over the moon when this new die was released!


I started off by creating a fun rainbow background on a 5,5 x 4,25 inches Strathmore bristol smooth panel. I first applied and blended oxide inks in a clockwise direction, starting from the top left hand corner: kitsch flamingo, dried marigold, squeezed lemonade, twisted citron, salvaged patina and shaded lilac. Next I used the Birthday Words stencil and more oxide inks to bring more interest to my panel, creating a tone on tone look, using picked raspberry, spiced marmalade, mustard seed, mowed lawn, peacock feathers and wilted violet. And as always I added texture: I mixed some black soot oxide ink with water and used a small brush to make splatters all over the panel, and then did the same with copic opaque white ink.


I knew that I wanted to add multiple greetings inside the cake, but I still wanted to have a bold sentiment right above my Interactive Cake, so I cut "Celebrate" from the Gift Card Bag die set out of gold glitter cardstock and out of white cardstock. I glued the gold glitter word on top of the white one, but shifted it a tiny bit to the right to create a white border, and then attached my "Celebrate" at the very top of my panel using liquid glue.


Next I moved on to the Interactive Cake, and started off by working on the upper part. I cut the top piece out of a fun polka dot pattern paper, as well as a white circle border and multiple colored circles that I glued on the circle border in a rainbow order using liquid glue. Next I attached this border at the very top of my cake panel using 1mm foam squares, and then cut more elements such as the white pull tab and six colorful candles and lights. I attached those different pieces at the top of my cake panel: the pull tab in the center and three candles on either side. I also white heat embossed three different Sentiment Strips: Birthday greetings on colored cardstock, trimmed them into slim banners using Sentiment Strips dies, and attached them on my cake panel right below the rainbow circle border using liquid glue.

Next I moved on to the lower part of my Interactive Cake. I cut the bottom piece out of the same polka dot pattern paper as before. I also cut another white circle border, as well as colorful circles that, again, I glued on the white border in a rainbow order using liquid glue. I attached this circle border at the very bottom of my cake panel, and then cut more items such as a couple of pink scallop decorative pieces and six gold glitter hearts that I attached on the cake using 1mm foam squares.


To build my cake, I first added 1/8" (= 3mm) foam strips at the back on the bottom piece of cake, along the very left and right edges and along the very bottom edge as well, leaving the scallop shaped top edge with no foam. I placed the top piece of cake behind the bottom piece, right between the foam strips, peeled the backing papers off the foam, and attached my cake on another bottom panel I had cut before, creating this way some sort of a pocket in which the top part of the cake can slide in and slide out. The last thing I did was to add some morning dew nuvo drops on each candle to make them sparkle.


PRETTY PINK POSH SUPPLIES
- Interactive cake die set
- Birthday words stencil
- Sentiment strips: birthday stamp set
- Sentiment strips die set
- Gift card bag die set


OTHER SUPPLIES
- Oxide inks: kitsch flamingo, picked raspberry, dried marigold, spiced marmalade, squeezed lemonade, mustard seed, twisted citron, mowed lawn, salvaged patina, peacock feathers, shaded lilac, wilted violet, black soot
- Copic opaque white ink
- Morning dew nuvo drops
- Gold glitter cardstock by Concord & 9th
- White cardstock by Lawn Fawn
- Pattern paper from the Make a wish birthday girl 6x6 paper pad by Echo Park
- Colored cardstock by The Stamp Market: peony, melon, sunshine, apple, island, lilac
- Strathmore bristol smooth cardstock (background)

Sunny Studio - Savanna Safari Birthday Card

jeudi 15 février 2024

Hi there,

I'm very happy to be back on Sunny Studio's blog with this Savanna Safari birthday card inspired by the Bighearted Bears card I made a few weeks ago. Once in a while, I like to look back at my cards to see which design I could recreate. Well, this time, I didn't have to look too far in the past, and thought that the tall and long rectangle windows were just perfect for the giraffe and her friends!


I started off by creating the background using some dies and pattern papers. I cut the frame out of an Amazing Argyle wooden pattern paper using the main die from Comic Strip Speech Bubble. I kept the frame only and attached it on a Sweater Weather turquoise pattern paper using 1mm foam squares. Next I cut another Comic Strip Speech Bubble frame out of a Dots & Stripes Pastels green pattern paper. This time I kept the inside pieces only, and used the Mini Grass Border die to cut four grass borders that I attached at the bottom of each section using 1mm foam squares.


I stamped my images on 80lb Neenah solar white cardstock using an alcohol marker friendly black ink, cut them all using the matching dies, and colored everything using my Spectrum Noir Illustrator markers and Graph'it brush markers. Here is the detailed list of the stamp sets I used: • Savanna Safari: giraffe, lion, zebra, toucan • Fabulous Flamingos: tropical leaves • Love Birds: branch, small leaves • Chickie Baby & Chubby Bunny: flowers • Love Monkey: vine


When the coloring was done, I attached the images on my panel using 1mm and 2mm foam squares. I also white heat embossed my "Have a wild day" greeting from Savanna Safari on a slim aqua banner I cut using a die from Notebook Photo Corners, and tucked it on the top right hand corner of my panel using foam squares again. As always I finished my card with highlights and details using a white gel pen, and a little bit of morning dew nuvo drops on the hearts to make them shine.


SUNNY STUDIO SUPPLIES
- Mini grass border die set
- Savanna safari stamp set
- Fabulous flamingos stamp set
- Love birds stamp set
- Chickie baby stamp set
- Chubby bunny stamp set
- Love monkey stamp set
- Notebook photo corners die set
- Comic strip speech bubble die set
- Sweater weather 6x6 paper pack
- Amazing argyle 6x6 paper pack
- Dots & stripes pastels 6x6 paper pack


OTHER SUPPLIES
- Spectrum Noir Illustrator markers
- Graph'it brush markers
- Sakura white gel pen
- Jet black ink by Lawn Fawn
- 80lb Neenah solar white cardstock (images)
- Strathmore bristol smooth cardstock (background)

Pretty Pink Posh Birthday Instagram Hop

mercredi 14 février 2024


Hi there,

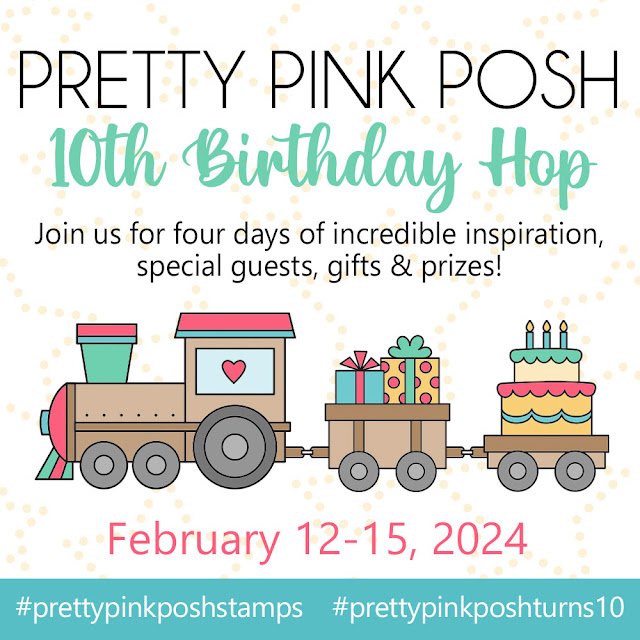
Join Pretty Pink Posh as they celebrate turning 10 with a big Birthday Release packed full of birthday products. Please check my post on Instagram and hop along to get inspired for your birthday projects year round!

There is also a free gift offer for qualifying purchases, so please check the graphic below for more details. And I've made a card featuring this lovely Potted Daffodils free gift so feel welcome to check it right here for some inspiration.


*****

On today's card, the main product is the brand new Birthday Train, which is a super cool addition to the already existing Valentine Train, and if you haven't seen the card I made with that cute love train, you can check it right here.


On my Valentine Train card, I had added a cute kitty from Cuddly Cats, well this time I went for a tropical/savanna theme by adding a sweet lion from Jungle Friends. As very often I started off by stamping all my images on 80lb Neenah solar white cardstock using an alcohol marker friendly black ink, I cut them all using the matching dies, and colored everything using my alcohol markers.

So, along with the images from Birthday Train, here are the other stamps I picked:  Jungle Friends for the lion, vine, leaves and flowers  Valentine Train for the heart wagon.


Once all the images were colored, I moved on to the background, and started off by cutting a Slimline Peekaboo Windows panel out of Strathmore bristol smooth cardstock. I colored my panel using, from the bottom to the top, squeezed lemonade, dried marigold and kitsch flamingo oxide inks. And next I added more interest using one of the the Layered Leaves & Flowers stencils along with, from the bottom to the top, mustard seed, spiced marmalade and picked raspberry oxide inks.

I also added texture: I mixed some copic opaque white ink with water and used a small brush to make splatters all over the panel, and did the same with black soot oxide ink for more contrast.


Once my panel was totally dry, I attached the images using 1mm and 2mm foam squares, and liquid glue. And then I created my sentiment using stamps from Birthday Train. I white heat embossed "Hooray" on pink cardstock and cut it using the matching die. And I gold heat embossed "It's your day" on white cardstock, trimmed it into a slim banner using a Sentiment Strips die, and then attached both pieces on my panel using foam squares again. And as always I finished my card by adding highlights and details to the images using a white gel pen.


PRETTY PINK POSH SUPPLIES
- Birthday train stamp set
- Jungle friends stamp set
- Valentine train stamp set
- Slimline peekaboo windows die set
- Sentiment strips die set
- Layered leaves & flowers stencils


OTHER SUPPLIES
- Spectrum Noir Illustrator markers
- Graph'it brush markers
- Oxide inks: squeezed lemonade, mustard seed, dried marigold, spiced marmalade, kitsch flamingo, picked raspberry, black soot
- Copic opaque white ink
- Sakura white gel pen
- Clear embossing ink by Lawn Fawn
- Gold embossing powder by Lawn Fawn
- Fine white embossing powder by Hero Arts
- Peony cardstock by The Stamp Market
- Strathmore bristol smooth cardstock (background)
- 80lb Neenah solar white cardstock (images)

Pretty Pink Posh - Potted Daffodils Gift With Purchase

samedi 10 février 2024

Hello there,

I'm super happy to be back with this lovely Scallop Box Card showcasing the beautiful Potted Daffodils stamp set, which is the free gift with purchase at Pretty Pink Posh on the occasion of their 10th Birthday Release. Please check the graphic down below for more details about this free gift.


I started off by stamping my images on 80lb Neenah solar white cardstock using an alcohol marker friendly black ink, cut them all using the matching dies, and then colored everything using my Spectrum Noir Illustrator markers and my Graph'it brush markers.


Along with the Potted Daffodils, I picked a hedgehog, leaves, flowers and butterflies from Hedgehog Friends. And once the coloring was done, I added highlights and details to the images using a white gel pen.


Next I cut all the Scallop Box Card pieces out of kraft cardstock, as well as the decorative panels out of a minty green pattern paper from the Welcome Autumn 6x6 paper pack by Echo Park. I assembled everything, and then stuck my images inside the box using 3mm glue dots and liquid glue.


For my greeting, I started by cutting the Friend Shadow Script twice: in yellow and in white. I glued the yellow one on top of the white one, but shifted it a little bit to the right to create a white border, and attached it on the front of my Scallop Box Card using liquid glue. Next I white heat embossed "Just checking in" from Potted Daffodils on grey cardstock, trimmed it into a slim banner a Sentiment Strips die, and finally attached it below "Friend" using 1mm foam squares.


PRETTY PINK POSH SUPPLIES
- Potted Daffodils stamp set
(gift with purchase until 02/17/24 or while supplies last)
- Hedgehog Friends stamp set
- Scallop box card die set
- Friend shadow script die set
- Sentiment strips die set


OTHER SUPPLIES
- Spectrum Noir Illustrator markers
- Graph'it brush markers
- Sakura white gel pen
- Jet black ink by Lawn Fawn
- Clear embossing ink by Lawn Fawn
- Fine white embossing powder by Hero Arts
- Minty green pattern paper from the Welcome Autumn paper pack by Echo Park
- Sunshine cardstock by The Stamp Market
- Slate cardstock by The Stamp Market
- Kraft cardstock by Lawn Fawn
- 80lb Neenah solar white cardstock (images)