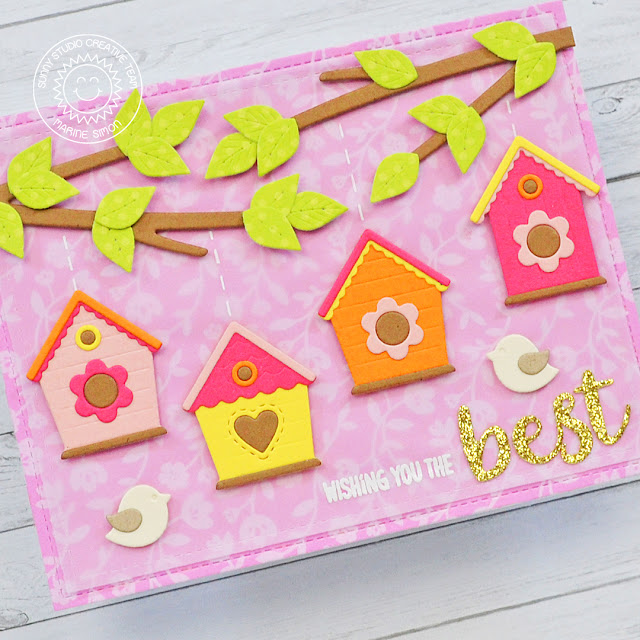
Sunny Studio - Build a Birdhouse Spring Card

jeudi 26 janvier 2023

Hello there,

I'm super happy to be back on Sunny Studio's blog with a cute spring card showcasing the brand new and ever so cute Build a Birdhouse die set. It's not that usual for me to only use die cuts on my projects, I'm more of a busy-scene-with-critters kind of crafter, but I really enjoyed creating and assembling this lovely card!

I wanted the birdhouses to be super colorful, so I started off by cutting all the different elements and birds out of several plain colored cardstock. The Build a Birdhouse die set comes with a pole die to place the houses on, but I wanted them to be hanging from a tree, so I used the Out On a Limb die set to cut two branches out of some brown cardstock, and some leaves out of a green dotted pattern paper from the new Spring Fever paper pack.


Next I cut a 5,5" x 4,25" pink floral panel using another paper from the Spring Fever paper pack, as well as a slightly smaller vellum panel. I temporarily taped the vellum panel to the pink one using washi tape, I assembled the birdhouses, and glued them on the vellum along with the branches, leaves and birds using foam squares.


For my greeting, I first white heat embossed the words "Wishing you the" from Country Carnival, and I cut some gold glitter letters to form the word "Best" using the Hayley Lowercase Alphabet, and finally read "Wishing you the best". Next I removed the washi tape that was keeping the pink panel and vellum panel together, I flipped the vellum panel over and applied liquid glue at the back of each die cut element, and then I attached that vellum panel to the pink floral one. And finally I added stitched lines above each birdhouse using a white gel pen to connect them to the branches.


SUNNY STUDIO SUPPLIES
- Build a birdhouse die set
- Out on a limb die set
- Spring fever paper pack
- Hayley lowercase alphabet
- Country carnival stamp set


OTHER SUPPLIES
- Clear embossing by Lawn Fawn
- Fine white embossing powder by Hero Arts
- Gold glitter cardstock by Concord & 9th
- Vellum from my stash
- Colored cardstock by The Stamp Market
- Sakura white gel pen

Sunny Studio - Hayley Lowercase Alphabet + Turning Cats into Tigers

jeudi 19 janvier 2023

Hey there,

I'm so happy to be back on Sunny Studio's blog with a busy but yet super cute slimline card featuring a lovely tiger family + a whole bunch of images, as well as the new Hayley Lowercase Alphabet. And speaking of "new", have you seen the amazing Spring collection? It's packed with so much cuteness, I can't wait to share the cards I've made with the new products!

For today's card, I first cut an 8,5" x 3,5" bristol panel, and created a jungle/tropical landscape using stencils and oxide inks. I divided my panel into several parts, and worked my way from the bottom towards the top. At the very bottom: a swamp using salvaged patina + peacock feathers oxide inks. Above that swamp: two hills and mountains using mowed lawn + rustic wilderness oxide inks. And above the mountains: the sky using squeezed lemonade + carved pumpkin oxide inks.


Once the landscape was done, I moved on to the coloring, and stamped all my images on white cardstock using an alcohol marker friendly black ink. I cut them all using the coordinating dies, and colored everything using my alcohol markers. Here's a detailed list of the stamps I used:

- kitties from Purrfect Birthday + Balloon Rides + Beach Buddies to make tigers
- grass details from Garden Critters
- the branch from Outback Critters
- leaves from Best Fishes
- the snow bank from Bear Hugs to make a grassy platform in the middle the swamp
- the tree trunk from Seasonal Trees
- the tropical birds from Tiki Time
- tropical leaves and flowers from Fabulous Flamingos
- the leaves and ivy from Tropical Scenes


Next I attached all the images on my panel using 1mm foam squares mostly, as well as 3mm glue dots and liquid glue.

I used the new Hayley Lowercase Alphabet to cut some letters and create the word "Wild". I cut those letters twice: in aqua and in white, and I glued the white letters at the back of the aqua ones to create an outline. Attached the letters on the sky section using liquid glue, and stamped the words "About You" from Squirrel Friends right below to finally read "Wild about you".


VIDEO


SUNNY STUDIO SUPPLIES
- Hayley lowercase alphabet die set
- Purrfect birthday stamp set
- Balloon rides stamp set
- Beach buddies stamp set
- Garden critters stamp set
- Outback critters stamp set
- Fintastic friends stamp set
- Savanna safari stamp set
- Best fishes stamp set
- Bear hugs stamp set
- Seasonal trees stamp set
- Tiki time stamp set
- Fabulous flamingos stamp set
- Tropical scenes stamp set


OTHER SUPPLIES
- Spectrum Noir Illustrator markers
- Graph'it brush markers
- Oxide inks: salvaged patina, peacock feathers, mowed lawn, rustic wilderness, squeezed lemonade, carved pumpkin
- Copic opaque white ink
- Sakura white gel pen
- Stencils by Lawn Fawn
- Black ink by Pinkfresh Studio
- Transotype perfect coloring paper (images)
- Strathmore bristol smooth cardstock (background)

Sunny Studio - Valentine Rainbow Shaker Tags

jeudi 5 janvier 2023

Hello there,

I'm thrilled to be back on Sunny Studio's blog with those cute and colorful Valentine shaker tags showcasing some adorable kitties from Meow & Furever. You might have noticed that I like to use rainbow colors on my cards, especially on Christmas cards, well today I decided to use those colors once again to create my Valentine tags, and I added golden accents to make them super bright and shiny.


I started off by creating the shaker tags, and cut all the different pieces I needed to build them using the Mini Mat & Tag 3 die set. I cut five tag bases out of a polka dotted paper from the Very Merry paper pack and five vellum tags to tone these down. I also cut five colorful window pieces out of a stripy paper from the Very Merry paper pack, five toppers out of heart papers from the Flirty Flowers paper pack, and finally five white decorative hearts. So, I built the five shaker tags (feel welcome to check the process video) and then I colored some cute kitties.


I stamped five images from Meow & Furever on white cardstock using an alcohol marker friendly black ink, cut them all using the coordinating dies, and colored everything using my alcohol markers. And because the tags were very colorful, I decided to keep the kitties pretty neutral and only used black, grey and white to color them.


Once the coloring was done, I added highlights on the images using a white gel pen, I white heat embossed five "Furever yours" greetings from Meow & Furever on black banners, and attached both the images and banners on the tags using foam squares.


VIDEO


SUNNY STUDIO SUPPLIES
- Meow & furever stamp set
- Mini mat & tag 3 die set
- Very merry paper pack
- Flirty flowers paper pack


OTHER SUPPLIES
- Spectrum Noir Illustrator markers
- Graph'it brush markers
- Sakura white gel pen
- Clear embossing ink by Lawn Fawn
- Fine white embossing powder by Hero Arts
- Black licorice cardstock by Lawn Fawn
- Golden heart confetti by Pretty Pink Posh
- Tiny iridescent heart confetti by Studio Katia
- Golden ribbon (old!) from my stash
- Transotype perfect coloring paper

Lawn Fawn - Snow Castle Magic Picture Changer Card

mardi 3 janvier 2023

 Hi there,

I'm so happy to be back today on Lawn Fawn YouTube Channel & Blog with this cute snowy and wintery Magic picture changer card. It was inspired by two cards, this one I made a few weeks ago for the release of the Fall & Winter 2022 collection, and this one I made it back in June 2019. On today's card, we have some cute mice standing behind a snow brick wall, supporting and cheering on two participants in a snow castle contest!

I started off with the background. I cut a 5,5" x 4,25" bristol panel, and created a snowy landscape on the lower part using cracked pistachio oxide ink and Hill stencils, and the sky on the upper part using peacock feathers and blueprint sketch oxide inks.

Once my panel was dry, I cut a frame out of it using a die from the Magic picture changer die set, and then set all the pieces aside for later, including the small middle square.


Next I worked on the interactive pocket. I cut a long bristol panel for the pocket die, and a short one for the moving piece die. I traced each window on the papers using a pencil, and then I stamped the images inside each window. On the long panel, I placed the castle right in the middle of the window, masked the sides of the castle and the top part as well using washi tape, applied Jet black ink, removed the washi tape and then stamped the image. I repeated those steps twice to get a very nice impression on the paper, and then I did the same on the short bristol panel, but this time I stamped the whole castle.

Next I cut masks using Post-it notes and placed them on both images, and then I created the same landscape on both panels as the one on the main panel using the small middle squares as a guide. Please watch the process video down below to see the whole process.


Once the ink was dry, I removed the masks and colored both images using my alcohol markers. I added white highlights on both images, and next I cut the panels. I assembled them to create my interactive pocket, attached the frame I cut at the beginning on top of it, and then stuck the interactive pocket and the panel on a card base.

Next I stamped some additional images, cut them all using the coordinating dies, colored everything using my alcohol markers, and once they were all done, I attached them on my panel using foam squares and liquid glue. I also stamped my greeting on the panel: at the top I silver embossed "Happy Winter", and at the bottom I stamped in black "We have snow much fun together".


Next I cut the decorative handle piece out of pink cardstock, attached it at the end of the pull tab, and then stuck a purple arrow right in its center. And as always I finished my card by adding highlights and details on the images and in the sky as well using a white gel pen.


VIDEO


LAWN FAWN SUPPLIES

Stamp sets
- Snowball fight
- Life is good
- Simply celebrate critters
- Car critters Christmas add-on
- Winter skies
- Holiday party animal

Die sets
- Magic picture changer + add-on
- Large stitched rectangle stackables

Misc
- Hillside stencils
- Sugarplum cardstock
- Jet black ink
- Liquid glue
- Post-it notes
- Clear embossing ink
- Silver embossing powder


OTHER SUPPLIES
- Spectrum Noir Illustrator markers
- Graph'it brush markers
- Oxide inks: cracked pistachio, peacock feathers, blueprint sketch, chipped sapphire
- Sakura white gel pen
- Copic opaque white ink
- Strathmore bristol smooth cardstock (background)
- Transotype perfect coloring paper (images)