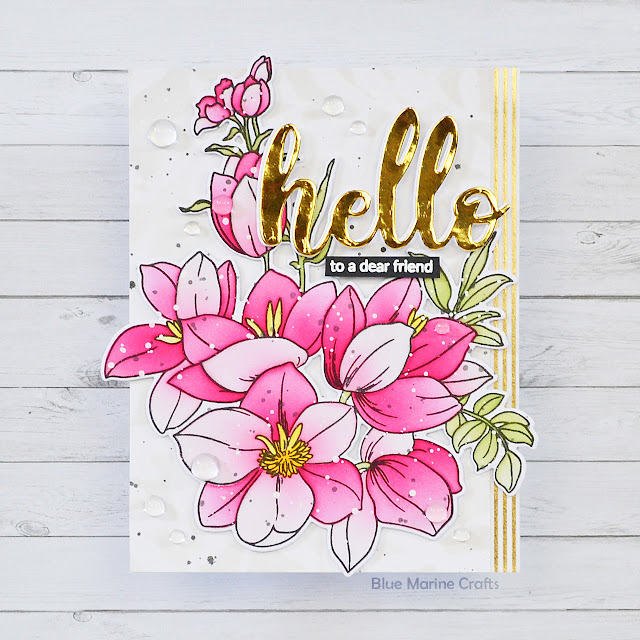
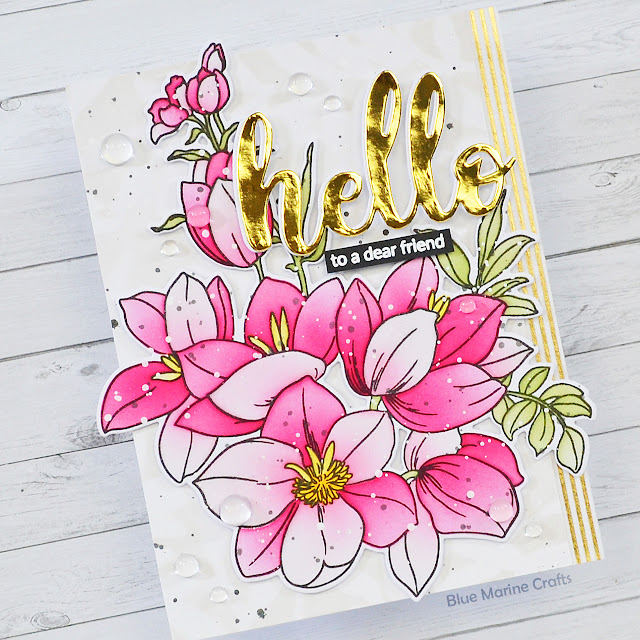
Altenew - In The Woodland Stenciled Card

lundi 31 juillet 2023

Hi there,

I'm thrilled to share with you this card I made using several Altenew products. It's totally different than what I usually make, but I had a blast creating this floral card!


I started off by stamping the largest flower cluster from In The Woodland using Obsidian pigment ink on Transotype perfect coloring paper. I used the coordinating die to cut the images, and then used the In The Woodland stencils along with Crisp dye inks to color the flowers and leaves.

To color the flowers, I used frosty pink + coral berry + ruby red + snapdragon + warm sunshine crisp dye inks. And for the leaves, I used frayed leaf + forest glades crisp dye inks.


Next I cut a 5,5 x 4 inches white panel, and used the Leaf Bed stencil along with lost shadow oxide ink to create a subtle leafy background. I added splatters to this panel by mixing black soot oxide ink with water, as well as copic opaque white ink with water. And I added the same textures on the flowers.

I cut a "Hello" out of gold mirror cardstock, another one out of white cardstock using the Simply Hello die, and glued the gold mirror "Hello" on top of the white one. I also white heat embossed "To a dear friend" from In The Woodland on black cardstock, and trimmed it into a slim banner.


Next I cut a 5,5 x 4,25 inches white card base. I added a piece of Gold Foil Pinstripe Washi Tape on the right edge of the card base, and then attached my panel on the card base. I stuck my flowers using 1mm foam squares, and my greeting elements using 2mm foam squares. And finally I glued a few clear droplets here and there to add more shine to my card.

I will share a second card very soon, so stay tuned!


ALTENEW SUPPLIES
- In the woodland stamp + die sets
- In the woodland stencils
- Leaf bed stencil
- Simply hello die
- Gold foil pinstripe washi tape
- Crisp dye inks: frosty pink, coral berry, ruby red, frayed leaf, forest glades, snapdragon, warm sunshine


OTHER SUPPLIES
- Gold mirror cardstock from my stash
- White cardstock by Lawn Fawn
- Black licorice cardstock by Lawn Fawn
- Copic opaque white ink
- Black soot oxide ink
- Clear embossing ink by Lawn Fawn
- Fine white embossing ink by Hero Arts
- Clear droplets by Studio Katia

Sunny Studio - Birthday Mice Slimline Card

jeudi 27 juillet 2023

Hello there,

I'm thrilled to be back on Sunny Studio's blog with this adorable slimline card showcasing the lovely Birthday Mouse, as well as some happy friends that I picked from other sets (listed below)


As very often I started off with the coloring. I stamped all my images on Transotype perfect coloring paper using an alcohol marker friendly black ink, I cut them all using the coordinating dies, and then colored everything using my Graph'it Brush markers and Spectrum Noir Illustrator markers. We have the sweet Birthday Mouse, and also:

- two mice from Harvest Mice
- the kite, tulips and butterflies from Spring Showers
- the mouse from Christmas Critters
- the hot air balloon, banner and clouds from Balloon Rides
- the grass sprigs from Garden Critters


Next I moved on to the background. I cut an 8,5 x 3,5 inches slimline Strathmore bristol smooth panel, and divided it in three sections that I colored using stencils from my stash and oxide inks. I used a cloudy stencil along with tumbled glass and salty ocean oxide inks to make the sky at the top. Next grassy stencils along with shabby shutters and mowed lawn oxide inks to make two grass borders, and finally I used antique linen and vintage photo oxide inks with washi tape to create a straight path at the bottom of the panel.


I stamped my "Have a mice day" greeting from Birthday Mouse in black at the very bottom of my panel, attached all the images using 1mm foam squares, and as always I finished my card by adding highlights and details to the images using a white gel pen.


SUNNY STUDIO SUPPLIES
- Birthday mouse stamp set
- Harvest mice stamp set
- Spring showers stamp set
- Christmas critters stamp set
- Balloon rides stamp set
- Garden critters stamp set


OTHER SUPPLIES
- Spectrum Noir Illustrator markers
- Graph'it brush markers
- Oxide inks: antique linen, vintage photo, shabby shutters, mowed lawn, rustic wilderness, salvaged patina, peacock feathers
- Sakura white gel pen
- Copic opaque white ink
- Detail black ink by Pinkfresh Studio
- Stencils by Lawn Fawn
- Strathmore bristol smooth cardstock (background)
- Transotype perfect coloring paper (images)

Sunny Studio - Magical Mermaids 3D Card

samedi 22 juillet 2023

Hey there,

It's been a while since my last Sunny Studio underwater card, so I'm very happy to be back on Sunny Studio's blog with this new 3D card showcasing three Magical Mermaids.


I started off by creating the card base using the Mini Slimline Out of the Box die set by My Favorite Things. I cut all the pieces out of white cardstock, cut an opening in the front panel, and assembled everything together. Next I cut the back panel out of Strathmore bristol smooth cardstock, colored it using salvaged patina + peacock feathers + blueprint sketch oxide inks, and stuck it on the white panel using liquid glue. And then I cut three wavy borders out of Strathmore bristol smooth cardstock again, colored them using antique linen + vintage photo oxide inks, and attached them inside the card using double sided tape.


Next I stamped all my images on Transotype perfect coloring paper using an alcohol marker friendly black ink, used the coordinating dies to cut them all, and colored everything using my Graph'it Brush markers and Spectrum Noir Illustrator markers. We have:

- the three mermaids + rocks + seaweeds + starfish + small fish from Magical Mermaids
- the crab + seaweed clusters from Ocean View
- the clown fish + seaweeds from Best Fishes
- the seaweed cluster from Fintastic Friends


I added highlights and details to the images using a white gel pen, and attached them inside the card using glue dots. And I wanted a few fish to be swimming, so I stuck those images on the end of slim strips of acetate using 3mm glue dots, and then attached the other end of those strips of acetate on the wavy borders using the same glue dots.


Finally I created my sentiment. I cut a black banner using a die from the Notebook Photo Corners die set, white heat embossed my "Make a splash" greeting from Best Fishes on top of it, and then attached the banner on the bottom right corner of the card front.


SUNNY STUDIO SUPPLIES
- Magical mermaids stamp set
- Ocean view stamp set
- Best fishes stamp set
- Fintastic friends stamp set
- Notebook photo corners die set


OTHER SUPPLIES
- Spectrum Noir Illustrator markers
- Graph'it brush markers
- Oxide inks: salvaged patina, peacock feathers, blueprint sketch, chipped sapphire, antique linen, vintage photo
- Mini slimline out of the box die set by My Favorite Things
- Sakura white gel pen
- Copic opaque white ink
- Detail black ink by Pinkfresh Studio
- Clear embossing ink by Lawn Fawn
- Fine white embossing powder by Hero Arts
- Strathmore bristol smooth cardstock (background)
- Transotype perfect coloring paper (images)

Sunny Studio - Jungle Friends Card

lundi 17 juillet 2023

Hello there,

I'm back today to share with you the last card I made using "old" products from Pretty Pink Posh. It's a new tropical card, these are definitely in the top 5 of the cards I like to make, it features the most adorable Jungle Friends, and just like the Monkey Friends card and Tropical Toucans card I made this month, I picked elements from other sets to help me to build them a lovely habitat.

I started off by stamping the four little guys from Jungle Friends on Transotype perfect coloring paper using an alcohol markers friendly black ink, I cut them all using the coordinating dies, and colored everything using my Spectrum Noir Illustrator markers and Graph'it brush markers.

Next I worked on the background elements. I cut a 5,5 x 4,25 inches Strathmore bristol smooth panel, and colored it using oxide inks, from the bottom to the top I used: squeezed lemonade, dried marigold and kitsch flamingo. And I wanted to add more interest to this background, so I used one of the Layered Leaves & Flowers stencils, and added darker shades of oxide inks, from the bottom to the top, I used: mustard seed, spiced marmalade and picked raspberry.


I used Nature Essentials to cut a few more pieces. I cut two tree trunks that I colored using vintage photo and ground espresso oxide inks. I also cut three grass borders, I colored two of them using antique linen and vintage photo oxide inks, and colored the remaining one using mowed lawn and rustic wilderness oxide inks.

I attached the three grass borders at the bottom of my panel and the tree trunks using 1mm and 2mm foam squares, and stuck my images as well. I white heat embossed my "You're the best" greeting from Jungle Friends in the middle of the panel, and as always I finished my card by adding highlights and details to the images using a white gel pen.


PRETTY PINK POSH SUPPLIES
- Jungle friends stamp set
- Nature essentials die set
- Layered leaves & flowers stencils


OTHER SUPPLIES
- Spectrum Noir Illustrator markers
- Graph'it brush markers
- Oxide inks: squeezed lemonade, mustard seed, dried marigold, spiced marmalade, kitsch flamingo, picked raspberry, antique linen, vintage photo, ground espresso, mowed lawn, rustic wilderness
- Sakura white gel pen
- Copic opaque white ink
- Detail black ink by Pinkfresh Studio
- Clear embossing ink by Lawn Fawn
- Fine white embossing powder by Hero Arts
- Transotype perfect coloring paper (images)
- Strathmore bristol smooth cardstock (background)

Sunny Studio - Crepe Paper Streamers Birthday Shaker Card

vendredi 14 juillet 2023

Hi there,

I'm back today on Sunny Studio's blog with a very colorful mini slimline birthday shaker card showcasing the Crepe Paper Streamers, as well as three lovely kitties from Birthday Cat.


I started off by creating my shaker panel using the same process as the Season's Tweeting card I made a while ago. I first cut a 6 x 3 inches Spring Sunburst rainbow polka dot panel, and cut three Wonky Windows out of it. Still at the back of my polka dot panel, I attached a piece of acetate, added foam strips along the four edges and around each window, and poured some Birthday Cake Dot Sprinkles and iridescent confetti inside each window. I cut a 6 x 3 inches white card base, and attached another Spring Sunburst pattern paper on top of it, and then attached my card base at the back of my Wonky Window panel to close the shaker windows.


Next I stamped my images from Birthday Cat on Transotype perfect coloring paper using an alcohol marker friendly black ink, I used the coordinating dies to cut them, and then colored my three cupcakes using Spectrum Noir Illustrator markers and Graph'it brush markers. To match the card base, I went for rainbow shades to color the cupcake cases, and next I attached a cupcake on each window using 1mm foam squares.

For my sentiment, I cut a black banner using a die from the Notebook Photo Corners die set, I white heat embossed my "Meow is the time to celebrate" greeting from Birthday Cat on top, and then attached the banner below the windows using 1mm foam squares.


Next I created some colorful Crepe Paper Streamers. I cut several streamers out of white cardstock using the long dies from the set, and used the small dies to cut many colorful pieces. Attached those tiny pieces on the white steamers in a rainbow order to match the card base, and finally stuck the streamers above the windows using 1mm foam squares.


SUNNY STUDIO SUPPLIES
- Crepe paper streamers die set
- Wonky windows die set
- Notebook photo corners die set
- Birthday cat stamp set
- Spring sunburst paper pack
- Birthday cake dot sprinkles


OTHER SUPPLIES
- Spectrum Noir Illustrator markers
- Graph'it brush markers
- Clear embossing ink by Lawn Fawn
- Fine white embossing powder by Hero Arts
- Sakura white gel pen
- Iridescent confetti by Studio Katia
- Transotype perfect coloring paper (images)
- Black licorice cardstock by Lawn Fawn
- Colored cardstock by Lawn Fawn + The Stamp Market

Lawn Fawn - Build a Drink Shaker Card

jeudi 13 juillet 2023

Hi there,

I'm back today on Lawn Fawn YouTube channel & blog with a refreshing shaker mojito I made using a mix of new products from the Summer 2023 release and older ones. No stamped and colored images on this new card, only die cuts and some inking.


I started off by cutting a Tropical Leaves Backdrop panel out of Strathmore bristol smooth cardstock that I colored using blue oxide inks: salty ocean all over the leaves, and then prize ribbon on the edges. I added texture to make this backdrop more interesting and started with a mix of chipped sapphire oxide ink and water that I splattered all over the leaves using a small brush, and also a mix of white ink and water that I splattered on the leaves as well.


Next I cut a 5,5 x 4,25 inches Strathmore bristol smooth panel. I covered the whole panel with tumbled glass oxide ink, and then used the Tropical Leaves Background stencils along with white ink to add a subtle decor to this panel. I dried and heat set the ink using my heat tool, and then cut a second Tropical Leaves Backdrop out of green shimmery cardstock. And next I assembled my background: I attached the green backdrop on top of the plain blue panel using 1 foam squares, and attached the blue backdrop on top of the green backdrop using 1mm foam squares again.

I created my shaker mojito using Build A Drink, and I invite you to watch the video down below to see the whole process, and check the list of supplies for more details ^^


To decorate the top of the glass and each side of it, I die cut a whole bunch of elements:
- the straw, parasol, slices of lime, ice cubes and small leaves from Build A Drink
- the limes, big leaves and flowers from Zesty Lemon

I added mowed lawn and rustic wilderness oxide inks to some of those pieces to bring more depth and interest, and next I assembled everything on my panel. Leaving some space for my greeting at the bottom of the panel, I first attached the shaker glass in the middle of it using liquid glue. And I added all the die cut pieces using 1mm and 2mm foam squares, liquid glue and 3mm glue dots.

Next I cut a black banner using the Heart Garland Portrait Backdrop die set, I white heat embossed my "Happy summer" greeting from Pool Party on top of it, and finally attached the banner below the shaker mojito using foam squares.


VIDEO


LAWN FAWN SUPPLIES

Stamp sets
- Pool party (greeting)

Die sets
- Build a drink
- Zesty lemon
- Tropical leaves backdrop
- Heart garland portrait backdrop
- Large stitched rectangle stackables

Cardstock & papers
- Black licorice
- White
- Cilantro
- Noble fir
- Green canvas
- Vellum
- Green shimmery (tropical pack)
- Yellow shimmery (pastel pack)
- Flower market paper pack
- Really rainbow scallops paper pack
- Spiffy speckles paper pack

Misc
- Tropical leaves background stencils
- Clear embossing ink
- White embossing powder


OTHER SUPPLIES
- Oxide inks: tumbled glass, salty ocean, prize ribbon, chipped sapphire, mowed lawn, rustic wilderness
- Copic opaque white ink
- Iridescent confetti by Studio Katia
- Ice cubes from my stash
- Strathmore bristol smooth cardstock

Pretty Pink Posh - Tropical Toucans Card

lundi 10 juillet 2023

Hey there,

I'm super happy to share with you the second card I made using Pretty Pink Posh "older" sets. This new jungle themed card features the Tropical Toucans, and I had so much fun coloring them and creating them a colorful habitat using different products from PPP.

I started off by stamping the three adorable Tropical Toucans on Transotype perfect coloring paper using an alcohol markers friendly black ink. I also stamped flowers and leaves from Jungle Friends. Cut all the images using the coordinating dies, and colored them all using my Spectrum Noir Illustrator markers and Graph'it brush markers.

I cut a 5,5 x 4,25 inches Strathmore bristol smooth panel, as well as three Stitched Leafy borders out of the same paper that I attached on the panel vertically using liquid glue. Next I colored my panel using distress oxide inks, and from the middle towards the edges I used: squeezed lemonade, twisted citron, pine needles and chipped sapphire. I added some texture to my panel: I first splattered clear water all over it and dried it using a paper towel, next I mixed some chipped sapphire oxide ink with water and did splatters using a small brush, and then I did the same with a mix of white ink and water.


Next I cut two Nature Essentials tree trunks out of Strathmore bristol smooth cardstock again to make branches. I colored both pieces using vintage photo and ground espresso oxide inks, and also added texture to those branches by splattering a mix of ground espresso oxide ink and water.

I cut quite a large square out of black cardstock, white heat embossed my "You can do it" greeting from Tropical Toucans on it, and stuck that square on the bottom right hand corner of the panel using 1mm foam squares. I attached all the images using the same foam squares, and finished my card by adding highlights and details to the images using a white gel pen.


PRETTY PINK POSH SUPPLIES
- Tropical toucans stamp set
- Jungle friends stamp set
- Stitched leafy borders die set
- Nature essentials die set


OTHER SUPPLIES
- Spectrum Noir Illustrator markers
- Graph'it brush markers
- Oxide inks: squeezed lemonade, twisted citron, pine needles, chipped sapphire
- Sakura white gel pen
- Copic opaque white ink
- Clear embossing ink by Lawn Fawn
- Fine white embossing powder by Hero Arts
- Black licorice cardstock by Lawn Fawn
- Transotype perfect coloring paper (images)
- Strathmore bristol smooth cardstock (background)

Sunny Studio - Happy Bastille Day

jeudi 6 juillet 2023

Hello there,

In case you don't know, I'm French, and next week on July 14th we will celebrate Bastille Day. I never make cards or anything crafty for this day, so I thought it would be fun to mark the occasion and finally create something to celebrate our National Day. My card features four adorable kitties from Birthday Cat, and to complete my scene, I shopped my entire Sunny Studio collection and found the perfect images that match today's theme.


So I started off with the coloring. I stamped the images on Transotype perfect coloring paper using an alcohol marker friendly black ink, as always I cut them all using the coordinating dies, and then colored everything using my Spectrum Noir Illustrator markers and Graph'it Brush markers. Of course I went for a blue, white and red color palette to match the French flag, and in addition to the kitties from Birthday Cat, I picked:

- the hot air balloon + banners from Balloon Rides
- the Eiffel tower + beret from Paris Afternoon
- the stars from North Pole
- the birds from Seasonal Trees


I silver heat embossed the Eiffel tower from Paris Afternoon on the same paper as the images, and then I worked on the background. To fit the four hot air balloons, I went for a slimline design and cut an 8,5 x 3,5 inches Strathmore bristol smooth panel that I colored using salty ocean + blueprint sketch + chipped sapphire oxide inks. I splattered my panel with copic opaque white ink, as well as a mix of black soot oxide ink and water.


I cut another 8,5 x 3,5 inches Strathmore bristol smooth panel, and cut a cloud border out of it using a die from the Slimline Nature Borders die set. I added a little bit of color to that border using tumbled glass oxide ink, and then I stamped my sentiment on the right side. I stamped the words "Floating by to say" from Floating By in black, and I silver heat embossed the word "Bonjour" from Charming City.

I attached everything on my dark blue panel using 1mm and 2mm foam squares, and finally added highlights and details to the images using a white gel pen.


SUNNY STUDIO SUPPLIES
- Birthday card stamp set
- Balloon rides stamp set
- Paris afternoon stamp set
- North pole stamp set
- Seasonal trees stamp set
- Floating by stamp set
- Charming city stamp set
- Slimline nature borders die set


OTHER SUPPLIES
- Spectrum Noir Illustrator markers
- Graph'it brush markers
- Oxide inks: salty ocean blueprint sketch, chipped sapphire, tumbled glass
- Sakura white gel pen
- Copic opaque white ink
- Clear embossing ink by Lawn Fawn
- Silver embossing powder by Lawn Fawn
- Detail black ink by Pinkfresh Studio
- Strathmore bristol smooth cardstock (background)
- Transotype perfect coloring paper (images)

Pretty Pink Posh - Monkey Friends Slimline Card

lundi 3 juillet 2023

Hello there,

Last month I had the great pleasure to be invited by Pretty Pink Posh to celebrate their June release, and I had loads of fun creating some colorful fruity cards for the occasion: here is my set of four Citrus cards, my Watermelon card, and my Fresh Berries Scallop Box card, if you want to check them out ^^

And I'm thrilled to be back this month to announce that I'm officially joining Pretty Pink Posh design team! I can't wait to share with you my future projects! Today we're starting with the cute Monkey Friends. I stamped three of them on Transotype perfect coloring paper using an alcohol marker friendly black ink and cut them using the coordinating dies. I also picked images from Tropical Toucans and Jungle Friends to bring more greenery, and colored everything using my Spectrum Noir Illustrator markers and Graph'it brush markers.


Next I cut an 8,5 x 3,5 inches Strathmore bristol smooth panel, and created a leafy background. I first applied salvaged patina oxide ink all over the panel, and then used the Layered Leaves & Flowers stencils along with peacock feathers oxide ink to add many leaves to my panel.

Once my panel was dry, I attached all the images using 1mm foam squares, I white heat embossed my "Hang in there" greeting from Monkey Friends, and finally added highlights and details to the images using a white gel pen to complete my card.


PRETTY PINK POSH SUPPLIES
- Monkey friends stamp set
- Tropical toucans stamp set
- Jungle friends stamp set
- Layered leaves & flowers stencils


OTHER SUPPLIES
- Spectrum Noir Illustrator markers
- Graph'it brush markers
- Oxide inks: salvaged patina, peacock feathers
- Sakura white gel pen
- Copic opaque white ink
- Clear embossing ink by Lawn Fawn
- Fine white embossing powder by Hero Arts
- Detail black ink by Pinkfresh Studio
- Transotype perfect coloring paper (images)
- Strathmore bristol smooth cardstock (background)