My Favorite Things + Lawn Fawn - Hanging Friends

vendredi 26 mai 2017

Hello there,

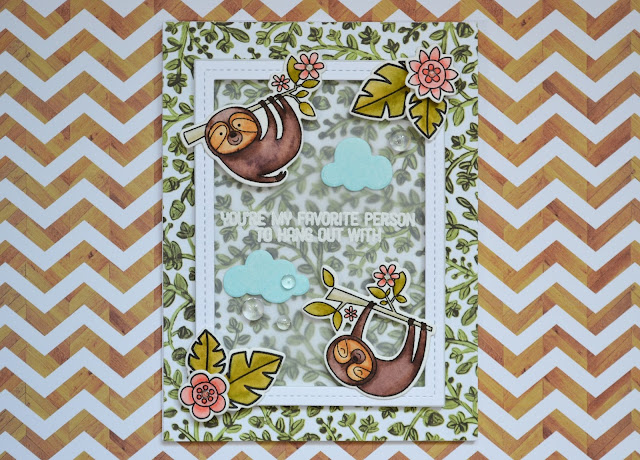
Here is a new card I made using for the first time the cutest sloth images ever! Hope you'll like it!


I first started by cutting two rectangle frames: one from white cardstock, one from white foam, and glued both piece together. I attached the frame on vellum and cut the extra pieces.

I white heat embossed my sentiment in the centre of the vellum, making sure my sloths would fit perfectly around it. Then I stamped my images on watercolor cardstock, colored them using watercolor pens and cut them using the coordinating dies.


I also colored a piece of watercolor cardstock using a light blue distress ink and die cut two little clouds from it. And as I was feeling that something was missing, I stamped some leaves and flowers that I also colored using my watercolor pens.


I attached my pattern paper on a white cardstock base using double sided tape, did the same with my white frame, and then started to glue all my elements, using glue dots and foam squares.

I added some enamel dots to the centre of the flowers, and some clear droplets to finish the card.

VIDEO
Below or here

SUPPLIES
- Sweet sloths stamp set + coordinating dies from My Favorite Things
- Critters in the jungle stanp set + coordinating dies from Lawn Fawn
- Stitched rectangle frame from Lawn Fawn
- Pattern paper from the Into the woods paper pack by Stampin Up!
- Tumbled glass distress ink from Tim Holtz
- Dual-tip watercolor pens from Santoro
- Clear droplets from Pretty Pink Posh
- Versamark ink from Tsukineko
- White embossing powder from Aladine
- Vellum from Canson
- Fun foam from Simon Says Stamp
- Solar white cardstock from Neenah

Under The Sea Card Series - The Little Mermaid - Water Shaker Card

jeudi 18 mai 2017

Hello there!

Here is a new card for my Under the sea card series I made for my great crafty friend Tina (@tinneke_th on instagram) :D Making a water shaker card was on my to-do or at least my to-try list for a very long time. But I had some hard times thinking about the process, so I finally ended up following Yainea's tutorial.

I first started by stamping a chevron pattern on some craft paper. Then I cut two circles from this craft paper and also from watercolor cardstock to create the porthole. I colored the porthole using two shades of brown distress inks, and applied some ink all around my chevron panel.


I stamped my images on watercolor cardstock, masked them, created my bottom of the ocean background using two shades of distress inks and a bunch of water splatters, and colored my images using my watercolor pens.

I stamped my sentiment on the same craft paper as the one I used for the main panel, cut it using a banner die cut and inked the edges to match the whole project.

Then I created the water shaker mechanism. I first glued a piece of clear acetate at the back of the main panel, and next I attached three foam strips around the circle, making sure there was enough space for my water shaker.


I attached my mermaid background at the back of the main panel, and I slipped my bag full of water and iridescent little stars between these two parts. I secured the bag with some classic adhesive tape and attached the whole thing to some heavy white cardstock.

I glued my sentiment using foam squares, attached some metal dots all around the porthole and added a little fish on each side of my sentiment to finish the card.

VIDEO
Below or here

SUPPLIES
- Mermaid for you & Fintastic friends stamp set + coordinating dies from Lawn Fawn
- Everyday sentiment banner die from Lawn Fawn
- Number of years stamp set from Stampin Up!
- Handcarved stamp set from Stampin Up!
- Vintage photo + Ground espresso + Salty ocean + Chipped sapphire distress inks from Tim Holtz
- Dark chocolate + Khaki inks from Simon Says Stamp
- Circle dies from my stash
- Dual-tip watercolor pens from Santoro
- Iridescent mini star confetti from Pretty Pink Posh
- Craft paper from Basic Grey
- Solar white cardstock from Neenah
- Enamel dots from My Mind's Eye

Lawn Fawn + MFT - Little Cupcake Shop - Shaker Card

lundi 8 mai 2017

Hey there!

Here is a new shaker card (I know, again! :D) I made for Marie's birthday, one of my dear crafty friends. When I received this triple window die, I knew that I wanted to use it someday to create a shop windows, so here it is!

I first started by creating the background. I masked a big part of my white cardstock to create the pavement, and then masked the pavement to create the brick wall. I applied my grey distress ink gently so the result would be soft.


I die cut the three windows, and then I created the awning. I first drew some lines on watercolor paper using a pink distress ink, and then I cut one side using a scalloped die.

To make the shaker, I attached a piece of clear acetate at the back of my panel, and several foam strips to create the sequins' spaces.


I made a sequin mix from my stash, put them in the three different spaces, and attached a piece of light pink paper to create the back of my little cupcake shop. I attached the awning using double sided tape and foam tape.

I stamped three cupcakes, colored them using my watercolor pens and cut them using the coordinating dies. At first I wanted to add a little dog, so I stamped and colored one too, but I ended up not using it.

I stamped my sentiment, attached the cupcakes and added two little pink hearts on each end of the sentiment to finish the card.

VIDEO
Below or here

SUPPLIES
- Baked with love stamp set + coordinating dies from Lawn Fawn
- Stitched scalloped border die from Lawn Fawn
- English brick wall stencil from My Favorite Things
- Stitched triple peek-a-boo window die from My Favorite Things
- Worn lipstick + weathered wood distress inks from Tim Holtz
- Dual-tip watercolor pens from Santoro
- Light pink paper from the All that glitters 6x6 pack by Kaisercraft
- Solar white cardstock from Neenah
- Watercolor paper from Canson
- Black ink from Hero Arts
- Sequins from my stash
- Beads from Pretty Pink Posh

SSS April Card Kit - Wild & Colorful - Baby Cards

samedi 6 mai 2017

Hey there!

It's been a while since the last time I played with a card kit from Simon Says Stamp. When I saw the beautiful papers and the cute stamps, I couldn't help myself making baby cards.


The process is the same for each card. I first started by cutting all the papers I wanted to use: four scalloped rectangles from the plaid papers, four stitched circles from vellum, four 8cm by 14 cm rectangles for my bases, and I used four beige tags from the kit.


On each rectangle, I used stitched line dies to add some cute interest. On each tag, I applied a distress ink that would match the base using a heart stencil. To cover the little craft circle at the top of the tags, I punched four circles that I glued instead.

I stamped my images, and colored them using my alcohol markers. I wanted to keep the coloring very simple, so nothing fancy and no shading. I fussy cut them, and to make them funnier and cuter, I added wiggly eyes.


Next I assembled all the papers together. The vellum piece on top of the scalloped rectangle, the scalloped rectangle on top of the tag. And the tag on top of the rectangle. I added some coordinating bakers twine at the top of each tag. Glued some white thread using big glue dots. And attached each little animal on top using foam squares.


For my sentiment, I die cut the word "welcome" from four different colors of mirror cardstock, attached it on each panel, and added the words "little one" just below. And I finally attached each panel on a white card base.

 VIDEO
Below or here

SUPPLIES
- Wild & Colorful april card kit from Simon Says Stamp
- Drawn hearts stencil from Simon Says Stamp
- Welcome spring die from Taylored Expressions
- Little Bundle stamp set from Lawn Fawn
- Broken china + candied apple + twisted citron + seedless preserves distress inks from Tim Holtz
- Scalloped rectangle stackables from Lawn Fawn
- Large stitched circle stackables from Lawn Fawn
- Basic stitched lines from My Favorite Things
- Vellum from Canson
- Lipstick red cardstock from Simon Says Stamp
- Purple cardstock from Bazzil
- Solar white cardstock from Neenah
- Mirror cardstock from my stash
- Bakers twine from Hemptique
- White thread from my stash
- Memento tuxedo black ink from Tsukineko
- Copic markers + Spectrum Noir markers
- 1,5cm circle punch from Artemio
- Wiggly eyes from Artemio