Sunny Studio - Summer Greenery Tropical Shaker Card

jeudi 30 juin 2022

Hello there,

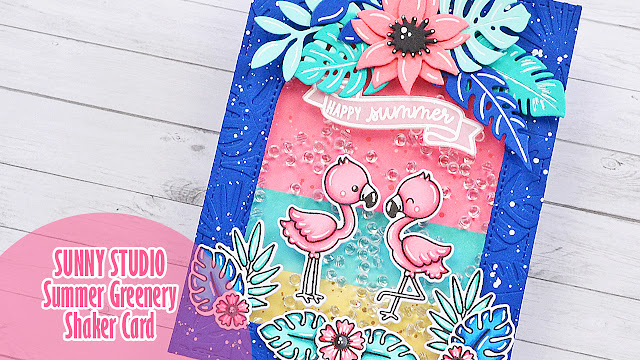
I'm back on Sunny Studio blog today with a new shaker card, I'm quite obsessed with them at the moment, they're so fun to make! This new card features some beautiful leaves from the Summer greenery die set, but before cutting them, I started off by stamping two cute flamingos, as well as some flowers and tropical leaves from Fabulous flamingos that I colored using my alcohol markers.

Next I created a simple distress oxide ink background. I divided a 5,5 x 4,25 inches bristol panel in three sections: sand at the bottom, ocean right above it, and sky at the top. For the sand section, I used antique linen + vintage photo + copic opaque white ink, for the ocean I used salvaged patina + peacock feathers, and for the sky I used worn lipstick + festive berries + copic opaque white ink.


I set my oxide ink panel aside to dry, and then created the panel that goes on the front. I cut a 5,5 x 4,25 inches navy blue panel, as well as a bunch of leaves out of the same paper using the Summer greenery die set. I attached the leaves on the panel using liquid glue, I added copic opaque white ink splatters and then cut a window out of the panel using a Stitched arch die.

I attached my window panel on a piece of acetate, added foam strips at the back of the panel all along the arch and on the sides as well, poured a bunch of clear jewels inside the window and then stuck the oxide ink panel to the foam strips to complete my shaker panel.


Next I cut more Summer greenery leaves and Spring greenery leaves out of different colored cardstock. I also created a flower using dies from the Botanical backdrop die set, I arranged all those pieces at the top of the arch window to create a cluster, and attached them all using foam squares and glue dots, as well as the flamingos, flowers and leaves at the bottom of the arch.

For my sentiment, I white heat the banner from Little birdie on vellum, as well as the "Happy summer" phrase from Fabulous flamingos inside of it, and finally attached it below the flower & leaf cluster using clear foam squares.


VIDEO


SUNNY STUDIO SUPPLIES
- Summer greenery die set
- Fabulous flamingos stamp set
- Little birdie stamp set
- Spring greenery die set
- Botanical backdrop die set
- Stitched arch die set


OTHER SUPPLIES
- Spectrum Noir markers
- Graph'it brush markers
- Oxide inks: antique linen, vintage photo, salvaged patina, peacock feathers, worn lipstick, festive berries
- Sakura white gel pen
- Copic opaque white ink
- Clear jewels from Picket Fence Studio
- Clear embossing ink by Lawn Fawn
- Fine white embossing powder by Hero Arts
- Vellum from Lawn Fawn
- Colored cardstock from The Stamp Market
- Strathmore bristol smooth cardstock
- Extreme black ink by My Favorite Things

Lawn Fawn - Swimming Pool Slimline Shaker Card

mardi 28 juin 2022

Hello there,

How about going to the swimming pool today to have a relaxing and refreshing moment. Today I'm on Lawn Fawn YouTube Channel with this re-creation of a card I made for Inspiration & Release Week in May. I got some comments and messages from people who would have loved to watch a video of that card. So I thought it would be fun to re-make it, using the same process, but with a different look.

I started off by stamping all the images using jet black ink and I colored everything using my alcohol markers with a fun and bright main color palette: green, aqua, yellow and pink. Once all the images were colored, I used the coordinating dies to cut them all. And then I created the decking panel.


I cut an 8,5 x 3,5 inches panel out of woodgrain kraft cardstock, and the Simple stripes landscape backdrop die to cut wood planks out of this slimline panel. I kept all the wood planks together using washi tape, and I cut the swimming pool shape using a Stitched rectangle frame. And then I used the same die to cut three rectangle frames out of vanilla malt cardstock.


I assembled all those pieces (wood planks + frames) on a large piece of clear acetate, and then I created room for the shaker pieces at the back of the panel using two layers of foam sticky strips. I attached a piece of All the dots pattern paper on a paper bag card base, added a bunch of clear jewels inside the pool, and finally stuck the card base to the foam strips to totally complete my decking swimming pool shaker panel.


Next I attached all my cute and colorful images on the panel using foam squares and glue dots, added white highlights and details on all of them, and finally glued a few clear droplets here and there to emphasize the water/wet theme.


VIDEO


LAWN FAWN SUPPLIES

Stamp sets
- Pool party
- Toucan do it
- Critters in the jungle
- Really high five
- Beary rainy day
- On the beach

Die sets
- Simple stripes landscape backdrop
- Stitched rectangle frames
- Large slimline with sliders

Papers
- All the dots paper pack
- Vanilla malt cardstock
- Woodgrain kraft cardstock
- Paper bag cardstock

Misc
- Jet black ink
- Glue dots
- Liquid glue


OTHER SUPPLIES
- Spectrum Noir markers
- Graph'it brush markers
- Sakura white gel pen
- Clear droplets by Gina K. Designs

Sunny Studio - Underwater Rainbow Shaker Card

jeudi 23 juin 2022

Hello there,

I'm back on Sunny Studio blog today with a rainbow shaker card featuring some cute and colorful jellyfish from Fintastic friends. I first started by stamping six jellyfish using an alcohol marker friendly black ink, and I went all rainbow to color those adorable sea critters.

I cut a 5,5 x 4,25 inches bristol panel, and to match the jellyfish, I picked some oxide inks to create an underwater rainbow background. From the top to the bottom I applied: kitsch flamingo, squeezed lemonade, cracked pistachio, peacock feathers and wilted violet. I added a little bit of texture but not too much: water splatters and white ink splatters.


Next I created the shaker. I cut the frame and two borders out of white cardstock using the Tropical trees die set, and first attached the frame on a piece of acetate. At the back of that frame, I added two layers of foam strips, poured a bunch of clear jewels inside the window, and then attached my rainbow panel to the foam strips to close and complete the shaker panel.


On the front of the card, I attached a border on each side, these are like vertical rocks and the jellyfish will swim between those two walls. I also embossed my sentiment from Best fishes in white in two parts: "It's your birthday" & "Make a splash" on black cardstock. And I trimmed those two phrases into two slim banners that I attached on my panel, along with the rainbow jellyfish, using foam squares.

As always I finished my card with some white highlights on the images, and I added a few clear droplets here and there on each side to totally complete my card.


VIDEO


SUNNY STUDIO SUPPLIES
- Fintastic friends stamp set
- Tropical trees die set
- Best fishes stamp set

OTHER SUPPLIES
- Spectrum Noir markers
- Graph'it brush markers
- Oxide inks: kitsch flamingo, squeezed lemonade, cracked pistachio, peacock feathers, wilted violet
- Sakura white gel pen
- Copic opaque white ink
- Clear embossing ink by Lawn Fawn
- Fine white embossing powder by Hero Arts
- Clear jewels by Picket Fence Studio
- Black licorice cardstock by Lawn Fawn
- Strathmore bristol smooth cardstock

Sunny Studio - Tropical Trees Nativity Scene

jeudi 16 juin 2022

Hello there,

I am back with a Christmas card! In June! It might be a bit early, but when I saw those palm trees from the Tropical trees die set by Sunny Studio, it clicked in my head and I immediately pictured a nativity scene, with black silhouettes, during a bright starry night.

I started off by cutting an 8,5 x 3,5 inches bristol panel, and I first created sand dunes using a slimline hill stencil along with tumbled glass and blueprint sketch oxide inks. And for the sky, I went with prize ribbon, chipped sapphire and black soot oxide inks. I kept the sand dunes without any texture, but I wanted the night sky to be full of stars, so I added lots of details on that part of the card: water splatters, white ink and liquid sparkles.


Next I cut the different elements out of black cardstock to create silhouettes. I cut four palm trees and two borders using the Tropical trees die set, and used coordinating dies from Holy night to create the nativity scene. And I attached all those pieces using foam squares: the borders at the bottom, the nativity scene in the middle and two palm trees on each side.


I embossed my "O holy night" sentiment from Holy night in silver on a small black Stitched circle that I attached in the middle of the card, and I finished my card by adding more stars in the sky using a white gel pen.


VIDEO


SUNNY STUDIO SUPPLIES
- Tropical trees die set
- Holy night stamp set
- Stitched circle large die set


OTHER SUPPLIES
- Oxide inks: tumbled glass, blueprint sketch, prize ribbon, chipped sapphire, black soot
- Sakura white gel pen
- Copic opaque white ink
- Liquid stardust by Lawn Fawn
- Clear embossing ink by Lawn Fawn
- Silver embossing powder by Lawn Fawn
- Black licorice cardstock by Lawn Fawn
- Slimline hill stencil by Lawn Fawn
- Strathmore bristol smooth cardstock

Celebrating Spellbinders 20th Birthday

mardi 14 juin 2022

Hey there,

Today is a very special day because Spellbinders celebrates its 20th birthday! What an incredible milestone, congratulations!!

Spellbinders is launching a Birthday Celebration Collection to celebrate this event, and I'm thrilled to join the party with those two birthday cards that feature the Color Block Balloons die set, Hand Drawn Scallops embossing folder and Birthday Unboxing Glimmer plates.

I went all rainbow, and even added vellum balloons that I gold foiled using the Twinkle Lights Hot Foil plate to give the illusion of clear balloons full of big gold confetti.

It was my very first time using the hot foil technique, so I don't have any process video to offer, but I loooved it, so I will definitely share videos using that technique in the future!

Happy birthday, Spellbinders!


Sunny Studio - Country Carnival Pop-Up Box card

jeudi 9 juin 2022

Hello there,

I'm back on Sunny Studio Blog, and today I take you to a theme park to have some fun, and eat popcorn and cotton candy! This super bright and colorful pop-up card features the adorable Country carnival stamp set, and to complete my scene, I also picked the castle from Enchanted, and the trees from Spring Scenes.

As always, I started off by stamping all the images using an alcohol marker friendly black ink, and I colored them using my alcohol markers in kind of a traditional funfair/amusement park colors: red and yellow, with a little bit of aqua and light grey.


Next I created the pop-up card base using colored cardstock, as well as a paper from Heroic Halftones and another one from Rainbow bright. On the front, I white heat embossed my sentiment " Wishing you lots of fun on your birthday" from Country carnival, I added highlights and details on the images using a white gel pen, and then I attached them all inside the box using 3mm glue dots.

And that's it! Hope you like this new cute and fun card! As always, feel welcome to watch the process video for more information and details. See you next week!


VIDEO


SUNNY STUDIO SUPPLIES
- Country carnival stamp set
- Enchanted stamp set
- Spring scenes stamp set
- Heroic halftones paper pack
- Rainbow bright paper pack


OTHER SUPPLIES
- Spectrum Noir markers
- Graph'it brush markers
- Mini slimline outside the box level up die set by MFT
- Mini slimline outside the box grassy hills die set by MFT
- Colored cardstock by The Stamp Market
- Clear embossing ink by Lawn Fawn
- Fine white embossing powder by Hero Arts
- Sakura white gel pen

Crafty Meraki - Rainbows & Balloons Birthday Cards

lundi 6 juin 2022

Hello there,

I'm back with a second set of cards I created as a guest designer for Crafty Meraki. Today is all about rainbows and cute bears, I've made two cards showcasing the ever so cute Birthday Bears stamp set, as well as the Party Balloons Mini Slimline die, and the Birthday Balloons stencil.

I started off by stamping the images using Lawn Fawn jet black ink, I cut them using my Scan 'n Cut machine, and colored everything using my alcohol markers.


For my first card, I cut a 5,5 x 4,25 inches kraft panel, and created white balloons using the Birthday Balloons stencil and white pigment ink. I cleaned the stencil, and next I put it back on the paper, shifting it a little bit to the right, and I applied kitsch flamingo, squeezed lemonade, cracked pistachio and peacock feathers oxide inks to create rainbow balloons.

I added some white ink splatters all over the panel, and once the panel was dry I heat embossed my "Happy Birthday" sentiment in gold in the middle of the panel. And then I attached all my cute images using 1mm foam squares.

As always I finished my card by adding white highlights and details on the images, and also added a few golden heart sequins for a touch of shine on this bright and cheerful birthday card.

***

For the second card I cut a 6,25 x 3,5 inches bristol panel, and used the same oxide inks as the ones I used before to create a rainbow background. And I added water splatters, and some droplets of white ink.


Next I cut the three Party Balloons Mini Slimline panels out of white cardstock. I stuck one of them on a piece of clear acetate, and attached the two other ones at the back of it. I added a bunch of tiny golden star sequins into each balloon section. And then I stuck my rainbow panel to totally close and finish my shaker panel.

Finally I white heat embossed my "Let's celebrate" sentiment on a black banner that I attached on the card using foam squares, along with a cute bear right above it.


VIDEO


CRAFTY MERAKI SUPPLIES
- Birthday bears stamp set
- Party balloons mini slimline die
- Birthday balloons stencil


OTHER SUPPLIES
- Spectrum Noir markers
- Graph'it brush markers
- Oxide inks: kitsch flamingo, squeezed lemonade, cracked pistachio, peacock feathers
- Sakura white gel pen
- Copic opaque white ink
- White pigment ink by Simon Says Stamp
- Clear embossing ink by Lawn Fawn
- Gold embossing ink by Lawn Fawn
- Fine white embossing powder by Hero Arts
- Golden heart confetti by Pretty Pink Posh
- Golden star confetti by Pretty Pink Posh
- Kraft cardstock by Lawn Fawn
- Black licorice cardstock by Lawn Fawn
- Strathmore bristol smooth cardstock

Sunny Studio - Three Frogs in a Pond

jeudi 2 juin 2022

Hey there,

I'm back with three little frogs having fun around the pond! I used the Swimming pool die to create the pond, as well as some images from different sets to make this cute scene:

Country scenes: cattails + lily pad
Feeling froggy: frog + dragonfly
Best fishes: leaves
Sealiously sweet: sentiment


I stamped all those cute images using an alcohol marker friendly black ink, coloring them using my alcohol markers, and cut everything using the coordinating dies.

For the background, I first cut a 5,5" x 4,25" bristol panel, and I used grass stencils along with mowed lawn + rustic wilderness distress oxide inks to create a large grass section on half of the panel. And on the rest of the panel, I created the sky using a cloud stencil along with tumbled glass + salty ocean distress oxide inks.


Next I cut the Swimming pool element, and I wanted the pond to look natural, so I colored it using grey markers to give it some stone effect. And to make the water inside the pond, I placed the die on a piece of bristol cardstock, traced the shape on the paper, fussy cut it, and then I colored that element using shabby shutters + broken china distress oxide inks.

I attached my pond border on the water element using foam squares, and then I stuck the whole piece on the panel using liquid glue. I cut around the frog images to get rid of the lily pads, and next I attached all my cute images on the panel around the pond using foam squares and glue dots.


For the sentiment, I stamped the words "You're" & "Awesome" on the top part of the panel, and between those words, I glued some letters that I cut using the Chloe alphabet die set to finally read "You're froggin' awesome".

I finished my card by attaching the panel on a kraft card base and adding white details and highlights on the images, and that's it! We have a cute and fun little scene, and I hope that you like it! As always, feel welcome to check the process video for more details. Thanks for stopping by and see you next week!


VIDEO


SUNNY STUDIO SUPPLIES
- Swimming pool die
- Feeling froggy stamp set
- Country scenes stamp set
- Best fishes stamp set
- Sealiously sweet stamp set
- Chloe alphabet die set


OTHER SUPPLIES
- Spectrum Noir markers
- Graph'it brush markers
- Oxide inks: mowed lawn, rustic wilderness, tumbled glass, salty ocean, shabby shutters, broken china
- Sakura white gel pen
- Copic opaque white ink
- Grass stencils by Lawn Fawn
- Cloudy stencil by Lawn Fawn
- Jet black ink by Lawn Fawn
- Black versafine ink
- Strathmore bristol smooth cardstock

Lawn Fawn - Citrus Edge to Edge Shaker Cards

Hi there,

I'm on Lawn Fawn YouTube Channel with this set of edge to edge citrus shaker cards, one with lemons and one with limes, showcasing Zesty Lemon. They were inspired by two cards I made for Inspiration & Release Week in May; I just added a shaker twist to make them even more fun.

I die cut all the elements, and to cut the lemons and limes, I picked the new Textured Canvas papers, these were definitely meant to make citrus elements, just perfect. And I also went through my cardstock collection to pick a few colors to cut the other elements.

I assembled all the pieces using liquid glue, and then I cut two 5,5 x 4,25 inches panels out of papers from the Flower Market paper pack. And next I created the edge to edge shaker panels. Please watch the video down below to see the whole process ^^


Once the shaker panels were done, I arranged and glued the lemons on the yellow panel, and the limes on the green panel using glue dots. I also cut some letters using the Henry's ABCs die set to make the words "Squeeze" and "Sub-lime".

And to complete my sentiments, for the green card, I white heat embossed "Hope your day is" from You goat this on mermaid cardstock, and for the yellow card, I white heat embossed the word "The" from You goat this as well and the word "Day" from All the clouds on mermaid cardstock. So on the yellow card my sentiment reads "Squeeze the day", and on the green card it reads "Hope your day is sub-lime".


I attached the yellow panel on a sticky note card base, and the green panel on a cilantro card base, I added highlights and details on the elements using a white gel pen, and finally I applied glossy accents on the lime segments and lemon segments to make them shiny and juicy.


VIDEO


LAWN FAWN SUPPLIES

Die sets
- Zesty lemon
- Henry's ABCs
- Large stitched rectangle stackables

Stamp sets
- You goat this
- All the clouds

Paper packs
- Flower market
- Spring fling

Cardstock
- Textured canvas (yellow)
- Textured canvas (green)
- Cilantro
- Noble fir
- Mermaid
- Sticky note
- Vanilla malt
- Fake tan
- White

Misc
- Clear embossing ink
- White embossing powder
- Glue dots


OTHER SUPPLIES
- Sakura white gel pen
- Glossy accents by Ranger
- Shaker mix by Dress my craft