25 Days of Christmas Tags with Hello Bluebird

vendredi 29 novembre 2019


Hello there,

I'm back today with tags for the 25 days of Christmas tags event, but this time featuring some cuties from Hello Bluebird. This 25 days of Christmas tag event is organized by Tracey McNeely and a lot of craft companies are sponsoring it.

There are many ways that you can get a chance to win a prize, and you will find all the details in Tracey's blog post.


So I first started by cutting six tags out of corrugated cardstock. And next I added a lot of texture to my tags: I applied white ink on the tags to make the corrugated texture pop, next I splattered white paint to create falling snow, and when it was dry I roughly applied white paste on the edges to create a frosty look on my tags. And to bring this frosty effect out, I sprinkled glitter on the paste to make it sparkle like real snow.


While the paste was drying, I stamped and colored my images, and when the coloring was done, I cut the images using the coordinating dies.


To get a nice back for my tags I attached them on a piece of brown cardstock, and next I used my cropadile to pierce holes at the top of my tags and to add white eyelets. I cut additional tags out of pattern papers by Echo Park and added white eyelets on those elements as well.

And finally, I stuck the critters, some snowflakes and assembled the tags with ribbon, twine and small bells.


VIDEO
Below or here

HELLO BLUEBIRD SUPPLIES
- First Snow stamp + die sets
- Frosty Flakes die set

OTHER SUPPLIES
- Spectrum Noir markers
- Kraft cardstock from my stash
- Pattern papers from by Echo Park
- Neenah solar white cardstock
- Brown cardstock by Lawn Fawn
- Vellum by Simon Says Stamp
- Pixie Dust cardstock by Lawn fawn
- White embossing paste by Wendy Vecchi
- Prisma glitter by Lawn Fawn
- Red ribbon by Stampin Up!
- Twine by Stampin Up!
- Bell from my stash

Isabel Cristina Stamps - Magical Snow Globe Tags

jeudi 28 novembre 2019

Hey there,

Lately I've been into making tags. Christmas tags, mostly. And today I'm back with more tags showcasing a brand new digital stamp set called Magical Snow Globe and designed by Isabel Cristina Stamps.

This new set theme is Harry Potter so if you're a fan or if you know someone who'd like to receive a magical card, this set is definitely for you.


As always when I use digital stamps, I printed my images on neenah solar white cardstock and cut them using my scan n cut machine. I wanted to make three tags with fronts and backs so I also printed and cut six globes. To create an opening in the globes, I used a circle die.


I could have made shaker globes but I wanted to try the embellished window technique Jennifer McGuire shared a couple of months ago on her channel. It's a very easy technique and the result is really cool.


I took a laminating sleeve, opened it and sprinkled white embossing powder inside of it. I folded the sleeve and put it through my laminator. And with the heat of the machine, the embossing powder melts inside of the sleeve.


Next I cut three pieces out of my snowy sheet, using a globe as a guide, and stuck them at the back of the globes using liquid glue. And then I simply adhered the other side of the globes to complete the tags (before attaching the pieces together, I added small pieces of gold thread to create a handles)


I colored the images using my alcohol markers, and next I attached them on the globes, fronts and backs. Finally I added white highlights on the images.

VIDEO
Below or here

SUPPLIES
- Magical Globes digital stamp set by Isabel Cristina Stamps
- Spectrum Noir markers
- Sakura white gel pen
- White embossing powder by Lawn Fawn
- Laminator + laminator sleeves from my local supermarket
- Neenah solar white cardstock
- Gold thread by Stampin Up!

Holiday Card Series 2019 w/ Hello Bluebird - Christmas in the Jungle

mardi 26 novembre 2019

Hi there, 
I'm back with a card featuring some cuties all gathered and getting ready to celebrate Christmas in the jungle.
To start, I stamped all my images on white cardstock using memento tuxedo black ink and I colored them using my alcohol markers. Here is a list of all the stamp sets that are featured on this card:
For my background, I cut a large panel out of strathmore bristol cardstock, two grass borders using a die from the Grassy Knoll die set and a cloud border using a die from that same Grassy Knoll die set and that I will use it as foliage.
To create the sky, I blended scattered straw, shabby shutters and mowed lawn oxide inks on my bristol panel. And I used a stencil and the same inks to give the illusion of woods in the background. The grass and cloud borders were colored using mowed lawn with a little bit of vintage photo to add shadows.
My critters needed a house so I cut a tree house out of woodgrain cardstock using the new Treehouse Scene die set. I also cut two additional trees using a die from the Halloween tree die set. And to give those elements a little more texture, I applied vintage photo and ground espresso distress inks on them.
I added splatters of ground espresso distress ink and also stuck vellum at the back of the house. And next I assembled the background elements, starting with the grass borders.
Next I cut a leaf using a die from the Tropical Foliage die set to use as a Christmas tree and colored it using my alcohol markers. And then I finally attached all the images using foam squares, glue dots and liquid glue.
For my sentiment, I cut the Wild About You sentiment out of woodgrain cardstock but used the word Wild only. And to complete it, I white heat embossed the words “Merry and” from the Snow Play stamp set on aqua cardstock so we can read “Merry and Wild” in the end. I trimmed around the words to create a small banner that I attached below the word Wild.
I stuck the remaining flowers and added white highlights on the images. And as a last final touch, I added dots of white nuvo drops in the center of each flower.
And that’s it! I hope you like this non traditional Christmas card! I leave you with the video (click on the picture below) and wish you an amazing day!
VIDEO
Below or here

HELLO BLUEBIRD SUPPLIES
Jungle Littles stamp + die sets
More Jungle Littles stamp + die sets
Autumn Gatherings stamp + die sets (for the bow tie)
Merry Mice stamp + die sets (lights + small present)
O Christmas Tree stamp + die sets(presents + scarf)
Snow Play stamp + die sets(hat + sentiment)
First Snow stamp + die sets(beanie)
Christmas Is Coming stamp + die sets(tiny hat)
North Pole Littles stamp + die sets (socks)
- Grassy Knoll die set
- Wild About You Words die
- Tropical Foliage die set
- Treehouse Scene die set
- Halloween Tree die set
OTHER SUPPLIES
- Spectrum Noir markers
- Oxide inks: scattered straw, shabby shutters, mowed lawn
- Distress inks: vintage photo, ground espresso
- Stencil by Tim Holtz
- Woodgrain cardstock by Lawn Fawn
- Clear embossing ink by Lawn Fawn
- White embossing powder by Hero Arts
- Sakura white gel pen

25 Days of Christmas Tags with Lawn Fawn

dimanche 24 novembre 2019

Hello there,

Today I'm very happy to be part of the 25 days of christmas tags event. It's a fun event organized by Tracey McNeely and a lot of craft companies are sponsoring it.

There are many ways that you can get a chance to win a prize. Please check Tracey's blog post to know those different ways.


So I wanted to create gingerbread house tags and to do so, I cut a bunch of elements using the Build a house die set as well as the Christmas add-on and also the Shadow box card mountain add-on for the trees.


I first started by applying double sided tape at the back of the house, I removed the back of the tape and attached a piece of twine to create the tag handle. I applied more tape, and stuck the house on a piece of the same kraft cardstock. I trimmed off the excess of paper to get a nice back for my house.

I can't create something without adding texture so I mixed vintage photo distress ink with water and splattered drops on my house, front and back. And for some contrast, I added splatters of white paint, front and back as well.


When both sides of the house were dry, I added details to the front. And once the main elements (door, window, roof, etc...) were attached, I added white nuvo drops to give the illusion of icing. And to coordinate with the window and door frames that were cut out of pixie dust cardstock, I sprinkled prisma glitter on the nuvo drops. This way I get a nice and sparkly icing.


I cut trees out of kraft cardstock, splattered the same ink and paint as before, and applied white nuvo drops on those elements.

Next I die cut three diagonal gift card pocket elements, cut the word "To" and a heart out of those pieces, covered the back using a piece of white cardstock, glued the middle of the letter O in place, applied thin double sided tape on all the edges except for the diagonal side and attached the element at the back of the house to create a pocket.


I was happy with my tags but felt that they needed some extra details, so I stamped images from the Sweet Christmas stamp set using brown ink and colored them using my alcohol markers.

When the images were colored I fussy cut them because I didn't want a white border around, and I stuck them, along with the trees, on my gingerbread houses.

And as a last final touch, I added clear shimmer on the images.

VIDEO
Below or here

LAWN FAWN SUPPLIES
- Build a house die set
- Build a house Christmas add-on
- Shadow box card mountain add-on
- Sweet Christmas stamp set
- Snow day remix 6x6 paper pack
- Cilantro cardstock
- Ballet slippers cardstock
- Mermaid cardstock
- Kraft cardstock
- Paper bag cardstock
- Pixie dust cardstock
- Prisma glitter
- Crunchy leaf ink

OTHER SUPPLIES
- Spectrum Noir markers
- Distress ink: vintage photo
- White paint by Hero Arts
- Simply white nuvo drops by Tonic Studio
- Twine from my stash

Holiday Card Series 2019 w/ Lawn Fawn - Clean & Simple Card Challenge

mardi 19 novembre 2019

Hi there,

I'm back today with something unusual: two clean and simple cards. I like that kind of project but if you follow for some time, you know that I'm a busy card kind of person.

But with my friends Mona and Laura, we've decided to challenge ourselves: we had to make clean and simple cards using one Lawn Fawn stamp set only. I chose the Mice on Ice stamp set. Not easy when you like to always add more and more details to a card so I hope I took up this challenge well.

So I first started by cutting a 5,5 x 4,25 inches kraft panel, and I used two circle dies from the Just Stitching Double Circle die set to create prints on my panel.


When it was done I placed my panel in my misti tool and stamped one of the images using brown ink.
And I colored those cute mice using different shades of browns to get a nice sepia/vintage look. When it was done, I stamped some snowflakes around the mice to add more interest.

Even if it's a clean and simple card, my panel was definitely too flat to me so I applied a little bit of vintage photo distress ink on the edges.


Next I stamped my sentiment: 
the first part using candied apple oxide ink to stamp the word "Joyful", and the second part at the bottom right hand corner using brown ink and saying "May the little things bring you happiness".

For a tiny little touch of sparkles I added a dot in the middle of each snowflake using a gold gel pen. And next I will stick my panel to a kraft card base.

And next I made a second card using two other stamps from the same set. I also used the same markers and the same inks to create it.


VIDEO
Below or here

LAWN FAWN SUPPLIES
- Mice on ice stamp + die sets
Just Stitching Double Circle die set

OTHER SUPPLIES
- Spectrum Noir markers
- Oxide ink: candied apple
- Distress ink: vintage photo
- Neenah desert storm cardstock
- Gold gel pen by UniBall

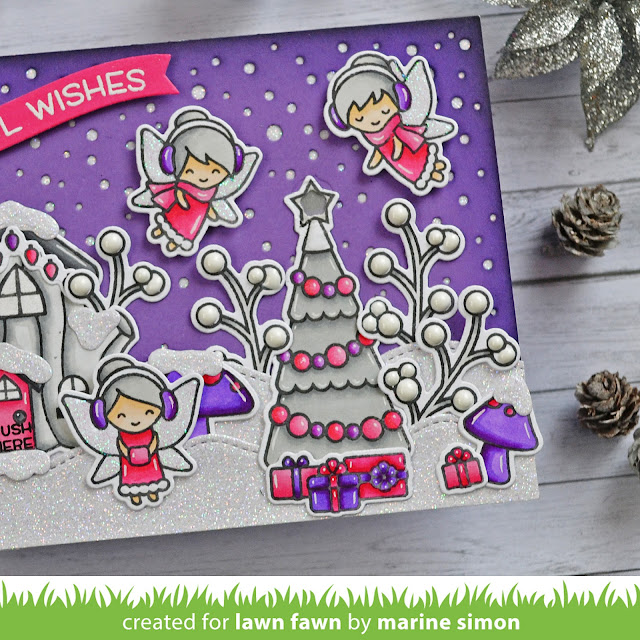
Holiday Card Series 2019 w/ Lawn Fawn - Light Up Fairy Card

Hi there,

A few days ago I shared a cute mushroom house showcasing the Lawn Fawn Merry Mice light up kit. It was the very first time I was using LEDs and copper tape on a card but I liked it so much that I wanted to create another light up card.

So this new card features the Frosty Fairy Friends stamp set, it's an oldie but goodie product and it's actually my all time favorite holiday stamp set.


I first started by cutting a background panel using Sugarplum cardstock and the Snowy Backdrop die. I applied wilted violet distress ink on the edges, and added a tiny bit of black soot to create more depth. To get a nice and pretty snowy sky, I stuck my panel on Pixie Dust cardstock.

As usual I stamped my images on white cardstock using Jet Black ink and colored them using my alcohol markers, using purples and pinks with touches of white. And I colored the tree to be silver.


When the coloring was done, I cut the images using the coordinating dies. Next I cut two borders out of Pixie Dust cardstock using dies from the Stitched Simple Wavy Border die set. I layered those borders and temporarily taped them to my snowy background.

I placed the images to get a general idea of the scene and marked where the Christmas tree star should be using a pencil. And I used a star shape die from the How You Bean Christmas Cookie Add-on set to cut my snowy panel right on the pencil mark. And I also cut the same star shape out of the top of my Christmas tree. To get a more diffuse light and at the same time hide the LED, I stuck a piece of vellum at the back of the star.

Next I adhered the pixie dust borders at the bottom of my snowy panel, cut a card base out of Sugarplum cardstock and marked the star spot on the card base to know exactly where I should put the LED.


Next I created the whole light up mechanism but it's easier to understand the process with a video so I highly recommend that you watch the video below to see how I made it ^^

When it was done, I applied three layers of foam tape to make sure that the light won't be on all the time. I removed the back paper, and attached my snowy panel on top. I attached was the tree first, and then I stamped the phrase Push Here. It's from the light up kit that was released last week but you can use a stamp from the Push Here stamp set that is from a previous release.

I stuck the house using glue dots making sure the door was positioned on the battery spot, and then I attached the remaining images. I added clear shimmer on some spots such as the windows, the star, the fairies dresses and tree ornaments, and next I applied white nuvo drops on each branch. And of course fairies need sparkly wings so I applied white blizzard nuvo drops on those elements.


For my sentiment, I first cut a banner out of pink cardstock using a die from the Simple Wavy Banner die set and white heat embossed the phrase Joyful Wishes from the Winter Wavy Sayings stamp set on it.

My scene needed more snow details so I cut a few extra pieces out of Pixie Dust cardstock using coordinating dies from the Frosty Fairy Friends stamp set and glued them on the house. I adhered the banner using foam squares, and added some mushrooms and gifts here and there, and also lights on the house to complete the scene. And the last final touch was to add white highlights on the images to make them pop a little bit more.

VIDEO
Below or here


LAWN FAWN SUPPLIES
- Frosty fairy friends stamp set 
- Christmas dreams stamp set
- Winter wavy sayings stamp set
- Merry mice for chibitronics stamp set (or equivalent Push Here stamp set)
- How you bean Christmas cookie add-on 
- Snowfall backdrop landscape die
- Stitched simple wavy border die set
- Simple wavy banner die set
- Jet black ink
- Clear embossing ink
- White embossing powder
- Sugarplum cardstock 
- Pixie dust cardstock

OTHER SUPPLIES
- Spectrum Noir markers
- Distress inks: wilted violet, black soot
- Sakura white gel pen
- Vellum from my stash
- Simply white nuvo drops by Tonix Studio
- White blizzard nuvo drops by Tonic Studio
- Clear shimmer pen by Spectrum Noir

Holiday Card Series 2019 w/ Magengo - Christmas Tags

samedi 16 novembre 2019

Hello there,

This week I shared three cute treat boxes for Magengo and I thought it would be nice to make coordinating tags.


So I started by cutting three tags out of navy blue cardstock using a die by Craftin Desert Divas, and I added texture and dimension to those pieces using embossing folders and a stencil.

For the first tag, I used an embossing folder with trees. For the second tag I used an embossing folder with snowflakes. And for the third tag, I used a stencil. I simply put the tag and stencil on top of two pieces of cardstock and I sent everything to my die cutting machine.


To make the embossed designs stand a little bit more, I very lightly applied a light champagne ink using an ink blending tool. And when it was done, I used a paper towel to get rid of any excess of ink.

To coordinate with my treat boxes, I cut three tags out of pattern papers from the I Love Winter paper pack by Echo Park. I used teal glitter ribbon to keep both tags together and tied a knot using white thread.


I printed three images from the Happy Winter digital stamp set and colored them using my spectrum noir markers. I fussy cut them and then I attached a vellum circle on each tag. I stuck two glue dots in the middle of the vellum circle, and attached silver thread. And finally I adhered the image on top of the thread using foam squares.


For the sentiments, I started by cutting three banners out red cardstock and I white heat embossed the phrases "Joyful Wishes" "Happy Holidays" and "Winter Wishes" on those elements.

I stuck a banner on each tag, and as a final touch I added clear droplets to add some sparkles to the tags.

VIDEO
Below or here


SUPPLIES
- Happy Winter digital stamp set by Magengo
- Spectrum Noir markers
- Tree embossing folder by Kaiser Craft
- Snowflake embossing folder by Toga
- Stencil by Echo Park
- Navy blue cardstock by Bazzil
- Pattern papers from the I Love Winter paper pack by Echo Park
- Vellum by Simon Says Stamp
- Silver thread from my stash
- Teal glitter ribbon by Stampin Up!
- Clear droplets from my stash
- Red cardstock from my stash
- White embossing powder by Hero Arts

Holiday Card Series 2019 w/ Magengo - No Glue Treat Boxes

mercredi 13 novembre 2019

Hello there,

I'm back today with three simple treat boxes that are easy to build and need no glue. I used a cut file designed by Magengo called No Glue Box and my Scan 'n Cut machine but you can also use a silhouette machine.


So I cut the boxes out of navy blue cardstock and cut some papers to decorate them: silver paper and pattern papers from the "I love Winter" paper pack by Echo Park. And I attached those elements on the box panels using liquid glue.


Next I built the box. Very easy, you just have to fold the stitched lines that the machine creates and then you put the box together. Please check the video below to see how it's done.


To close the boxes I added ribbon and to decorate them I colored trees from the O Christmas Tree digital stamp set using my alcohol markers. And I tried to use the same colors as the ones on the pattern papers.

When the trees were colored, I fussy cut them and cut circles out of vellum that I stuck on the boxes. I adhered glue dots in the middle of the vellum circles and attached silver thread. And then I stuck the Christmas tree on the boxes right on the thread using foam squares. And the final step was to add clear shimmer on the trees.


VIDEO
Below or here


SUPPLIES
- Spectrum Noir markers
- Navy blue cardstock by Bazzil
- Pattern papers from the I Love Winter 6x6 paper pack by Echo Park
- Ribbon by Stampin Up!
- Silver thread from my stash
- Neenah solar white cardstock
- Clear shimmer pen by Spectrum Noir

Miss Ink Stamps - Watercolored Holiday Scenes - Zig Markers

samedi 9 novembre 2019

Hi there,

Miss Ink Stamps new release is now available and I'm very happy to showcase some of the new products in my video and blog post today.


For the first card, I used the Calm and Bright stamp set. I stamped the background image and sentiment on watercolor paper and cut the scene using an oval die. The fox/mouse/bunny image was stamped the same way and cut using my Scan 'n Cut machine.


I used my zig markers to color the entire scene and image. Here are the colors I used:

- snowy ground: 091 light grey
- sky: 037 cornflower blue + 031 cobalt blue
- tree trunks: 062 dark brown
- foliage: 044 deep green
- owl: 096 mid grey + 093 green grey + 091 light grey
- fox: 067 mustard + 091 light grey
- mouse: 091 light grey
- bunny: 064 oatmeal + 091 light grey

When everything was colores, I masked the sentiment and splattered drops of white paint all over the panel to create falling snow. And next I applied Cosmic Shimmer Fluffy Stuff by Creative Expressions on the trees. It's a white liquid that turns into a cool snow texture when you heat it.

Next I cut a card base, and attached my panel to it using double sided tape. And finally I stuck my fox/mouse/bunny image on the panel using foam squares.

***

The second card features the Woodland Hearth stamp set and Season's Greetings stamp set. Like the first card, I stamped the trees and sentiment on watercolor paper and cut the scene using an oval die. And the bunnies were stamped on the same paper and cut using my Scan 'n Cut machine.


Here are the markers I used on this card:

- snowy ground: 091 light grey
- sky: 037 cornflower blue + 031 cobalt blue
- tree trunks: 062 dark brown
- foliage: 044 deep green
- trees: 091 light grey + 094 grey brown + 095 dark grey

- socks: 029 geranium red + 052 bright yellow + 031 cobalt blue + 048 emerald green

When everything was colores, I created falling snow using white paint, as well as fluffy snow on the trees. I applied morning dew nuvo drops on the berries, attached my panel to a white card base and finally stuck the little bunnies using foam squares.


And that's it! I hope you like those two soft and lovely little scenes. I leave you with the video, and wish you an amazing day!

VIDEO
Below or here


MISS INK STAMPS SUPPLIES
- Calm and Bright stamp set
- Woodland Hearth stamp set
- Season's Greetings stamp set

OTHER SUPPLIES
- Zig markers
- Black ink by Hero Arts
- Oval die from my stash
- White paint by Hero Arts
- Cosmic shimmer fluffy stuff by Creative Expressions
- Morning Dew nuvo drops by Tonic Studio
- Watercolor paper by Arteza
- Water brush by Arteza
- White cardstock (card base) by HobbyCraft

Hello Bluebird - Bold Holidays

samedi 2 novembre 2019

Hello there,

I'm glad to share with you a trio of holiday cards featuring the brand new Bold Holidays stamp set designed by Hello Bluebird, as well as the Holiday Flurries stamp set which is from a previous release.

I'm usually into making busy cards with lots of critters and background elements but this new Bold Holidays stamp set called for simplicity so I tried to stay minimalist.


The process was the same for the three cards, so here are the different steps:

 1. I cut a 5,5 x 4,25" panel out of colored cardstock. To be able to stamp the three words in the middle of my panel, I traced some pencil marks from one side at 1,25" ; 2" and 2-3/8". And I did the same marks from the other side, and I traced the lines.


2. I chose some snowflakes from the Holiday Flurries stamp set and stamped them all around the panel using clear embossing ink to create a snowflake frame.


3. I sprinkled embossing powder on the ink,


4. And I heat set the snowflakes. And I like to start to heat the paper from the back first, this way I get a better result with the melting.

5. Next I stamped a big word in the middle section of my panel using the same clear embossing ink,


6. I sprinkled gold embossing powder on it, and heat set it.


7. To add more interest and details to my frame, I stamped more snowflakes using clear embossing ink only to get a nice ton on ton impression.


8. Next I stamped the outlined version of the big word on the top and bottom sections of my panel.


9. To darken my panel, I applied distress inks on the edges,


10. And to get more texture on my panel, I splattered drops of white paint, as well as drops of liquid stardust for a lot of sparkles.


11. I applied clear shimmer inside the top and bottom words. This way those words will stand out a little bit more, and it's a holiday card so the more sparkles the better!

12. I cut a card base out of the same colored cardstock, and stamped my sentiment (from the Holiday Flurries stamp set) inside of it.


13. I attached my panel on the front, and added the final touch with morning dew nuvo drops on the snowflakes.


VIDEO
Below or here


HELLO BLUEBIRD SUPPLIES
- Bold Holidays stamp set
- Holiday Flurries stamp set

OTHER SUPPLIES
- Raspberry cardstock by Lawn Fawn
- Blue Jay cardstock by Lawn Fawn
- Storm Cloud cardstock by Lawn Fawn
- Gold embossing powder by Lawn Fawn
- Silver embossing powder by Lawn Fawn
- White embossing powder by Hero Arts
- Festive berries, aged mahogany, chipped sapphire, black soot, hickory smoke distress inks
- Clear embossing ink by Lawn Fawn
- Clear shimmer pen by Spectrum Noir
- Morning Dew nuvo drops by Tonic Studio
- White paint by Hero Arts
- Liquid stardust by Lawn Fawn