CRAFTY MERAKI - 2nd Anniversary Video Hop + Giveaway

lundi 30 mai 2022

Hello there,

Today I have the honor and great pleasure to be guest designing for Crafty Meraki. They are celebrating their 2nd anniversary so we're a bunch of crafters, all gathered to celebrate this amazing milestone in a video and Instagram hop, so make sure to check the description box under my video to get all the details about this hop!


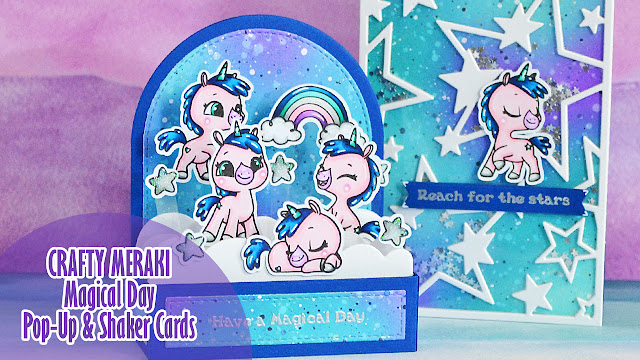
I'm showcasing the super cute Magical Day stamp set and Stargazer mini slimline die today with a pop-up card and a shaker card. And I started off by stamping the images using Lawn Fawn jet black ink, I cut them all using my Scan'n Cut machine, and I used my alcohol markers to color everything. Next I added glitter to the stars, and moved on to the background.


I cut a bristol panel large enough to fit the different pieces I wanted to ink, and colored that piece of paper using salvaged patina, peacock feathers and wilted violet oxide inks. And I also added lots of splatters and textures to achieve the magical and dreamy look I had in mind.


Once the paper was dry, I cut the different pieces, and built the pop-up card. I invite you to watch the process video down below to get all the information. And next I attached some unicorns, stars and rainbow inside the box.

***

Now to the shaker card. I cut a 6,25 x 3,5 inches bristol panel, and used the sames oxide inks as the one I used before to make the background: salvaged patina, peacock feathers and wilted violet. And I added the same details and textures as well.


I cut three Stargazer panels out of white cardstock, and stuck one of them on a piece of clear acetate, and I attached the two other panels at the back. I added tiny silver star confetti into each star section, and then I stuck my oxide ink panel to totally close and finish my shaker panel.

I heat embossed my "Reach for the stars" sentiment in silver on a navy blue banner, the same navy blue cardstock I used on the first card, and attached it, as well as a unicorn, on the card using foam squares.

And that's it, a huge thank you to Crafty Meraki for inviting me, it was so much fun to create those two cards today. But I will be back in few days with another set of cards, so stay tuned!


VIDEO


CRAFTY MERAKI SUPPLIES
- Magical day stamp set
- Stargazer mini slimline die


OTHER SUPPLIES
- Spectrum Noir markers
- Graph'it brush markers - Oxide inks: salvaged patina, peacock feathers, wilted violet, prize ribbon, black soot - Outside the box level-up die set by My Favorite Things - Outside the box clouds die set My Favorite Things - Sakura white gel pen - Copic opaque white ink - Liquid stardust by Lawn Fawn - Blue jay cardstock by Lawn Fawn - Shimmery vellum by Lawn Fawn - Strathmore bristol smooth cardstock - Star sequins by Pretty Pink Posh - Clear embossing ink by Lawn Fawn - Silver embossing powder by Lawn Fawn - Jet black ink by Lawn Fawn

Sunny Studio - Mix & Match Summer Scene

jeudi 26 mai 2022

Hello there,

I'm so happy to be back on Sunny Studio blog today with this cute and colorful summer card. To create this lovely scene, I picked my images from different sets: 

Kiddie poolgirl + sun lounger
Tiki time: bar + birds + cocktail
Beach buddies: sunglasses + sunscreen
Beach babies: balloon
Fabulous flamingos: leaves + flower + pineapple + watermelon + sentiment

I stamped all those images using an alcohol marker friendly black ink, used the coordinating dies to cut them all, and colored everything using my alcohol markers.


Next I moved on to the background. I cut a 5,5" x 4,25" bristol panel, and used a hill stencil along with distress oxide inks to create a beach scene at sunset. At the bottom: antique linen + vintage photo to make a sand border. At the top: squeezed lemonade + dried marigold + kitsch flamingo + picked raspberry to make a sunset sky.


Once the panel was dry, I attached all my cute images using 1mm and 2mm foam squares. Next I stamped my sentiment "Happy Summer" on the bottom part, and finished my card by adding highlights and details on the images using a white gel pen.


VIDEO


SUNNY STUDIO SUPPLIES
- Kiddie pool stamp set
- Tiki bar stamp set
- Beach buddies stamp set
- Sending sunshine stamp set
- Seasonal trees stamp set
- Fabulous flamingos stamp set

OTHER SUPPLIES
- Spectrum Noir markers
- Graph'it brush markers
- Oxide inks: antique linen, vintage photo, squeezed lemonade, dried marigold, kitsch flamingo, picked raspberry
- Sakura white gel pen
- Copic opaque white ink
- Hill stencil by Lawn Fawn
- Jet black ink by Lawn Fawn
- Black versafine ink
- Strathmore bristol smooth cardstock

Sunny Studio - Wonky Windows Underwater Shaker Card

jeudi 19 mai 2022

Hey there,

I'm so happy to be back on Sunny Studio blog with this bright and cute underwater card showcasing the new Wonky windows die. When I saw this new die from Summer release, I immediately thought of making a shaker card with it, so here we go!

I stamped the images first using an alcohol marker friendly black ink, I cut them all using the coordinating dies, and then colored everything using my alcohol markers. We have underwater critters and seaweeds from Fintastic friends and from Best fishes, I also picked the small rocks from Savanna safari, and the grass sprigs from Bunnyville to make more seaweeds.

Next I created my underwater panel. I cut a 5,5 x 4,25" bristol panel and used four oxide inks to make it, from bottom to top: salvaged patina, peacock feathers, ribbon prize and a teeny tiny bit of black soot.


Once my underwater panel was dry, I used the Wonky windows die to cut six openings out of it. I taped the die on one half of the panel, and sent it to my die cutting machine. I kept the inside pieces in the same order and set them aside, and I did the same thing on the other half of the panel. I flipped the die so that the bottom windows wouldn't be the same as the ones at the top and taped the die to the paper, and I sent it to my die cutting machine to cut three more openings and this way get a 3 x 2 grid.


Next I temporarily taped my six window panel to a card base, and I attached the inside pieces on the matching window. I removed the six window panel, and then created the shaker. I stuck a piece of clear acetate at the back of the panel, also added foam strips at the back to divide the six windows and make room for the shaker accessories, and before adding those shaker accessories, I just added powder inside the six windows, all along the edges, this way the jewels won't stick to the foam,

I cleaned the acetate using a microfiber cloth to remove the powder excess, I added a few clear jewels on each inside piece, and I finally attached my six window panel on top of the card base to totally close and complete my underwater shaker panel. And next I stuck all my cute images using glue dots mostly, and also foam squares at some places.


The last thing I did was creating the sentiment. I didn't want it to cover too much of the images, so I went with vellum. I white heat embossed the banner from Little birdie, and inside that banner I also white heat embossed "You're fintastic", I used the coordinating die to cut that banner that I finally attached in the middle of the card using three tiny dots of liquid glue.


VIDEO


SUNNY STUDIO SUPPLIES
- Wonky windows die
- Fintastic friends stamp set
- Best fishes stamp set
- Savanna safari stamp set
- Bunnyville stamp set
- Little birdie stamp set


OTHER SUPPLIES
- Spectrum Noir markers
- Graph'it brush markers
- Oxide inks: salvaged patina, peacock feathers, prize ribbon, black soot, chipped sapphire
- Copic opaque white ink
- Sakura white gel pen
- Clear embossing ink by Lawn Fawn
- Fine white embossing powder by Hero Arts
- Vellum by Lawn Fawn
- Clear jewels by Studio Katia
- Strathmore bristol smooth cardstock

Sunny Studio - Baby Elephants Dreamy Card

jeudi 12 mai 2022

Hello there,

I'm back on Sunny Studio blog today with another baby card, super sweet and precious, showcasing Baby Elephants.

I started off with the background. I cut a 5,5 x 4,25 inches bristol panel and picked three different oxide inks to create the base of my sky: peacock feathers at the bottom, blueprint sketch in the middle and wilted violet at the top. Next I wanted to add clouds to this background, but before creating them, I set the panel aside to dry and let the inks really soak into the paper.


So while the paper was drying, I stamped some cute elephants and stars from Baby elephants, a butterfly nest from Spring showers, and clouds from Balloon rides. As always I used the coordinating dies to cut them all, and used my alcohol markers to color everything.


Next I worked on my background panel again, and created clouds using a cloud stencil along with white pigment ink. On the bottom left corner of the panel, I white heat embossed my sentiment "Welcome baby girl", and then I attached my images using foam squares, glue dots and liquid glue.


Once all the images were attached, I added some final details: highlights using my white gel pen, I also added a bow from Passionate penguins on each elephant's head, and finally applied a coat of glossy accents on the star balloon to make it super shiny.


VIDEO


SUNNY STUDIO SUPPLIES
- Baby elephants stamp set
Spring showers stamp set
- Balloon rides stamp set
- Passionate penguins stamp set


OTHER SUPPLIES
- Spectrum Noir markers
- Graph'it brush markers
- Oxide inks: peacock feathers, blueprint sketch, wilted violet, chipped sapphire
- Sakura white gel pen
- Extreme black ink by My Favorite Things
- White pigment ink by Simon Says Stamp
- Clear embossing ink by Lawn Fawn
- Fine white embossing powder by Hero Arts
- Copic opaque white ink
- Cloudy stencil by Lawn Fawn
- Strathmore bristol smooth cardstock

Sunny Studio - Underwater Baby Card

jeudi 5 mai 2022

 Hi there,

I'm super happy to be back on Sunny Studio blog with more Summer Release inspiration! Today I'm showcasing the Inside greetings congrats stamp set on my card, I picked two sentiments from that set and created a sweet and fun underwater baby card.

The first thing I did was to stamp my cute shark family using an alcohol marker friendly black ink. The shark on the left is from Fintastic friends, and the one on the right and the baby are from Sea you soon. I cut them using the coordinating dies and colored them using my alcohol markers. And to fit the blue background I had in mind, I picked blue grey shades to color the sharks.


Next I cut a 5,5 x 4,25" bristol panel and used salvaged patina, peacock feathers and blueprint sketch oxide inks to create my underwater background.

I cut the Botanical backdrop out of navy cardstock to create underwater foliage, and white heat embossed my two sentiments from Inside greetings congrats on my panel: one in the top left corner and one in the bottom right corner. I stuck the foliage frame on the panel, I added highlights on the leaves using a white gel pen, and then I attached the shark family in the middle of the card using foam squares.


I added more highlights on the images, and finally I added a few clear droplets here and there to match the underwater theme and also fill up the empty spaces.


VIDEO


SUNNY STUDIO SUPPLIES
- Inside greetings congrats stamp set
- Fintastic friends stamp set
- Sea you soon stamp set
- Botanical backdrop die


OTHER SUPPLIES
- Spectrum Noir markers
- Graph'it brush markers
- Oxide inks: salvaged patina, peacock feathers, blueprint sketch
- Sakura white gel pen
- Copic opaque white ink
- Clear embossing ink by Lawn Fawn
- Fine white embossing powder by Hero Arts
- Navy cardstock by The Stamp Market
- Clear droplets by Gina K. Designs

Lawn Fawn - Father's Day Open Box Card

Hello there,

I'm super happy to be back on Lawn Fawn YouTube channel with this box card. I've created a busy scene with lots of cute images, and also added a little twist to make an underwater viewing gallery.

I started off by stamping and die cutting the images first, and I colored them using my alcohol markers. With all the khaki green shades (the box itself, cattails and grass sprigs...) I went with yellow shades to color the ducks to make them all pop in the scene.


Next I worked on the box card. I cut two panels out of a paper from the textured dot bright paper pack, and I want to keep the back of the box only, so on one of the panels I cut both flaps, and on the other one I cut the smaller flap only. I folded the different score lines on both pieces, and next I created the opening. And I invite you to watch the process video down below to see how it was done, it's always easier to understand such things with images ^^


Next I decorated the panels: a white rectangle, two Flower market squares, as well as an Into the woods rectangle. I attached those elements on the panels, and next I cut six insert pieces. I added double sided sticky tape on the tabs and also folded those tabs, I stuck those insert pieces and assembled the box card. I just left the front of the box card open to be able to stick some images under the water. And speaking of sticking images, I attached them all using 3mm glue dots.


Once all my images were attached, I closed and sealed the box card, and then I added some flies into the scene. I cut thin strips of acetate and stuck a fly at the end of each strip, and I attached those acetate strips inside the box card using glue dots.

I cut some Henry's ABCs letters to make the word "Dad", I also white heat embossed my sentiment on a black licorice banner, and also cut a white frame to make the underwater viewing gallery pop. I attached all those elements to totally finish my pop-up box card.


VIDEO


LAWN FAWN SUPPLIES

Stamp sets
- Rub a dub dub flip-flop
- Rub a dub dub
- You are sublime
- Dad + me
- Mermaid for you
- Ocean shell-fie
- Swan soiree
- Toadally awesome
- Beary happy holidays
- Let's play

Die sets
- Scalloped box card pop-up
- Large stitched rectangle stackables
- Small stitched rectangle stackables
- Stitched simple wavy borders
- Grassy border
- Flippin' awesome
- Henry's ABCs

Papers
- Flower market paper pack
- Into the woods remix paper pack
- Watercolor wishes paper pack
- Textured dot bright cardstock
- Textured canvas cardstock
- White cardstock
- Black licorice cardstock

Misc
- Clear embossing ink
- White embossing powder
- Glue dots
- Liquid glue


OTHER SUPPLIES
- Spectrum Noir markers
- Graph'it brush markers
- Sakura white gel pen