Isabel Cristina Stamps - Wild Jungle - Inside Tunnel Card

samedi 27 avril 2019

Hello there,

Today I'm back with an inside tunnel card. I used measurements from Jennifer McGuire and used a brand new digital stamp set called Wild Jungle and designed by Isabel Cristina Stamps.


To begin I took a 8,5 x 11 inches green cardstock that I cut in half to create two panels both measuring 4,25 x 11 inches.


I scored one part at 5,5, and folded it. And I also cut half an inch from one end.


I scored the second part at half an inch, 5,5 and 6 inches, and folded the lines.


I cut a 5,5 x 4.25 inches panel and trimmed it a teeny tiny bit to get a slightly smaller panel. I scored at 1/4 of an inch from both ends, folded the lines and created a second identical panel.


I took the long panel, placed the thin tab at the top and die cut a circle to create a window. Next I placed one of the smaller panels behind the window, aligned them according to the score lines, and cut a circle out of the panel to create a window smaller than the first one. And I used this new window panel as a guide to cut a smaller circle out of the second panel.


Next I worked on the long panel. I didn't want it to be plain so I applied mowed lawn distress ink on top of it, trying to keep a light hand around the circle so it wouldn't be dark green everywhere. For more interest and details, I splattered the same ink on the edges and corners of the panel. And because I think that green and gold are pretty nice together, I added gold splatters on the panel.


Next I covered the middle panel with a flower patterned paper. I simply cut the same circle out of this paper and glued it on the green window panel. And I did the same thing on the second window panel using a leaf patterned paper. I could have used directly those pattern papers as the window panels but they're pretty thin papers so gluing them on the green panels made them more sturdy. As a background I simply applied tumbled glass oxide ink on a piece of bristol cardstock and splattered water on top of it.


Next I assembled the tunnel. The tumbled glass panel was attached inside the long panel. Next I adhered both of the small panels inside the long one and closed the tunnel. For the front of the card, I cut my sentiment using a circle die, painted the edges using the same gold paint as before and attached it on a bigger leaf circle.


The images were printed on Neenah solar white cardstock using my Epson printer and colored using my spectrum noir markers, as always. To save time I die cut and colored off camera some tropical leaves and flowers and assembled everything using 3mm glue dots.


Finally I added gold sequins outside and inside to match the gold paint, and applied clear shimmer to the butterflies. 


VIDEO
Below or here


SUPPLIES
- Wild Jungle digital stamp set by Isabel Cristina Stamps
- Feuilles exotiques die set by 4enScrap
- Spectrum Noir markers
- Distress ink: mowed lawn
- Oxide ink: tumbled glass, spun sugar, picked raspberry, antique linen, spiced marmalade, shabby shutters, mowed lawn
- Unicorn white paint by Hero Arts
- Gold metallic paint by Creative Expressions
- Cilantro cardstock by Lawn Fawn
- Pattern papers by Craft Sensations
- Sakura white gel pen
- Clear shimmer pen by Spectrum Noir
- Gold sequins by Pretty Pink Posh

Hello Bluebird - Magical Rain Shaker Card

mercredi 24 avril 2019

Hey there,

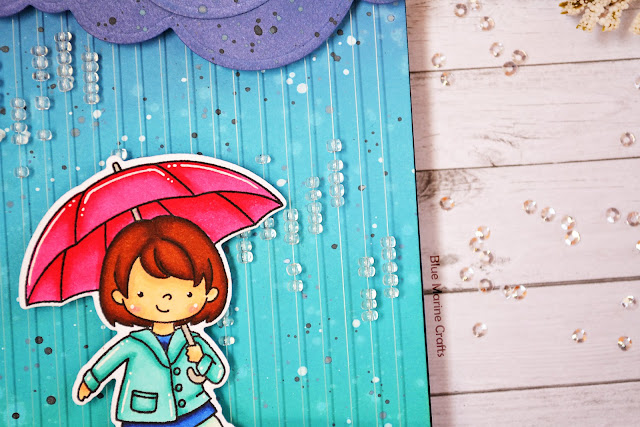
I've been wanting to try to make a magical rain shaker card for a few weeks now, since I saw Laura's video, so when I received the Hello Bluebird Rainy Day stamp set I took my beads out of their box and started to work on a card.


To begin, I cut a 5,5 x 4.25 inches bristol panel and chose some oxide inks: broken china, chipped sapphire, peacock feathers and lucky clover.

First I applied the lightest colors: peacock feathers at the bottom of the panel, and broken china on the rest of it. Next I added the dark colors: lucky clover at the bottom, and chipped sapphire at the top.

I splattered water on the panel and dried it to create rain drops. I also added chipped sapphire and black soot drops. And to finish the panel I added white drops to add more contrast.


To create to rain shaker mechanism I adhered foam strips at the top and bottom of the panel. Next I marked every 5 mm, again at the top and bottom. I took nylon thread and put 5 clear beads on it, removed a part of the backing paper on the foam strips, and attached the thread on the first mark, top and bottom.

And I did the same thing for all the strings: five beads on the thread, and attaching the thread on the top and bottom marks.

To secure all the strings during the process, I simply adhered double sided tape on both ends of the threads. And I also applied powder along the foam strips to avoid any stickiness.


When all the strings were done, and to make more room for the beads, I attached a second strip of foam at the top and bottom of the panel. And of course I trimmed off the threads.

Next I colored my image using my alcohol markers. As always it was stamped on Neenah solar white cardstock using memento tuxedo black ink.

I cut a cloud border and a hill border out of bristol cardstock and colored them using the same inks as the ones used on the background, stamped my sentiment on the hill border, and attached them on my panel. And finally I attached the image using glue dots.

VIDEO
Below or here

HELLO BLUEBIRD SUPPLIES
- Rainy day stamp + die sets
- Grassy knoll die set
- Hill and dale die set

OTHER SUPPLIES
- Spectrum Noir markers
- Oxide inks: peacock feathers, lucky clover, broken china, chipped sapphire, black soot
- Unicorn white paint by Hero Arts
- Neenah solar white cardstock (for the images)
- Strathmore bristol smooth cardstock (for the background elements)
- Dark blue cardstock by Sostrene Grene (for the card base)
- Memento tuxedo black ink
- Clear beads from my stash
- Nylon thread from my stash
- Sakura white gel pen
- Sakura black gel pen

Lawn Fawn - The Little Red Riding Hood - Tale Series - Pull Tab Card

samedi 20 avril 2019

Hello there,

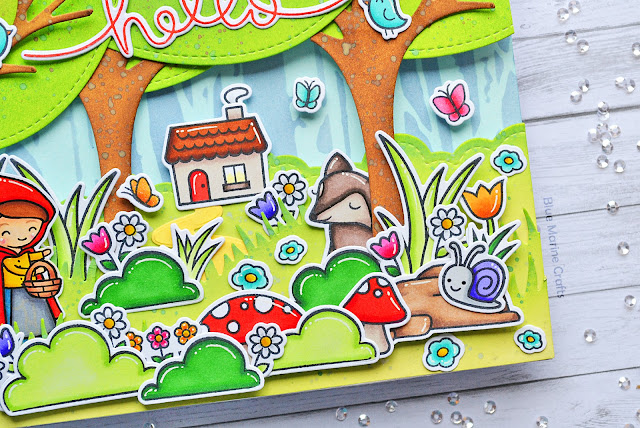
Welcome to this new blog post for my tale series. After the Frog King, and Sleeping Beauty, here is a little scene featuring The Little Red Riding Hood. I did some customization to create the characters and thought it would be fun to add a pull tab element so that the wolf appear from behind a tree.


So to start, I made a prototype, just to give me an idea and to be sure it was doable. And next I stamped the image on Neenah solar white cardstock using antique linen distress ink. A light ink, visible enough to help me customize it but soft enough to disappear under the coloring. When the coloring was done I simply draw the lines using a Faber Castell black pen.


I stamped and colored a lot of other elements to create my into the woods scene: some cute critters, leaves, flowers, clouds to use as bushes and a fox that was turned into a friendly wolf.

For the background I cut a large bristol panel, applied tumbled glass oxide ink on most of it and then used a stencil and stormy sky oxide ink to create a bunch of trees.

All the other elements were cut out of bristol cardstock and colored using oxide inks: vintage photo and ground espresso for the trees, mowed lawn and vintage photo for the foliage, and shabby shutters and mowed lawn for two grass borders and a cloud border. 


I layered the three borders on top of each other and temporarily taped the back panel with the borders, and placed some elements, just to guide me and have an idea of where to place the pull tab.

When I knew where to place the wolf, I marked the left side of the tree, removed all the elements, traced verticals lines to make sure I was going to die cut the pull tab elements straight, taped the slot die on the tree mark, and the notch die on the left edge of the panel, and run it through my die cutting machine.


I die cut the pull tab main element, folded the score lines and applied double sided tape on the tabs, put it through the slot at the back of the panel, and die cut and attached the sleeve to help the mechanism work easily and straight. I also used the remaining piece of grass border to die cut the arrow and complete the mechanism.

I applied two layers of foam tape around the pull tab at the back of the grass borders and attached them on the back panel.


The tabs were a little bit too long so I just trimmed them off a little bit and adhered the wolf. Next I attached the images using foam adhesive squares and glue dots. I made sure not to put adhesive on the wolf and tested the mechanism several times during the process.

My sentiment was stamped using candied apple oxide ink, die cut and attached on the panel. And as a final touch I applied clear shimmer to the butterflies.

VIDEO
Below or here


LAWN FAWN SUPPLIES
- Dad + me die set
- Butterfly kisses stamp + die sets
- Oh gnome stamp + die sets
- Yay kites stamp + die sets
- Winter village stamp + die sets
- Mermaid for you stamp + die sets
- Easter party stamp + die sets
- Critters in the forest stamp + die sets
- Blue skies stamp + die sets
- Critters on the farm stamp + die sets
- Cheery Christmas stamp + die sets
- Gleeful garden stamp + die sets
- Puffy cloud border die set
- Grassy hillside border die set
- Leafy tree backdrop: landscape die set
- Let's toast pull tab add-on die set

OTHER SUPPLIES
- Spectrum Noir markers
- Oxide inks: shabby shutters, mowed lawn, vintage photo, ground espresso, tumbled glass, stormy sky, antique linen, candied apple
- Memento tuxedo black ink
- Birch tree stencil by Tim Holtz
- Sakura white gel pen
- Sakura black gel pen
- Neenah solar white cardstock (for the images)
- Strathmore bristol smooth cardstock (for the background elements)
- White cardstock by HobbyCraft (for the card base)
- Clear shimmer pen by Spectrum Noir

Lawn Fawn - Magical Garden - Double Slider Surprise

mercredi 17 avril 2019

Hey there,

Today I'm sharing with you a new double slider card, I really enjoy creating them and be sure that if we had more hours in a day, I would make more ^^


I first started by cutting all the elements: 2 pocket panels, 2 small panels and a track piece. All from bristol cardstock. I applied double sided tape to both of the pocket pieces and to the track piece, and folded the thin tabs on both pocket pieces. 

Next I attached a strip of plastic bag (2-1/4" wide) around the track piece. I placed the seam of the plastic strip on one side of the track piece and applied double sided tape. And I did the same thing at the back but on the opposite side. 

I die cut one more pocket piece and one more panel piece from bristol cardstock and used them to die cut grass borders.


To create the sky on the three panels I used spun sugar, picked raspberry, seedless preserves distress inks and a little bit of chipped sapphire at the very top. The grass borders were colored using chipped sapphire. And for more texture and details I splattered coordinating drops on each panel.

I die cut some elements from the mushroom house set and colored them using the same distress inks as before, and I assembled it. 

Before starting to assemble the slider I die cut notches on both sides of the front pocket piece. I aligned the right side of the track piece on my mat and attached the right panel to the plastic strip. Turned the track piece over, aligned it on the mat and adhered the other panel to the plastic strip. Next I attached both pocket pieces together, and adhered the slider inside.

To totally complete the slider element I applied seedless preserves distress ink on a piece of bristol cardstock, die cut 2 tabs, and attached them on both sides of the slider pocket.


Next I stamped all my images on Neenah solar white cardstock using memento tuxedo black ink and colored them using my spectrum noir markers. I used some new color combos on this card so be sure to check the video below to complete your chart ^^

For my sentiment, I stamped 2 speech bubbles, a heart and the word Hi on vellum using seedless preserves oxide ink and heat embossed them using clear embossing powder.


Next I stuck all the images down using glue dots, and stamped some dragonflies and diamond shapes using seedless preserves and picked raspberry oxide inks. For more sparkles I added white blizzard nuvo drops on the flowers and the fairies wings, and also white nuvo drops in the center of each flower.

And finally I cut a card base out of dark blue cardstock, layered a glitter pink scalloped panel and a plaid panel on top of each other, and attached the slider on top using strong tape.

VIDEO
Below or here


LAWN FAWN SUPPLIES
- Fairy friends stamp + die sets
- Gleeful garden stamp + die sets
- Some bunny stamp + die sets
- Oh gnome stamp + die sets
- Butterfly kisses stamp + die sets
- Happy village stamp + die sets
- Double slider surprise die set
- Mushroom house die set
- Fancy scalloped rectangle stackables die set
- Large stitched 4 bar rectangles die set
- Grassy border die set
- Sparkle cardstock "Spring"
- Perfectly plaid Fall 6x6 paper pack
- Clear embossing powder

OTHER SUPPLIES
- Spectrum Noir markers
- Distress inks: spun sugar, picked raspberry, seedless preserves, chipped sapphire
- Distress oxide ink: seedless preserves
- Dark blue cardstock by Sostrene Grene
- Versamark ink
- Sakura white gel pen
- Memento tuxedo black ink
- Vellum from my stash

Lawn Fawnatics Challenge #50 - Fun with Food - Pull Tab Pop-Up Card

samedi 13 avril 2019


Hello there,

I've made this pull tab pop-up card for the Fun with food Lawn Fawnatics Challenge, and because Easter is round the corner I thought it would be fun to color some cute bunnies. I also kind of cased myself because I was inspired by this card I made a few months ago to create the inside, but this time I also added an entire scene on the outside of the card.


So, to begin, I worked on the front panel which will show the outside of my carrot cupcake factory.


The background was colored using peacock feathers on most of the bristol panel and twisted citron at the very bottom of it. I splattered water on top of it and also a little bit of white paint.


I die cut a garden border and colored it using vintage photo and ground espresso. As for the grass border, it was colored using twisted citron and mowed lawn. Next I cut a carrot shape and colored it using spiced marmalade, rusty hinge, plus a little bit of vintage photo on the edges and some alcohol markers.


I die cut two doors to create one. One was colored using ground espresso and the other one using peacock feathers and alcohol markers. Next I attached all the elements on the panel using double sided tape, glue dots and foam adhesive squares.


I stamped a lot of images on Neenah solar white cardstock using memento tuxedo black ink, and as always everything was colored using my Spectrum Noir markers.


For the inside of the card, I cut a 6 x 9,5 inches panel that I folded in half and cut another panel from the same paper that I run through my die cutting machine with a stencil on top of it. I added an extra piece of cardstock under just to get a nice impression of my stencil.


I cut a panel out of plaid paper, cut a circle in the middle of it, and also die cut a ring and a cross shape that will be used to create a window. To create this window I glued a piece of acetate at the back of the plaid panel and attached the ring and the cross on the front.


For the counter I cut a 6 x 4 inches panel that I scored at 1", 2" and 3" on the short side. I folded the score lines and attached the panel inside the card base.


To create the outside of the window I simply die cut a circle that I colored using peacock feathers distress ink and added a small cloud. I taped it behind the window using washi tape, applied double sided tape at the back of it, pressed the panel inside the card base above the counter, and then removed the panel and the washi tape.


Next I taped the plaid panel and the card base together and die cut a notch just above the window on both panels. I die cut the pull tab mechanism, folded the score lines, and cut the slot out of the card base panel.


I put the pull tab mechanism through the slot at the back of the panel, die cut the sleeve, and attached it at the back of the panel to secure the pull tab.


The pull tab was visible through the window so I had to cut it a little bit. And to be able to glue the bunny off center, I first attached a piece of scrap paper, and then I glued the bunny on the left.


I applied two layers of foam tape inside the card base and attached the window panel. And I applied two layers of foam tape again on the outside around the pull tab mechanism and attached the carrot panel.


To be able to glue all my images, I cut a 6 x 2 inches panel that I scored on the short side at 1/2",1" and 1,5", and I attached it on the counter. And I finally used glue dots to attach all the images.


VIDEO
Below or here


LAWN FAWN SUPPLIES
- Blue skies stamp + die sets
- Baked with love stamp + die sets
- Some bunny stamp + die sets
- Eggstra amazing easter stamp + die sets
- Butterfly kisses stamp + die sets
- Just for you stamp set
- Just for you labels die set
- Stitched garden border die set
- Simple grassy hillside die set
- Scalloped treat box spring house add-on die set
- Mushroom house die set
- Let's toast pull tab add-on die set
- Pumpkin pie paper from the Perfectly Plaid Fall 6x6 paper pack
- Paper bag cardstock
- Chocolate bar cardstock

OTHER SUPPLIES
- Spectrum Noir markers
- Distress inks: peacock feathers, twisted citron, spiced marmalade, rusty hinge, vintage photo, mowed lawn, weathered wood, black soot
- Brick stencil by My Favorite Things
- Sakura white gel pen
- Sakura black gel pen
- Neenah solar white cardstock
- Strathmore bristol smooth cardstock

Hello Bluebird - Jungle Set

mercredi 10 avril 2019

Hey there,

I'm back with a jungle set including a card and three tags and featuring theJungle Little stamp set by Hello Bluebird. I didn't use a lot of supplies but I stamped a bunch of flowers and leaves to build my card and tags.


As always, the images were stamped on Neenah solar white cardstock using memento tuxedo black ink. 


For the background I cut a 5.5 x 4.25" bristol panel, used washi tape to create strips, and cut a circle out of masking paper that I adhered to the bristol panel. I used spun sugar and picked raspberry distress inks to color the background.


I removed the masking paper and the washi tape, next I adhered the other part of the masking panel, and applied spun sugar on the circle area.


To be able to create foil on my card and tags I splattered reactive mist on top of them and let them dry over night. The day after, I put my card and tags with a sheet of gold foil on top in a folded paper and run them through my laminator. It's a cheap one I bought a few years ago at my local supermarket.


To complete the tags I die cut and glued reinforcers on the front and back. Next I stuck all the images down using glue dots and foam adhesive squares. I also gold heat embossed my sentiment three times and attached them on the card and tags.


To finish the card I attached a gold mirror heart on the monkeys paws, adhered the panel to a white card base and added white nuvo drops on the flowers. And finally I glued clear sequins and added twine to the tags. 


VIDEO
Below or here


HELLO BLUEBIRD SUPPLIES
- Jungle littles stamp + die sets
- Stitched tag builder die set
- Spring gatherings die set (for the heart)

OTHER SUPPLIES
- Spectrum Noir markers
- Distress inks: spun sugar, picked raspberry
- Reactive mist by Heidi Swapp
- Gold foil sheet by Heidi Swapp
- Versamark ink
- Gold embossing powder by Aladine
- Sakura white gel pen
- Sakura black gel pen
- Twine by Stampin Up!
- Clear sequins by Pretty Pink Posh
- Neenah solar white cardstock (for the images)
- Strathmore bristol smooth cardstock (for the backgrounds)
- Heavy white cardstock by HobbyCraft (for the card base)

Hello Bluebird - Beautiful Spring

samedi 6 avril 2019

Hey there,

I'm super happy to share with you this bright and happy spring card featuring some cute Hello Bluebird critters and a lot of flowers and leaves.


First I created a light coral/pink background. I like blue skies but I wanted to change and thought these colors would be nice for a spring card. I applied spun sugar oxide ink on most of the bristol panel, next I applied dried marigold at the bottom and then I blended both colors.


I also splattered the same inks on the panel, as well as white drops on the pink part. And I die cut a grass border that I colored using twisted citron and mowed lawn oxide inks.


As always when I use my alcohol markers, I stamped the images on Neenah solar white cardstock using memento tuxedo black ink. And as a final touch to the critters, I added black dots on their eyes to make them pop and white dots on the cheeks.


The sentiment was stamped using versamark ink and white heat embossed, all the images were attached using foam adhesive squares and glue dots and because the grass was a little too flat I stamped some grass images on it using mowed lawn oxide ink.


To finish the card I adhered my panel to a white card base, added white nuvo drops in the center of each flower and clear shimmer to the butterflies.


VIDEO
Below or here

HELLO BLUEBIRD SUPPLIES
- Spring banner script stamp set
- Banner buddies stamp + die sets
- Spring gatherings stamp + die sets
- Grassy knoll die set

OTHER SUPPLIES
- Spectrum Noir markers
- Oxide inks: dried marigold, spun sugar, twisted citron, mowed lawn
- Versamark ink
- White embossing powder by Hero Arts
- White nuvo drops
- Strathmore bristol smooth cardstock (for the background)
- Neenah solar white cardstock (for the images)
- White cardstock by HobbyCraft (for the card base)

Isabel Cristina Stamps - Beauty Princess - Reveal Wheel Card

mercredi 3 avril 2019

Hello there, 

Back with a new card showcasing a brand new set designed by Isabel Cristina Stamps and called Beauty PrincessThis set couldn't come at a better time because it can help me continue my tale series.


I think you have recognised Aurora aka Sleeping Beauty and her fairy godmothers, and I was inspired by the end of the Disney movie when the clouds change colors from blue to pink and pink to blue.


First, I played with tumbled glass and spun sugar distress inks on a piece of bristol cardstock.

I applied a lot of clear water on the paper and then put colors here and there. I didn't want the colors to mix and become violet so I used my heat tool between each layer. Three layers of pink and blue were applied, and next I simply splattered water on top of the panel and used paper towel to dry it. To complete the background and accentuate the light and floaty side of the clouds, I also splattered a lot of teeny tiny drops of white paint.


Next I used the reveal wheel die set from Lawn Fawn and first started by die cutting the main panel out of my pink and blue background. I also die cut the small circle, the wheel, and a second panel, all from white cardstock.

I placed the wheel behind the pink and blue panel, marked the center and next I pierced a hole at the back of the panel, right on the pencil mark. And then I placed a circle die in such a way that the hole was in the middle of the die, and run it through my die cutting machine. 

I took a brad from my stash and put it through the back of the small circle, the back of the wheel, and the back of the pink and blue circle. I attached foam adhesive squares on the small circle, placed the wheel element at the back of the main panel, and pressed onto the white panel to stick it down.

I put a million foam adhesive squares around the wheel, making sure not to touch it, secured the pink and blue circle using liquid glue, and then I removed all the backs and attached the main panel.


I die cut a cloud border from white cardstock, gold heat embossed my sentiment on it, and attached it at the bottom of the panel. Next I attached the wheel panel to a white card base. And I used the chimney die from the mushroom house die set to create an arrow that I glued on the left side.

The images were printed on Neenah solar white cardstock using my Epson printer, and colored using alcohol markers. I also die cut some small clouds, and next I attached everything on the panel using foam adhesive squares.


To finish the card, I added some morning dew drops here and there, and also clear shimmer on the clouds and wings.


VIDEO
Below or here

SUPPLIES
- Beauty princess digital stamp set by Isabel Cristina Stamps
- Reveal wheel die set by Lawn Fawn
- Puffy cloud border die set by Lawn Fawn
- Fairy friends stamp set by Lawn Fawn (for the sentiment)
- Mushroom house die set by Lawn Fawn (for the chimney die)
- Village shops die set (for the clouds)
- Happy village die set (for the clouds)
- Spectrum Noir markers
- Distress inks: tumbled glass, spun sugar
- Sakura white gel pen
- Morning dew nuvo drops
- White blizzard nuvo drops
- Spectrum Noir clear shimmer pen
- Strathmore bristol smooth cardstock
- Neenah solar white cardstock
- White cardstock by HobbyCraft (for the card base)
- Versamark ink
- Antique gold embossing powder by Simon Says Stamp