Valentine Card Mini Series - Candy Heart Air Balloons

mercredi 30 janvier 2019

Hello there,


Today I'm sharing with you a trio of valentine cards. They're cute and bright, and very easy and quick to make.

I first started by die cutting the hearts. I cut three different hearts from plaid papers, three plain hearts from white cardstock and another set of three white plain hearts but only to keep the letters. I glued each white heart at the back of a plaid heart, and then added the letters.


I wanted to make those candy hearts as hot air balloons so I stamped three of them on Neenah solar white cardstock using memento tuxedo black ink, and did a little bit of coloring using my spectrum noir markers to match the candy hearts.

I didn't need the balloons so I cut them and replaced them by the candy hearts using my 2 way zig liquid glue.


I cut three bristol cardstock squares, and attached a circle mask on each one. On the 1st one I applied squeezed lemonade oxide ink, on the 2nd one I applied twisted citron oxide ink, and on the last one I applied spun sugar oxide ink. Water was also splattered and dried using paper towel on each panel.


Next I applied sugar glitter paste on each panel using a polka dot stencil. And when it was done I removed all the masking circles. The cards were finally assembled following the same process: a white card base, next a colored cardstock matching the candy hearts and then the main panel.

The candy heart balloons and the clouds were attached using foam adhesive squares. And a final touch I added morning dew nuvo drops on each panel.

VIDEO
Below or here


LAWN FAWN SUPPLIES
- Candy heart die set
- Blue skies stamp set + coordinating dies
- Pivot pop-up die set (for the clouds)
- Chili pepper + sunflower + cilantro cardstocks
- Dahlia + Hydrangea + Carnation plaid papers from the Perfectly plaid spring pack

OTHER SUPPLIES
- Spectrum Noir alcohol markers
- Oxide inks: twisted citron, spun sugar, squeezed lemonade
- Sugar glitter paste by BoBunny
- Polka dot stencil by Craft Sensations
- White cardstock by HobbyCraft
- Masking paper by Simon Says Stamp

Hello Bluebird - Blue Winter

samedi 26 janvier 2019

Hello there,

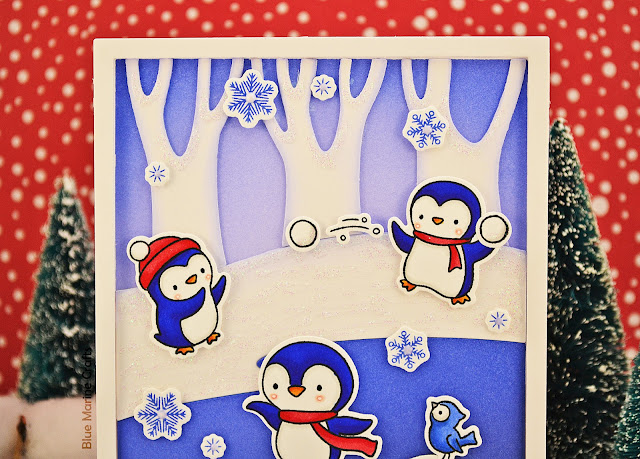
I'm very excited to share with you my very first card using Hello Bluebird supplies. I really love their cute designs and unique dies so you will definitely see more cards featuring this brand in the future!


As you probably already know I like to start by the coloring part. So I stamped all my images on Neenah solar white cardstock using memento tuxedo black ink and colored them using my spectrum noir markers.

For the background I die cut the skating pond scene, and next I created the sky using a bristol panel, and shaded lilac + blueprint sketch oxide inks.


I took the pond element and colored it using blueprint sketch + chipped sapphire oxide inks. I kept the chipped sapphire at the bottom, just to make shadows. For the other elements of the scene, I took shaded lilac oxide ink and applied it on the edges.


I die cut another skating pond scene from white cardstock that I entirety attached to the bristol panel. This white layer will help to give dimension to the scene. I also added white blizzard nuvo drops on the white elements. It adds sparkles to the snow and makes the scene less flat.


I stamped my sentiment using versamark ink and white heat embossed it. All the images were attached using double sided foam tape. The snowflakes were placed randomly except for the ones at the top which are just here to hide some glue dribbles ^^

To finish the card I attached the frame using foam adhesive squares, attached my panel to a white card base and as a final touch I added white nuvo drops in the center of each snowflake.

VIDEO
Below or here


SUPPLIES
- Skating party stamp set + coordinating dies by Hello Bluebird
- Snow play stamp set + coordinating dies by Hello Bluebird
- Skating pond scene die by Hello Bluebird
- Spectrum Noir alcohol markers
- Oxide inks: shaded lilac, blueprint sketch, chipped sapphire
- Versamark ink
- White embossing powder by Aladine
- White gel pen by UniBall
- Black gel pen by Sakura
- White blizzard Nuvo drops
- Neenah solar white cardstock (for the images)
- Strathmore bristol smooth cardstock (for the background elements)

Valentine Card Mini Series - Mr & Mrs Frog

mercredi 23 janvier 2019


Hello there,

Today's card is about two cute little frogs. They're in love with each other and like to spend time on a water lily leaf in the pond.


As always, I first started by stamping all my images on Neenah solar white cardstock using memento tuxedo black ink. Every time i plan to use my alcohol markers, I go with this paper and ink.

So I colored the images my Spectrum Noir markers, and even added dots to the frogs to make them cuter and less flat.


To start building the scene, I applied cracked pistachio and lucky clover oxide inks on a bayou backdrop, a grass border and two cloud borders. The cloud borders will be used as bushes. I used Strathmore bristol cardstock for all the background elements. Water was splattered and dried using paper towel. I also added tiny drops of lucky clover oxide ink.

I colored the hill border using tumbled glass oxide ink. It will be used as a pond.


I die cut a heart from masking paper, and attached it in the middle of a bristol panel. Next I colored the panel using spun sugar and picked raspberry oxide inks. I also added water splatters, and picked raspberry drops mostly around the heart.


I removed the masking heart and attached the borders using double sided tape. The sentiment was stamped using versamark ink and gold heat embossed in the middle of the heart. The bayou backdrop was attached using foam adhesive squares and double sided tape. And next I attached all the images using glue dots.

Next I die cut a bunch of small hearts that I glued on the ivy frame. And as a final touch I applied clear glitter on the hearts and flowers.

VIDEO
Below or here


LAWN FAWN SUPPLIES
- Toadally awesome stamp set + coordinating dies
- Bayou backdrop die set
- Puffy cloud border die set
- Simple stitched hillside border die set
- Grassy border die set
- I love you(calyptus) stamp set (for the sentiment)
- Baked with love stamp set + coordinating dies (for the hearts)

OTHER SUPPLIES
- Spectrum Noir markers
- Oxide inks: cracked pistachio, lucky clover, spun sugar, picked raspberry, tumbled glass
- Shimmer pen by Spectrum Noir
- Versamark ink
- Antique gold embossing powder by Simon Says Stamp
- Masking paper by Simon Says Stamp
- Strathmore bristol smooth cardstock
- White cardstock by HobbyCraft
- Neenah solar white cardstock

Valentine Card Mini Series - Love is in the air

samedi 19 janvier 2019


Hello there,

Today I'm back with a new valentine card. I didn't put a lot of critters or layers as I usually do so it's quite simple but very cute at the same time. I'm also entering this card to the "Happy Little Critters" Lawn Fawnatics Challenge ^^


I first started by stamping my images on Neenah solar white cardstock using memento tuxedo black ink, next I colored them using my spectrum noir markers and I cut them using the coordinating dies.


I used the sentiment "I love you" from the new I love you(calyptus) stamp set. To stamp one letter at a time I simply masked the others using washi tape, applied versamark ink, removed the tape, stamped the letter on a flag and then white heat embossed it.


And then I white heat embossed a small heart stamp on the remaining flag.


To build the background, I die cut four cloud borders from white cardstock, and also some small hearts from masking paper that I attached on a bristol panel that I colored using tumbled glass and salty ocean oxide inks.


To give some dimension to the clouds I applied hickory smoke distress ink on top of them but only along the puffy edges. I even added white blizzard Nuvo drops on those puffy edges to make them stand out more.


Next step was attaching everything. The borders were attached using double sided tape and the images were attached using 2mm and 1mm foam adhesive squares.


The background was still a little too flat to me so I took the small heart from the sentiment and used salty ocean and tumbled glass oxide inks to stamp a bunch of them and do like a ton on ton effect.


Finally I added more sparkles to the card by applying white blizzard Nuvo drops on the small white hearts and clear shimmer to the balloons.


VIDEO

Below or here


LAWN FAWN SUPPLIES
- I love you(calyptus) stamp set
- Bicycle built for you stamp set + coordinating dies
- Baked with love stamp set + coordinating dies
- Winter skies stamp set + coordinating dies
- Blue skies stamp set + coordinating dies
- Puffy cloud border die set

OTHER SUPPLIES
- Spectrum Noir alcohol markers
- Distress oxide inks: tumbled glass, salty ocean
- Distress ink: hickory smoke
- Versamark ink
- White embossing powder by Aladine
- Memento tuxedo black ink
- Neenah solar white cardstock (for the images)
- White cardstock (for the card base)
- Strathmore bristol cardstock (for the background)
- Nuvo white blizzard
- Masking paper by Simon Says Stamp
- Shimmer pen by Spectrum Noir

Isabel Cristina Stamps - Frozen

mercredi 16 janvier 2019

Hello there,

Today I'm sharing two cards i made using a new digital set by Isabel Cristina Stamps. It's called Winter Princess and is all about the disney movie Frozen. Here's a close-up look at the set:


A quick note about Isabel Cristina digital sets: easy print pages are included in her sets and the images already have the perfect size. No need to edit them on a computer.

When I use digital stamps, I always print the images on Neenah solar white cardstock using my Epson printer. It is a pretty old ink jet printer but it does the job perfectly. 


For the card featuring Elsa and her castle, I first colored her using my spectrum noir markers. Frozen is a very famous movie and the characters are super popular but still, I had a picture of them on my phone to make sure I was using the right colors ^^

Using the same markers and a white gel pen, I added a bunch of tiny dots on the shadows to give the illusion of sparkles.  


To create the castle, I folded in half a large piece of masking paper, drew some basic shapes and lines and cut it. I attached the masking castle on a bristol panel using a T ruler to make sure it was centered and straight.

I also cut a hill shape from masking paper and attached it at the bottom of my panel.

I used tumbled glasse and peacock feathers oxide inks to create the sky, and applied sugar glitter paste by using a snowflake stencil.

For the sentiment I print another page using a laser printer, cut the sentiment I wanted to use, placed it in a folded paper with a piece of silver foil on top and put it through my laminator. Its a cheap one I bought a few months ago at my local supermarket.


To make it more resistant I attached the copy paper sentiment on a piece of cardstock, cut another masking hill border that I attached at the bottom of my panel and applied tumbled glass oxide ink. This way Elsa isn't floating in the air ^^

I attached the sentiment and image using foam adhesive squares, added a bunch of sequins and a snowflake at the top of the castle, and attached my panel to a white card base to finish the card.

For the second card, I colored the rest of the images: Anna, Olaf, Kristoff and Sven. I added some details on Anna's clothes, trying to match the movie.


I took my printed copy paper, cut the bottom with the big sentiment and snowflakes, and die cut a stitched rectangle from it.


I placed the panel with the silver foil on top in a folded paper, and put it through my laminator.  Next i attached it to some cardstock to make it more resistant.


I die cut a scallop rectangle from shinny paper, attached it to a white card base.


Next I attached the foiled panel. And then the images using foam adhesive squares to finish this second card.

VIDEO
Below or here

SUPPLIES
- Spectrum Noir markers
- Oxide inks: tumbled glass, peacock feathers
- Sugar glitter paste by BoBunny
- Snowflake flurries stencil by Craftin Desert Divas
- Fancy frame die set by Craftin Desert Divas
- Silver foil by Heidi Swapp
- Masking paper by Simon Says Stamp
- Shiny white paper from my stash
- Strathmore bristol smooth cardstock
- White cardstock by HobbyCraft (for the card base)
- Neenah solar white cardstock (for the images)
- Sequins from my stash
- White gel pen by UniBall

Valentine Card Series 2019 - Sweet Couple - Shaker Card - Tunnel Card

samedi 12 janvier 2019

Hey there,

I'm super excited to share with you the first card of my Valentine Card Mini Series. During the next weeks i will share several projects showcasing cuties, hearts, red and pink colors and sparkles so I hope you'll like them ^^


So, for this first project, I used the brand new Candy hearts die set by Lawn Fawn along with some other supplies because my absolute favorite thing is to mix and match different sets to build my scenes!

I cut three rectangles measuring 5,5 by 4-1/4 inches. From the dark pink panel I cut a big rectangle. I used the created frame as a guide to die cut a medium rectangle from the plaid panel. And then I used the created frame as a guide to die cut a small rectangle from the white panel.


I used the white frame and a pencil to mark where I wanted to color the background, and used spun sugar oxide ink on bristol cardstock to do it.

I added water drops on top of it, dry them and added tiny drops of picked raspberry oxide ink for more interest.

I mirror stamped the boy so he can be facing the girl. I simply stamped him on acetate, turn the acetate over and applied it on the cardstock. To redo the lines, I simply used a fine black marker by Faber Castell. And to cut the boy, I placed the die at the back of the paper, trying to align it using the light above my desk, and run it through my Big Shot.

To create the shaker, I attached an acetate rectangle at the back of the white frame, added two layers of double sided foam tape along the edges, applied powder along the tape inside the shaker to avoid any stickiness, filled the window with tiny hearts from Pretty pink posh and closed it by attaching the background panel.


I die cut two "I love you" candy hearts from dark pink and white cardstocks. And a solid one from white cardstock. I glued the solid one at the back of the pink one. And used the tiny white letters to fill the wholes in the pink heart.

I attached my images using double sided tape and attached the other frames. The candy heart was attached using square adhesives. Next I attached my panel to a white card base and finally I added clear glitter to the heart to make it super shiny.

VIDEO
Below or here

LAWN FAWN SUPPLIES
- Candy heart die set
- Puffy cloud border die set
- Stitched rectangle frame die set
- Large stitched 4 bar rectangle die set
- Let's play stamp set + coordinating dies
- Bicycle built for you stamp set + coordinating dies
- Dahlia paper from the Perfectly plaid "Spring" 6x6 paper pack
- Chill pepper cardstock

OTHER SUPPLIES
- Spectrum Noir alcohol markers
- Oxide inks: spun sugar, picked raspberry
- Iridescent mini heart confetti sequins by Pretty Pink Posh
- White cardstock from HobbyCraft
- Strathmore bristol smooth cardstock (for the background)
- Neenah solar white cardstock (for the images)
- Memento tuxedo black ink
- Fine black marker by Faber Castell
- White gel pen by UniBall
- Shimmer pen by Spectrum Noir
- Acetate from my stash

Lawn Fawn - There's snow place like home - No-line coloring

mercredi 9 janvier 2019

Hello there,

I'm glad to share with you this winter card showcasing some masking and no-line coloring using alcohol markers. Ever since I got the Sweet Christmas stamp set, I have been wanting to use the gingerbread house as a regular house. Now it's a done deal with this cute cabin ^^

For this new project I was inspired by this picture:


I first started by cutting two pieces from masking paper: a hill border, and a mountain border. I attached the masking hill border at the bottom of my bristol cardstock panel, stamped the house and trees using barely beige ink from Simon says stamp, and masked them.


Next I attached the masking mountain border, i also added three masking clouds and then I colored the sky using tumbled glass oxide ink.

I removed the mask of the mountain, attached the mask of the sky and used tumbled glass and peacock feathers oxide inks to color the mountains.  Then i removed all the masking pieces except for the hill border.


I used a light grey zig marker to trace lines on the house to create planks and then colored it using my alcohol markers. I also added more shadows and details using colored pencils to define the planks and windows better.

I die cut three mountain tops and a hill border from white glitter paper and attached them to my panel. And to add even more sparkles to the scene, i stamped the roof of the house at the back of the same white glitter paper, fussy cut it and glued it on the house.


For my sentiment, I stamped the first and last parts, and created small strips. The middle part was made using the word snow of a let it snow sentiment.

Once the sentiment was complete i attached my panel to a white card base and finally I added a bunch of white Nuvo drops to create falling snow.

VIDEO
Below or here

LAWN FAWN SUPPLIES
- Sweet Christmas stamp set
- Snow day stamp set
- Stitched mountain border die set
- Simple stitched hillside border die set
- Pivot pop-up die set (for the clouds)
- Big winter scripty words stamp set + coordinating dies
- Snow cool stamp set (for the sentiment)

OTHER SUPPLIES
- Spectrum Noir markers
- Oxide inks: tumbled glass, peacock feathers
- Colored pencils
- Simply white Nuvo drops
- White gel pen by UniBall
- Barely beige ink by Simon Says Stamp
- White glitter cardstock from my stash
- Masking paper from Simon Says Stamp

Lawn Fawnatics Challenge #43 "Wonderful Winter" - Penguin Family

samedi 5 janvier 2019


Hello there,

Today I'm very happy to share with you my first 2019 project. It was inspired by a card Nicky Meek shared recently on instagram. I just love it and thought it would be cool to give that tall style a try ^^ This card was also inspired by the gorgeous colors of the "Wonderful Winter" Lawn Fawnatics Challenge.


All my images were stamped on neenah solar white cardstock using memento tuxedo black ink, colored using my spectrum noir markers and cut using the coordinating dies.


Next I die cut four hill borders, two mountains borders and some small clouds to build my background. I wanted them to match the igloos and snow balls so I applied squeezed lemonade oxide ink on the borders.


At the beginning I wanted the sky to be blue but there was too much contrast and I didn't like it so I ended up making a pink sky and I think it coordinates better with the soft yellow of the borders.


All the borders were attached together using double sided foam tape to give some dimension to the scene. I used adhesive squares to attach the clouds and glue dots to attach all the images.


I white heat embossed the first and last parts of the sentiment, applied blue oxide ink on top to coordinate with the blue on my images and cut them to create small banners. For the middle part I stamped the end of a "Let it snow" sentiment using pink oxide ink to match the sky and cut it using the coordinating die.


I attached my panel to a white card base, and applied clear glitter to the clouds to finish the card.


VIDEO
Below or here


LAWN FAWN SUPPLIES
- Snow cool stamp set + dies
- Toboggan together stamp set + dies
- Winter skies stamp set + dies
- Here we go a waddling stamp set + dies
- Winter penguin stamp set + dies
- Beary happy holidays stamp set + dies
- Critters in the artic stamp set + dies
- Winter big scripty words stamp set + dies
- Stitched hillside border die set
- Stitched mountain border die set
- Pivot pop-up die set (for the cloud dies)

OTHER SUPPLIES
- Distress oxide inks: squeezed lemonade, spun sugar, worn lipstick, blueprint sketch
- Spectrum Noir markers
- Clear glitter pen by Spectrum Noir
- White gel pen by UniBall
- Black gel pen by Sakura
- Memento tuxedo black ink
- White cardstock by HobbyCraft (for the card base)
- Strathmore bristol smooth cardstock (for the borders)
- Neenah solar white cardstock (for the images)