Hello Bluebird - Pathway Background Mini Slimline Card

samedi 27 février 2021

 Hey there,

I'm back with another Hello Bluebird card, and this time it features the Pathway background stamp. I used this stamp as well as other images to create my scene on a mini slimline card. It's a new trend going on at the moment and I wanted to try it.

So I simply cut a Neenah solar white panel measuring 5 x 3 inches, and I stamped a part of the Pathway background on that panel. And like always I used my alcohol markers to color the entire panel. And once my mini panel was complete, I stamped additional images and used my alcohol markers again to color everything.

I attached my small panel on a 5-1/4 x 3-1/4 inches card base using foam tape, and then all my cute images on top using a combination of foam squares and glue dots. I stamped my sentiment and used a white gel pen to add highlights on the images and then I added a tiny white nuvo drop in the middle of each orange flower.


And that's it for this lovely picnic scene in the countryside. I leave you with the video, you can click on the picture below, and wish you a very nice day.


VIDEO
(click on the picture below)


HELLO BLUEBIRD SUPPLIES
- Pathway background
- Spring gatherings
- Autumn gatherings
- Fairy dance
- My snowman
- Picked for you
- Merry mice
- Field mice
- Party on the farm
- Strawberry jam


OTHER SUPPLIES
- Spectrum Noir markers
- Graph'it brush markers
- Sakura white gel pen
- 80lbs Neenah solar white cardstock
- Memento tuxedo black ink
- White nuvo drops by Tonic Studio

Hello Bluebird - Customization + Mix & Match

lundi 22 février 2021

 Hi there,

I'm very happy to be back with this lovely scene at the farm featuring several stamp sets designed by Hello Bluebird. As always, I started by stamping all the images using Memento tuxedo black ink, used the coordinating dies to cut them all, I fussy cut is the Farmland background, and used my alcohol markers to color everything.

Once the coloring was done, I created a simple sky on a 5,5 x 4,25" bristol panel using a cloud stencil along with tumbled glass and salty ocean distress inks. As well as a grass border using shabby shutters and peeled paint distress inks. And a hill border that I turned into a pond using shabby shutters and broken china distress inks.


I assembled the pond and grass borders using foam squares. And next I attached the fence images directly on the Farmland background using foam squares again, and once those fences were in place, I stuck the background and the borders on the cloud panel using foam sticky tape and foam squares. And then I attached all my cute images.


And I did some customization to add pigtails to the character. I took the zebra images, cut their tails and glued them on both sides of the character's head to give him pigtails and this way turn him into a girl. I used a black marker to connect the tails to the head and finally used my brown markers again to fill some tiny white spots.


VIDEO
(click on the image below)


HELLO BLUEBIRD SUPPLIES
- Farmland background
- Fishin hole
- Party on the farm
- More jungle Littles
- Picked for you
- Otter friends
- My snowman
- Long distance
- Hill and Dale
- Grassy Knoll

OTHER SUPPLIES
- Spectrum Noir markers
- Graph'it brush markers
- Distress inks: tumbled glass, salty ocean, shabby shutters, peeled paint, broken china
- Cloud stencil by Lawn Fawn
- Sakura white gel pen
- Memento black markers
- Memento tuxedo black ink
- 80lbs Neenah solar white cardstock
- Strathmore bristol smooth cardstock

Isabel Cristina Stamps - Mini Fairies Slider Surprise Card

vendredi 19 février 2021

 Hi there,

Today's card is a slider surprise card that showcases the lovely Bella Mini Fairies digital stamp set designed by Isabel Cristina stamps. This set was released this month, along with some other super cute sets, including the awesome It's Movie Night set that I used to create the card below. The little guys at the bottom are from that set, and I mixed it with the amazing Talking Toys set to really get into the movie theme.

Isabel has a bunch of movie and tv series related sets in her etsy shop, they're all coordinates perfectly with the It's Movie Night set so you might want to check those out!

Back to today's card. I used most of the images from Bella Mini Fairies, but to brighten up the scene I used some images from other sets. And you will find all the details below the video at the end of this blog post.


I printed all the images on 80lbs Neenah solar white cardstock using my Epson xp-225, cut them all using my Scan 'n cut machine, and coloed everything using my alcohol markers.


Next I moved on to the interactive part of the card and cut three different panels out of strathmore bristol cardstock: a slider panel using the slider surprise die set by My Favorite Things, a simple rectangle measuring the same as the slider panel, and a pull tab panel using another die from the Slider surprise die set.

I started with the slider panel. I used a cloud stencil along with tumbled glass distress ink to create a simple sky. And at the bottom I used shabby shutters and mowed lawn distress inks to create grass.

Added some texture to the sky section by mixing tumbled glass and salty ocean distress inks with water and creating splatters on the paper.to create texture on my panel, but to me it definitely needed a little more contrast so I also used some salty ocean distress ink. And I did the same thing on the grass section using the same green inks as before.

Next I wanted the inside panel to also have clouds and I wanted them to be coordinated so I tape the simple rectangle panel on my desk. I placed the slider panel on top, and the stencil on top, made sure that I was placing the stencil on the right cloud section, removed the slider panel, and then applied tumbled glass distress ink on my simple rectangle panel. And I did the same process to cover the entire panel.

And I also created the same cloud pattern on the pull tab panel.


Next I assembled my three elements, and I started by folding the score lines on the slider panel. I applied double sided sticky tape at the back of the slim rectangle, peeled the backing paper off, made sure that my slider panel was laying flat on my desk, and stuck the pull tab panel at the back of it, making sure to have the rounded edges on the notch side.

I applied foam sticky tape all around the pull tab panel and then attached it to the remaining panel. And next it was time to assemble and stick all my cute images on that slider panel using glue dots and also foam squares.


I stamped my sentiment as well as an arrow at the top of the pull tab panel, and finally I applied some glitter on the fairies wings and butterflies and white nuvo drops in the middle of each flower.


VIDEO
(click on the picture below)


ISABEL CRISTINA STAMPS SUPPLIES
- Bella Mini Fairies: fairies & tree house
- Flower Bunnies: fences, flower bushes, flowers & butterflies
- Flower Friends: flower garland, branch & small flowers
- Woodland Friends: tree trunk & mushroom

OTHER SUPPLIES
- Spectrum Noir markers
- Graph'it brush markers
- Distress inks: tumbled glass salty ocean, shabby shutters, mowed lawn
- Slider surprise die set by My Favorite Things
- Pull here stamp set by Lawn Fawn
- A little sparkle stamp set by Lawn Fawn (for the sentiment)
- Cloud stencil by Lawn Fawn
- White blizzard nuvo drops by Tonic Studio
- White nuvo drops by Tonic Studio
- 80lbs Neenah solar white cardstock
- Strathmore bristol smooth cardstock
- Sakura white gel pen

Lawn Fawn - Beary Fun Waving Pull Tab Birthday Card

mardi 16 février 2021

 Hello there,

Today we join a cute bear family at the arcade games. They're playing at the claw machine and it looks like they're going to clear it out!

As always, I started with the coloring part. I stamped all my images on 80lbs Neenah solar white cardstock using jet black ink, cut them all using the coordinating dies, and colored everything using my alcohol markers.

For the background, I chose two papers: a rainbow paper and a shimmery light blue cardstock. I cut a star background out of the light blue cardstock that I attached on the rainbow paper paper using liquid glue. And I also created a very simple floor using a green pattern paper.

Next I moved on to the interactive part of my card, and I invite you to watch the process video below to see how it was done; it's always easier to understand with images ^^

When it was all done, I stuck the floor using double sided sticky tape, and attached my panel on a mermaid card base using two layers of foam tape. And then I finally assembled and attached all my cute images on my panel using a combination of foam tape for the largest pieces, as well as foam squares and glue dots.

Once everything was attached, I white heat embossed my sentiment 'Have a beary fun birthday' on black cardstock and I trimmed it into slim banners that I attached below the notch. And finally I cut the arrow out of chili pepper cardstock and stuck it at the top of the pull tab to totally complete my card.

VIDEO
(click on the picture below)


LAWN FAWN SUPPLIES

Stamp sets

You’re claw-some

Snow much fun

Den sweet den

Holiday helpers


Die sets

Waving pull tab

Snowy backdrop

Large stitched rectangle stackables

Picket fence


Papers

Blue cardstock from Tropical shimmer

Mermaid cardstock

Chili pepper cardstock

Black licorice cardstock

from Really rainbow 6x6 pack

from Really rainbow Christmas 6x6 pack


Misc.

Jet black ink

Clear embossing ink

White embossing powder


OTHER SUPPLIES


- Spectrum Noir markers
- Graph'it brush markers
- Sakura white gel pen
- 80lbs Neenah solar white cardstock

Crafty Friends Challenge - I was inspired by Mona Toth

samedi 13 février 2021

 Hey there,

Today I'm sharing a special video! My friend Mona and I challenged ourselves to create a card that is inspired by a card the other one made, and more precisely inspired by our coloring. I knew immediately the card that would be my inspiration. It's the first one I saw when I came across her Instagram page two years ago, the card that made me fall in love with Mona' style.

So for the theme, I went with an underwater scene with a yellow base, and for the coloring I went with Mona's favorite color combo which is pink, yellow and aqua blue.


Mona has a Valentine surprise for you in her video, she will pick a winner among the comments on both our videos and the prize is pretty cool so you definitely don't want to miss it. Also she will announce the winner in her IG page and in her next video on the 20th of February.

And here's the link to Mona's video, so go check it out to see how she was inspired by my coloring and comment for a chance to win! Good luck!


So, about my card: I had some super cute underwater sets by Sunny Studio that I wanted to use since a long time so I went with those sets. I stamped all the images on 80lbs neenah solar white cardstock using memento tuxedo black ink, cut them all using the coordinating dies and colored everything using my alcohol markers.


Once all my cute ocean critters were done, I moved on to the background and cut a slider panel out of Strathmore bristol cardstock using the Slider Surprise die set by My Favorite Things. And I used shades of blue oxide inks to create the ocean background: salty ocean, blueprint sketch and chipped sapphire.

Next I created texture: water droplets first, and then to bring more contrast I mixed some chipped sapphire oxide ink with water and used a small brush to create tiny dots all over the paper but mostly at the bottom.

I created another panel measuring the same as the slider panel, and cut a pull tab panel using a die from the same Slider Surprise die set, and to color that third panel I only used salty ocean oxide ink but created the same texture as the other two panels.

Next I assembled the elements, and I invite you to watch the video below to see how it was done.


When my interactive panel was done,  I stuck the images, starting with the seaweed border at the very bottom. Next I stamped 'Pull here' at the top of the pull tab panel and white heat embossed my sentiment 'It's your birthday', I also cut some letters to create the word Splash. I used the Charlie alpha die set by Hello Bluebird, and I stuck those letters on the pull tab panel, but instead of the letter A, I attached a lobster, as well as a starfish and a small fish.

To feel some of the gaps here and there I stamped bubbles using chipped sapphire and blueprint sketch oxide inks. And for a touch of shine, I also added a few morning dew nuvo drops.

And finally, to match Mona's card, I needed a yellow card base, so I cut a 5,5 x 4,25" yellow panel that I stuck on a yellow card base, and then attached my under water slider panel on top using foam tape.


VIDEO
(click on the picture below)


SUPPLIES
- Best fishes stamp set by Sunny Studio
- Tropical scenes stamp set by Sunny Studio
- Penguin pals stamp set by Sunny Studio
- Slider surprise die set by My Favorite Things
- Charlie alpha die set by Hello Bluebird
- Push here stamp set by Lawn Fawn
- Spectrum Noir markers
- Graph'it brush markers
- Distress oxide inks: salty ocean, blueprint sketch, chipped sapphire
- Sakura white gel pen
- Morning dew nuvo drops by Tonic Studio
- Memento tuxedo black ink
- Clear embossing ink by Lawn Fawn
- White embossing powder by Lawn Fawn
- 80lbs Neenah solar white cardstock
- Strathmore bristol smooth cardstock
- Yellow paper by Lawn Fawn

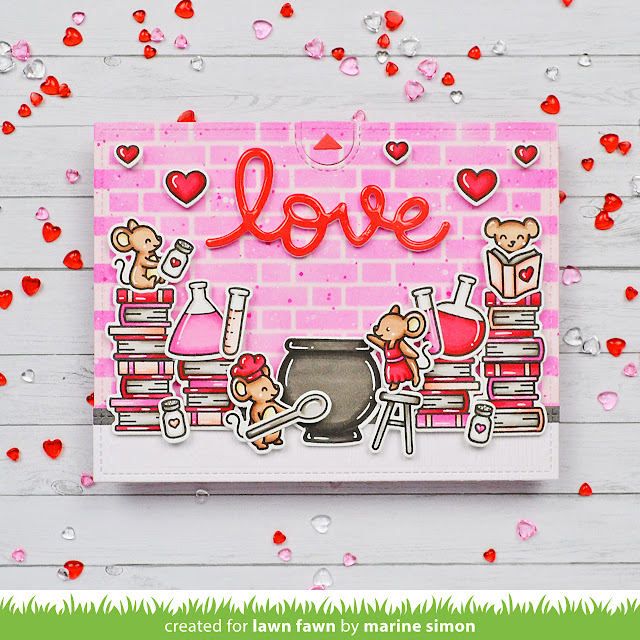
Lawn Fawn - Love Potion Pull Tab Card

mardi 2 février 2021

 Hello there,

Today, the mouse family is back, and we join them to make a love potion! As always I used a bunch of images from different sets so feel welcome to check the list of supplies below. I stamped everything using jet black ink, used the coordinating dies to cut them all, and my beloved alcohol markers to color everything.

Next I cut a 5,5 x 4,25" panel that I entirely covered with spun sugar distress ink, and used a brick stencil along with picked raspberry distress ink to create my wall. I also added texture to that background: water droplets, picked raspberry + water droplets, and white paint + water droplets.


Next I moved on to the interactive part of my card, and I invite you to watch the video below to see how it was made ^^ And when it was all built up, I attached my images using foam squares.


I wanted my sentiment to be very bold so I started by coloring a piece of paper using candied apple oxide ink, and I sent that paper to my die cut machine with the scripty love die as well as the arrow handle die from Let's toast pull tab.


I cut the word love a second time out of white foam and stuck my red love word on top, and attached my dimensional sentiment right in the middle of my panel above the big heart. I also glued the arrow at the top of the pull tab. Next I used a white gel pen to add highlights on the images, and finally I applied glossy accents on the word love to make it super shiny.


VIDEO
(click on the picture below)


LAWN FAWN SUPPLIES

Stamp sets
Push here
Science of love
Wild for you
Fortune teller tabby
Keep swimming
Crazy antics
Unicorn picnic
A creature was stirring
Merry mice
You're just my type
Den sweet den
Thanks a latte

Die sets
Let's toast pull tab
Scripty love
Picket fence border
Large stitched rectangle stackables

Misc.
Jet black ink
Brick stencil
Neutral woodgrain cardstock
Ballet slippers cardstock


OTHER SUPPLIES
- Spectrum Noir markers
- Graphit brush markers
- Distress inks: spun sugar, picked raspberry
- Sakura white gel pen
- Glossy accents by Ranger
- 80lbs Neenah solar white cardstock
- Strathmore bristol smooth cardstock