Sunny Studio - Edge to Edge Mini Slimline Shaker Card

jeudi 30 décembre 2021

Hey there,

I'm thrilled to be back on Sunny Studio blog with this new edge to edge mini slimline shaker card featuring the lovely Balloon bouquet. I've created a hot air balloon using Balloon rides, and also picked the bunny from that stamp set to create a cute bunny couple.

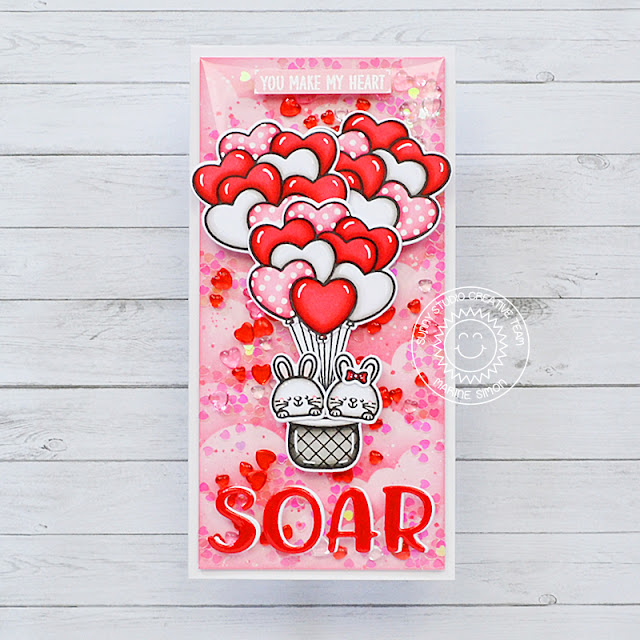
To begin, I stamped the images using an alcohol marker friendly black ink, I cut them all using the coordinating dies and then I colored everything using my alcohol markers. I stamped the balloon bouquet three times to get a big balloon bouquet, and I went with traditional valentine colors: red, pink and white.

Next I created the background. I cut a 5-3/4 x 2-3/4 inches bristol panel that I covered with spun sugar distress ink. I used a cloud stencil along with worn lipstick distress ink to create a pretty pink cloudy sky. And I also added some texture to that cloudy sky: water droplets + a mix of worn lipstick and water + a mix of copic opaque white ink and water.


I took a plastic packaging from my stash and cut the four edges off to get two plastic sheets. I kept one of those, and added double sided tape on the four edges. I placed my cloudy panel right in the center of that plastic sheet and cut the four corners off. I attached the bottom tab at the back of the panel and did the same thing with the long sides. Through the last open side, I poured some Heart droplets and tiny heart confetti inside the pocket. And then I attached the last tab at the back of the panel to finally close it.

I cut the word "Soar" out of red cardstock and out of white cardstock using the Chloe alphabet die set. I stuck the white letters at the back of the red ones to create an outline. I also white heat embossed the phrase "You make my heart" from Balloon rides on a light pink cardstock. And I cut a 6 x 3 inches white card base.


I attached the shaker panel on the card base, and then stuck the letters at the bottom and the small banner at the top using liquid glue. I added white dots and details on the images, attached them on the pocket using glue dots, and finally I applied a coat of glossy accents on each letter.


VIDEO


SUNNY STUDIO SUPPLIES
- Balloon bouquet mini stamp set
- Balloon rides stamp set
- Chloe alphabet die set
- Heart droplet mix


OTHER SUPPLIES
- Spectrum Noir markers
- Graph'it brush markers
- Distress inks: spun sugar, worn lipstick
- Copic opaque white ink
- Sakura white gel pen
- Tiny heart confetti by Pretty Pink Posh
- Glossy accents by Ranger
- Cloudy stencil by Lawn Fawn
- Clear embossing ink by Lawn Fawn
- Fine white embossing powder by Hero Arts
- Pink + red cardstocks by The Stamp Market
- Strathmore bristol smooth cardstock

Sunny Studio - Birthday Pull Tab Card

jeudi 23 décembre 2021

Hello there,

I'm back today with an interactive card featuring a cute kitty from Christmas Critters by Sunny Studio. Obviously it's a Christmas themed stamp set, but I like to use my supplies in different ways, and today happens to be my birthday as well, so I thought it would be fun to use this Christmas themed stamp set to create a birthday card.

As always I stamped my images using an alcohol marker friendly black ink, I used the coordinating dies to cut them all, and then colored everything using my alcohol markers. And to make this card super happy and bright, I used rainbow colors to color the banners and the presents.

Chrismas critters: cat and both parts of the present
Lazy Christmas: presents
Balloon rides: banner and the party hats


After the coloring, I moved on to the background. I cut a 5-3/4 x 2-3/4 inches bristol panel, and with the colorful images, I decided to keep this background pretty neutral so I covered it with tumbled glass distress ink. I added a few drops of copic opaque white ink mixed with water, as well as splatters of tumbled glass distress ink mixed with water.

Once the panel was dry, I created the interactive feature, and I invite to click on the last image down below to watch the process video. I always easier to understand with images ^^

So once the kitty was finally in its box, I attached the other presents using foam squares, and then the banners at the top and the party hats here and there around the presents.


I stamped my sentiment "Happy Birthday" from Barnyard Buddies below the presents using black ink, and then I cut a 6 x 3 inches panel using a paper from the Rainbow Bright paper pack. I stuck this rainbow panel on top of a light blue card base, and then I attached my interactive panel on top using foam tape.

As always I added highlights and details on the images using a white gel pen, and to finish this birthday card and make it even more happy and festive, I glued a whole bunch of jewels all around the presents.

And that's it. I hope that this card will inspire you to stretch out your supplies. Don't forget the process video if you need more information. Thanks for stopping by, and I wish you a very merry Christmas. See you next time!


VIDEO


SUNNY STUDIO SUPPLIES
- Christmas critters stamp set
- Lazy Christmas stamp set
- Balloon rides stamp set
- Barnyard buddies stamp set
- Rainbow bright 6x6 paper pack


OTHER SUPPLIES
- Spectrum Noir markers
- Graph'it brush markers
- Distress ink: tumbled glass
- Let's toast pull tab die set by Lawn Fawn
- Copic opaque white ink
- Sakura white gel pen
- Extreme black ink by My Favorite Things
- Black versafine ink
- Jewels from my stash

Lawn Fawn - Magic Picture Changer Mini Slimline Card

Hey there,

I'm so happy to be back on Lawn Fawn blog and channel with this super cute interactive birthday card showcasing Party Pig which is the new free gift that you can receive during the month of your birthday from November 2021 through October 2022. Make sure to check this link to know more about this mini free stamp set.

I started by stamping my image using jet black ink, I cut them all using the coordinating dies and then colored everything using my alcohol markers. And as always I picked my images from several stamp sets, so make sure to check the list of supplies or video down below for more details.

Next I cut a 6 x 3" mini slimline panel out of Strathmore smooth bristol cardstock, and created the background using stencils and distress inks. On the bottom part, I created soil using a hillside stencil + gathered twigs and ground espresso distress inks. On the middle part, I created grass using a grassy stencil + shabby shutters and mowed lawn distress. And on the top part, I created the sky using a cloudy stencil + tumbled glass and salty ocean distress inks.


Next I cut the frame out of this panel, and created the magic picture changer element. And I invite you to watch the process video down below because it's always easier to understand this part with images.

I cut a 6 x 3" card base, I attached the pocket at the bottom using double sided tape, and the sky at the top using foam tape to be at the same height as the pocket. Next, I attached everything using glue dots, foam squares and liquid glue.


Next I created the first part of my sentiment. I cut the word "Oink" three times: one time out of a brown pattern paper and two times out of white cardstock. I glued the white letters on top of each other to create dimension, and then I attached the brown letters on top.

And for the second part of my sentiment, I placed the panel in my Misti tool, with the letters, not attached yet, at the top. I placed the phrase "Translation: happy birthday" between the letters and the trees, removed the letters and stamped the phrase using jet black ink. And then I finally attached the letters right above the phrase.  And finally I cut the pull tab decorating piece and attached it at the end of the pull tab.


VIDEO


LAWN FAWN SUPPLIES

Stamp sets
Party Pig
Really high five
Hay there
Swan soirée
Toadally awesome
Butterfly kisses
Ocean shell-fie
Tree before 'n Afters

Die sets
Magic picture changer
Finley's ABCs
Large mini slimline stackables

Misc
Sweater weather 6x6 paper pack
Jet black ink
- Hillside stencil
- Cloudy stencil
- Grassy stencil


OTHER SUPPLIES
- Spectrum Noir markers
- Graph'it brush markers
- Distress inks: tumbled glass, shabby shutters, mowed lawn, gathered twigs, ground espresso
- Bristol smooth strathmore cardstock
- Sakura white gel pen
- Copic opaque white ink

Sunny Studio - Beary Big Hugs Tunnel Card

jeudi 16 décembre 2021

Hello there,

I'm back with a new tunnel card, and this time I'm showcasing some adorable bears from Bear hugs by Sunny Studio, and I've made a home for them to hibernate through spring time.

I stamped all the images on white cardstock using an alcohol marker friendly black ink, cut them all using the coordinating dies and then colored everything using my alcohol markers. As I always like to do, I picked my images from different stamp sets: Holy night - grass ; Happy harvest - mushrooms ; Savanna safari - rocks ; Seasonal trees - pine trees ; Penguin pals - heart ; Deck the halls - hanging accessory ; Balloon rides - banner

Next I cut three 5,5 x 4,25" panels: a bristol panel, a kraft panel and a brown panel. I set the brown panels aside for later, and started working on the white panel. I covered it with faded jeans oxide ink, and then stamped a row of trees from Bear hugs using chipped sapphire oxide ink.

To darken this forest background, I used chipped sapphire oxide ink again and applied it on the edges, and to add even more contrast, I also added a little bit of black soot oxide ink. And finally, to make this panel full of stars, I added white splatters using copic opaque white ink mixed with water.

Next I used dies from Stitched oval 2 to cut windows out of the blue panel and out of the kraft panel. I used the largest oval die to cut the opening out of the blue panel, and used the second largest oval die to cut the opening out of the kraft panel. And to coordinate with the blue panel, I also added texture on the kraft panel and the brown panel using distress inks.


To create my sentiment, I cut some letters out of aqua cardstock to form the word "Beary", and I also cut a long strip out of vellum and I white heat embossed the words "Sending you" and "big hugs" from Bear hugs on both ends of the strip, leaving enough space in the middle for the word "Beary". I attached the vellum strip at the top of the blue panel, and then I assembled the three panels to finally create my tunnel background. I added foam tape at the back of the blue panel and at the back of the kraft panel, I stuck the kraft panel on top of the brown panel, and then I attached the blue panel on top of the kraft panel.

I also cut a grass border using a die from Picket fence and attached it at the bottom of the blue panel, and then I attached all my cute images using glue dots and foam squares. Finally I attached my panel on a brown card base, and as always I finished my card by adding highlights and details on the images using a white gel pen.

And that's it! I hope that you like this new lovely little scene featuring the cutest bear family. Feel welcome to watch the video for more information. Thanks for stopping by, and see you next time!


VIDEO


SUNNY STUDIO SUPPLIES
Bear hugs stamp set
- Holy night stamp set
- Happy harvest stamp set
- Savanna safari stamp set
- Seasonal trees stamp set
- Penguin pals stamp set
- Deck the halls stamp set
- Balloon rides stamp set
- Stitched oval 2 die set
- Picket fence die set
- Chloe alphabet die set


OTHER SUPPLIES
- Spectrum Noir markers
- Graph'it brush markers
- Sakura white gel pen
- Copic opaque white ink
- Oxide inks: faded jeans, chipped sapphire
- Distress inks: gathered twigs, ground espresso, rustic wilderness
- Mermaid + noble fir + paper bag + chocolate bar cardstocks by Lawn Fawn
- Extreme black ink by My Favorite Things
- Clear embossing in by Lawn Fawn
- Fine white embossing powder by Hero Arts

Holiday Card Series w/ Sunny Studio - Pristine Poinsettia & Winter Greenery

jeudi 9 décembre 2021

Hello there,

I'm so happy to be back with a very pretty poinsettia arrangement showcasing the Pristine poinsettia die set and the Winter greenery die set by Sunny Studio.

I started by cutting a 5,5 x 4,25" panel out of a blue pattern paper from the All is bright 6x6 paper pack, as well as all the greenery and berry elements, and went with a turquoise color palette, with silver mirror and white glitter accents. But I think that this design would look gorgeous with a pink poinsettia + violet shades for the greenery + some silver glitter accents, or maybe something more traditional with a red poinsettia + green shades for the greenery + gold glitter accents.The possibilities are endless!

The first thing I did was to assemble the poinsettia and to do this, I referred to the guide on the Pristine poinsettia page to help me build it the right way.


And once my poinsettia was done, I placed my panel in my misti tool with everything (poinsettia + greenery) on top of it, just to get a general idea of the design, and I placed my sentiment stamps from Holiday express on the right side. I removed the poinsettia and die cut pieces, and silver heat embossed my sentiment.

Next I stuck my panel on a blue card base, and I stuck all my elements, starting with the poinsettia using glue dots. And next the other pieces using liquid glue and as well as foam squares to bring dimension.


Once everything was attached, I felt like it needed a final touch but I didn't want to add highlights using my white gel pen like I usually do, so I just mixed a few drops of copic opaque white ink with water and splattered a few drops on top of the poinsettia and greenery to bring some kind of a frosty/snowy look.


VIDEO


SUNNY STUDIO SUPPLIES
- Pristine poinsettia die set
- Winter greenery die set
- Holiday express stamp set
- All is bright 6x6 paper pack


OTHER SUPPLIES
- Clear embossing by Lawn Fawn
- Silver embossing powder by Lawn Fawn
- Copic opaque white ink
- White cardstock from my stash
- Silver mirror cardstock from my stash
- Pixie dust cardstock by Lawn Fawn
- Mermaid cardstock by Lawn Fawn
- Sea glass cardstock by The Stamp Market
- Tropic teal cardstock by The Stamp Market
- Emerald isle cardstock by The Stamp Market
- Jade cardstock by The Stamp Market

Holiday Card Series w/ Sunny Studio - Tunnel Shaker Card

jeudi 2 décembre 2021

Hello there,

I'm thrilled to be back on Sunny Studio blog today with this tunnel shaker card featuring three super cute penguins having fun and dancing to celebrate the holidays. They are from Penguin pals as well as the fishes, postcards and candy canes, and I also picked the tree from Feeling frosty. I stamped those images on white cardstock using extreme black ink by My Favorite Things, and colored them using my alcohol markers.

Next I created the tunnel panels. I cut four 5,5 x 4,25" panels out of grey, white glitter and white cardstock as well as a grey pattern paper from the Subtle grey tones paper pack. I set the pattern paper panel aside and kept the three others. And using dies from Stitched Oval 2, I cut a large oval window out of the grey panel, a medium oval window out of the white glitter panel, and a small oval window out of the white panel.

I wanted this tunnel card to be a shaker card as well, so I kept the white panel and attached a piece of acetate at the back of it using liquid glue. I added foam tape at the back of each tunnel panel.

And on the white panel, I also added foam tape all around the window to create room for the sequins. I applied powder all along the inside edges of the foam around the window (the powder makes the edges of the foam non sticky and this way the sequins don't stick to it), I cleaned the acetate, and then I added a mix of white sequins, snowflakes, Pure white jewels and Crystal clear jewels into the window section. I peeled the backing off the foam tape and attached the pattern paper panel to totally close the shaker. And then I stuck the two other tunnel panel on top of this shaker panel: the white glitter one first and then the grey one on top.

To finish this tunnel nicely, I created a frame. I first used the largest die from Scalloped oval mat 1 to cut a white woodgrain panel, and then I used the largest die from Stitched oval 2 to cut a window out of this woodgrain element and this way create an oval frame that I attached on the tunnel panel.

I also cut and glued a white wavy border at the bottom of the panel, and then I attached the images using liquid glue, foam squares and glue dots. And finally I white heat embossed my sentiment "It's penguining to look a lot like Christmas" from Penguin pals on a slim blue banner that I attached at the top of the tunnel using liquid glue.


VIDEO


SUNNY STUDIO SUPPLIES
- Stitched oval 2 die set
- Scalloped oval mat 1 die set
- Penguin pals stamp set
- Feeling frosty stamp set
- Pure white jewels
- Crystal clear jewels
- Subtle grey tones 6x6 paper pack

OTHER SUPPLIES
- Spectrum Noir markers
- Graph'it brush markers
- Sakura white gel pen
- Sequins and snowflakes from my stash
- Fog cardstock by Lawn Fawn
- Pixie dust cardstock by Lawn Fawn
- Mermaid cardstock by Lawn Fawn
- Clear embossing ink by Lawn Fawn
- White embossing powder by Lawn Fawn

Holiday Card Series w/ Lawn Fawn - Rainbow Snowflake Cards

mardi 30 novembre 2021

 Hey there,

I'm so happy to be back on Lawn Fawn YouTube channel with this rainbow snowflake set of cards. Very quick to make, and easy to mass produce!

So to create this rainbow set, I picked five different cardstock, ballet slippers, fake tan, sticky note, cilantro and mermaidand cut a 5,5 x 4,25" panel out of each color.

The process is the same for the five cards. I started by creating a snowflake background on each panel using oxide inks and the Snowflake background stencils.

- pink panel: kitsch flamingo + picked raspberry
- orange panel: carved pumpkin + ripe persimmon
- yellow panel: squeezed lemonade + mustard seed
- green panel: mowed lawn + rustic wilderness
- blue panel: tumbled glass + peacock feathers


Next I white heat embossed five sentiments from the Magic holiday message stamp set on vellum, and cut them using a die from the Large stitched circle stackables die set.


I also cut five Magic iris snowflakes out of shiny and sparkly papers and five more out of shimmery cardstocks that coordinated with the snowflake panels, and then I assembled everything.

Once again the process is the same for the five cards. I started by gluing a vellum circle at the back of the shimmery snowflake. Next on the front, I glued a sparkly snowflake. And finally I attached this whole vellum snowflake element in the middle of the panel using liquid glue. I did this for the five cards, and that was it!


VIDEO


LAWN FAWN SUPPLIES

Stamp sets
- Magic holiday messages

Die sets
- Magic iris snowflake add-on
- Large stitched rectangle stackables
- Large stitched circle stackables

Cardstock
- Ballet slippers
- Fake tan
- Sticky note
- Cilantro
- Mermaid
- Pixie dust
- Silver glitter
- Gold glitter
- Gold mirror
- Vellum
- Shimmer tropical (pink, orange, yellow, green)
- Shimmer gemstone (turquoise)

Misc
- Snowflake background stencils
- Clear embossing ink
- White embossing powder


OTHER SUPPLIES
- Oxide inks: 
- kitsch flamingo, picked raspberry, carved pumpkin, ripe persimmon, squeezed lemonade, mustard seed, mowed lawn, rustic wilderness, tumbled glass, peacock feathers

Holiday Card Series w/ Hello Bluebird - Christmas Delivery with Rudolph

dimanche 28 novembre 2021

 Hello there,

I'm back today with a cute and fun Hello Bluebird card that features Rudolph the reindeer. He has sneaked out of the barn and has borrowed Santa's car to deliver Christmas presents by himself, so let's join the fun!

I stamped all my images using an alcohol marker friendly black ink, cut them all using the coordinating dies and then colored everything using my alcohol markers.

After the coloring I cut a 5,5 x 4,25" panel out of bristol cardstock and used salty ocean, prize ribbon and chipped sapphire oxide inks to color it and create a night sky. And to make this night sky a starry sky, I added three different textures: water splatters, liquid stardust and copic opaque white ink.

I let the paper dry, next I attached my panel on a white card base, and then I attached all the images on my panel using foam squares mostly, and also liquid glue and glue dots.

And as always I finished my card by adding a whole bunch of details and highlights on the images and background using a white gel pen to make everything pop even more.


VIDEO


HELLO BLUEBIRD SUPPLIES
City Sidewalks stamp set
- Winter skate stamp set
- Deck the tree stamp set
- Deck the halls stamp set
- Fall friends stamp set
- Puddle play stamp set
- North Pole littles stamp set
- First snow stamp set
- Photo stack die set


OTHER SUPPLIES
- Spectrum Noir markers
- Graph'it brush markers
- Oxide inks: salty ocean, prize ribbon, chipped sapphire
- Sakura white gel pen
- Copic opaque white ink
- Liquid stardust by Lawn Fawn
- Clear embossing ink by Lawn Fawn
- White embossing powder by Lawn Fawn
- Vellum by Simon Says Stamp
- Strathmore bristol smooth cardstock

Holiday Card Series w/ Hello Bluebird - Deck The Tree Slimline Card

samedi 27 novembre 2021

Hey there, 

I'm so happy to be back with this lovely slimline card that features a bunch of cute friends designed by Hello Bluebird and all gathered to decorate their tree house.

As always I started by stamping all the images using an alcohol marker friendly black ink, I cut them all using the coordinating dies and used my alcohol markers to color everything. And I went with my favorite holiday color combination this year which is brown, red and pink with a little bit of white.


After the coloring, I cut the tall tree out of kraft cardstock, and used walnut stain distress ink to add more interest to that tree. I also added brown splatters using walnut stain distress ink mixed with water, and then lots of white splatters using a few drops of copic opaque white ink with a little bit of water.


I let everything dry, and then assembled the background. I cut an 8,5 x 3,5" inches panel out of vellum, and another one out of a red pattern paper. I also cut a white frame, and I stuck that frame on the vellum panel using liquid glue. And then I attached this vellum panel on top of the red panel.

I glued the small snow border at the bottom of the frame, and stuck the tree. I also stuck the inside pieces of three, and then attached all the images on that tree using a combination of foam squares, glue dots and liquid glue.


Finally I white heat embossed the phrase "Merry Christmas from our home to yours" on red cardstock, trimmed it into a slim banner that I attached above the last bunny at the bottom, and as always I added a whole bunch of highlights and details on the images and on the vellum as well using a white gel pen.


VIDEO


HELLO BLUEBIRD SUPPLIES
- Deck the tree stamp set
- O Christmas tree stamp set
- Flying high stamp set
- High-rise tree scene die


OTHER SUPPLIES
- Spectrum Noir markers
- Graph'it brush markers
- Distress ink: walnut stain
- Sakura white gel pen
- Copic opaque white ink
- Vellum by Simon Says Stamp
- Red pattern paper by Lawn Fawn
- Kraft cardstock by Lawn Fawn
- Chili pepper cardstock by Lawn Fawn
- Clear embossing ink by Lawn Fawn
- White embossing powder by Lawn Fawn