Sunny Studio - Spring Greenery & Stamp Customization

jeudi 31 mars 2022

Hello there,

I'm super happy to be back on Sunny Studio blog because today's card is all about customization. I created my own leafy background using Spring greenery, I used the branch from Outback critters to make bamboo, and turned bears from Bear hugs into pandas.

So as always I started off by stamping all my images using an alcohol marker friendly black ink, I cut them all using the coordinating dies, and I first worked on the bears from Bear hugs, and turned them into pandas. Please watch the video down below to see the whole process ^^

Once my cute pandas were done, I colored the other images: the branches from Outback critters in green to create bamboo, the mountains from Spring scenesthe grass, butterflies and small flower from Bunnyville.

Next I created my leafy background. I cut a 5,5 x 4,25" bristol panel, and started by covering it with mowed lawn oxide ink. Next I applied some rustic wilderness oxide ink on the four edges, and then used my mowed lawn blending tool again to achieve a nice blending.

I die cut the Spring greenery leaves several times out of bristol cardstock, and colored them using rustic wilderness oxide ink again. And next I randomly glued them on my green panel using liquid glue. I added texture and details to this leafy panel: splatters of rustic wilderness oxide ink + water, splatters of black soot oxide ink + water, and splatters of copic opaque white ink + water.

To set my cute panda scene, I cut some additional pieces: two Stitched oval elements out of a grass pattern paper from the Spring Fling paper pack and out of a blue pattern paper from the Spring Sunburst paper pack, and one Scalloped oval element out of a yellow cardstock. I layered those pieces on top of each other to create a cute scenery, and then I popped the whole on my leafy background using foam squares.

I stuck all the images, and for my sentiment I cut a pink banner using a die from the Stitched rectangle die set, I white heat embossed my customized sentiment "For my beary sweet mom" on it, and attached it right below the cute pandas. I attached my panel to a green card base, and as always I finished my card by adding highlights and details to the images and sky using a white gel pen.


VIDEO


SUNNY STUDIO SUPPLIES
- Spring greenery die set
Bear hugs stamp set
- Outback critters stamp set
- Spring scenes stamp set
- Bunnyville stamp set
Little Birdie stamp set
- Garden fairy stamp set
- Stitched oval 2 die set
- Scalloped oval mat 1 die set
- Picket fence die set
- Stitched rectangle die set
- Spring fling paper pack
- Spring sunburst paper pack


OTHER SUPPLIES
- Spectrum Noir markers
- Graph'it brush markers
- Oxide inks: mowed lawn, rustic wilderness, black soot
- Copic opaque white ink
- Sakura white gel pen
- Clear embossing ink by Lawn Fawn
- Fine white embossing powder by Hero Arts
- Pink cardstock by The Stamp Market
- Yellow cardstock by Lawn Fawn
- Strathmore bristol smooth cardstock

Sunny Studio - Two Cards Featuring Bunnyville

jeudi 24 mars 2022

Hello there,

Spring has arrived so it's time to share with you some cute and sweet Easter inspiration showcasing the adorable Bunnyville stamp set by Sunny Studio. Originally, I had planned to make just one card, the one with the carrot houses, but I really wanted to use the carrot balloons so I made a second card to feature those balloons.

I started off by cutting a 5,5 x 4,25" bristol panel, and used stencils from stash along with oxide inks to create a lovely countryside scenery. At the bottom of the panel, I created a grass section using shabby shutters + mowed lawn oxide inks. Right above it, I created a hill section using mowed lawn + rustic wilderness oxide inks. And at the top of the panel, I created a cloudy stencil using tumbled glass + salty ocean oxide inks.


Next I stamped my images using an alcohol marker friendly black ink, cut them all using the coordinating dies and then colored everything using my alcohol markers. And as always, I picked the images from some other stamp sets: Harvest mice for the cart and Balloon rides for the banner.


Once the coloring was done, I attached everything on my countryside panel. I first glued the yellow carrot + some grass inside the cart using liquid glue, and next I stuck the other images using foam squares for the biggest images, as well as glue dots and liquid glue for the smallest ones.


Next I created my sentiment in two parts. I cut the letters to form the word "Easter" out of a light blue cardstock using the Chloe alphabet die set, and as always I added white letters at the back to create an outline and make the letters pop on the green background. I attached those letters at the bottom of my panel, and then stamped the word "Happy" from Fabulous flamingos right above the letters. I used my white gel pen to add highlights and details to the images and finally attached my panel on a white card base.

***


And like I said at the beginning, I really wanted to use the carrot balloons from Bunnyville, so I created a mini slimline edge to edge shaker card inspired by the Heart bouquet card I shared here on the blog back in December. To make this hot air carrot balloon, I also picked the bunny + basket from Balloon rides, as well as the balloon strings from Heart bouquet. And for my sentiment, I white heat embossed the phrase "May your Easter be a happy one" from Bunnyville on green cardstock and cut it using a die from the Scalloped circle mat 1 die set.


VIDEO


SUNNY STUDIO SUPPLIES
Bunnyville stamp set
- Heart  bouquet
- Balloon rides
- Harvest mice
- Fabulous flamingos
- Chloe alphabet die set
- Scalloped circle mat 1 die set


OTHER SUPPLIES
- Spectrum Noir markers
- Graph'it brush markers
- Oxide inks: shabby shutters, mowed lawn, rustic wilderness, tumbled glass, salty ocean
- Sakura white gel pen
- Copic opaque white ink
- Stencils by Lawn Fawn
- Extreme black ink by My Favorite Things
- Black versafine ink
- Clear embossing ink by Lawn Fawn
- Fine white embossing powder by Hero Arts
- Light blue cardstock by Lawn Fawn
- Green cardstock by Lawn Fawn
- Strathmore bristol smooth cardstock
- Bunny trail shaker accessories by Buttons Galore

Lawn Fawn - Singing in the Rain Platform Pop-Up Card

mardi 22 mars 2022

Hey there,

I'm so glad to be back on Lawn Fawn YouTube Channel with this new platform pop-up card that is inspired by this Singing In The Rain mini slimline card I made back in February for Spring release week.


I started by stamping all my images using jet black ink, except for the lamp posts. I wanted to add a bit of shadows on those two images so I stamped them using river rock ink. I cut them all using the coordinating dies and then colored everything using my alcohol markers.


Next I created the platform pop-up card base. I cut the different elements out of Strathmore bristol cardstock: 2 main pieces, 3 t-shape pieces, and a background panel. On the background piece, I created a rainy night sky using blueprint sketch, chipped sapphire and black soot oxide inks, as well as the rainy sky stencil + fairy dust stencil paste. And for the platform pop-up itself, I used hickory smoke distress ink + oxide ink as well as the brick stencil. And I invite you to watch the video down below to see the whole inking and building process ^^


Once the scenery was built and complete, I stuck my cute images on the t-shape pieces using 3mm glue dots. Next, I created my sentiment in two parts: for the 1st part I white heat embossed the phrase "Rain or shine" on a black licorice banner, and for the 2nd part I created the word "Sing". I cut the letters twice: out of peacock cardstock and out of white cardstock. I glued the white letters behind the peacock ones to create an outline, and then I stuck those letters on the front of the platform, with the small banner right above it.


To decorate the side sections, I glued some music notes, and to stay in this rainy theme, I finally applied a coat of glossy accents on the letters to bring a shiny and wet effect.


VIDEO


LAWN FAWN SUPPLIES

Stamp sets
- Beary rainy day
- Elphie selphie
- Here we go a waddling
- Critter concert

Die sets
- Platform pop-up + add-on
- Henry's ABCs
- Everyday sentiment banners

Misc
- Rainy sky stencil
- Brick stencil
- Fairy dust stencil paste
- Clear embossing ink
- White embossing powder
- Jet black ink
- River rock ink
- Peacock cardstock
- Black licorice cardstock

OTHER SUPPLIES
- Spectrum Noir markers
- Graph'it brush markers
- Oxide inks: blueprint sketch, chipped sapphire, black soot, hickory smoke
- Copic opaque white ink
- Sakura white gel pen
- Strathmore bristol smooth cardstock

Sunny Studio - Little Birdie Mini Slimline Baby Card

jeudi 17 mars 2022

 Hello there,

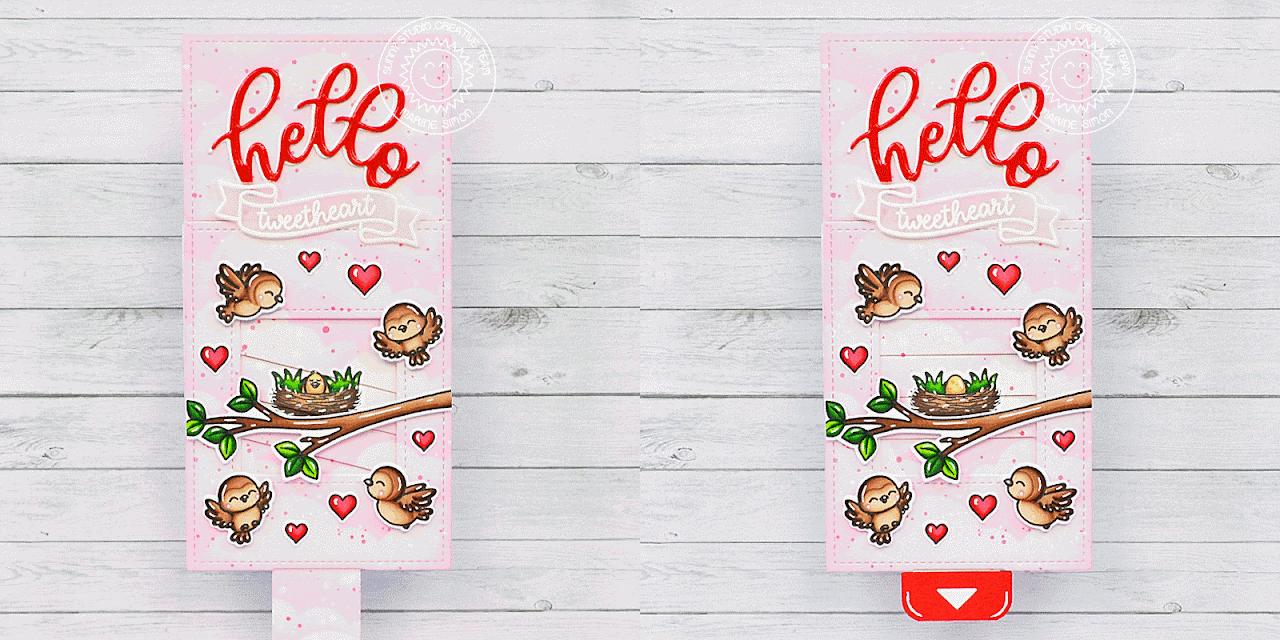
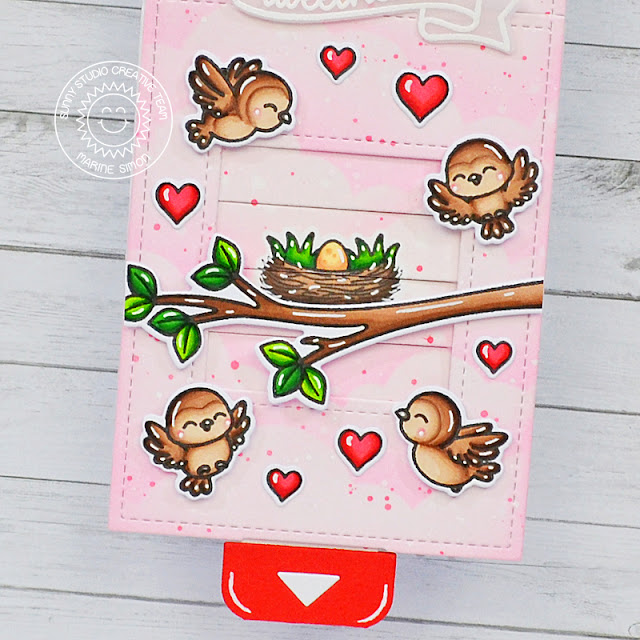
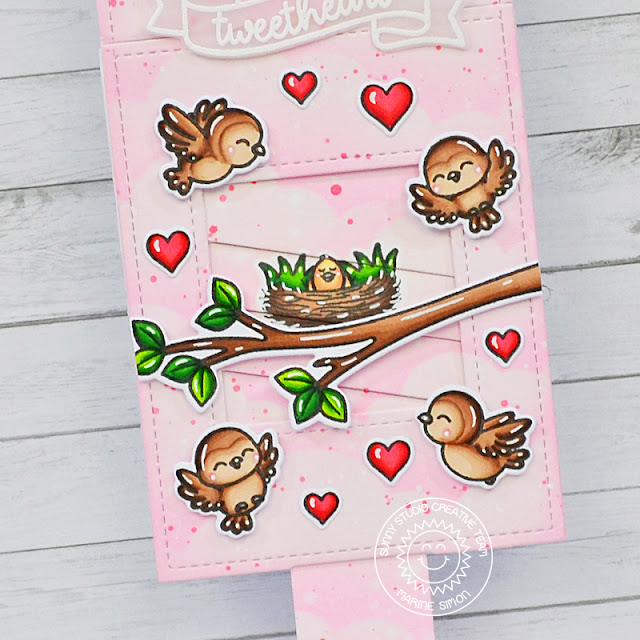
I'm back on Sunny Studio blog with a new interactive card featuring the adorable Little Birdie stamp set. With that set, I've already created tropical birds and canaries, and today, I'm making a sparrow family welcoming a new baby bird.

I started off with the interactive part of the cart, and created two little nests using some images from several sets: the nest is from Little birdie, the egg is from Farm fresh, the grass is from Holy night and the teeny tiny bird is from Seasonal trees. I did some masking and colored those images using my alcohol markers. You can check the video down below to watch the whole masking process, as well as the construction of the interactive element.

For the background, I cut a 6 x 3" mini slimline panel out of bristol cardstock, and I covered it first with spun sugar distress ink to get a nice and even soft pink base. And to give more interest to this plain background, I used a cloud stencil from my stash along with kitsch flamingo distress ink to create a lovely cloudy sky all over the panel. I also added some texture to this background: water splatters, white ink splatters, and worn lipstick distress ink mixed with water splatters.


Once the interactive element was done, I stamped additional images: some birds and the branch from Little birdie and some hearts from Fabulous flamingos using an alcohol marker friendly black ink and colored everything using my alcohol markers.

I cut those images using the coordinating dies, and next I created my sentiment in two parts. First part: I cut the word "Hello" from the Slimline scalloped frame die set out of red cardstock and out of white cardstock, and I stuck the white "Hello" at the back of the red one to create an outline. Next I white embossed the banner and the word "Tweetheart" from Little birdie on vellum, and I die cut the pull tab decorative pieces.


And then I assembled everything on a 6 x 3 inches white card base. I attached the pocket using liquid glue, and the background piece using foam to be at the height as the pocket, next the handle at the end of the pull tab, and then the word "Hello" at the top of the panel, with the vellum banner right below. And finally the cute little sparrows and branch using foam squares, and the hearts using liquid glue.

At the end, I added highlights on the images using a white gel pen, and added glossy accents on the word "Hello" for a touch of shine on the card.

And that's it. A lovely little scene with a sparrow family welcoming a teeny tiny baby sparrow to the world. I hope you like this new sweet and cute interactive card, thanks for stopping by and see you next week! 


VIDEO


SUNNY STUDIO SUPPLIES
Little Birdie stamp set
- Seasonal trees stamp set
- Farm fresh stamp set
- Fabulous flamingos stamp set
- Holy night stamp set
- Slimline scalloped frame die set


OTHER SUPPLIES
- Spectrum Noir markers
- Graph'it brush markers
- Distress inks: spun sugar, kitsch flamingo, worn lipstick
- Copic opaque white ink
- Sakura white gel pen
- Magic picture changer + add-on by Lawn Fawn
- Red cardstock by Simon Says Stamp
- Vellum by Simon Says Stamp

Sunny Studio - Cherry Blossoms in Paris Shaker Card

jeudi 10 mars 2022

Hi there,

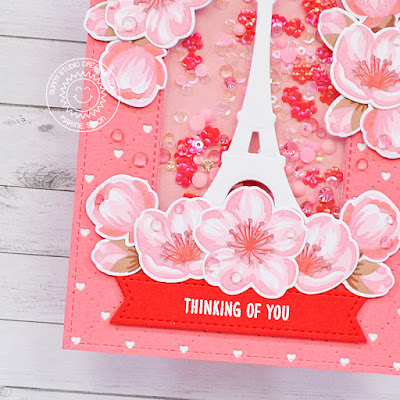
Today I'm featuring the gorgeous Cherry Blossoms stamp set on a pretty and elegant shaker card. I started off by stamping all the flowers, and to help me in this task, I followed the numbers on the stamp set, as well as the guide on the Cherry Blossoms page.

I used distress oxide inks to create the flowers: spun sugar, worn lipstick, festive berries and aged mahogany, and Lawn Fawn inks for the stems. Feel welcome to check the video below to watch the whole layering process.

Once all the flowers were done, I moved on to the background. I cut a 5,5 x 4,25" panel out of a raspberry pink cardstock and I added details and texture on this plain panel using the Quilted heart portrait die. And then I attached my panel on a white panel.


Next I created the shaker. I used the second Stitched arch die to cut a window out of my panel. I applied liquid glue at the back, attached a piece of acetate, and next I added foam strips at the back of the panel, as well as all around the arch window.

I added sequins and jewels inside the window, and attached a light pink panel on the foam strips to totally close the shaker panel. Next I cut the Eiffel tower using the coordinating die from Paris afternoon and attached it in the middle of the arch window using foam squares, and stuck flowers at the bottom of the arch.


I added more flowers at the top on each side of the arch window, and for my sentiment, I die cut a red banner using a die from Stitched rectangles, and white heat embossed the phrase "Thinking of you" from Critters on the go. I tucked the banner under the flowers at the bottom, and finally I added a few clear jewels here and there for an extra touch of shine. 


VIDEO


SUNNY STUDIO SUPPLIES
- Cherry blossoms stamp set
- Critters on the go stamp set
- Paris afternoon stamp set
- Quilted heart portrait die
- Stitched arch die set
- Stitched rectangles die set


OTHER SUPPLIES
- Oxide inks: spun sugar, worn lipstick, festive berries & aged mahogany
- Lawn Fawn inks: doe & walnut
- Clear embossing ink by Lawn Fawn
- Fine white embossing powder by Hero Arts
- Colored cardstock by The Stamp Market
- Flowers sequins by Simon Says Stamp
- Jewels by Studio Katia
- Light pink sequins from my stash

Lawn Fawn - Pirate Platform Pop-Up Card

mardi 8 mars 2022

 Hey there,

I am thrilled to be back on Lawn Fawn YouTube channel and blog with this platform pop-up card! This new interactive die and add-on are so fun and easy to use, perfect to create little scenes, I think it has become my favorite interactive die! As always I mixed several stamp sets to build my scene, and I went with a pirate/tropical theme with a favorite of mine: Ahoy Matey to create a cute pirate scene on a desert island!

Creating this platform pop-up card was so much fun, but quite long so I'm leaving you with the video down below because images are worth a thousand words ^^


VIDEO


LAWN FAWN SUPPLIES

Stamp sets
- Ahoy matey
- Toucan do it
- Critters in the jungle
- Critters from the past
- Life is good

Die sets
- Platform pop-up + add-on
- Henry's ABCs
- Simple stitched wavy borders

Misc
- Tropical leaves background stencils
- Black licorice cardstock
- Red & white stripe paper from Let it shine 6x6 paper pack
- Jet black ink


OTHER SUPPLIES
- Spectrum Noir markers
- Graph'it brush markers
- Oxide inks: mowed lawn, rustic wilderness, antique linen, frayed burlap, vintage photo, cracked pistachio, peacock feathers, blueprint sketch
- Sakura white gel pen
- Copic opaque white ink

Sunny Studio - Charming City 3D Pop-Up Card

jeudi 3 mars 2022

Hello there,

Today I'm taking you back to Paris with this super cute and colorful 3D card featuring Charming cityI started off by stamping all my images using an alcohol marker friendly black ink, I cut them all using the coordinating dies and colored everything using my alcohol markers. In addition to the buildings, trees and street lamps from Charming city, I also stamped and colored the Eiffel tower from Paris afternoon, a girl from Fall kiddos and the cute sausage dog from Critters on the go.

Once the coloring was done, I cut all the pieces to build my 3d card. I created a cloudy sky for the background using a cloud stencil and tumbled glass distress ink, and I used a brick stencil with hickory smoke distress ink to create pavement on the insert pieces. Next I assembled all the pieces to build my 3D card base, and once it was done, I attached all the images on the insert pieces using gue dots for the buildings and liquid glue for the smallest pieces, as well as two more images on the front.


Next I created my sentiment. I white heat embossed the words "From" from Chickie baby and "With love" from Spring showers on black cardstock and trimmed them into two small banners. And for the word "Paris", I used the Chloe alphabet die set to cut the letters twice out of two shades of aqua cardstock, I layered the letters and glued them on the front of the card as well.


And that's it. Now let's go for a walk in the streets of Paris, shall we? Let's go up the Eiffel tower and have a stunning view of the city! As always feel welcome to check the process video. I'll be back next Thursday with a new Sunny Studio card, thanks for stopping by and have a very nice day!


VIDEO


SUNNY STUDIO SUPPLIES
Charming city stamp set
- Paris afternoon stamp set
- Fall kiddos stamp set
- Critters on the go stamp set
- Spring showers stamp set
- Chickie baby stamp set
- Chloe alphabet die set

OTHER SUPPLIES
- Spectrum Noir markers
- Graph'it brush markers
- Mini slimline outside the box level-up die set
- Distress inks: tumbled glass, salty ocean, hickory smoke
- Sakura white gel pen
- Clear embossing ink by Lawn Fawn
- Fine white embossing powder by Hero Arts
- Brick stencil by Lawn Fawn
- Cloudy stencil by Lawn Fawn
- Colored cardstock by The Stamp Market