Spooky Card Series w/ Hello Bluebird - Spooky Shelves

mardi 29 septembre 2020

Hey everyone,

Halloween is next month so there is still plenty of time to create spooky cute cards! This one features several stamp and die sets, including Frightful Little Bits from the last release.

Like always I started by stamping and cutting the images, and I colored them using my alcohol markers.

When the coloring was done, I created the shelf background. I cut my frame out of white woodgrain cardstock and colored it using vintage photo distress ink. Next I separated the frame and squares and applied ground espresso on the edges to bring more depth to the elements. And I added texture to those pieces by splattering ground espresso distress ink mixed with water.

Next I cut a slimline panel measuring 8,5 x 3,5 inches and used a brick stencil along with hickory smoke distress ink to create a wall background. And to make this panel less flat, I added texture by splattering black soot distress ink mixed with water.

I temporarily taped the wooden frame to the brick panel and attached the square panels using liquide glue. Next I cut three more frames out of brown cardstock, I layered those pieces on top of each other, stuck my wooden frame on top and finally attached the whole element on the brick panel.

Next I attached the images on my panel using foam squares, glue dots and liquid glue. I added white hightlights on the images using my white gel pen, and white heat embossed my sentiment ‘Happy Haunting’ on a thin grey banner that I attached in the middle of my panel usinf foam squares. And finally I added white blizzard nuvo drops on the lights to make them shine.


VIDEO

(click on the picture below)


HELLO BLUEBIRD SUPPLIES

- Frightful little bits

- Little haunters

- Halloween fun

- Tabitha

- Halloween party

- Spooky spellers

- Gallery frame #5


OTHER SUPPLIES

- Spectrum Noir markers

- Distress inks: vintage photo, ground espresso, hickory smoke, black soot

- Sakura white gel pen

- White blizzard nuvo drops by Tonic Studio

- 80lb Neenah solar white cardstock

- Strathmore bristol smooth cardstock

- Woodgrain cardstock by Simon Says Stamp

- Brick stencil by Lawn Fawn

- Clear embossing ink by Lawn Fawn

- White embossing powder by Lawn Fawn

- Memento tuxedo black ink

- Narwhal cardstock by Lawn Fawn

Lawn Fawn - A Waving Pull Tab Slimline Polar Bear Card

samedi 26 septembre 2020

 Hi there,

Today I'm back with some cute polar bears celebrating Christmas on the ice field. To create this card, I gathered most of the bears we got in the new release, as well as some other images to help me create my scene. I stamped all the images on white cardstock using jet black ink and used the coordinating dies to cut them all.

When the coloring was done, I cut some elements to build my background: a slimline panel, a wavy borders, and two dens.


I started by coloring the wavy border using blueprint sketch, chipped sapphire and black soot distress inks. I colored the middle section of the slimline panel using tumbled glass. And used cracked pistachio and salty ocean distress inks for the sky.

Like always I added texture to those elements, as well as liquid stardust drops all over the panel to get a starry sky and a sparkly snow field.


I created a den for my bear family, and next I moved on to the waving pull tab mechanism and I encourage you to watch the video below to see how it was done, it's easier to understand with images ^^


When the mechanism was done, I attached the bear between the arms using foam tape. I also stuck the ocean border using double sided tape, and I gave the bear a blue scarf using glue dots. I stamped two more snow angel prints, and stuck two little bears on those print using foam tape again.

I applied two layers of foam tape at the back of my panel, making sure to stay away from the pull strip, and I stuck my panel on a card base. And then I finally attached the rest of the images using glue dots and foam tape.


Once everything was attached, I cut an arrow out of pixie dust cardstock that I attached at the top of the pull strip. Next I made the christmas tree lights shiny using glossy accents. And finally I added chunky glitter on the top edge of the wavy border.


VIDEO
(click on the picture below)


LAWN FAWN SUPPLIES

Stamp sets

- Snow much fun

- Den sweet den

- Yeti or not

- Christmas dreams

- Cheery christmas

- Offset sayings christmas

- Beary happy holidays

- Baaah humbug

- Critters in the arctic


Die sets

- Large slimline

- Waving pull tab starter

- Stitched dens

- Stitched simple wavy borders


Misc.

- Chunky glitter

- Black licorice + Mermaid + Pixie dust cardstocks

- Glue tube

- Jet black ink

- Clear embossing ink

- White embossing powder


OTHER SUPPLIES
- Spectrum Noir markers
- Distress inks: tumbled glass, blueprint sketch, chipped sapphire, black soot, cracked pistachio, salty ocean
- Sakura white gel pen
- 80lb Neenah solar white cardstock
- Strathmore bristol smooth cardstock
- Glossy accents by Ranger

Spooky Card Series with Hello Bluebird - Monochromatic Slimline Card

dimanche 20 septembre 2020

 Hey there,

I'm glad to be back with a monochromatic card showcasing Frightful Little Bits by Hello BluebirdI like to make that kind of card for Halloween, I think it gives an extra spooky mood to a project.

I stamped my images using memento tuxedo black ink. I cut them using the coordinating dies and used my alcohol markers to color everything.


To create the background I started by die cutting trees using the Birch Trees die set. I cut them out of Strathmore bristol smooth cardstock and used hickory smoke and black soot distress inks to color them.

To ground my little spooky scene, I cut three borders using the Ocean Waves Scene Horizontal die. that I colored using hickory smoke and black soot distress inks.


For the sky, I cut a circle out of masking paper that I attached in the middle of a Strathmore bristol panel, and again I used hickory smoke and black soot distress inks to create a dark sky. Next I added a lot of texture: water drops, black drops, white drops and also sparkly stars.


When the background was finally done, I removed the mask, attached the borders using foam tape, and used liquid glue to stick the birch trees on either side of the Moon. Next I attached all my cute images using glue dots. And finally I added white highlights on the images, as well as some grass details on the borders.


VIDEO
(click on the picture below)


HELLO BLUEBIRD SUPPLIES
- Frightful little bits stamp set
- Birch trees die set
- Ocean waves scene horizontal die

OTHER SUPPLIES
- Spectrum Noir markers
- Distress inks: hickory smoke, black soot
- Sakura white gel pen
- White acrylic paint
- Liquid stardust by Lawn Fawn
- Memento tuxedo black ink
- 80lb Neenah solar white cardstock
- Strathmore bristol smooth cardstock

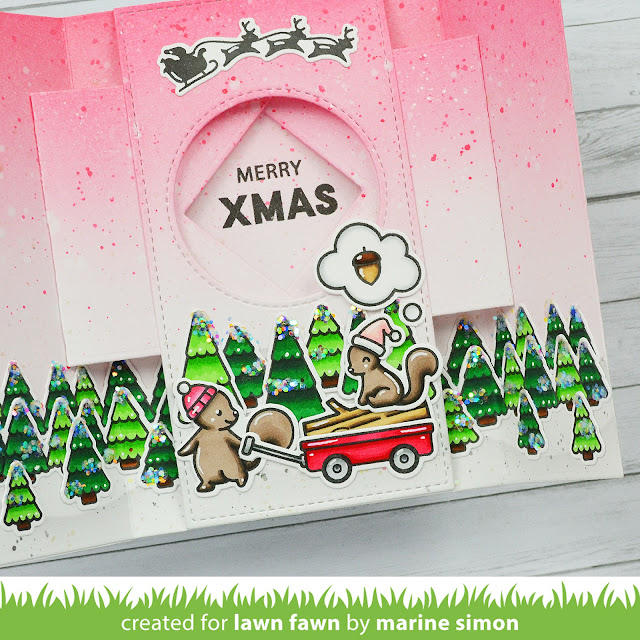
Holiday Card Series w/ Lawn Fawn - Winter Wonderland Shutter Card

mardi 15 septembre 2020

 Hello there,

I'm excited to be back with a shutter card, showcasing some lovely squirrels celebrating Christmas. Those cuties are from Let's go nuts, a brand new stamp set. Originally they're supposed to go with a fall theme but I thought it would be fun to take them to a winter wonderland.

I started by stamping the images using Jet black ink, and I colored everything using alcohol markers.


When the coloring was done, I created a house for my little characters using another new product: the Acorn House die set. I die cut all the pieces and added distress inks to make them less flat.

Before assembling the house, I glued small pieces of vellum at the back of the door and window and then I finally attached everything to build a acorn house.


Next I moved on to the shutter card. I started by cutting a card base, two shutters and one center piece out of strathmore bristol cardstock. And to create a winter landscape on the card base, I used a hill stencil. I placed it right below the marks that the die creates, and used spun sugar to create a cute pink base for my sky. Next I added worn lipstick distress ink from the top towards the bottom and blended the colors together.

For the bottom of my card, I wanted to create snow so I placed the same stencil over the pink sky and used hickory smoke to create some snowy hills. And I applied the ink with a light hand to keep the whole background very light.

Next I put the center piece in the middle of my shutter panel and placed the stencil on top, trying to match with the other hills. And I used spun sugar and worn lipstick distress inks again to create a coordinated sky on that center piece. And I did the snowy hills as well using the same stencil along with hickory smoke distress ink.

I also needed the shutters to match with the other pieces, so I used the same inks again on those elements.

Next I added lots of texture, starting with some water drops all over the panel. I dried the water using a paper towel, and next I smooshed my worn lipstick ink pad onto my glass surface, I added water to the ink and splattered drops on my paper on the sky section.

For the snowy hills, I mixed some hickory smoke distress ink with water and splattered drops as well on the bottom of my shutter panel.

And the last step: I made my panel super sparkly using liquid stardust.


Next I assembled the shutter card and I started by folding the sides and tabs in. I took the shutters, folded the tabs as well, and attached those two elements inside the card base. And next I attached the center piece as well.

I also created another panel for the front of my card. This panel was cut using the largest die from the Large Stitched 4 Bar Rectangle die set, and I used the same inks and created the same textures as before on that panel.


Next I finally attached the images using a combination of liquid glue, glue dots and foam squares. I added some shine to the lights using glossy accents, and stamped my sentiment "Merry Xmas".

I applied super sticky tape on the outside left flap of the shutter panel and stuck my front panel to that flap. And I still had two white sections that I needed to cover to make the card prettier, and to close the card easily I starting by attaching a piece of twine on the right flap using a small piece of tape.

I applied the same tape on that white section, and used a paper from the new Let it shine paper pack to cover that section. I trimmed off the paper and next I did the same thing on the other white section using the same twine and paper. Finally I got messy and added chunky glitter on some parts of the scene.


VIDEO
(click on the images below)


LAWN FAWN SUPPLIES

Stamp sets

- Let’s go nuts

- Car critters christmas add-on

- Christmas dreams

- Holiday party animal

- Joy to the woods

- Cheery christmas

- Yeti or not

- Winter skies

- Offset sayings christmas

- Simply celebrate winter


Die sets

- Shutter card

- Shutter card add-on

- Acorn house

- Build a house christmas add-on


Misc.

- Let it shine 6x6 paper pack

- Paper bag cardstock

- Chocolate bar cardstock

- Narwhal cardstock

- Vellum

- Hill stencils

- Liquid stardust

- Jet black ink

- Chunky glitter

- Glue tube

- Double sided tape

- Peppermint single cord


OTHER SUPPLIES
- Spectrum Noir markers
- Distress inks: spun sugar, worn lipstick, hickory smoke
- Sakura white gel pen
- 80lb Neenah solar white cardstock
- Strathmore bristol smooth cardstock

Hello Bluebird - Sparrows & mice

samedi 12 septembre 2020

 Hello there,

Today I'm sharing a lovely slimline card featuring some happy critters playing music and dancing up in the trees. I stamped all my images using Potting Soil ink by Ranger, cut them all using the coordinating dies and colored used my alcohol markers to color everything.

When everything was colored, I cut a slimline panel out of strathmore bristol cardstock, measuring 8,5 x 3,5". And I used blue distress inks to color my background: tumbled glass, broken china and faded jeans.


Once I was happy with the blending, I added water drops to my panel that I dried using a paper towel, and next I added more texture by mixing some inks with water.


I attached my panel to a light blue card base, and white heat embossed my sentiment 'Let's celebrate you' from Garden Party, and then I attached all my images glue dots and foam squares. Finally I added white highlights on the images to make them pop. 


VIDEO
(click on the picture below)


HELLO BLUEBIRD SUPPLIES
- Garden party
- Oh nuts

OTHER SUPPLIES
- Spectrum Noir markers
- Distress inks: tumbled glass, broken china, faded jeans
- Sakura white gel pen
- Potting soil ink by Ranger
- 80lb Neenah solar white cardstock
- Strathmore bristol smooth cardstock

Lawn Fawn - Pick of the Patch Shutter Card

jeudi 10 septembre 2020

 Hello there,

Lawn Fawn Fall & Winter release is finally available, so I'm super excited to share this shutter card with you today. This new die set is so easy to use and I had a lot of fun using it.

I started with the structure of card. I used the main die set as well as the add-on to cut my elements: a card base, two shutters and one center piece.


Originally you can build a thin sleeve to close the shutter card, but I decided to skip that part and to create a whole scene on the outside of the card well using the biggest rectangle from the Large Stitched 4 Bar rectangle die set. That die fits perfectly the size of the shutter card when it's closed. And I also cut three wavy borders and a tree.

So I started with the outside panel that I mostly covered with tumbled glass distress ink. I added a little bit of faded jeans distress ink at the top, and next I added some texture to my panel: water drops first, and then splatters of faded jeans and chipped sapphire distress inks mixed with water.

To color the three wavy borders, I used peeled paint and forest moss distress inks. And the tree was cut out of woodgrain cardstock and colored using vintage photo and ground espresso distress inks.


Once all my elements were done, I assembled everything on the rectangle panel, starting with the borders using double sided tape, and then the tree using liquid glue.

Next I colored my shutter card base using the same blue inks as before. And I colored the center piece and the two shutters using the same inks as well.

Next I created some hills using the same green inks as before along with a hillside stencil. And I did the same thing at the bottom of the center piece.


I assembled the shutter card and I started by folding the sides and tabs in. I used my bone folder to get a nice crease. I took the shutters and folded the tabs as well, I applied doubled sided tape on those tabs, and also at the back of the card base tabs.

The die has created marks on the card base, these are guides to help us place the shutters at the right spot. So I took the left shutter , removed the backing paper, placed it right up against the left panel between the marks, and I folded that left panel to stick the shutter to it   .

And I did the same thing with the right shutter: removed the backing paper, placed it between the marks right up against the right panel, and folded that panel to attach the shutter to it    .

Next I removed the backing paper off the top tab on the card base, I lined up the center piece with the bottom tab, and I pressed down at the top to stick the  the center piece to the tab. I removed the backing paper off the bottom tab, and attached the bottom of the center piece to finally complete my shutter card.


Next I moved on to the coloring. I stamped the images using jet black ink, used the coordinating dies to cut them all and colored everything using my alcohol markers.

When all my cute images were colored, I assembled them on the front panel and inside the card as well, using glue dots mostly but also liquid glue at some places.


To stamp my sentiment, I placed the shutter panel in my misti tool and used jet black ink to stamp "You're the pick of the patch".

Next I attached a piece of twine on the remaining white panel on the right using a small piece of tape, I cover that white panel with a pattern paper from the Into the Woods remix 6x6 paper pack, and I trimmed off the excess of paper.

With the shutter card closed, I applied double sided tape on the left flap and attached the front panel to that left flap.

Next, with the shutter card open, I attached another piece of twine on the white section at the back of the front panel. And then I stuck a piece of the same pattern paper as the other side. I trimmed off the excess of paper, and finally the card was done and ready to be closed.
 

VIDEO
(click on the picture below)


LAWN FAWN SUPPLIES

Stamp sets
- Let's go nuts
- Pick of the patch
- Happy harvest
- Jump for joy
- Swan soirée
- Toadally awesome
- Oh gnome

Die sets
- Shutter card
- Shutter card add-on
- Stitched simple wavy borders
- Leafy tree backdrop landscape

Misc.
- Jet black ink
- Crunchy leaf ink
- Into the woods 6x6 paper pack
- Hillside stencil


OTHER SUPPLIES
- Spectrum Noir markers
- Distress inks: tumbled glass, faded jeans, chipped sapphire, peeled paint, forest moss
- Sakura white gel pen
- 80lb Neenah solar white cardstock
- Strathmore bristol smooth cardstock
- Twine by Stampin Up!

Spooky Card Series with Not 2 Shabby - Critter Costume Party 1

lundi 7 septembre 2020

 Hey there,

Today I'm very pleased to be guest designing for Not 2 Shabby! I will share three cards during this month featuring the super cute Critter Costume Party stamp set, and the first one is an interactive spooky green mood card.

Like always I started by stamping the images using an alcohol marker friendly ink, I cut them all using my scan n cut and colored everything using my alcohol markers.

When the coloring was done, I cut a panel out of Strathmore bristol cardstock using the reveal wheel die set and circle add-on by Lawn Fawn. I cut a slightly bigger circle out of masking paper, and covered the hole in the panel, and next I created a spooky background using twisted citron, mowed lawn and black soot distress inks.


When my spooky sky was done, I made it more interesting by splattering water all over the panel. Next I added a million stars using liquid stardust, and to darken my sky and make it more creepy, I added drops of black soot distress ink mixed with water.

I removed the mask and cut two grass borders to ground my scene that I colored using hickory smoke and black soot distress inks.

Next I cut a 5,5 x 4,25" black card base and stuck a black shimmery panel on top of it. And I moved on to the interactive part of my card: I cut two wheels, a black one and a white one, a small circle, and I also took a small brad in my stash.

I wanted the inside of the wheel to be white in order to match with the moon, so I cut the scallop edges off the white wheel and stuck the white circle in the middle of the black wheel.


Next I put the brad into the small circle first and next into the wheel at the back and I opened the brad to keep the pieces together. I applied foam squares on the small circle around the brad, I lined up the wheel behind my spooky panel, and next I pressed down onto the card base to attached just the wheel.

I applied foam squares at the back of the spooky panel on the four edges and stuck it on the card base as well. And to totally complete my background, I attached the grass borders, and on one of them I white heat embossed my sentiment 'Happy Halloween'.

Next I attached my four images using foam tape. And to tell the recipient of the card how to use the wheel, I cut two arrows out of grey cardstock, I started by attaching one with the pointy end at the bottom, next I cut the head off the second arrow and stuck it at the top to create a double arrow.

And finally I added a few white blizzard nuvo drops here and there to make the sky even more spooky cute.


VIDEO
(click on the picture below)


SUPPLIES
- Reveal wheel die set by Lawn Fawn
- Reveal wheel circle add-on by Lawn Fawn
- Outside in stutched rectangle stackables by Lawn Fawn
- Grassy knoll die set by Hello Bluebird
- Spectrum Noir markers
- Distress inks: twisted citron, mowed lawn, black soot, hickory smoke
- Sakura white gel pen
- Clear embossing ink by Lawn Fawn
- White embossing powder by Lawn Fawn
- White blizzard nuvo drops by Tonic Studio
- Memento tuxedo black ink
- Masking paper by Simon Says Stamp
- 80lb Neenah solar white cardstock
- Strathmore bristol smooth cardstock
- Black shimmery cardstock by Lawn Fawn
- Black licorice cardstock by Lawn Fawn
- Narwhal cardstock by Lawn Fawn