Holiday Card Series 2018 - Carol Penguins - Tunnel Card

samedi 15 décembre 2018

Hello there,

Today I'm glad (but also a little bit sad) to share with you my last Holiday card for this year. I've been making that kind of card for several years now, and it's always so fun. This year I used a lot of Lawn Fawn supplies because it's definitely my favorite brand, but I also enjoyed using digital stamps by Isabel Cristina, and other brands such as Hero Arts, Simon Says Stamp or 4enscrap...

In case you're interested, you'll find all my Holiday cards here ^^


So for this last holiday themed project, I first started by stamping all the images on Neenah solar white cardstock using Memento tuxedo black ink. I colored them using my alcohol markers, added white details on the images, applied white blizzard Nuvo drops on the tree ornaments, and then fussy cut everything.


Next I cut three 4,25 x 5,5" rectangles. I die cut a large circle from the blue cardstock and then used that "holed" blue cardstock as a guide to die cut a medium circle from the plaid cardstock and then used that "holed" plaid cardstock as a guide to die cut a small circle from the white cardstock. So when all three put on top of another, it would create a tunnel.


To create the sky, I applied distress oxide inks on a piece of Strathmore bristol smooth cardstock, splattered water on it that I dried using paper towel. I stamped the Santa's sleigh image, and added white dots all around it to create falling snow. Then I stamped my sentiment on a cloud border (but used as a snow border ^^) using the same blue oxide ink as the one used for the sky.


On a white card base, I attached the sky panel using double sided tape, next I attached the other elements ("holed" panels + cloud "snow" borders) using double sided foam tape. All the images were attached using glue dots. And finally I added some shimmer to the street lights.

VIDEO
Below or here

LAWN FAWN SUPPLIES
- Here we go a waddling stamp set
- Winter skies stamp set
- Christmas dreams stamp set
- Snow day stamp set
- Season's tweetings stamp set
- Puffy cloud border die set
- Perfectly plaid "Bluebell" paper

OTHER SUPPLIES
- Spectrum Noir markers
- Distress oxide inks: peacock feathers, black soot
- Blue cardstock by Bazill
- White cardstock by Bazill
- Neenah solar white cardstock (for the images)
- Strathmore bristol smooth cardstock (for the background)
- Memento tuxedo black ink (for the images)
- Black versafine ink (for Santa's sleigh)
- White gel pen by UniBall
- Clear glitter brush pen by Spectrum Noir
- White blizzard Nuvo drops

Holiday Card Series 2018 - Yana Smakula' style

mercredi 12 décembre 2018

Hello there,

Today I'm sharing with you several CAS (clean and simple) cards I made inspired by Yana Smakula. I'm a big fan of her simple and elegant projects so I thought I could give it a try and put my busy style aside for one day ^^

Here are the projects that inspired me:

For my bohemian lace background card, I used a mandala stamp my friend Anna designed for Craftin Desert Divas. When I bought it, I knew i wanted to make those cards inspired by Yana.

Craft card: the mandala was stamped using a light brown ink. I added white drops on the small circles and white heat embossed my sentiment on a small banner that I attached in the middle of the panel.


Navy cardstock: the mandala and the sentiment were gold heat embossed and I added clear drops on the small circles.


Red cardstock: the mandala was stamped using a dark red ink. I added white and clear drops on the small circles and gold heat embossed my sentiment on a small banner that I attached in the middle of the panel.


***

For my easy Christmas cards, I used a stamp set by Pink Fresh Studio and several old stamp sets from my stash. I literally turned my craft room upside down to find the perfect stamps for these cards! ^^ 

For these three cards, I gold heat embossed a long rectangle to create the base of the snow globe and different images that I painted white using a gel pen. I also added white drops to create falling snow.


For these three cards, I gold heat embossed a long rectangle to create the base of the snow globe and different images that I painted white using a gel pen. I also added white drops to create falling snow.


And for the last two cards, I simply gold heat embossed the images and sentiments, and added colorful drops.


VIDEO
Below or here

SUPPLIES
- You stamp set by Craftin Desert Divas
- Merry and bright stamp set by Simon Says Stamp
- Merry and bright toy store stamp set by Pink Fresh Studio
- Old stamp sets from my stash
- Versamark ink
- Gold embossing powder by Aladine
- White embossing powder by Aladine
- White Nuvo drops
- Clear Nuvo drops
- Khaki ink by Simon Says Stamp
- Schoolhouse red ink by Simon Says Stamp
- Navy cardstock by Sostrene Grene
- Craft cardstock by Neenah
- Red cardstock by Simon Says Stamp
- Light blue cardstock by Simon Says Stamp

Kat Scrappiness Charity Blog Hop & Sale to Benefit Coffee Oasis

vendredi 7 décembre 2018


Hello there, and welcome to the
Kat Scrappiness Charity Blog Hop & Sale to Benefit Coffee Oasis!

From today, December 7th, through December 10th, a bunch of crafters are going to share winter themed projects, and the sale at Kat Scrappiness will benefit a US based local charity, The Coffee Oasis. Kat Scrappiness is donating 15% of all sale proceeds to Coffee Oasis.

Coffee Oasis is a coffee shop/organization located in Washington State (USA) that provides help for American youth including programs for drug abuse, homelessness, violence and poverty.

(you can read more about their programs here: https://thecoffeeoasis.com/youth-programs/)


We hope that this blog hop will bring awareness to organizations such as Coffee Oasis and that we can raise a little money and support or them! Like said before, Kat Scrappiness has pledged to donate 15% of all sales proceeds to Coffee Oasis and the other sponsors have all donated prizes to give away to all of you blog and youtube hoppers! So please visit them and show some support.
You can also donate directly to Coffee Oasis here: http://kskat.com/donate. Even if you can only donate $1 or $5, it doesn't matter. Every little bit will help a kid in need.

***
TWO WAYS TO PARTICIPATE AND WIN IN THIS BLOG HOP

Option 1: Create a winter themed card and enter it into the blog hop by clicking on "Add Your Link" at the bottom of the list and follow the instructions, it's quick and easy! If you have any questions on how to enter the blog hop, contact Kat Scrappiness.

Option 2: Leave a comment under this article (or under my video) or on the blogs/YouTube channels participating in the hop! A super commenter will be picked to win a prize too!

Use this link to see the other hoppers, and to add your project if you want to participate in the hop ^^
And scroll down to the end of this article to see all the prizes being donated by the sponsors.

***


I'm very happy to participate in this hop and help bringing this noble cause to light. For this project, I used my all time favorite winter stamp set by Lawn Fawn and available in Kat Scrappiness shop.


I first started by stamping my images on Neenah white cardstock using my Misti tool and memento tuxedo black ink. Colored them using my alcohol markers and cut them using the coordinating dies.


Next I die cut trees from white cardstock and white glitter cardstock, and three cloud borders from the same cardstocks to create snowy grounds.


I cut and scored a large bristol smooth panel according to Janie's measurementscreated the sky using two shades of distress inks and applied glimmer paste on it using a snow stencil.


Once everything was dry, I attached the cloud borders on the step parts using double sided tape. I white heat embossed my sentiment on bristol smooth cardstock, trimmed it to make a small banner and applied ink on it, the same as the darkest one I used on the background.


Finally, I attached all the elements on the step panel using glue dots.

VIDEO
Below or here

SUPPLIES
- Spectrum Noir alcohol markers
- Snow day stamp set + coordinating dies by Lawn Fawn
- Puffy cloud border die set by Lawn Fawn
- Sugar glitter paste by Bo Bunny
Neenah white cardstock (for the images)
- Strathmore bristol smooth cardstock (for the card base)
- White glitter cardstock by Rayher
- White embossing powder by Aladine
White gel pen by UniBall
Memento tuxedo black ink

***

Prizes being donated by the sponsors:

Holiday Card Series 2018 - Lawn Fawn Collab w/ Mona Toth - Floating Floor Pop-Up Card

mardi 4 décembre 2018

Hello there,

Today I'm very excited to share with you this floating floor pop-up card I made as a guest
for Mona Toth Lawn Fawn Holiday Card Series!


This collab is a six day long card series (Dec 1-7) during which Lawn Fawn passionate crafty friends are sharing projects. I am very honored that Mona asked me to be part of this collab, thanks again my friend!

Don't forget to go and comment on her blog for a chance to win a $50 gift certificate to scrapbook.com!


I first started by stamping all my image on Neenah solar white cardstock using Memento tuxedo black ink (it's an alcohol marker friendly ink) and my Misti tool so I can stamp everything twice to get a good impression.


Next I colored the images using my Spectrum Noir markers, and fussy cut everything. Usually I like to use the coordinating dies to have a white border around the images but this time it wouldn't fit with the design, in my opinion.


Now to the card base. I attached a 5,5 x 4,25" rectangle of light brown pattern paper on one side of a kraft standard card base. Next I attached one side of the floating floor panel, placed my images and traced tiny marks using a pencil to know where they were. From one pencil mark to another, I cut the "floor" to create thin cracks.


I cut several acetate strips that I placed into the thin cracks, and closed the card to attached the floating floor and the acetate strips. It's pretty difficult to explain, so the best is to watch the video below ^^


Next I attached my images. Some, like the fireplace, were glued directly on the background paper, and the others were glued on the acetate strips using glue dots. To finish the card, I simply added clear shimmer to the big red bow and on the presents, and clear Nuvo drops on the ornaments.

VIDEO
Below or here

LAWN FAWN SUPPLIES
- Holiday Helpers stamp set
- Toboggan together stamp set
- Cheery Christmas stamp set
- Christmas dreams stamp set

OTHER SUPPLIES
- Spectrum Noir alcohol markers
- Pattern papers from my stash
- Versamark ink
- Antique gold embossing powder by Simon Says Stamp
- Memento tuxedo black ink
- Clear Nuvo drops
- Acetate from my stash

Lawn Fawnatics Challenge #41 - "Shaped Cards" - Blue Winter - Box Card

mercredi 28 novembre 2018


Hey there,

It's been a little while since my last Lawn Fawnatics Challenge project as I was busy mass-producing holiday cards ^^ But when I saw the theme of this new challenge, I grabbed my box card die set and started creating.


I first started by stamping a bunch of images on Neenah solar white cardstock using Memento tuxedo black ink.


Colored everything using my Spectrum Noir markers and cut them using the coordinating dies.


Next I cut all the elements to build my box card: the base, two squares and one rectangle, insert pieces, and one mountain border from dark blue cardstock + cloud borders and mountain tops from white glitter cardstock + banner things from both cardstocks.


I assembled everything using double sided tape, and attached all the images using glue dots.


I added glitter to the lights to finish the card.


VIDEO
Below or here

LAWN FAWN SUPPLIES
- Here we go a waddling stamp set + coordinating dies
- Winter village stamp set + coordinating dies
- Cheery Christmas stamp set + coordinating dies
- Winter skies stamp set (for the snowflakes)
- Scalloped box card pop-up die set
- Puffy cloud border die set
- Stitched mountain border die set

OTHER SUPPLIES
- Spectrum Noir alcohol markers
- Dark blue cardstock from my stash
- White glitter cardstock from my stash
- White blizzard Nuvo drops
- Memento tuxedo black ink
- White gel pen by UniBall

Le Petite Market - Space Bookmarks

samedi 24 novembre 2018

Hey there,

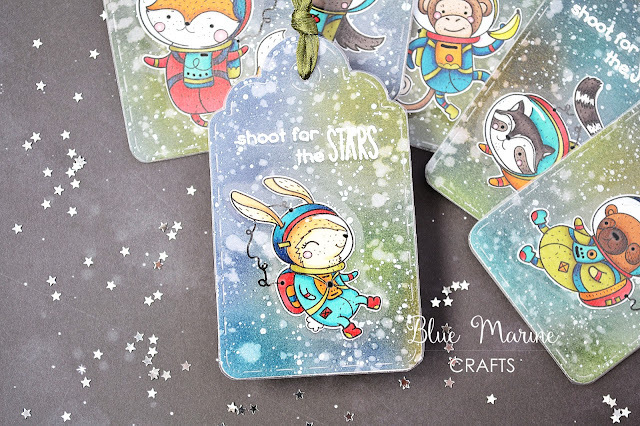
Today I'm sharing with you some bookmarks I made using adorable digital stamps by Le Petite Market. Their images are very unique and just so cute! Hope you'll like them as much as I do!


I first started by printing the images on Neenah solar white cardstock. My printer is an Epson xp-225 and the ink never smears even if I use alcohol markers.


Colored everything using my Spectrum Noir markers, and trying to keep the same color combo for every critter. Next I fussy cut them.


For the galaxy backgrounds, I simply applied several distress inks on a large piece of bristol smooth cardstock, splattered water and silver paint on it, and then die cut tags from it.


I also die cut dark blue glitter tags using the same that I attached at the back of each galaxy panel.


I white heat embossed a sentiment and glued a critter on each tag.


I laminated all the tags, pierced the hole on each one using my fuse tool, and added khaki ribbons to finish the bookmarks.

VIDEO
Below or here

SUPPLIES
- Animal astronauts digital stamp set by Le Petite Market (Etsy)
- Out of this world stamp set by Lawn Fawn (for the sentiment)
- Tag it die set by Craftin Desert Divas
- Distress inks: mustard seed, peacock feathers, blueprint sketch, black soot, carved pumpkin, twisted citron, candied apple
- Versamark ink
- White embossing powder by Aladine
- Neenah solar white cardstock (for the images)
- Strathmore bristol smooth cardstock (for the background)
- Glitter cardstock by Rayher
- Ribbon by Stampin Up!
- Laminator + laminating sheets from my supermarket

Holiday Card Series 2018 - Christmas Under the Sea - One Layer Card

samedi 17 novembre 2018

Hello there,

Back with a card that combines my two favorite themes: under the sea + christmas. It's a one layer card with a lot of masking, so the process was kind of long but so fun. I even customized the submarine so we can see the see horse elf driving it ^^


I first started by stamping all the images on Neenah solar white cardstock using Memento back ink. 


Next I cut large pieces of masking paper, attached them one at a time on my panel to create hills in my scene, and applied distress inks.


Then I finally removed all the masking elements, splattered water on my panel to create water bubbles, and colored the images using alcohol markers.


Next I white heat embossed my sentiment, stamped more bubbles that I covered with clear Nuvo drops, added white highlights on some images and finally attached the panel on a white card base.

VIDEO
Below or here

LAWN FAWN SUPPLIES
- Frosty fairy friends stamp set
- Cheery Christmas stamp set
- Toboggan together stamp set
- Critters in the jungle stamp set
- Fintastic friends stamp set
- Mermaid for you stamp set
- You are sublime stamp set

OTHER SUPPLIES
- Distress inks: salty ocean, blueprint sketch, chipped sapphire, black soot
- Spectrum Noir alcohol markers
- Memento tuxedo black ink
- Morning dew Nuvo drops
- White blizzard Nuvo drops
- White gel pen by UniBall
- Versamark ink
- White embossing powder by Aladine

Holiday Card Series 2018 - Bright Snowflakes

mercredi 14 novembre 2018

Hello there,

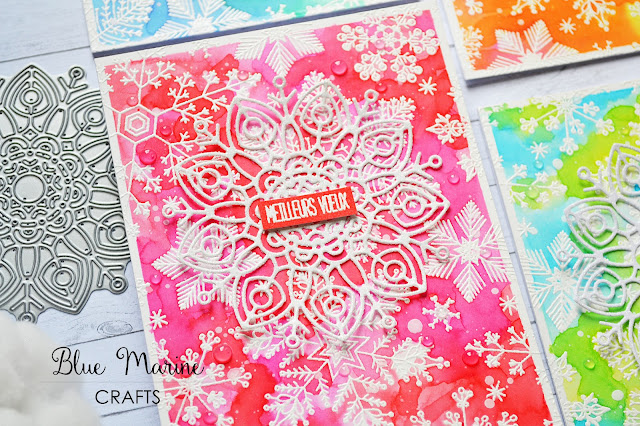
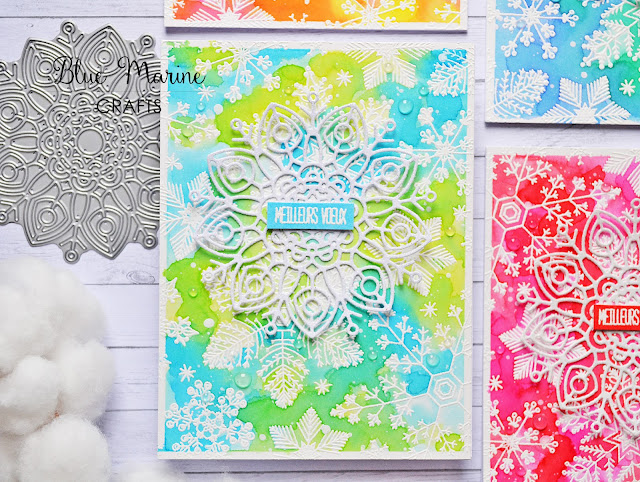
Today I'm sharing with you four bright, colorful and simple holiday cards. I used several brands to create them: Hero Arts for the snowflake background, Simon Says Stamp for the big snowflake die, Tim Holt's distress inks, and 4enscrap for my French sentiment.


Also, they were inspired by a project Laura Bassen shared recently (her video)


So like I said, these cards were pretty simple to make, here's the process:


I first started by stamping the snowflake background on four Strathmore bristol smooth panels using versamark ink and my misti tool. Next I white heat embossed the snowflakes using my heat tool.


Then I picked several colors of distress inks I thought would go well together, I temporarily taped the embossed bristol panel on thick cardboard, applied a lot of clear water on the paper and then started painted using my distress inks mixed with water. I used my heat tool to dry the ink faster and repeated the painting process one or two times to get brighter colors.


Once my panels were dry, I splattered white distress ink on top of them to add more texture.


I white heat embossed my sentiment four times, trimmed each piece to get small banners and inked them using distress inks that would coordinate with my snowflake backgrounds.


I die cut four large snowflakes from white glitter cardstock and glued them in the top middle part of my panels. Next I attached my sentiments right in the middle of these big snowflakes using foam adhesive squares.


I attached each panel on a white card base, and added a bunch of clear drops on each one to finish the projects.

VIDEO
Below or here

SUPPLIES
- Hand drawn snowflake background rubber stamp by Hero Arts
- Big huge felicity snowflake die by Simon Says Stamp
- Distress inks: candied apple, picked raspberry, spun sugar, salty ocean, tumbled glass, twisted citron, spiced marmalade, squeezed lemonade, blueprint sketch, lucky clover, cracked pistachio
- Bonne année stamp set by 4enscrap
- Strathmore bristol smooth cardstock (for the panels)
- Versamark ink
- White embossing powder by Aladine
- White glitter cardstock by Rayher
- White cardstock by HobbyCraft (for the card base)
- Morning dew Nuvo drops