Sunny Studio - Sliding Window Birthday Card

jeudi 25 mai 2023

Hello there,

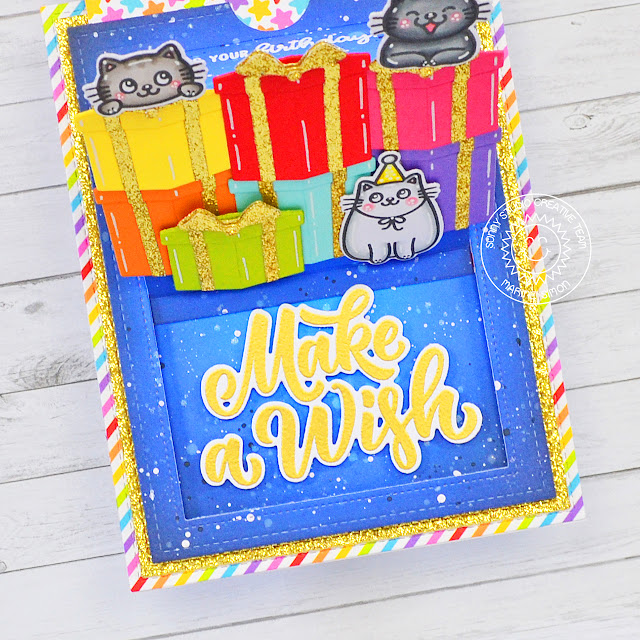
I'm back on Sunny Studio's blog with this super bright and shiny interactive card showcasing the Perfect Gift Boxes die set, as well as three cute kitties from Birthday Cat. Love those little guys so much, I can't wait to feature them on more cards!


I started off by cutting a few panels: a 5,5 x 4,25 inches Rainbow Bright pattern paper, a slightly smaller gold glitter panel, and two even smaller Strathmore bristol smooth panels. I attached the gold glitter panel on the rainbow panel using double sided tape, and then worked on the two blank bristol panels. I colored them both using blue oxide inks: salty ocean + blueprint sketch + chipped sapphire, and added texture to both panels: chipped sapphire + water splatters, white ink + water splatters, and liquid stardust + water splatters. I set one aside and kept the other to create my interactive panel using the Sliding Window die set.

I white heat embossed my "It's your birthday" greeting from Party Pups on the interactive panel, added foam tape at the back all along the edges except for the top, and then attached it to the second blue panel using foam tape.


Next I cut seven Perfect Gift Boxes out of different colored cardstock, I cut the ribbons and bows out of gold glitter cardstock, assembled everything using liquid glue, and then attached the boxes on my interactive panel using 1mm foam squares. And I was going to stop there, but I felt that my card needed something else, so I stamped three kitties from Birthday Cat on white cardstock using an alcohol marker friendly black ink, cut them using the coordinating dies, colored them using my Graph'It Brush markers, and then stuck them among the boxes using foam squares again.


I also wanted to add a second sentiment behind the interactive panel. I gold heat embossed a "Make a Wish" greeting from Big Bold Greetings on white cardstock, cut it using the coordinating die, and stuck it behind the panel using foam squares. And next I added a few extra details: I cut a gold glitter star using a die from Wrap Around Box that I glued at the top of the panel, and added a golden thread handle to be able to pull the panel.


SUNNY STUDIO SUPPLIES
- Perfect gift boxes die set
- Sliding window die set
- Wrap around box die set
- Birthday card stamp set
- Party pups stamp set
- Big bold greetings stamp set
- Rainbow bright paper pack


OTHER SUPPLIES
- Oxide inks: salty ocean, blueprint sketch, chipped sapphire
- Copic opaque white ink
- Sakura white gel pen
- Detail black ink by Pinkfresh Studio
- Clear embossing ink by Lawn Fawn
- White fine embossing powder by Hero Arts
- Gold embossing powder by Lawn Fawn
- Gold glitter cardstock by Concord & 9th
- Colored cardstock by Lawn Fawn + The Stamp Market
- Strathmore bristol smooth cardstock (background)
- Transotype perfect coloring paper (images)
- Gold thread by Stampin' Up!

Sunny Studio - Rainbow Bright Balloons

jeudi 18 mai 2023

Hey there,

I'm so happy to be back on Sunny Studio's blog with this bright and cheerful birthday card showcasing some Bright Balloons. Once again I went for a rainbow theme, definitely a safe bet to make someone smile, and I started off by creating the background. I cut a 5,5 x 4,25 inches Quilted Heart Landscape panel, and used blue oxide inks to color it: salty ocean + blueprint sketch + chipped sapphire. As always I added splatters on my panel to make it less flat: chipped sapphire + water splatters, and white ink + water splatters.


Once my Quilted Heart Landscape panel was dry, I cut a 5,5 x 4,25 inches panel out of a rainbow pattern paper from the Spring Fling paper pack, and I attached my Quilted Heart panel on top using 1mm foam squares.

Next I cut three round shaped balloons and two oval shaped balloons using dies from Bright Balloons. I used another rainbow pattern paper from the Spring Fling paper pack to cut them all, and to really make them stand out on the blue background, I cut additional balloons out of gold glitter cardstock. I stuck a gold glitter balloon behind each rainbow balloon, and I attached them on my panel using foam squares.

To make the balloons pop even more, I cut the highlight details out of white cardstock using dies from Bright Balloons, and I gave each balloon its own highlights. And I also wanted to add a string below each balloon, so I used a die from Comic Strip Everyday to cut five light grey strings that I glued on the panel using liquid glue.


For my sentiment, I started by cutting a black banner using a die from Notebook Photo Corners, I white heat embossed the "Floating by to say happy birthday" greeting from Floating by on it, and then I attached the banner on my panel right below the balloons using 1mm foam squares. And finally I glued a few golden heart sequins here and there to bring even more shine to my card.


SUNNY STUDIO SUPPLIES
- Bright balloons die set
- Quilted heart landscape backdrop die
- Comic strip everyday die set
- Notebook photo corners die set
- Floating by stamp set
- Spring fling paper pack


OTHER SUPPLIES
- Oxide inks: salty ocean, blueprint sketch, chipped sapphire
- Copic opaque white ink
- Clear embossing ink by Lawn Fawn
- Fine white embossing powder by Hero Arts
- Golden heart sequins by Pretty Pink Posh
- Gold glitter cardstock by Concord & 9th
- Black licorice cardstock by Lawn Fawn
- Strathmore bristol smooth cardstock

Sunny Studio - Graduation Kitty Shaker Tags

jeudi 11 mai 2023

Hello there,

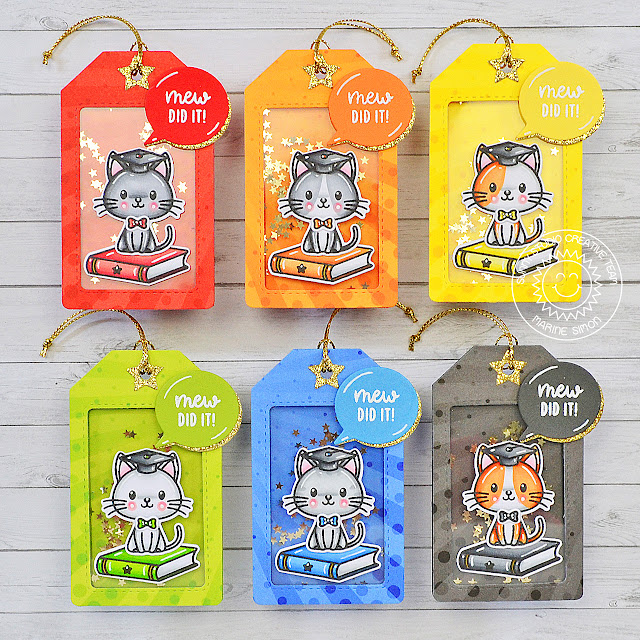
I'm super happy to be back on Sunny Studio's blog with those six graduation shaker tags showcasing the ever so cute kitty from Grad Cat. Love this sweet little guy so much I thought it would be fun to create a variety of cats with matching bow ties and books.

I started off by stamping six kitties, books and bow ties, all from Grad Cat, on Transotype perfect coloring paper using an alcohol marker friendly black ink, I cut them all using the coordinating dies, and colored everything using my Spectrum Noir Illustrator markers and Graph'it Brush markers. I colored each kitty in a different way to make each one of them unique, and once the coloring was done, I stamped a star, again from Grad Cat, on each book spine.


Next I created six shaker tags using the same process as the Meow & Furever tags I made back in January. The papers I used are from the Heroic Halftones paper pack, and these are perfect because they look like they're shining a light on each kitty that just graduated. So, I made those tags using the Mini Mat & Tags 3 die set, and to decorate the top I cut and glued a gold glitter star using a die from the Mini Mat & Tags 4 die set, and used gold thread from my stash to make handles.


I attached each kitty and book on their matching tags using 1mm foam squares, and then I created the greetings. I cut six speech bubbles out of matching cardstock using a die from the Comic Strip Speech Bubbles die set, next I cut six more speech bubbles out of gold glitter cardstock, I attached a gold glitter speech bubble behind each colored speech bubble, and then stuck the elements on the tags using 1mm foam squares again. As always I finished the tags by adding highlights and details on the images and speech bubbles using a white gel pen.


SUNNY STUDIO SUPPLIES
- Grad cat stamp set
- Comic strip speech bubbles die set
- Mini mat & tags 3 die set
- Mini mat & tags 4 die set
- Heroic halftones paper pack


OTHER SUPPLIES
- Spectrum Noir Illustrator markers
- Graph'it brush markers
- Sakura white gel pen
- Golden star confetti by Pretty Pink Posh
- Detail black ink by Pinkfresh Studio
- Clear embossing ink by Lawn Fawn
- Fine white embossing powder by Hero Arts
- Gold glitter cardstock by Concord & 9th
- Golden thread by Stampin' Up!
- Colored cardstock by Lawn Fawn & The Stamp Market
- Transotype perfect coloring paper (images)

Sunny Studio - Scrumptious Cupcakes Shaker Card

jeudi 4 mai 2023

Hi there,

I'm back on Sunny Studio's blog today to offer you a delicious cupcake from Scrumptious Cupcakes! I created this birthday shaker card using bits and pieces from different sets, and the first thing I did was to create the background. I cut a 5,5 x 4,25 inches Strathmore bristol smooth panel, and used distress oxide inks to color it. From the center: kitsch flamingo, squeezed lemonade and salvaged patina. As always I splattered the panel with water and white ink to make it less flat, and set it aside to dry.


Next I worked on the shaker panel. I cut a white Bursting Hearts panel, as well as a white frame using a die from my stash. I attached the frame on the front of the bursting hearts panel, and at the back I stuck an acetate panel. Still at the back of the bursting hearts panel, I attached foam strips all along the four edges, added golden heart sequins on the acetate, and then stuck my oxide ink panel on the foam strips to close my shaker panel. I attached it on a card base, and then moved on to the cupcake.

I created it using Lawn Fawn Inks. For the cupcake case I used butter + lemonade + sunflower inks, for the cupcake itself I used doe ink, and for the frosting I used ballet slippers + peachy keen + wild rose inks.


I cut each element using the coordinating dies, and set them aside for a minute because I wanted to add a small background behind my cupcake. As a base I cut a scalloped circle out of a Dots & Stripes Pastels pattern paper using a Scalloped Circle Mat 1 die, and then I cut a gold glitter frame using the same Scalloped Circle Mat 1 die as well a Stitched Circle die to create a frame that I attached on the scalloped circle.

I stuck my scalloped element in the middle of the Bursting Hearts panel, and then the cupcake on top using 1mm foam squares. Next I white heat embossed my greeting on a Notebook Photo Corners black banner combining words from Garden Fairy and Panda Party, and I attached the banner below the cupcake.


SUNNY STUDIO SUPPLIES
- Scrumptious cupcakes stamp set
- Garden fairy stamp set
- Panda party stamp set
- Bursting hearts backdrop die
- Scalloped circle mat 1 die set
- Stitched circle die set
- Notebook photo corners die set
- Dots & stripes pastels paper pack


OTHER SUPPLIES
- Distress oxide inks: kitsch flamingo, squeezed lemonade, salvaged patina
- Lawn Fawn inks: butter, lemonade, sunflower, doe, ballet slippers, peachy keen, wild rose
- Copic opaque white ink
- Clear embossing ink by Lawn Fawn
- Fine white embossing powder by Hero Arts
- Gold glitter cardstock by Concord & 9th
- Black licorice cardstock by Lawn Fawn
- White cardstock by Hero Arts
- Strathmore bristol smooth cardstock (background)
- Transotype perfect coloring paper (cupcake)
- Golden heart sequins by Pretty Pink Posh

Lawn Fawn - Honey Bear Shaker Card

mardi 2 mai 2023

 Hello there,

I'm thrilled to be back on Lawn Fawn Blog and YouTube channel with this lovely spring card featuring a cute bear and his jar of honey, as well as some sweet little bees.

As very often, the idea I had in mind included lots of bits and pieces, so I needed a bigger panel than the usual A2 size to be able to fit all the pieces, so I cut my main panel out of Strathmore bristol smooth cardstock using the Peekaboo Pop-Up die set, and the first thing I did was to color it using stencils and oxide inks. I created two grass borders at the bottom of my panel using the Grassy stencil and Grassy Hillside stencil along with shabby shutters and mowed lawn oxide inks. And on the top section I used the Spring Blossoms stencils along with shabby shutters, mowed lawn, spun sugar and worn lipstick oxide inks to get a beautiful floral sky and emphasize the spring theme.

I never leave an oxide ink background without adding texture so this is what I did next. I first mixed rustic wilderness oxide ink with water and splattered droplets on the grass borders. I mixed a few drops of copic opaque white ink with water and this time added splatters all over the panel, and for the top section I mixed mustard seed oxide inks with water and splattered droplets on the floral section.

Next step was to create the honey jar, and I invite you to watch the process video (linked down below) to see how it was made. It's always more understandable with images.

Next I worked on the bit and pieces I wanted to feature on my panel. I cut all the elements to build the bear, the bees and the flowers, and you will find a detailed list of the products (papers + dies) I used down below. So I assembled and glued all the pieces together, and then I attached everything on my panel using foam squares mostly.

Finally for my greeting I cut a banner, white heat embossed my sentiment on top of it, and then attached the banner above the bear.


VIDEO


LAWN FAWN SUPPLIES

Stamp sets
- How you bean + coordinating dies
- How you bean strawberry add-on (greeting)

Die sets
- Panel: peekaboo pop-up
- Banner: heart garland backdrop landscape
- Tag: stitched teapot
- Dripping honey: I scream you scream
- Bees: meadow backdrop portrait
- Bear: woodland critter huggers + woodland critter huggers winter add-on + stitched cupcake + build a snowman
- Flowers: spring flowers backdrop + little flowers + apple border

Stencils
- Spring blossoms
- Grassy
- Grassy hillside

Cardstock & papers
- Yellow paper from Watercolor wishes rainbow
- Banner: guava
- Tag: speckled eggshell
- Bees: vellum, sunflower, black licorice, storm cloud
- Bear: paper bag, kraft, chocolate bar, ground coffee, ballet slippers, vanilla malt
- Flowers: white, ballet slippers, cilantro, shimmer yellow (pastels pack)

Misc
- Crunchy leaf ink
- Clear embossing ink

OTHER SUPPLIES


- Oxide inks: shabby shutters, mowed lawn, spun sugar, worn lipstick, rustic wilderness, mustard seed, black soot, vintage photo, ground espresso
- Sakura white gel pen
- Golden heart sequins by Pretty Pink Posh
- Twine from my stash
- Strathmore bristol smooth cardstock (background)