Affichage des articles dont le libellé est technique: sliding. Afficher tous les articles

Sunny Studio - Super Duper Sliding Window Birthday Card

vendredi 28 mars 2025

Hello there,

I'm happy to be back with a new Sliding Window card, another birthday themed one, featuring the cutest super heroes. I really love to create those interactive cards because they're very easy to assemble, and they're great to use your pattern papers, one thing I wish I'd do more often.


So, I started off by stamping my Super Duper images on 110lb Neenah solar white cardstock using an alcohol marker friendly black ink, I cut them using the coordinating dies, and colored everything using my Ohuhu markers and Graph'it brush markers. I went for a fun green + aqua + blue + yellow color palette that matches the super hero theme quite nicely, and once the coloring was done, I added highlights and details to the images using a white gel pen.


I stamped numbers and letters on 110lb Neenah solar white cardstock using the Balloon Numbers and the Balloon Alphabet. I first stamped a "1" and a "0" using Lawn Fawn freshly cut grass dye ink, and cut those numbers using the coordinating dies. Next I stamped "HB2U" (happy birthday to you) using Lawn Fawn fish tank, freshly cut grass, sunflower and mermaid dye inks, and I wanted those letters to be real letters and not balloons, so before stamping them, I masked the balloon details with washi tape, and after die cutting the letters, I trimmed off the excess of paper below each letter with scissors. I set everything aside and moved on to the Sliding Window card.

I cut a 5 x 3,75 inches Surprise Party Starry Blue panel using the largest Stitched Rectangle, cut the Sliding Window out of it, as well as the notch at the very top, and also cut a 5 x 3,25 inches Heroic Halftones Yellow panel.

I folded my Sliding Window Starry Blue panel on the score lines, flipped it over, and added double sided tape to the slim bottom tab. I peeled the backing paper off this tab, flipped my Yellow panel over, and attached it at the back of my Sliding Window Starry Blue panel, lining up the bottom edge of the Yellow panel with the edge of the slim tab. And I wanted to frame my sliding starry blue panel nicely, so I cut a 5 x 3,75 inches Heroic Halftones Black panel, cut a Sliding Window out of it, as well as the notch at the top, I trimmed the center of that panel to get a frame, and stuck that frame to my Starry Blue panel using liquid glue.

Next I cut a Heroic Halftones Green panel using the largest Stitched Rectangle, I flipped my Sliding Window panel over, and added foam strips along the bottom edge, on the long edges as well, but not along the top edge. I peeled all the backing papers off, and attached my sliding panel to the Green panel. Next I attached my sliding panel to a 5,25 x 4 inches holographic panel, and finally to a 5,5 x 4,25 inches Polka Dot Parade Green panel.

And to complete my interactive panel, I attached the remaining piece of Heroic Halftones Black paper at the top of the Yellow pull tab panel, cut a green eyelet using a Sliding Window die, stuck that eyelet, pierced a hole through it, and added navy blue thread twine with a green bead to be able to pull the interactive panel.

Next I decorated the front of my Sliding Window panel. I cut a 3 x 1/4 inch slim strip out of dark gray cardstock and attached it at the very bottom of the interactive panel using 2mm foam squares. I cut three Cityscape borders out of indigo blue cardstock, stuck each border to some lighter blue cardstock, trimmed that lighter blue cardstock all around the buildings, added highlights and details using a white gel pen, cut the borders to fit on the interactive panel, and attached them using foam squares.

I cut a speech bubble out of black cardstock using a Comic Strip Speech Bubble die, white heat embossed "Have an incredible birthday" from Super Duper on it, and then attached the images and "HB2U" on the front of the card and on the inside as well using 1mm and 2mm foam squares.

Next I stamped two balloon strings from Balloon Alphabet, cut them and attached each of them to an acetate strip using liquid glue. At the end of each string, I attached the "1" and the "0" using 3mm glue dots, I stuck the strings in the girl's hand using liquid glue again, and this way when the Sliding Window card is open, the balloons stay up in the air.


SUNNY STUDIO SUPPLIES
- Balloon numbers stamp set
- Balloon alphabet stamp set
- Super duper stamp set
- Cityscape die
- Comic strip speech bubble die set
- Sliding windows die set
- Stitched rectangle die set
- Surprise party paper pack
- Heroic halftones paper pack
- Polka dot parade paper pack


OTHER SUPPLIES
- Ohuhu markers
- Graph'it brush markers
- Sakura white gel pen
- Clear embossing ink by Lawn Fawn
- Fine white embossing powder by Hero Arts
- Memento tuxedo black ink (images)
- Lawn Fawn dye inks: freshly cut grass, sunflower, mermaid, fish tank
- Holographic cardstock by Lawn Fawn
- Black licorice cardstock by Lawn Fawn

- 110lb Neenah solar white cardstock (images)

Sunny Studio - Sliding Window Rainbow Birthday Card

vendredi 14 mars 2025

Hello there,

I'm happy to be back with this super colorful interactive birthday card featuring, as very often, a mix & match of images from different Sunny Studio sets. Once again the mouse family is back to make you smile, and to create my Sliding Window interactive panel, I used multiple Surprise Party pattern papers to make sure everything coordinates nicely.

I started off by stamping my images on 110lb Neenah solar white cardstock using an alcohol marker friendly black ink, I cut them using the coordinating dies, and then colored everything using my Ohuhu markers in browns for the mice and bright rainbow colored for the balloons and presents. Here is a detailed list of the stamp sets I used: • Party Pets - small presents, party hats, balloons • Lazy Christmas - large presents • Harvest Mice + Merry Mice + Christmas Critters - mice.

I cut a 5 x 3,75 inches Surprise Party Banner panel using the largest Stitched Rectangle, cut the Sliding Window out of it, as well as the notch at the very top, and also cut a 5 x 3,25 inches Surprise Party Balloon panel.

I folded my Sliding Window Banner panel on the score lines, flipped it over, and added double sided tape to the slim bottom tab. I peeled the backing paper off this tab, flipped my Balloon panel over, and attached it at the back of my Sliding Window Banner panel, lining up the bottom edge of the Balloon panel with the edge of the slim tab. And I wanted to frame my sliding Banner panel nicely, so I cut a 5 x 3,75 inches Surprise Party Chevron panel, cut a Sliding Window out of it, as well as the notch at the top, I trimmed the center of that panel to get a frame, and stuck that frame to my Banner panel using liquid glue.

Next I cut a Surprise Party Sprinkles panel using the largest Stitched Rectangle, I flipped my Sliding Window panel over, and added foam strips along the bottom edge, on the long edges as well, but not along the top edge. I peeled all the backing papers off, and attached my sliding panel to the Sprinkles panel. Next I attached my panel to a 5,25 x 4 inches Surprise Party Polka dot panel, and finally to a 5,5 x 4,25 inches Surprise Party Pink Starry panel.

And to complete my interactive panel, I attached the remaining piece of Chevron paper at the top of the Balloon pull tab panel, cut a gold mirror eyelet using a Sliding Window die, stuck that eyelet, pierced a hole through it, added gold thread twine with a rainbow bead to be able to pull the interactive panel, and a turquoise bow for a lovely decorative accent.

Next I decorated the front of my Sliding Window panel. I cut two Surprise Party Green Polka Dot panels as wide as the interactive panel (3 inches), used a die from the Ribbon & Lace Border die set to create two scalloped borders, attached those borders using liquid glue, and then stuck the images to the scalloped borders using 1mm and 2mm foam squares. To stick the balloons up in the air, I attached each of them to a slim strip of acetate, and then attached each end of the acetate strips next to each other at the back of the upper scalloped green border using liquid glue.

I created two different greetings: one for the pull tab, and one for the inside of the card. For the one on the pull tab, I simply white heat embossed "Happy Birthday" from Party Pets on black cardstock, I cut it with the matching die, and attached it to the pull tab using 1mm foam squares. For the greeting on the inside, I white heat embossed my Inside Greetings Belated Birthday sentiment on aqua cardstock, I framed it using the third smallest Limitless Labels 1 die, and I stuck the label inside the card using 1mm foam squares again.

To finish my card, I added a few extra details: I cut a 3 x 1/4 inch slim stripe out of a Surprise Party Stripe paper, and attached it to the tab right below the mice using liquid glue. Finally I added highlights and details to the images using a white gel pen.


SUNNY STUDIO SUPPLIES
- Inside greetings belated birthday stamp set
- Party pets stamp set
- Lazy Christmas stamp set
- Harvest mice stamp set
- Merry mice stamp set
- Christmas critters stamp set
- Sliding window die set
- Stitched rectangles die set
- Ribbon & lace borders die set
- Limitless labels 1 die set
- Surprise party 6x6 papers


OTHER SUPPLIES
- Ohuhu markers
- Graph'it brush markers
- Sakura white gel pen
- Memento tuxedo black ink (images)
- Clear embossing ink by Lawn Fawn
- Fine white embossing powder by Hero Arts
- Ribbon & gold thread by Stampin Up
- 110lb Neenah solar white cardstock (images)
- Gold mirror cardstock by Craftelier
- Acetate by Lawn Fawn
- Colored cardstock by Lawn Fawn

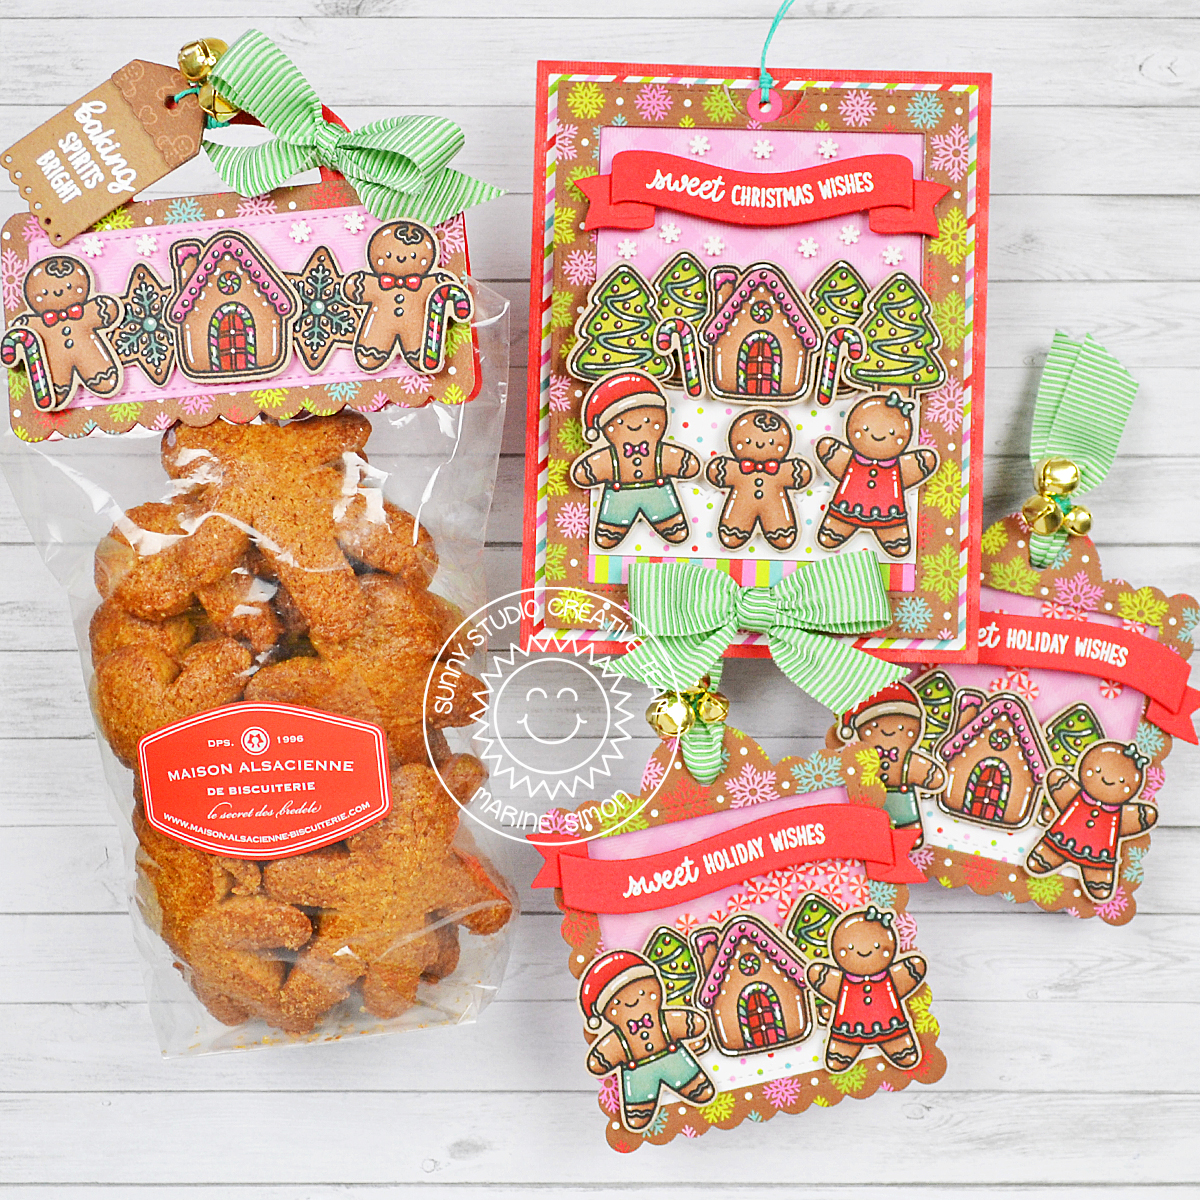
Sunny Studio - Set of Sweet Interactive Card + Treat Bag Topper + Shaker Tags

jeudi 19 décembre 2024

Hello there,

I'm so happy to be back on the Sunny Studio blog with this super cute set of interactive card + treat bag topper + shaker tags featuring the lovely gingerbread cookies from Baking Spirit Bright and Christmas Cookies. My first plan was to make the shaker tags and treat bag topper only, but I had some extra stamped images, so I quickly created a sliding card to go with my tags and treat bag topper. And to make sure that everything coordinates nicely, I used the All Is Bright 6x6 paper pack.


I started off by stamping all my images on kraft cardstock using memento tuxedo black ink. I cut them all using the coordinating dies, and colored everything using my alcohol markers. Here is a detailed list of the stamp sets I used:  Baking Spirit Bright - house, trees, stars, candy canes, small gingerbread man  Christmas Cookies - large gingerbread people.

So, let's start with the Sliding Window card, shall we? I cut a 5 x 3,75 inches All Is Bright pink gingham panel using the largest Stitched Rectangle, cut the Sliding Window out of it, as well as the notch at the very top, and also cut a 5 x 3,25 inches All Is Bright green panel.


folded my Sliding Window pink panel on the score lines, flipped it over, and added double sided tape on the slim bottom tab. I peeled the backing paper off this tab, flipped my 5 x 3,25 inches green panel over, and attached it at the back of my Sliding Window pink panel, lining up the bottom edge of my pink panel with the slim tab. And I wanted to frame my sliding pink panel nicely, so I cut a 5 x 3,75 inches All Is Bright snowflake panel, cut a Sliding Window out of it, as well as the notch, I trimmed that panel to get a frame, and I stuck that frame to my pink panel using liquid glue.

Next I cut an All Is Bright gingerbread man paper as wide as my sliding panel, I flipped my Sliding Window panel over, and added foam strips along the bottom edge, on the long edges as well, but not along the top edge. I peeled all the backing papers off, and attached my sliding panel to the gingerbread man panel. I attached my panel to a 5,25 x 4 inches All Is Bright stripe panel, and finally to a 5,5 x 4,25 inches All Is Bright red panel.

To totally complete my interactive panel, I attached the remaining piece of snowflake paper at the top of the green pull tab panel, cut an pink eyelet using a Sliding Window die, stuck that eyelet, pierced a hole through it, and added some turquoise twine to be able to pull the interactive panel.


Next I decorated the front of my Sliding Window panel. I cut two All Is Bright polka dot panels as wide as the interactive panel (3 inches), used a die from the Ribbon & Lace Border die set to create two scalloped borders, attached those borders using 1mm foam squares, and then I stuck the images to the scalloped borders and to the pull tab panel using 1mm and 2mm foam squares.


I created two different greetings: one for the front of the card, and one for the inside. For the first one, I cut my two Brilliant Banner 1 pieces out of red cardstock, I white heat embossed "Sweet Christmas Wishes" from Baking Spirits Bright on the front pieces, attached that front piece to the back piece using 1mm foam squares, and then I stuck the whole banner above the trees using 2mm foam squares. For the second greeting, I cut a small Scalloped Oval Mat 1 panel out of aqua cardstock, white heat embossed "Sugar & Spice Make Christmas So Nice" from Baking Spirits Bright on that scalloped panel, I pulled the interactive panel of my card, and attached my small scalloped panel on the bottom section using 1mm foam squares.


To finish my card, I added a few extra details: I cut a 3 inches wide slim stripe out of an All Is Bright paper, and attached it to the tab right below the gingerbread people using liquid glue. I added a few White Snowflake confetti around the Brilliant Banner 1, added highlights and details to the images using a white gel pen, and added a bow at the very bottom of my card using liquid glue.

*****

Now let's move on the shaker tags! They both were made following the same steps and matching All Is Bright papers:

1. Cut a Scalloped Square Tag panel out of a snowflake paper, and used the fifth smallest Stitched Square die to cut an opening inside my tag panel
2. Cut a whole Scalloped Square Tag panel out of acetate, and attached that acetate panel to the back of the snowflake frame using liquid glue
3. Still at the back of the frame, added foam strips on the four edges
4. Poured some candy cane confetti from my stash inside the frame
5. Cut a whole Scalloped Square Tag panel out of a pink gingham paper, and stuck that pink panel to the foam strips to totally close the shaker tag


I cut a polka dot panel using the fifth smallest Stitched Square die again, trimmed that panel into two slim strips that I attached at the bottom of each shaker window using liquid glue, and then I stuck my images using 1mm and 2mm foam squares.

I created two identical greetings using Brilliant Banner 3 dies. I cut each banner piece out of red cardstock, white heat embossed "Sweet Holiday Wishes" from Baking Spirit Bright on the front piece, stuck that front piece to the back piece using 1mm foam squares, and then attached the whole banner to the shaker window using 2mm foam squares.

For the final details, I added highlights to the images using a white gel pen, and tied some ribbon with golden bells at the top of each tag.

*****

And last but not least: the Treat Bag Topper. I used the main die to cut the base out of red cardstock, another base out of an All Is Bright snowflake paper and I trimmed the handle off, and one last base out of an All Is Bright red gingham paper and I trimmed it to keep the handle only. I attached the red gingham handle to the red Treat Bag Topper base using liquid glue, and next the snowflake panel. I used another Treat Bag Topper die to cut the pink gingham panel, attached it to the snowflake panel using liquid glue, and then stuck the images using 1mm and 2mm foam squares.


For my greeting, I first cut a light brown tag using a Window Quad Square die, I white heat embossed "Baking Spirit Bright" from Baking Spirit Bright on the lower section of my tag, cut the top decorative piece out of an All Is Bright gingerbread man paper, stuck it to the top of my tag using 1mm foam square, and tied the tag to the handle along with three golden bells using turquoise twine. I added highlights and details to the images using a white gel pen, glued a few White Snowflake confetti, and finally attached a bow on the handle using liquid glue.


SUNNY STUDIO SUPPLIES
- Baking spirit bright stamp set
- Christmas cookies stamp set
- Sliding window die set
- Treat bag topper die set
- Scalloped square tag die set
- Ribbon & lace border die set
- Stitched rectangle die set
- Scalloped oval mat 1 die set
- Stitched square die set
- Window quad square die set
- Brilliant banner 1 & 3 die sets
- All is bright 6x6 papers


OTHER SUPPLIES
- Ohuhu markers
- Graph'it brush markers
- Spectrum Noir Illustrator markers
- Sakura white gel pen
- Clear embossing ink by Lawn Fawn
- Fine white embossing powder by Hero Arts
- Bells from my stash
- Candy cane confetti from my stash
- Ribbon by Stampin Up
- Twine by Lawn Fawn
- Kraft cardstock by Lawn Fawn (images)

Sunny Studio - Flamazing Sliding Window Card

jeudi 25 juillet 2024

Hello there,

I'm so happy to be back on the Sunny Studio blog with this fun and bright interactive Sliding Window card featuring three cute Fabulous Flamingos in a tropical scenery. Oh how I love to make tropical cards!


As very often I started off with the coloring and stamped all my images on 80lb Neenah solar white cardstock using an alcohol marker friendly black ink. I cut them all using the coordinating dies, and colored everything using my alcohol markers using corals for the flamingos, red for the flowers and different greens for the leaves. Here is a detailed list of the products I used: • Fabulous Flamingos - flamingos, hearts • Tropical Birds - ivy, leaves, flowers • Silly Sloths - flowers, leaves.


I cut a 5 x 3,75 inches Strathmore bristol smooth panel using the largest Stitched Rectangle, and colored it using oxide inks. I started off by covering it with cracked pistachio oxide ink to create a nice and even base. I added and blended some lucky clover oxide ink on the four edges, and then brought more interest to this background using a leafy stencil from my stash along with lucky clover oxide ink. I splattered clear water all over my panel and dried it using a paper towel. Next I mixed some pine needle oxide ink with water, used a small brush to make splatters on my panel, and then did the same with black soot oxide ink and with copic opaque white ink.


Next I cut and colored two additional Strathmore bristol smooth panels. The first one measures 5 x 3,25 inches, I cut the second one using the largest Stitched Rectangle die, and colored them both using the same colors. I first covered them with tattered rose oxide ink, and used the same leafy background stencil as before along with saltwater taffy oxide ink.

Once my leafy green panel was dry, I cut my Sliding Window out of it, as well as the notch at the top, folded my panel on the score lines, flipped it over, and added double sided tape on the slim bottom tab. I peeled the backing paper off this tab, flipped my 5 x 3,25 inches leafy pink panel over, and attached it at the back of my leafy green panel, lining up the bottom edge of the leafy green panel with the slim tab. I glued the small tab piece at the top of my leafy green panel, pierced a hole through that tab, cut a green eyelet using a die from Sliding Window, attached this eyelet to the tab, and added red twine to create a handle and be able to pull the interactive panel.

I flipped my leafy green panel over, and added foam strips along the bottom edge, on the side edges as well, but not along the top edge. I peeled all the backing papers off, and attached my leafy green panel to the remaining leafy pink panel to complete the whole interactive process. Next I cut a 5,25 x 4 inches white panel that I attached to a 5,5 x 4,25 inches Polka Dot Parade red pattern paper, and then stuck this whole panel to a white card base.


At the inside bottom of the card, I stamped "You're flamazing" from Fabulous Flamingos in black, added a few extra images, and did the same at the inside top of the pull tab. I also white heat embossed the banner from Little Birdie on vellum, embossed "Hello friend" from Chubby Bunny and Bighearted Bears inside the banner, cut it using the matching die, and attached it below the flamingos using clear foam squares. As always I finished my card by adding highlights and details to the images using a white gel pen.


SUNNY STUDIO SUPPLIES
- Fabulous flamingos stamp set
- Tropical birds stamp set
- Silly sloths stamp set
- Chubby bunny stamp set
- Little birdie stamp set
- Bighearted bears stamp set
- Sliding window die set
- Stitched rectangle die set
- Polka dot parade 6x6 paper pack


OTHER SUPPLIES
- Spectrum Noir Illustrator markers
- Graph'it brush markers
- Oxide inks:
- Copic opaque white ink
- Sakura white gel pen
- White blizzard nuvo drops
- Jet black ink by Lawn Fawn
- Clear embossing ink by Lawn Fawn
- Fine white embossing powder by Hero Arts
- Leafy stencil from the Layered leaves & flowers stencil pack by Pretty Pink Posh
- Vellum by Lawn Fawn
- 80lb Neenah solar white cardstock (images)
- Strathmore bristol smooth cardstock (background)

Sunny Studio - Big Panda Sliding Window Interactive Card

vendredi 14 juin 2024

Hello there,

I'm super excited to be back on the Sunny Studio blog with this bright and colorful interactive card featuring Big Panda which is an amazing addition to the large critters we already have: Big Bunny and Holiday Hugs. Tropical cards are always so fun to make, I like to use vibrant colors when I create one, and this new card makes no exception.


I started off by stamping my images on 80lb Neenah solar white cardstock using an alcohol marker friendly black ink. I used the coordinating dies to cut them all, and colored everything using my Graph'it brush markers and my Spectrum Noir Illustrator markers.

Here is a detailed list of the products I used: • Big Panda for the panda, coconut cocktail and sunglasses • Fabulous Flamingos for the tropical leaves and flowers • Panda Party for the banner • Sending Sunshine for the small palm tree • Seasonal Trees for the large palm tree and coconuts


I cut a 5 x 3,75 inches Strathmore bristol smooth panel using the largest Stitched Rectangle, and colored it using oxide inks. From top to bottom, I applied tumbled glass, squeezed lemonade and dried marigold. And I added a jungle pattern using a tropical leaves stencil from my stash along with, from top to bottom, salty ocean, mustard seed and carved pumpkin oxide inks. Next I added texture to my panel to make it even more interesting, starting with water splatters that I dried with a paper towel. I also mixed some black soot oxide ink with water and used a small brush to make more splatters, and then did the same with copic opaque white ink mixed with water.


Next I cut and colored two additional Strathmore bristol smooth panels. The first one measures 5 x 3,25 inches, and I colored it using tumbled glass oxide ink. I cut the second one using the largest Stitched Rectangle, and I colored it using squeezed lemonade oxide ink. 


Once my tropical panel was dry, I cut my Sliding Window out of it, as well as the notch at the top, folded my panel on the score lines, flipped it over, and added double sided tape on the slim bottom tab. I peeled the backing paper off this tab, flipped my additional blue panel over, and attached it at the back of my tropical panel, lining up the bottom edge of the blue panel with the slim tab. I glued the small tab piece at the top of the blue panel, pierced a hole on that tab, cut a yellow eyelet using a die from Sliding Window, attached this eyelet on the tab, and added gold thread to create a handle and be able to pull the tab.

I flipped my tropical panel over, and added foam strips along the bottom edge, on the side edges as well, but not along the top edge. I peeled all the backing papers off, and attached my tropical panel to the extra yellow panel to complete the whole interactive process. Next I cut a 5,5 x 4,25 inches light brown woodgrain panel, and attached my interactive panel to it using liquid glue.


I attached all my images on my panel using 1mm and 2mm foam squares. I also created two sentiments. I white heat embossed "Hello" and "Summer" from Big Panda on black cardstock, and cut them using the coordinating dies. I attached "Hello" at the top of the pull tab using foam squares, attached "Summer" on the inside and stamped "Happy" from Big Panda right above it in black. And finally I added highlights and details to the images using a white gel pen.


SUNNY STUDIO SUPPLIES
- Big panda stamp set
- Sending sunshine stamp set
- Seasonal trees stamp set
- Fabulous flamingos stamp set
- Panda party stamp set
- Sliding window die set
- Stitched rectangle die set


OTHER SUPPLIES
- Spectrum Noir Illustrator markers
- Graph'it brush markers
- Oxide inks: tumbled glass, salty ocean, squeezed lemonade, mustard seed, dried marigold, carved pumpkin, black soot
- Copic opaque white ink
- Sakura white gel pen
- Clear embossing ink
- Fine white embossing powder
- Jet black ink by Lawn Fawn
- Gold thread by Stampin Up
- Tropical leaves background stencils by Lawn Fawn
- Light brown woodgrain cardstock by Lawn Fawn
- Yellow cardstock by The Stamp Market
- 80lb Neenah solar white cardstock (images)
- Strathmore bristol smooth cardstock (background)