Lawn Fawnatics Challenge #35 || Cupcake Party || Pop-Up Card

jeudi 30 août 2018


Hello there,

Lawn Fawnatics Challenges are always so cool and diversified, it has now become kind of a habit for me to participate every time. For this one, I didn't have any coffee or tea related stamp sets, but when I saw the word "treats" I immediately thought of the "Baked with love" stamp set I have in my stash.

And as I didn't want my card to be flat, I decided to build a pop-up counter to place all my elements on it and give the illusion of a "real" kitchen ^^


I first started by stamping all my images on Neenah solar white cardstock using my Misti tool and alcohol marker fridnely black ink. I them using my Spectrum Noir markers, trying to choose colors that would match nicely with the paper I wanted to use as a background. I used the coordinating dies to cut everything.


Then I built the scene, and for that I cut a white card base and two rectangles of pattern papers, one to make the wall and one to make the floor. I attached them on the card base using double sided tape.
I cut and scored a piece of wood pattern paper to make the furniture, and two small rectangles and two small squares to make the drawers and cupboards; I attached them using double sided foam tape (all the measurements are shown in the video below)


To be able to attached all my images on the counter, I cut and scored three small pop-up elements: one for the blender, one for bowl and one for the flour bag/cupcake stand (again, all the measurements are shown in the video below) All the other elements were attached using foam adhesive squares.


I applied clear glitter to the cupcakes, added white drops on the drawers and cupboards to create handles, and attached my sentiment in the middle of the floor to finish the card.

VIDEO
Below or here

LAWN FAWN SUPPLIES
- Baked with love stamp set + coordinating dies
- Just for you labels stamp set + coordinating dies
- Perfectly plaid pattern paper
- Let's bokeh in the snow paper

OTHER SUPPLIES
- Spectrum Noir markers
- Neenah solar white cardstock
- Wood pattern paper from my stash
- White cardstock (for the card base) from HobbyCraft
- Simply white Nuvo drops
- Clear glitter pen from Spectrum Noir
- Pale tomato ink from Hero Arts

Holiday Card Series 2018 - Frosty Forest - Diorama Card Series

dimanche 26 août 2018

Hey there,

I continue my Holiday Card Series for 2018 with this winter diorama using my all time favorite holiday stamp set: Frosty Fairy Friends from Lawn Fawn. I really hope I'll never bored of this amazing set! ^^


I first started by stamping all my images on Neenah solar white cardstock using alcohol marker friendly black ink. Colored them using my Spectrum Noir markers and cut everything using the coordinating dies.


Next I build the diorama using several elements: a base using pattern paper, and borders using white cardstock (mountains, forest, and clouds for snow)


All the measurements for this diorama are shown in this video.


I stamped my sentiment on the front cloud border, applied clear glitter to the red berries and fairies wings, and attached the images on the different borders using glue dots. The two flying fairies were attached using a thin strip of cleat acetate.


VIDEO
Below or here

LAWN FAWN SUPPLIES
- Frosty fairy friends stamp set + coordinating dies
- Stitched mountain border die set
- Puffy cloud border die set
- Forest border die set

OTHER SUPPLIES
- Spectrum Noir markers
- Neenah solar white cardstock
- White cardstock from HobbyCraft
- Pattern paper from Action

Under The Sea Card Series - Trio of Rainbow Cards - DIY Wreath Builder

samedi 18 août 2018

Hello there,

According to my blog, it's been two years since my last (and unique! LOL) rainbow project so I'm more than excited to share this trio of cards I've made using a home made wreath builder (tutorial here)


I first started by cutting three 4 x 4" squares to fit in my wreath builder (I used Neenah solar white cardstock). Then I used my misti tool to stamp all my images on my papers using black alcohol marker friendly ink.

On the first one I stamped different fishes from various sizes in circles, going small in the middle and bigger towards the edges.


On the second one, I stamped star fishes, also in circle, like they're dancing ^^


On the third one, I stamped mermaids and sea horses among other cute things. All the images on the three panels were colored using the same color combos of spectrum noir markers.


I gold heat embossed my sentiments on the first two cards, and die cut a big hello from gold glitter cardstock for the third one. And to finish them, I simply attached my panels to white card bases.

VIDEO
Below or here

LAWN FAWN SUPPLIES
- Mermaid for you + So jelly + Fintastic friends + You are sublime + Critters in the sea stamp sets
- Scripty hello die

OTHER SUPPLIES
- Spectrum Noir markers
- Neenah solar white cardstock
- White cardstock from HobbyCraft (card base)
- Versamark ink
- Antique gold embossing powder from Simon Says Stamp
- Gold glitter cardstock from American Crafts

Isabel Cristina Stamps - Wild Safari

lundi 13 août 2018

Hey there,

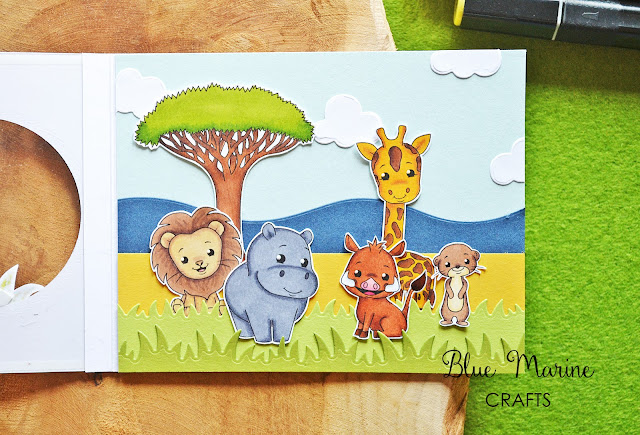
Have you ever been on a safari in Kenya or South Africa? I've never been. But how special and fantastic it would be to see or catch sight of beautiful wild animals in their natural habitat, such as the cuties on my card! They're all from the new "Wild Safari" digi stamp set from Isabel Cristina Stamps. So adorable! And the set also comes with some trees and leaves, perfect to build the cutest scenes! 

Here is a close-up at the set:


And you know that I sometimes get inspiration on the internet, so here is the picture that inspired me:

(https://trevorgustafson.com/portfolio/cartoon-stylized/)

So, to the process! I first started by cutting several elements to build my scene: two grass borders from two different green cardstock, a thin rectangle from light orange cardstock, a hill border from navy cardstock, a large rectangle from light blue cardstock and some clouds from white cardstock. 


Next I attached each cardstock element (except for the clouds) on the large light blue rectangle using double sided tape: first the hill border, then the light orange rectangle, and finally the grass borders.


I die cut two circles from white cardstock to create my binoculars panel and attached a piece of clear acetate at the back to make a window.


I printed all my images on neenah solar white cardstock, colored them using spectrum noir markers and fussy cut them. Glued the clouds using liquid adhesive, and then I attached all the cuties using glue dots.


On the front of the binoculars window panel, I attached my sentiment, two little leaf bushes and climbing plants. To finish the project, I simply attached both panel to a white card base.

VIDEO
Below or here

SUPPLIES
- Wild Safari digital stamp set by Isabel Cristina Stamps
- Spectrum Noir markers
- Grassy Fields die set by My Favorite Things
- Sweet sloths stamp set by My Favorite Things (for the clouds dies)
- Neenah Solar White cardstock
- Colored cardstocks from Stampin Up! and Simon Says Stamp
- Acetate from my stash
- White gel pen from UniBall

Holiday Card Series 2018 w/ Lawn Fawn - Magical Winter

mardi 7 août 2018


Hey there,

These past few days have been very hot here where I live (France) and as I'm really not a summer person, today I'd rather be enjoying a cold and sunny winter day! So when I saw this new Lawn Fawnatics "Favorite Place" Challenge, I thought it would be perfect to start my Holiday Card Series and share my first Christmas card for 2018!


I first started by stamping all my image on Neenah solar white cardstock using black alcohol marker friendly ink. Then I colored them using my spectrum noir alcohol markers, and cut everything using the coordinating dies. Next I cut different pieces of blue cardstock to build the card: a card base, a large rectangle and a thin strip.


On the large rectangle, I partially die cut a circle. And on the card base, I traced that circle using a pencil so I knew where to stamp all the little snowflakes. I made little dots in the center of each snowflake using white Nuvo Drops. On the thin strip, I white heat embossed my sentiment.


I put little pieces of double sided foam tape at the back of the window panel, and attached it to the card base. Glued the sentiment strip on a white cloud border, and attached the whole element at the bottom of the window.


I added some elements to the fairy house: piles of snow and some lights. Then I attached all the images on my panel using foam adhesive squares and/or liquid glue. Added some white highlights here and there using a white gel pen, applied clear glitter to the berries, glossy accents to the lights, and sparkling accents to the fairies wings to finish the card.

VIDEO
Below or here

LAWN FAWN SUPPLIES
- Frosty Fairy Friends stamp set + coordinating dies
- Puffy Cloud Border die set
- Toboggan Together stamp set (for the sentiment)
- Mermaid cardstock

OTHER SUPPLIES
- Spectrum Noir markers
- Inside scalloped circle die set from Craftin Desert Divas
- Simply white Nuvo Drops
- White Blizzard Nuvo Drops
- Clear glitter pen from Spectrum Noir
- White gel pen from UniBall
- Versamark ink
- White embossing powder from Aladine

Lawn Fawnatics Challenge #33 - Under The Sea Simple Fun Fold Card - Zig Coloring

jeudi 2 août 2018

Hello there,

I really love Lawn Fawnatics Challenges and I always try to create something for it. This time, the theme is Fun Folds, and as Under the sea themed projects are my favorite to make, I just couldn't help myself but using a bunch of fishes, mermaids, etc... And even some two cute pirates searching for a treasure ^^ The process was quite long as there was a lot of images to color but I think the result is totally worth it ^^


I first started by cutting a large rectangle from bristol cardstock (measurements: 12" x 5,5") and traced pencils lines at 2" and 4" from each small sides to get an idea of the different folded parts. 


Next right above the top pencil line, I traced a wave line and a hill line for the ocean and a dune. And then at the very bottom of the panel, I traced some other lines using a die to create sand.


Stamped all my images using black alcohol marker friendly ink and masking paper on some areas, and colored everything: the background using some distress inks, and the images using my zig markers with water.


I traced black lines over the pencil drawings previously made for the waves, dune and sand to coordinate with the images, and then I scored lines on the pencils lines made at the beginning to be able to fold the card.


I added clear glitter on the treasure and the mermaids tails, and glossy accents on the red diamond. Finally I stamped a lot of water bubbles and added clear drops on top.

VIDEO
Below or here

LAWN FAWN SUPPLIES
- Mermaid for you + Ahoy, matey + You are sublime + Fintastic friends + Critters in the sea + So jelly stamp sets
- Simple stitched hillside border die set
- Stitched wave border die set

OTHER SUPPLIES
- Distress inks: chipped sapphire, salty ocean, tumbled glass
- Strathmore bristol smooth cardstock
- Clear glitter pen from Spectrum Noir
- Glossy accents from Ranger
- White blizzard + Morning dew Nuvo Drops

Zig markers
- sky: 36
- palm trees: 44 - 62 - 65
- sand: 67
- treasure chest: 62 - 63
- coins: 50
- diamond: 22
- green mermaid: 64 - 47 - 52 - 28
- pink mermaid: 64 - 25 - 65 - 28 - 52
- whale: 95
- baby whale + grey fish: 94
- turtle: 43 - 46 - 44
- leaves: 80
- corals: 25 - 21
- jellyfish: 31
- red fishes: 22
- fish couple: 31 - 80
- girl: 71 - 28 - 22 - 31 - 91 - 95
- boy: 71 - 28 - 22 - 31 - 91 - 95 - 62