Isabel Cristina Stamps - Magical Night - Floating Element

mercredi 29 mai 2019


Hello there,


When I saw this new set designed by Isabel Cristina Stamps, especially the image I used, I immediately pictured these cuties floating in the sky above Agrabah.


So I used a tutorial by Jennifer McGuire to make Jasmine and Aladdin float in the night sky on the magic carpet.
This new set is full of beautiful images. You can recreate the Agrabah palace, or a scene in the streets when Aladdin and Jasmine meet each other by the apple stand. And there are also Abu the monkey, Rajah the tiger and of course Genie.


To begin, I printed my image on Neenah solar white cardstock using my Epson printer, as always. And I colored it using my alcohol markers, trying to be as true to the movie as I could.


Next I cut my Agrabah skyline using my Silhouette machine. I searched for Arabian silhouette in Google, opened it in the Silhouette software and the machine cut it for me.


Next I cut a 5,5 x 4,25 inches bristol panel and picked several oxide inks: antique linen, victorian velvet, seedless preserves, chipped sapphire and black soot. I started at the bottom with the lightest color and went to the top, trying to get a nice blending.


When the ink blending was done, I stamped my sentiment at the bottom of the skyline using versamark ink, and I heat set it using gold embossing powder.


To create the floating image, I first die cut a small rectangle behind it using a die from the Little Flowers die set by Lawn Fawn. I taped it and sent it to my die cutting machine. Next I cut a circle out of navy blue cardstock, it was the closest color to my background, marked the middle on both sides, and attached a cent on one side of this circle.


I placed the circle behind the background panel, with the pencil mark showing in the middle, attached foam squares, and finally adhered Jasmine and Aladdin. Next I attached the skyline using double sided tape and liquid glue. I put two layers of foam tape at the back of the panel, making sure the circle had enough space to move, and attached it to a black card base.


The final touch to this magical night was to add a bunch of stars using a white gel pen.


VIDEO
Below or here

SUPPLIES
- Critters ever after stamp set by Lawn Fawn (for the sentiment)
- Oxide inks: antique linen, victorian velvet, seedless preserves, chipped sapphire, black soot
- Spectrum Noir markers
- Black cardstock from my stash
- Neenah solar white cardstock (for the image)
- Strathmore bristol cardstock (for the background)
- Versamark ink
- Gold embossing powder by Aladine
- Sakura white gel pen

Summer Card Series with Lawn Fawn - Chilling in the pool - Magic Picture Changer Card

samedi 25 mai 2019

Hey there,

Today I'm starting my Summer Card Series! I hope you'll find some inspiration in my projects over the weeks. This first card features some cute little peas chilling in the pool. Life doesn't seem to be too difficult for them.


I first started by cutting two pieces of Strathmore bristol cardstock. On the long one I used the large pocket piece die and a pencil to mark to window. And on the short one I used the moving piece die to mark the window.


On the long panel window, I stamped a donut using memento tuxedo black ink and I masked it. On the short panel I stamped a pea, masked it, stamped the donut on top and masked it too.


To create the pool I simply applied tumbled glass distress ink on both panels. I splattered water on the panels. And also added salty ocean drops. I forgot to color the middle of the first donut so i used a polka dot stencil to apply ink just on that spot.


Next I stamped additional images and colored them using my spectrum noir markers. As I wrote before, the paper is Strathmore bristol cardstock. It's perfect for blending inks and it works pretty well with alcohol markers. And to make my little peas even cuter, I gave them faces using black versafine ink. Of course I stamped sunglasses on the last little pea and added white highlights on the donut rubber rings.


Next step was to die cut the elements. I taped the dies on my panels and sent them to the machine. When the die cutting was done I applied double sided tape on the thin tabs of the main pocket piece, front and back. I folded the score lines, and folded the tabs down to attach them.


Next I applied a generous amount of powder on the flaps, front and back, and along the thin tabs. This will help the mechanism work smoothly. I put the moving piece in the pocket piece through the slot, and insert each flap into a slot. I made sure the moving piece was straight and I closed the pocket. I played with it a few times just to check if it was working well, and use a microfiber to get rid of any excess of powder.


To complete the pool, I cut a frame out of bristol cardstock and colored it the same way I colored the first elements. I applied thin double sided tape at the back of it and attached it to the pocket, making sure the notch was on the side of the tab. I cut the tab part of the moving piece out of cream cardstock, and only cut the tab that I glued on the moving piece tab. I also cut the tab handle out of sticky note cardstock and attached it to the tab.


For the base I cut a 5,5 x 4,25 inches panel out of a yellow scallop paper, a sticky note frame, and two white panels. One measuring 4 1/4 x 3 1/4, and one measuring 4 1/8 x 3 1/8 inch. When all the panels were stuck, I attached my images using foam adhesive squares. The first part of my sentiment was stamped using spiced marmalade oxide ink and cut using the coordinating die. And the second part was white heat embossed on black cardstock. And as a very final touch I added morning dew nuvo drops here and there on the pool area.


VIDEO
Below or here


LAWN FAWN SUPPLIES
- Be hap-pea stamp + die sets
- Donut worry stamp + die sets
- Happy summer stamp + die sets
- Aloha stamp + die sets
- Sweetest flavor stamp + die sets
- Stitched rectangle frame die set
- Magic picture changer + add-on die sets
- Sphinx paper from the Really rainbow scallops 6x6 paper pack
- Sticky note cardstock
- Black licorice cardstock

OTHER SUPPLIES
- Spectrum Noir markers
- Neenah solar white cardstock
- Memento tuxedo black ink
- Distress inks: tumbled glass, salty ocean
- Oxide ink: spiced marmalade
- Strathmore bristol smooth cardstock
- Sakura white gel pen
- Versamark ink
- White embossing powder by Hero Arts
- Morning dew Nuvo drops by Tonic

Hello Bluebird - Make a wish

samedi 18 mai 2019

Hello there,

Today's card features a bunch of cute critters all gathered to celebrate someone's special day.


To start I cut a 6 x 6 inches square out of Strathmore bristol cardstock and taped it to a wood panel. I covered the paper with a lot of clear water and applied spun sugar distress ink. I dried the paper using my heat tool and repeated this process twice.


Still using spun sugar, I made splatters on the panel. And for more contrast I added darker splatters using picked raspberry distress ink. White drops were also added to the panel, as well as gold splatters.


Next I die cut two clouds and three rainbow pieces using Lawn Fawn cardstocks: mermaid, ballet slippers and sticky note. I glued those rainbow pieces on a piece of white cardstock, and trimmed the excess of paper to get one entire rainbow element. And to match the soft and magical theme of the card I applied white blizzard Nuvo drops on each part of the rainbow.


My images were stamped on Neenah solar white cardstock using Memento tuxedo black ink and cut using the coordinating dies. And I used my favorite medium to color them: my Spectrum Noir markers.


My sentiment was die cut twice: one out of gold mirror cardstock and one out of white cardstock. I glued the gold mirror sentiment on top of the white just to get some dimension.

I attached all the elements: the sentiment was adhered using my all time favorite liquid glue which is the zig 2 way glue pen, the rainbow, clouds and images were attached 1mm and 2mm foam adhesive squares. I attached the panel to a white card base and added a bunch of pale pink sequins. And finally clear shimmer was applied to the fairy's wings to add one more touch of magic.


VIDEO
Below or here


HELLO BLUEBIRD SUPPLIES
- North stars stamp + die sets

- Banner buddies stamp + die sets
- Maverick stamp + die sets
- Snow play stamp + die sets
- Fairy garden stamp + die sets
- Rainbow sky die set
- Make a wish die set

OTHER SUPPLIES
- Spectrum Noir markers

- Distress inks: spun sugar, picked raspberry
- White paint by Hero Arts
- Sakura white gel pen
- Gold metallic paint by Creative Expressions
- Sakura black gel pen
- Cardstocks by Lawn Fawn: mermaid, ballet slippers, sticky note
- Gold mirror cardstock from my stash
- Strathmore bristol smooth cardstock (for the background)
- Pale pink sequins by Noga Sequins
- Neenah solar white cardstock (for the images)
- White cardstock by HobbyCraft (for the card base)

Lawn Fawnatics Challenge #52 - Pet Love - Pull Tab Card

mercredi 15 mai 2019


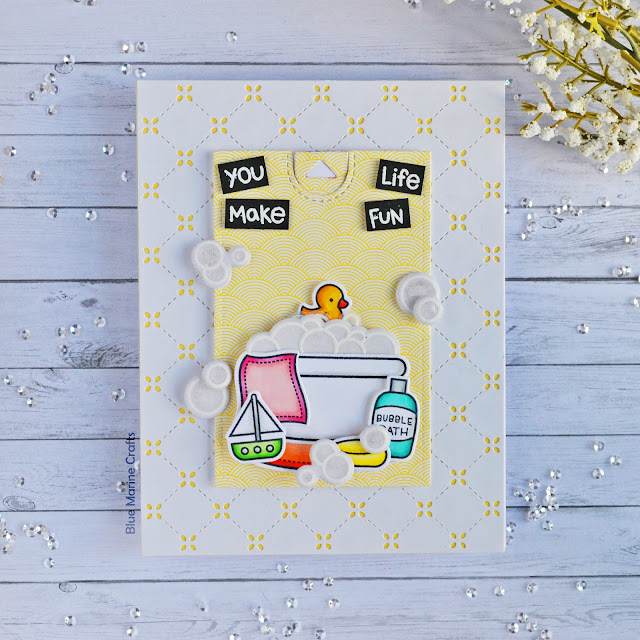
Hello there,

If you follow me on Instagram, you may already know that I have a dog, a dachshund named Moon. And even though he really hates being showered, I was totally inspired by him to create this card.


I first started by stamping my images on Neenah solar white cardstock using memento tuxedo black ink. And I colored them using my Spectrum Noir markers.


For the background I cut a 5,5 x 4,25 inches panel from sticky note cardstock. I die cut a white quilted backdrop, and a small rectangle out of a yellow pattern paper. The quilted backdrop was attached to the yellow panel using thin double sided tape.

I placed some elements on the yellow panel and marked the top of the bubbles, used a ruler to trace a vertical line, placed the slot die on the vertical line and just under the mark, placed the notch die at the top and sent them to my die cutting machine.

I also die cut the pull tab mechanism and the sleeve, folded the lines, put the pull tab through the slot at the back of the panel, and attached the sleeve to help the pull tab go up and down straight. I trimmed off the pull tab and used the remaining piece of pattern paper and the tab die to cut the arrow.


Next I applied two layers of foam tape at the back of the panel and attached it to the quilted backdrop. I glued the bath tub and the bubbles together, and did the same thing with the dog the duck and some small bubbles.


I trimmed off the tabs so they could fit behind the dog, glued the bath tub to the carpet, attached the dog the the tabs, and finally attached the bath tub/carpet element using foam adhesive squares. The rest of the images was attached using foam adhesive squares too.

I white heat embossed my sentiment on black cardstock, cut each word apart and adhered them using foam adhesive squares. Finally I attached my panel to a white card base, and applied clear shimmer to the bubbles.

VIDEO
Below or here


LAWN FAWN SUPPLIES
- Quilted backdrop
- Large stitched 4 bar rectangles
- Let's toast pull tab add-on
- Rub a dub dub stamp + die set
- Little bundle stamp + die set
- Let's play stamp + die set
- Christmas dreams stamp + die set
- Sphinx pattern paper from the Really Rainbow Scallops 6x6 paper pack
- Sticky note cardstock
- Black licorice cardstock

OTHER SUPPLIES
- Spectrum Noir markers
- Memento tuxedo black ink
- Versamark ink
- White embossing powder by Hero Arts
- Clear shimmer pen by Spectrum Noir
- White cardstock by HobbyCraft
- Neenah solar white cardstock
- Vellum by Simon Says Stamp

Isabel Cristina Stamps - Birthday Bunny - Pull Tab Card

samedi 11 mai 2019

Hello there,

I'm back to share with you a special card featuring a cute bunny designed by Isabel Cristina StampsTomorrow it will be Isabel's birthday so for the occasion, she has designed this cutie that you can download for free on her etsy shop.


She's also having a birthday sale. On all orders above 3 euros, you get a 20% discount and it goes from today until sunday 13th 12am CET time.


To start, I created the background. I cut a 5.5 x 4.25 inches bristol panel and used tumbled glass and salty ocean distress inks to color it. I first applied the lightest color all over the panel, and next I used a stencil and the darkest color to create rays. To accentuate the area where I wanted to put the bunny, I applied more salty ocean ink.


I splattered water on the panel and dried it, and I did the same thing using salty ocean and blueprint sketch distress inks. And because birthdays are festive, I added gold splatters on the panel.


Next I colored the bunny and the balloons using my alcohol markers. The image was printed on Neenah solar white cardstock using my epson printer.


I cut the word happy out of several cardstocks, and also a box out of kraft cardstock. I cut the top part of the box and applied vintage photo distress ink on the edges to make it look less flat.


I traced vertical lines at the bottom and top of my panel, and decided to cut a scallop rectangle out of my background panel. On the bottom mark I placed the slot die and on the top mark I placed the notch die. And I run them through my die cutting machine.


I cut the pull tab mechanism out of white cardstock, folded the score lines, applied tape on the tabs, and put it through the slot at the back of the panel. To help the pull tab go up and down straight, I die cut the sleeve, folded the lines and attached it at the back of the panel. And the remaining piece of scallop rectangle was glued at the top of the pull tab.


The tabs were a little bit too wide so I simply cut them in half. I attached the top of the box using foam adhesive squares, and I also placed foam adhesive squares at the bottom of the tabs, the bunny will be adhered to them. I trimmed the tabs, attached the bunny and next stuck the rest of the box down using several layers of foam squares. This way the bunny has enough space to move easily.


I cut a white card base and attached my panel using two layers of foam tape. To make the card even more festive, I applied clear shimmer to the letters, and added morning dew nuvo drops on the balloons to make them shine like real ones. And finally I added colorful nuvo drops around the box.


VIDEO
Below or here

SUPPLIES
- Birthday bunny digital stamp set
- Let's toast pull tab add-on die set by Lawn Fawn
- Finley's ABCs die set by Lawn Fawn
- All prettied up die set by Mama Elephant
- Stencil from my stash
- Spectrum Noir markers
- Distress inks: tumbled glass, salty ocean, blueprint sketch, vintage photo
- Colorful cardstocks by Lawn Fawn
- Kraft cardstock by Hero Arts
- Neenah solar white cardstock (for the image)
- Strathmore bristol smooth cardstock (for the background)
- White cardstock by HobbyCraft (for the card base)
- Nuvo drops by Tonic
- Sakura white gel pen
- Clear shimmer pen by Spectrum Noir

Hello Bluebird - Fairies & Flowers

mercredi 8 mai 2019

Hi there,

Today's card features a lot of images and a lot of coloring. I used the whole new fairy garden stamp set and some cuties from the garden friends stamp set.


I wanted to use all the fairies on this card so I cut a long bristol panel measuring 8 x 4.25 inches, and used chipped sapphire and black soot distress inks to color it. I knew the images would be colorful, so choosing these dark inks helped making them pop.

When the background was done, I splattered water using a small brush to create stars. And I used the same inks to add more details to this night sky.


As always the images were stamped on Neenah solar white cardstock using memento tuxedo black ink and colored using my spectrum noir markers. And of course, fairies need sparkles so I added white blizzard nuvo drops on their wings.


The sentiment was stamped using versamark ink and white heat embossed to make it pop from the dark background. I added white highlights on the images and next I attached them on the background panel using foam adhesive squares and glue dots. Finally I created a card base from black cardstock, and stuck my panel down.


VIDEO
Below or here


HELLO BLUEBIRD SUPPLIES
- Fairy garden stamp + die set
- Bee happy stamp + die set
- Garden friends stamp + die set

OTHER SUPPLIES
- Spectrum Noir markers
- Distress inks: chipped sapphire, black soot
- Sakura white gel pen
- Neenah solar white cardstock
- Strathmore bristol smooth cardstock
- Black cardstock by Simon Says Stamp
- White blizzard Nuvo drops by Tonic
- Morning dew Nuvo drops by Tonic
- Simply white Nuvo drops by Tonic

Hello Bluebird - Sepia Style

samedi 4 mai 2019

Hello there,

Today I'm back with a pretty simple card, there's not a ton of elements on it but I think it's still nice with the map in the background and the whole sepia/vintage look of the card.


I used the brand new Maverick stamp set and a bird from the Banner buddies stamp set by Hello Bluebird. Stamped the images on Neenah solar white cardstock using memento tuxedo black ink and colored them using my alcohol markers.

For the background, I cut a panel out of a map pattern paper I had in my stash and used different distress inks to make it look old and worn out. I directly applied vintage photo all over the panel, and next ground espresso on the edges. I used scissors to damage the edges, I also creased the paper, and finally added more ink on the edges. And I wanted the map to be stained so I added splatters of the same brown inks, mostly on the edges and corners.


My sentiment was stamped on kraft cardstock using versamark ink and white heat embossed. I turned it into a banner and applied vintage photo distress ink on the edges to match the rest of the card.

I attached the map on a kraft card base, which edges were also colored using vintage photo ink. I assembled the elephant and the plane using washi tape, and attached everything using foam adhesive squares. Finally I stamped the second part of my sentiment inside the card using black versafine ink.


VIDEO
Below or here


HELLO BLUEBIRD SUPPLIES
- Maverick stamp + die sets
- Banner buddies stamp + die sets

OTHER SUPPLIES
- Spectrum Noir markers
- Distress inks: vintage photo, ground espresso
- Versamark ink
- Embossing powder by Hero Arts
- Sakura white gel pen
- Sakura black gel pen
- Kraft cardstock by Hero Arts
- Map pattern paper from my stash
- Black versafine ink

Lawn Fawnatics Challenge #51 - Seagulls - Tunnel Card

mercredi 1 mai 2019

Hey there,

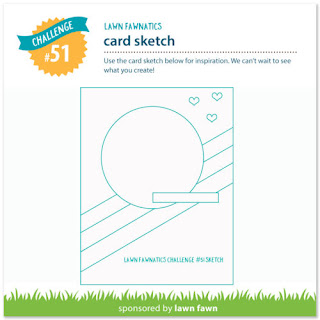
Today I'm back with a tunnel card inspired by the latest Lawn Fawnatics Challenge. I hope it will give you a foretaste of summer with these palm trees and cute seagulls!


To begin, I stamped the images on Neenah solar white cardstock using memento tuxedo black ink. And I colored them using my alcohol markers. When the coloring was done, I cut the images using the coordinating dies.


I cut a 5.25 x 4 inches panel from bristol cardstock and cut a large circle out of it. Next I applied tape to delimit a large strip. And I used tumbled glass distress ink as a base to color this large strip. I splattered water on top of it and dried it. And did the same thing with salty ocean and blueprint sketch distress inks.


I cut two other 5.25 x 4 inches bristol panels. I used the first window panel (the one with the blue strip) as a guide to cut a smaller circle out of the second panel. And I used this second panel as a guide to cut a smaller circle out of the third panel.


Next I took the first panel, and die cut two waves in the blue strip area. This way I'll be able to tuck the wooden poles into the panel. To customize those poles, I cut the small branch parts and I used a black pen and a white gel pen to complete them. I also cut the legs and wings on two seagulls so they seemed to be seating and resting on the poles.


I tucked the wooden poles in the panel from the back, attached them using glue dots and adhered the seagulls using foam adhesive squares. I cut and colored a hill border and an ocean border. The hill was colored using scattered straw distress ink and the ocean was colored the same way I colored the large strip on the first panel. I attached the hill border at the back of the first panel. And attached the ocean border at the back of the second one.


I applied foam tape at the back of each panel, attached a circle that I colored using tumbled glass distress ink on a pattern paper panel and adhered each panel on top of the other. And then I attached the images using glue dots and liquid glue. The sentiment was stamped on black cardstock using versamark ink, white heat embossed and attached on the card using foam adhesive squares. And as a final touch I stamped seagull silhouettes using black versafine ink, I added coconuts and the last seagull that is going to join the others in the sky.


VIDEO
Below or here


LAWN FAWN SUPPLIES
- So owlsome stamp + die sets
- Yay, kites stamp + die sets
- Rub a dub dub stamp + die sets
- Let's play stamp set (for the sentiment)
- Life is good stamp + die sets
- Happy village stamp + die sets
- Critters from the past stamp + die sets
- Ocean wave accents die set
- Simple stitched hillside border die set
- Stitched wave border die set
- Sea serpent pattern paper from the Really rainbow scallops 6x6 pack
- Black licorice cardstock

OTHER SUPPLIES
- Spectrum Noir markers
- Distress inks: tumbled glass, salty ocean, blueprint sketch, scattered straw
- Memento tuxedo black ink
- Black versafine ink
- Versamark ink
- White embossing powder by Hero Arts
- Sakura white gel pen
- Sakura black gel pen
- Strathmore bristol cardstock
- Neenah solar white cardstock
- Circle dies from my stash