Lawn Fawn - Build a Vivarium

jeudi 27 août 2020

 Hey there,

A few weeks ago I created this card, it was inspired by some lovely penguins wandering around the Shedd Aquarium in Chicago. And after I finished that card, I knew that I wanted to use the Build An Aquarium die set again to create vivariums.

So I started by stamping all my images on white cardstock using jet black ink, I used the coordinating dies to cut them all and colored everything using my alcohol markers.

When the coloring was done, I cut a slimline panel out of vanilla cardstock. I masked a thin strip at the bottom using washi tape, that strip will be the floor, I taped the brick stencil on top of the paper and used walnut stain distress ink to create a nice wall all over the panel.

Once the ink was dry, I moved the washi tape to create a very simple floor using antique linen distress ink.


Next I moved on to the vivariums. I started bu cutting the frames out of chocolate bar cardstock and the tops and bottoms out of paper bag cardstock. And because I wanted all the elements to match, I added a little bit of walnut stain distress ink on the top and bottom pieces.


I created the backgrounds of my vivariums. I first traced the shape of the aquarium die on white cardstock, three times, and used distress inks to color those three elements: evergreen bough and lucky clover.

I white heat embossed my sentiment on two strips and I also cut the frame three times out of a thick cardstock to create dimension. I applied doubled sided tape at the back of those thick frames and assembled the vivariums.

I started by attaching a thick frame on a green background. Next I applied liquid glue at the back of a chocolate bar frame and stuck on top of the thick frame. On the left and right sides, I also glued a thin strip, and finally I attached the top and bottoms strips using liquid glue again. I assembled the two other vivariums and finally I stuck those three elements on my brick slimline panel.


And to ground those little scenes, I cut three hill borders. I colored them using gathered twigs and ground espresso distress inks and attached them at the bottom of each vivarium.

Next I filled up the three vivariums with the images using glue dots mostly, but also a little bit of liquid glue and a few foam squares at some places. Once everything was attached, I added white highlights on the images to make them pop and stuck my panel on a ground coffee card base.


VIDEO
(click on the picture below)


LAWN FAWN SUPPLIES

Stamp sets - Crazy antics - Dandy day - Critters in the jungle - A bug deal - Butterfly kisses - Open me - Critters down under - Harold's ABCs - Christmas fishes - Offset sayings: birthday - Bugs and kisses - Swan soiréeDie sets - Build an aquarium - Stitched hillside borders - Large slimlineMisc. - Brick stencil - Jet black ink - Glue tube - Double sided tape - Clear embossing ink - White embossing powderCardstock - Vanilla malt - Paper bag - Chocolate bar - Ground coffee


OTHER SUPPLIES
- Spectrum Noir markers - Distress inks: walnut stain, antique linen, evergreen bough, lucky clover, gathered twigs, ground espresso - Sakura white gel pen - 80lb Neenah solar white cardstock - Strathmore bristol smooth cardstock

Isabel Cristina Stamps - Fairies & Mushrooms Slimline Card

lundi 24 août 2020

Hello there,

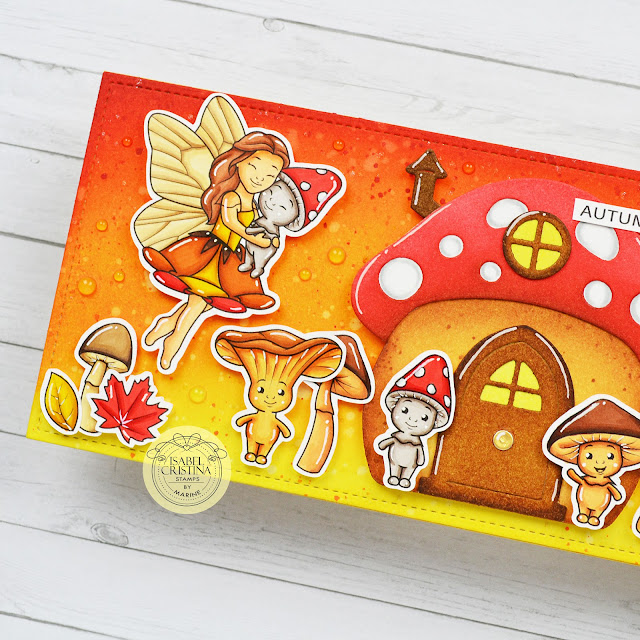
Today I'm showcasing the lovely Fairies and Mushrooms digital stamp set designed by Isabel Cristina Stamps. This set includes the cutest mushrooms ever!


I started by printing and cutting the images, and I colored them using my alcohol markers like always.

When the coloring was done, I cut a slimline panel out of strathmore bristol cardstock and picked some distress inks to create a very bright fall background: squeezed lemonade, spiced marmalade, ripe persimmon and fried brick. Once I was happy with the blending, I splattered water all over the panel that I dried using a paper towel. Next I brought sparkles to the background by splattering liquid stardust everywhere. And finally I added more texture by splattering spiced marmalade and fried brick distress ink mixed with water.


I wanted to give my cute mushrooms a home so I cut some elements to build a mushroom house. The paper is strathmore bristol cardstock again and I used distress inks to colors all the elements.


When the house elements were colored, I assembled everything, and finally attached the mushroom house and the images on my slimline panel using foam tape. I cut the doorknob out of gold cardstock and glued it in the middle of the door. And next I attached my sentiment. And to add a last magical detail, I added morning dew nuvo drops here and there.


VIDEO
(click on the picture below)


SUPPLIES
- Large slimline die by Lawn Fawn
- Mushroom house die set by Lawn Fawn
- Spectrum Noir markers
- Distress inks: squeezed lemonade, spiced marmalade, ripe persimon, fired brick, scattered straw, vintage photo, ground espresso, candied apple
- Sakura white gel pen
- Liquid stardust by Lawn Fawn
- Morning dew nuvo drops by Tonic Studio
- 80lb Neenah solar white cardstock
- Strathmore bristol smooth cardstock

Hello Bluebird - Hey Gnomie

jeudi 20 août 2020

 Hello there,

Today we join some cute gnomes in a lovely place where trees are pink. Like always I started with the coloring. I stamped the images using Potting Soil ink by Ranger, used the coordinating dies to cut them all and my alcohol markers to color everything.

When the coloring was done, I cut the background elements out of Strathmore bristol cardstock using the new Ocean Waves Scene Horizontal die. But I kept just a few of the die cut pieces to build my scene.

And for the background I cut a strathmore bristol panel measuring 8-1/8 x 3,5" and covered it with tattered rose oxide ink to get a nice peachy panel. I added texture by splattering water all over the panel. I dried the paper using a paper towel, and next used ripe persimmon distress ink mixed with water to add some contrast. And finally for a little touch of sparkle, I added golden drops as well.


Next I colored the other background elements using oxide inks and distress inks.

For the tree house, I did the same thing as the background elements: I cut all the pieces and then added contrast and details using distress inks.


Once all my elements were colored and assembled, I attached everything on the background panel using a combination of foam squares, liquid glue and glue dots. And finally I stamped my sentiment 'Hey Gnomie' using Potting Soil ink again, and I also added clear shimmer to the butterfly's wings.


VIDEO

(click on the picture below)


HELLO BLUEBIRD SUPPLIES


Stamp sets

- Next door gnomes

- Garden party

- Picked for you

- Garden friends

- Banner buddies

- Field mice

- Fairy garde,


Die sets

- Treehouse scene

- Ocean waves scene horizontal


OTHER SUPPLIES

- Spectrum Noir markers

- Oxide inks: tattered rose, worn lipstick, frayed burlap

- Distress inks: festive berries, antique linen, aged mahogany, hickory smoke, walnut stain, fossilized amber, ripe persimon

- Potting soil ink by Ranger

- Sakura white gel pen

- Gold watercolor paint from my stash

- Liquid stardust by Lawn Fawn

- Wooden textures cardstock by Simon Says Stamp

- Strathmore bristol cardstock

- 80lb Neenah solar white cardstock

Lawn Fawn - A Sparkly Slimline Card

samedi 15 août 2020

Hi there,

I'm back with some cute unicorns and fairies living in a sweet and enchanted kingdom up in the clouds. This card is kind of a twin of the one I made a few weeks with the giant octopus. Underwater then and un in the clouds now.
I started by stamping, cutting and coloring my images. Next I cut a slimline panel out of strathmore bristol cardstock and used three oxide inks to create the sky: spun sugar, worn lipstick and festive berries.

I covered the entire panel with spun sugar, and to create clouds I used the cloudy stencil along with worn lipstick.

Next I added texture, like always. I first splattered water drops that I dried using a paper towel. And to bring contrast I mixed
 my festive berries ink pad with some water and splattered drops on the paper.

And I added more sparkles to my background by using the starry sky stencil along sugar glitter paste by BoBunny.
Next I cut a bunch of elements to create the castle out of shiny papers. I used foam tape to assemble the pieces and also liquid glue for the smallest elements. And once it was complete, I applied foam tape and liquid glue at its back to attached it on my panel.

I stuck the clouds and added glitter on all of them, and next I attached the remaining images on my panel.
The last step was to add my sentiment 'Hope your day sparkles'. It's from A Little Sparkle, I white heat embossed it on the same shimmery yellow cardstock as the one I used on the castle, and I used a banner die to cut it.

I stuck that banner at the very bottom of my slimline panel, and finally added white highlights on the images.


VIDEO
(click on the picture below)

LAWN FAWN SUPPLIES

Stamp sets
- Unicorn picnic
- All the clouds
- A little sparkle
- Bicycle built for you

Die sets
- Large slimline
- Build a castle
- Flippin' awesome

Cardstock
- Pixie dust
- Shimmer tropical
- Shimmer pastel
- Ballet slippers

Misc.
- Cloudy stencil
- Starry sky stencil
- Clear embossing ink
- White embossing powder
- Chunky glitter
- Jet black ink


OTHER SUPPLIES
- Spectrum Noir markers
- Oxide inks: spun sugar, worn lipstick, festive berries
- Sugar glitter paster by BoBunny
- Sakura white gel pen
- 80lb Neenah solar white cardstock
- Strathmore bristol smooth cardstock

Hello Bluebird - Magical Fairy Dance

mercredi 12 août 2020

Hey there, Marine here with a magical card featuring some lovely dancing fairies. I started by stamping all the images on 80lb Neenah solar white cardstock using an alcohol marker friendly black ink, I cut them all using the coodinating dies and colored them using my alcohol markers.

From last release, I used images from two sets: Fairy Dance and Garden Party. And from previous releases, I used 

When the coloring was done, I cut all the background elements out of Strathmore bristol smooth cardstock using the new Fairy Glade Scene Horizontal die and colored them using distress inks:

  • mushroom heads: spun sugar & picked raspberry (+ picked raspberry (mixed with water) splatters)
  • mushroom body: tumbled glass & wilted violet (+ wilted violet (mixed with water) splatters)
  • leaves: shaded lilac & wilted violet (+ blueprint sketch (mixed with water) splatters)

I also cut a panel measuring 8-1/8 x 3-1/8 inches for my background that I colored tumbled glass, blueprint sketch, chipped sapphire and black soot distress inks. I splattered water all over the panel and used a paper towel to dry it and this way create stars in my night sky. And to make that sky very shiny, I used liquid stardust that I splattered all over the panel as well. And my night sky definitely needed more contrast so I mixed some black soot distress ink with water and created drops at the top of my panel on the darkest parts.

Finally I colored the hills using wilted violet and chipped sapphire distress inks to stay in the magical mood. And I added black soot splatters on those pieces as well.


Before assembling all the elements, I still needed to back the mushrooms so I glued those pieces of white glitter cardstock and trimmed them off. Next I attached the background elements on my panel using foam to create nice dimension. And the images were stuck using liquid glue, foam squares and glue dots.

Next I used my misti tool and black versafine ink to stamp my sentiment 'Have a magical day' and then I added clear shimmer to the fairies hair to give them silver hair. And the last details: white blizzard nuvo drops on the wings, and a bunch of morning dew nuvo drops here and there to make the scene more magical.

And that's it, a magical land where you can play music and dance all day long. I leave you with the video (click on the picture below) and wish a very nice day. See you next time!


VIDEO

(click on the picture below)


HELLO BLUEBIRD SUPPLIES

Fairy dance stamp set

- Garden party stamp set

- Fairy Glade Scene Horizontal die


OTHER SUPPLIES

- Spectrum Noir markers - Distress inks: tumbled glass, blueprint sketch, chipped sapphire, black soot, spun sugar, picked raspberry, shaded lilac, wilted violet - Sakura white gel pen - Pixie dust cardstock by Lawn Faw, - Strathmore bristol smooth cardstock - 80lb Neenah solar white cardstock - Liquid stardust by Lawn Fawn - Jet black ink by Lawn Fawn (for the images) - Black versafine ink (for the sentiment) - Clear shimmer pen by Spectrum Noir - White blizzard nuvo drops by Tonic Studio - Morning dew nuvo drops by Tonic Studio

Impronte d'Autore - Harry Potter Magic Iris Card

dimanche 9 août 2020

Hello there,

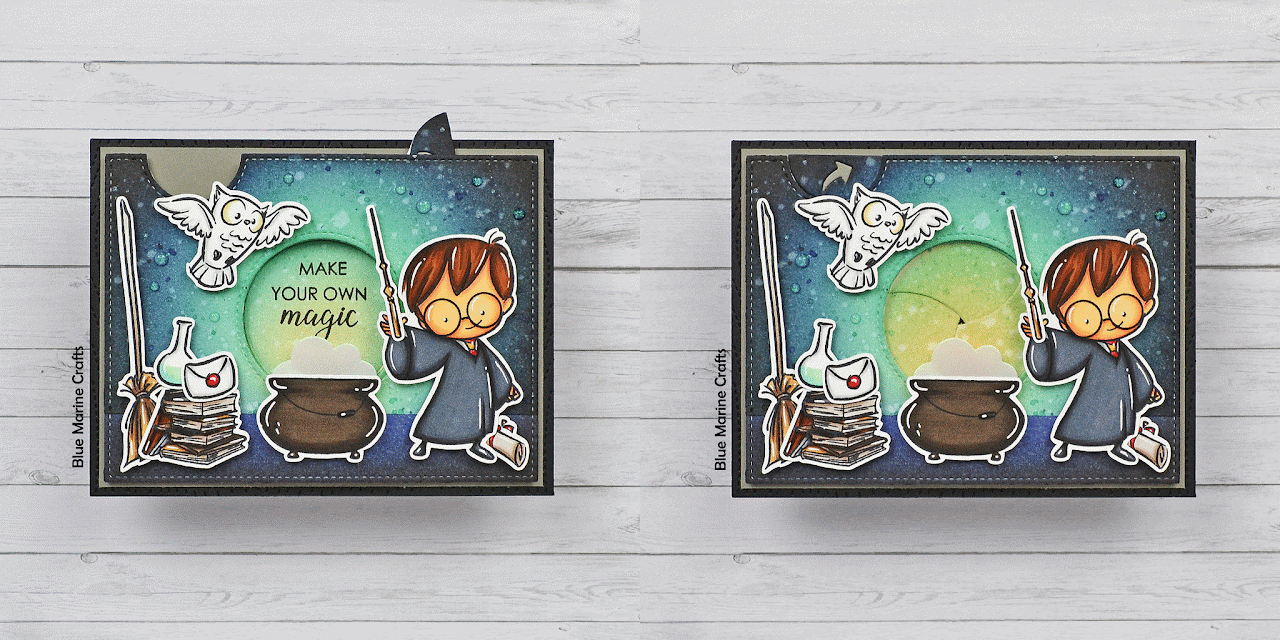
Today's card features some super cute images from the Always Believe in Magic and You Are Magical stamp sets by Impronte d'Autore.


I started by stamping the images on 80lb neenah solar white cardstock using memento tuxedo black ink, I cut them all using my Scan 'n Cut and colored everything using my alcohol markers.


When the coloring was done, I moved on to the background. I cut the main panel and the arrow handle out of Strathmore bristol cardstock, I kept everything together using washi tape at the back, and used distress inks to create a dark and magical background: antique linen, evergreen bough, chipped sapphire and black soot.

For the texture, I first added water drops that I dried using a paper towel. Next I smooshed my evergreen bough, chipped sapphire and black soot ink pads onto my glass surface, I added water and splattered drops on the paper. And finally I added a bunch of liquid stardust drops because every magical card needs sparkles.

I let the panel dry and next I colored the bottom. I applied washi tape right above that section and used chipped sapphire and black soot distress inks to create the floor.


To create the magic iris, I started by cutting all the pieces: 3 rings, 3 sausages, 2 tabs and 3 stabilizers. And to match the front panel, I applied some evergreen bough distress ink on the inside of each circle. And I encourage you to watch the video below to see the process of making the mechanism.


Next. I wanted the inside of the iris to match the circle I colored at the beginning along with the main panel. So I used antique linen and evergreen bough distress inks again to make the iris the same as the circle. And of course I added the same textures.

When the iris was dry, I applied double sided tape as well as liquid glue on the front of the ring, I placed the main panel on top, trying to align everything nicely and I pressed down to stick the panel to the magic iris.


I cut a 5,5 x 4,25" card base, a black wooden backdrop and a grey rectangle a little bit smaller than the backdrop, and I attached those elements on top of the other.

Next I opened the iris and placed it on the card base, I applied liquid at the back of the circle and tucked it right in the middle of the panel.

I placed the card base in my misti tool and stamped my sentiment 'Make your own magic', and next I attached the main panel using foam tape.


To create smoke above the cauldron, I cut a cloud out of some pearlescent vellum that I attached at the back of it using liquid glue. And next I stuck everything using foam tape. Finally and to make the scene a little bit more magical, I added some white blizzard nuvo drops.


VIDEO
(click on the picture below)


SUPPLIES
- Magic iris die set by Lawn Fawn
- Magic iris add-on by Lawn Fawn
- Stitched wooden backdrop by Lawn Fawn
- Spectrum Noir markers
- Distress inks: antique linen, evergreen bough, chipped sapphire, black soot
- Liquid stardust by Lawn Fawn
- Sakura white gel pen
- 80lb Neenah solar white cardstock
- Strathmore bristol smooth cardstock
- Narwhal + Black licorice cardstocks by Lawn Fawn
- Pearlescent vellum by Lawn Fawn
- Memento tuxedo black ink
- White blizzard nuvo drops by Tonic Studio

Simon Says Stamp + Isabel Cristina Stamps - A Magical Flippin Awesome Card

jeudi 6 août 2020

Hey there,

Today's card is very special because the cute Unicorn Love stamp set I used on this card was designed by Isabel Cristina Stamps and it is now available at Simon Says Stamp as a clear stamp set! How exciting!


I first cut the images using my Scan 'n Cut machine and then I colored everything using my alcohol markers. When it was done, I added clear shimmer to the rainbow and unicorns mane, and also some white dots using a gel pen in order emphasize the sparkly effect.


For the background, I cut a 5,5 x 4,25" panel and covered it with blueprint sketch oxide ink to get a nice and even base. Next I added chipped sapphire at the top and edges, and also a little bit of black soot oxide ink on the edges to make the sky even darker.

Next I added texture: water drops + liquid stardust + drops of black soot mixed with water.


I cut a flippin panel, as well as four squares and colored those elements using blueprint sketch oxide ink + same textures.

Next I folded the lines and tabs on the flippin panel using a bone folder. I attached the four squares, as well as cloud borders.


I stuck my flippin element on the night sky panel. And next I created my sentiment. I white heat embossed the first part 'Hope your day is' using the Unicorn Tales by Hello Bluebird. And for the second part, I cut the word 'magical' using the Harold's ABCs die set by Lawn Fawn. I used white cardstock to cut those letters and I stuck them as a base. And I cut the letters again using a yellow glitter cardstock and I attached those letters on top of the first ones.


Next I finally attached the unicorns, one on each flap, using glue dots. I stuck the arrow handle at the end of the flippin element, and I stuck my panel on a blue card base. And finally I added a few morning dew drops here and there to bring more shine to the sky.


VIDEO
(click on the image below)


SUPPLIES
- Spectrum Noir markers
- Oxide inks: blueprint sketch, chipped sapphire, black soot
- Flippin awesome die set by Lawn Fawn
- Large stitched rectangle stackables die set by Lawn Fawn
- Puffy cloud border die set by Lawn Fawn
- Harold's ABCs die set by Lawn Fawn
- Unicorn tales stamp set by Hello Bluebird
- Liquid stardust by Lawn Fawn
- Sakura white gel pen
- Clear glitter pen by Spectrum Noir
- Morning dew nuvo drops by Tonic Studio
- Clear embossing ink by Lawn Fawn
- White embossing powder by Lawn Fawn
- Strathmore bristol smooth cardstock
- 80lb Neenah solar white cardstock
- Yello shimmer cardstock by Lawn Fawn
- Pearlescent vellum by Lawn Fawn

Lawn Fawn - Surfing Santa Sliding Card

dimanche 2 août 2020

Hi there,

We all know that time flies and before we realize, fall will be here and next of course Christmas time. So Santa has decided to take some relaxing time to recharge his batteries and to be perfectly up for the holiday season.


I started with a total customization of Santa. I stamped him using Jellyfish ink, a very light ink, and used a pencil to draw a vintage swimsuit and I also


Sand border: antique linen + vintage photo
Wavy boder: tumbled glass + peacock feathers
Ocean wave border: peacock feathers + blueprint sketch

After the borders I moved on to the rectangle, and used tumbled glass and salty ocean distress inks along with the cloudy stencil to create a simple and pretty sky.


VIDEO
(click on the image below)


LAWN FAWN SUPPLIES

Stamp sets
- All the clouds
- Crazy antics
- Ocean shell-fie
- Ho ho holidays
- Yeti or not
- Critters from the past
- Dad + me
- On the beach
- You are sublime
- Keep on swimming
- Fintastic friends

Die sets
- Large stitched rectangle stackables
- Stitched simple wavy borders
- Stitched wavy borders
- Slide on over waves

Misc.
- Cloudy stencil
- Jet black ink


OTHER SUPPLIES
- Spectrum Noir markers
- Distress inks: scattered straw, vintage photo, tumbled glass, peacock feathers, blueprint sketch, salty ocean
- Sakura white gel pen
- 80lb Neenah solar white cardstock