Lawn Fawn - Using the Peekaboo Pop-Up to Extend a Scene

mardi 30 août 2022

Hello there,

I'm so happy to be back with this super cute apple themed card. We meet the mouse family again, this time they're busy picking apples and selling yummy things that they have baked in their lovely apple house!

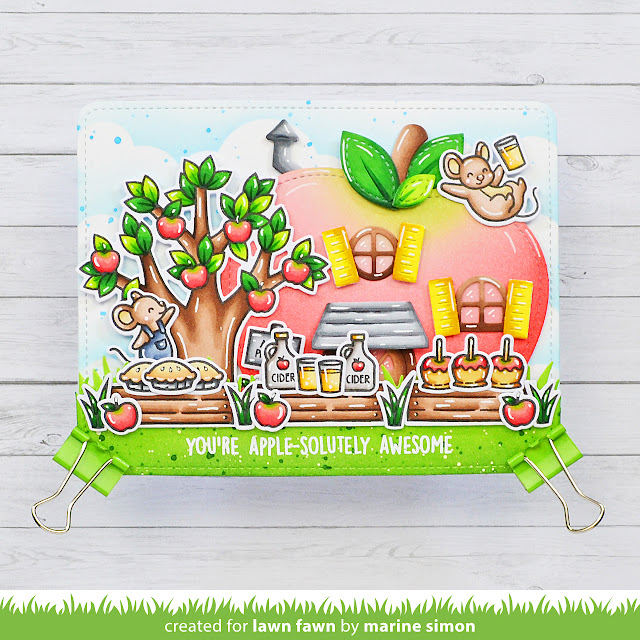
I started by stamping all the images using Jet black ink, and I colored everything using my alcohol markers. Next I cut them all using the coordinating dies and moved on to the background.

I used the main die from the Peekaboo pop-up die set, and used it in a different way than it's supposed to be. So I cut one main panel and turned it to place the score lines at the bottom. I used the same die again to cut another piece of panel, and from that second panel I cut a grass border. Please check the process video down below for more information.


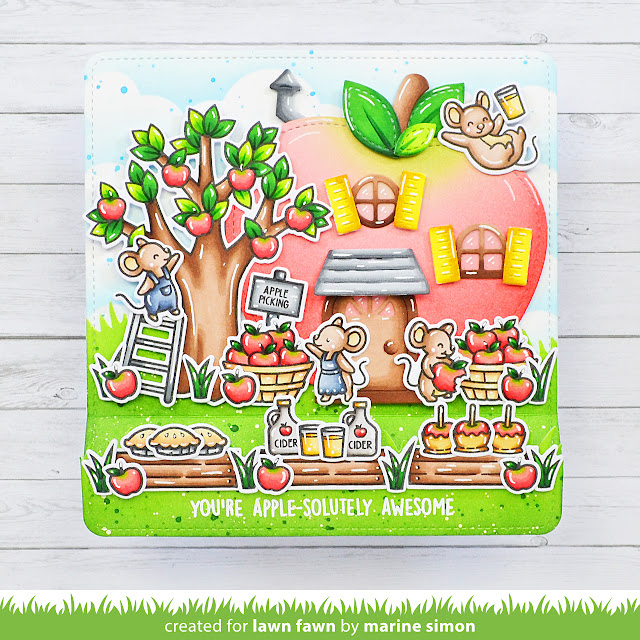
I colored the grass border using mowed lawn and rustic wilderness distress inks, and added a little bit of texture using rustic wilderness oxide ink mixed with water, as well as copic opaque white ink mixed with water. Next I colored the main panel. The lower part using a grass stencil along with mowed lawn & rustic wilderness distress inks, and the upper part using the cloudy stencil along with tumbled glass & salty ocean distress inks.


Next I cut all the different elements to create the apple house. I colored the apple itself using saltwater taffy, abandoned coral and candied apple distress inks, and colored the smallest pieces using my alcohol markers. Next I white heat embossed my sentiment on the grass border, and added vellum at the back of the door and windows, and then I started to assemble everything.


I started by folding the score lines on the main panel: the upper score line to form a valley, and the lower score line to form a mountain. I stuck the grass border at the bottom of the panel using double sided tape, and then I attached all the pieces on the panel, starting with the apple house, and next the apple tree, the mice and all the bits and pieces to bring life to this little scene. Finally I attached my panel to a 5,5 x 4,25" white card base.


VIDEO


LAWN FAWN SUPPLIES

Stamp sets
- Apple-solutely awesome
- Berry special
- You autumn know
- A creature was stirring
- Garden before 'n afters
- Swan soiree
- Toadally awesome

Die sets
- Peekaboo pop-up
- Outside in stitched apple
- Pumpkin house
- Mushroom house
- Build a castle
- Scalloped treat box beach add-on
- Grassy hillside

Misc
- Jet black ink
- Clear embossing ink
- White embossing powder
- Grassy stencil
- Cloudy stencil
- Vellum


OTHER SUPPLIES
- Spectrum Noir markers
- Graph'it brush markers
- Distress inks: mowed lawn, rustic wilderness, tumbled glass, salty ocean, saltwater taffy, abandoned coral, candied apple
- Copic opaque white ink
- Sakura white gel pen
- Strathmore bristol smooth cardstock

[CLOSED] Sunny Studio 7th Birthday Blog Hop + Giveaway

vendredi 26 août 2022


Hi there,

Today is a very special day because we are celebrating two things: Sunny Studio 7th birthday, and the release of the Fall & Winter 2022 collection! Woohoo!! This new release is absolutely amazing, so many cute and fun designs for Fall, Halloween and Christmas. I personally fell in love with the Squirrel friends, they're just so adorable and so unique, and that's why I chose to showcase them today.

Please scroll down for more information & details about this blog hop + giveaway!


So as always I started off by stamping all my cute images using an alcohol marker friendly black ink, I cut them all using the coordinating dies and then colored everything using my trusty alcohol markers. Besides the images from Squirrel friends, I also picked the branch from Little birdie.

Once the coloring was done, I cut an 8,5 x 3,5" slimline panel, and colored it using oxide inks. At the very bottom of the panel, I created a grass border using a grass stencil by Lawn Fawn along with shabby shutters & peeled paint oxide inks. And on the rest of the panel, I created a bright autumn sky using scattered straw, spiced marmalade, ripe persimmon and candied apple.

*****

SUNNY STUDIO'S 7th BIRTHDAY BLOG HOP DETAILS


Sunny Studio is offering a 20% off branded products (excluding clearance and new release products) using discount code SEVENYEARS at checkout through August 31th. One discount code per order. And a free mini acorn ornament die will be automatically included in all orders (while supplies last)


During this hop, you also have the opportunity to win a $25 gift card to sunnystudiostamps.com on each Design Team member blog. All you have to do is to leave a comment under this blog post, and under each Design Team member blog post for a chance to win a prize. I will pick a winner among the comments I get. This giveaway runs through August 31st, and all the winners will be announced on Sunny Studio's blog on Sept 4th.

Check the links below to hop along:


And if you leave a comment on each Sunny Studio Fall & Winter Release introduction blog post, it will give you more chances to win a $25 gift certificate! Here are the links to those blog posts:


Good luck, and happy shopping!

*****


Next I attached all the images on my slimline panel using foam squares, and then I created my sentiment. I cut the word "Nutty" using a die from the Nutty for you die set and stuck it on the panel. I white heat embossed the words "You're a little" above it + "& I love it" below it. And as always I finished my card by adding white highlights and details to the images.


VIDEO


SUNNY STUDIO SUPPLIES
- Squirrel friends stamp set
- Little birdie stamp set
- Nutty for you die set


OTHER SUPPLIES
- Spectrum Noir markers
- Graph'it brush markers
- Oxide inks: scattered straw, spiced marmalade, ripe persimmon, candied apple, shabby shutters, peeled paint
- Copic opaque white ink
- Sakura white gel pen
- Clear embossing ink by Lawn Fawn
- Fine white embossing powder by Hero Arts
- Grass stencil by Lawn Fawn
- Slimline die by Lawn Fawn
- Peacock cardstock by Lawn Fawn
- Strathmore bristol smooth cardstock

Sunny Studio - Clean & Simple Golden Butterflies Cards

jeudi 18 août 2022

Hey there,

I'm thrilled to be back on Sunny Studio's blog with this duo of cute and bright cards. They feature the butterfly stamp from the Watering can stamp set, I didn't get a chance to use that stamp before, and I thought it would be nice to use it with rainbow colors.


I started by cutting a 6 x 3" mini slimline white panel, and an 8,5 x 3,5" slimline white panel. On the mini slimline panel I printed texture using the Moroccan circles embossing folder, and on the slimline panel I added texture by creating lines each quarter of an inch using a ball tool.

I gold heat embossed a bunch of butterflies on vellum, and I cut them using the coordinating die. I used that same coordinating die to cut colorful butterflies. And I white heat embossed a "Thinking of you" sentiment from Watering can on a black banner.


Next I assembled the cards. On the mini slimline panel, I added a vertical row of butterflies. I first attached plain butterflies in a rainbow order using foam squares, tucked my "Thinking of you" sentiment between two butterflies, and then stuck a golden butterfly on each plain butterfly using liquid glue.


And on the slimline panel, I stamped a simple "Hello" sentiment from Lovely lilacs, attached plain butterflies in zigzag using foam squares, and then added a golden butterfly on each plain butterfly. And I finished both cards by gluing clear droplets to bring more light.


VIDEO


SUNNY STUDIO SUPPLIES
- Watering can stamp set
- Moroccan circles embossing folder
- Lovely lilacs stamp set


OTHER SUPPLIES
- White cardstock from my stash
- Colored cardstock by The Stamp Market
- Black licorice cardstock by Lawn Fawn
- Clear embossing ink by Lawn Fawn
- Fine white embossing powder by Hero Arts
- Gold embossing powder by Lawn Fawn
- Black versafine ink
- Clear droplets by Studio Katia

Sunny Studio - Watering Can & Sunflower Layering Stamps

jeudi 11 août 2022

 Hey there,

I'm super happy to be back this week on Sunny Studio's blog with another stamp layering card! Today I'm showcasing the Watering can stamp set again, but this time, I'm putting some beautiful sunflowers from the Sunflower fields stamp set in it. A good way to officially start making fall cards!


I started by stamping the watering can. I wanted it to bring a bold contrast with the sunflowers, so I stamped it using dark blue inks. Next I stamped some sunflowers and leaves, and to make sure that I was layering the stamps correctly, I used the guide on the Sunflower fields page to help me line up everything. And just like the Lovely lilacs card I shared last week, I used Lawn Fawn dye inks to stamp all the images:

- Watering can: blue jay + deep sea
- Sunflowers: butter + lemonade + sunflower + doe + walnut
- Leaves: celery stick + freshly cut grass + jalapeno


Next step was to create the background. I cut a Quilted heart portrait panel out of bristol cardstock, and used salvaged patina, peacock feathers and blueprint sketch oxide inks to color it. I added lots of texture to that panel, and once it was dry, I attached it to a piece of white cardstock.

I stuck the watering can and the sunflowers using 1mm and 2mm foam squares, and next I added my sentiment. I white heat embossed the "Autumn blessings" sentiment from Happy harvest on black cardstock, trimmed it into a small banner and added a piece of white cardstock to create an outline, and used clear foam squares to stick that banner on the panel.

I attached the panel to a white card base, and finally glued a few clear droplets here and there to bring a touch of shine to the card. And that's it, super pretty and bright, I hope that you like it. I have a process video for you, so feel welcome to watch it for more information. Thank you so much for stopping by, and see you next week!


VIDEO


SUNNY STUDIO SUPPLIES
- Watering can stamp set
- Sunflower fields stamp set
- Quilted hearts portrait die
- Happy harvest stamp set


OTHER SUPPLIES
- Oxide inks: salvaged patina, peacock feathers, blueprint sketch, chipped sapphire
- Lawn Fawn dye inks: blue jay + deep sea, butter + lemonade + sunflower + doe + walnut, celery stick + freshly cut grass + jalapeno
- Copic opaque white ink
- Clear embossing ink by Lawn Fawn
- Fine white embossing powder by Hero Arts
- Clear droplets by Studio Katia
- Black licorice cardstock by Lawn Fawn
- Strathmore bristol smooth cardstock

Sunny Studio - Lovely Lilacs Layering Stamps Shaker Card

jeudi 4 août 2022

 Hello there,

I'm so happy to be back on Sunny Studio's blog with a new shaker card, I just can't help myself they're so fun and easy to make, showcasing the gorgeous Lovely lilacs stamp set, as well as the Watering can stamp set.

I started off with the layering and stamping process of the images. I used dye inks by Lawn Fawn to stamp all the images, and when I use layering stamps for the first time, I always like to prep the stamps, meaning that I first add clear embossing ink on the stamp, next I clean the stamp and then I apply the chosen colored ink. Adding clear embossing ink first helps the colored ink to get a good grip on the stamp and this way the stamping is more precise and the result consistent.

And one amazing thing about Sunny Studio's layering stamp sets is that there is a guide on the products pages to help us line up the stamps correctly and get a beautiful result! So easy and useful!

Next I created the Watering can. It has only two layers, and I used two shades of yellow in order to compliment the lilac flowers nicely.

Here are the Lawn Fawn inks I used to create the flowers & watering can: 
- flowers: fresh lavender + grape soda + grape jelly + sugarplum
- leaves: celery stick + freshly cut grass + doe
- watering can: lemonade + sunflower


Next I created the shaker panel. I cut a 5,5 x 4,25" panel out of a Sweater weather pattern paper, and cut a Stitched arch window out of it. And I also cut a 5,5 x 4,25" bristol panel that I colored using shaded lilac oxide ink.

I attached a piece of acetate at the back of the window panel, and added four layers of foam tape at the back of it, on the four edges. Next I applied powder inside the window, all along the foam edges, that makes the foam edges non sticky so the sequins don't stick to it. Quickly cleaned the acetate to get rid of any excess of powder, and then added a mix of purple & dark blue sequins + Clear jewels inside the window. 

I peeled the backing papers off the foam tape, and attached the shaded lilac panel to totally close and complete the shaker panel. And next I attached the watering can and flowers using 1mm and 2mm foam squares.

For my sentiment, I cut a banner out of vellum using a die from the Stitched rectangles die set, and I white heat embossed the "Thinking of you" sentiment from the Watering can stamp set on it, and I attached that banner on the bottom right hand corner of the panel using clear foam squares.

And to totally finish the card, I added a few clear droplets here and there to catch the light and bring more shine. And that's it! I love those beautiful lilac flowers, how the colors coordinate nicely with the watering can and background, and I hope that you like it too. As always, you are more than welcome to check the process video for more details and information. Thank you so much for stopping by, and see you next week!


VIDEO


SUNNY STUDIO SUPPLIES
- Lovely lilacs stamp set
- Watering can stamp set
- Stitched arch die set
- Stitched rectangles die set
- Sweater weather 6x6 paper pack
- Clear jewels


OTHER SUPPLIES
- Oxide inks: shaded lilacs, blueprint sketch
- Lawn Fawn dye inks: fresh lavender, grape soda, grape jelly, sugarplum, celery stick, freshly cut grass, doe, lemonade, sunflower
- Copic opaque white ink
- Clear embossing ink by Lawn Fawn
- Fine white embossing powder by Hero Arts
- Vellum by Lawn Fawn
- Clear droplets by Studio Katia
- Sequin mix by Pinkfresh Studio

Lawn Fawn - BBQ Magic Picture Changer Card

Hi there,

I'm thrilled to be back on Lawn Fawn YouTube Channel and Blog with this new super cute and fun scene. Today we are the witnesses of a theft, the neighborhood doggies have joined forces against the humans to steal some delicious grilled sausages.

When I make a Magic picture changer card, I always start by making the background, so this is what I did. I cut a 5,5 x 4,25" bristol panel, and used stencils along with oxide inks to create my background. For the bottom part, I used the Grassy stencil with mowed lawn + rustic wilderness to make two grass borders. For the middle part, I used the Skinny stripes stencil with tea dye + vintage photo + ground espresso to make a wooden fence. And for the top part I used the Cloudy stencil with tumbled glass + salty ocean to make a simple sky.

Next I used the frame die from the Magic picture changer die set to cut a frame out of my background panel. And then I created the interactive element. I invite you to watch the process video down below to see exactly how it was done.


I stamped some additional images using Jet black ink, I cut them all using the coordinating dies, and colored everything using my alcohol markers. Next I attached the frame on the interactive pocket, and then I assembled the different elements on a card base: the interactive pocket using double sided tape, the remaining piece of background panel using foam tape, and all the images using foam squares and liquid glue.

The corners and legs of the barbecue were hidden because of the interactive mechanism, so to fix that, I stamped and colored an additional barbecue, and I stuck it on the card.


For the sentiment I stamped the words "It's time to" on the upper part of the panel, and I cut some letters using Henry's ABCs to make the word "Pawty" that I attached above the dogs using liquid glue. And the final step, I cut the decorative handle out of turquoise cardstock, folded it in half and attached it at the end of the pull tab using liquid glue, and I added the arrow that I cut out of yellow cardstock right in the middle.


VIDEO


LAWN FAWN SUPPLIES

Stamp sets
- Simply celebrate critters
- Let's BBQ
- Beary rainy day
- Furry & bright
- A creature was stirring
- Tea-rrific day add-on

Die sets
- Magic picture changer + add-on
- Large stitched rectangle stackables
- Henry's ABCs

Misc
- Jet black ink
- Grassy stencil
- Skinny stripes stencil
- Cloudy stencil
- Textured canvas orange cardstock
- Textured canvas aqua cardstock
- Sticky note cardstock
- White cardstock
- Post-it notes


OTHER SUPPLIES
- Spectrum Noir markers
- Graph'it brush markers
- Oxide inks: mowed lawn, rustic wilderness, vintage photo, ground espresso, tumbled glass, salty ocean
- Distress ink: tea dye
- Copic opaque white ink
- Sakura white gel pen
- Strathmore bristol smooth cardstock