Affichage des articles dont le libellé est theme: encouragement. Afficher tous les articles

Lawn Fawn - Bold & Bright Butterflies

mardi 3 mars 2026

Hello there,

I'm thrilled to be back with this trio of colorful and bold butterfly themed cards featuring a mix & match of Lawn Fawn items from different years: the gorgeous Butterfly Background stencil set and the Scripty Thinking Of You die + Outline Add-On from the February 2026 release, and the amazing Layered Butterflies die set from an older release to create three magnificent butterflies. Three pretty simple cards, easy and quick to mass produce, but still very catchy for the eye with the contrast between the black elements and the bright colors.


I started off by creating my three backgrounds. I cut three panels out of Strathmore bristol smooth cardstock using the largest Outside In Stitched Rectangle Stackables die, and on each panel I masked the stitched edges off with washi tape.


On each panel I first created a soft cloudy background using the Cloudy stencil along with oxide inks: scattered straw for the orange butterfly card, salvaged patina for the blue butterfly card and kitsch flamingo for the purple butterfly card. Next I used the Butterfly Background stencil set on each panel to create three gorgeous butterfly patterns:

• on the orange butterfly card, I applied fossilized amber oxide ink with stencil #1, added a bit of orange in the center of each butterfly using ripe persimmon oxide ink, used my fossilized amber blending tool to mix the colors, and repeated that process until I was happy with the blending. I removed the stencil #1 and lined up the stencil #2 on top of the butterflies and applied black soot oxide ink all over the stencil. I removed that second stencil and added texture to my panel: I mixed copic opaque white ink with water and used a slim brush to add white splatters all over my panel, and I did the same with Liquid Stardust,


• on the blue butterfly card, I applied salvaged patina oxide ink with stencil #1, added a bit of turquoise in the center of each butterfly using peacock feathers oxide ink, used my salvaged patina blending tool to mix the colors, and repeated the process several times. I removed the stencil #1 and lined up the stencil #2 on top of the butterflies and applied black soot oxide ink all over the stencil. I removed that second stencil and added the same texture I added to my first panel,


• on the purple butterfly card, I applied picked raspberry oxide ink with stencil #1, added a bit of purple in the center of each butterfly using wilted violet oxide ink, used my picked raspberry blending tool to mix the colors, and repeated the process several times. I removed the stencil #1 and lined up the stencil #2 on top of the butterflies and applied black soot oxide ink all over the stencil. I removed that second stencil and added the same texture I added to the other panels.


When they were dry, I cut three Large Stitched Rectangle Stackables panels out of Black Licorice cardstock, attached each butterfly panel to one of those black panels using double sided sticky tape, and then each black panel to a matching card base.

Next I cut my Layered Butterflies pieces: three intricate butterfly wings out of Black Licorice cardstock, three whole butterflies out of Strathmore bristol smooth cardstock, three whole butterflies out of Vellum, and nine butterfly bodies out of Storm Cloud cardstock.


With the nine butterfly bodies, I created three bodies just by sticking three bodies on top of each other using liquid glue. On the vellum butterflies, I added white splatters. On each white panel, I used the same oxide inks as the ones I used to make the backgrounds and added the same textures. And when everything was dry, I assembled my three butterflies: I attached each body to an intricate butterfly, each intricate butterfly to a colorful butterfly using liquid glue, each colorful butterfly to a vellum butterfly, all of this using liquid glue. When the glue was dry, I bent the wings of each butterfly to add dimension, and finally stuck a black pearl at the top of each butterfly's body.


Next I created three identical greetings using the Scripty Thinking Of You die and the Scripty Thinking Of You Outline Add-On. For each card, I cut the shadow element out of Vellum, and cut "Thinking Of You" three times out of Black Licorice cardstock. I attached each word on top of each other to get some nice dimension, and then stuck them to the vellum shadow piece using liquid glue. Finally I attached a butterfly and a greeting to each card using foam squares.


VIDEO


LAWN FAWN SUPPLIES
- Butterfly background stencil set
- Scripty thinking of you die
- Scripty thinking of you outline add-on die
- Layered butterflies die set
- Large stitched rectangle stackables die set
- Outside in stitched rectangle stackables die set
- Vellum
- Black licorice cardstock
- Storm cloud cardstock
- Cloudy stencil
- Liquid stardust


OTHER SUPPLIES
- Oxide inks: black soot, scattered straw, fossilized amber, ripe persimmon, salvaged patina, peacock feathers, kitsch flamingo, picked raspberry, wilted violet
- Copic opaque white ink
- Glossy accents by Ranger
- Onyx pearls by Pretty Pink Posh
- Strathmore bristol smooth cardstock (backgrounds)

Sunny Studio - Black Swan Themed Card

vendredi 1 août 2025

Hello there,

I'm happy to be back with this Black Swan ballet themed card featuring the Tiny Dancers by Sunny Studio. This ballet is my all-time favorite, I like the story and the music, so I definitely had to turn my dancers into swans.

I started off by stamping five Tiny Dancers on 110lb Neenah solar white cardstock using an alcohol marker friendly black ink, I cut them using the matching dies, and colored everything using my Ohuhu markers and my Graph'it brush, using light greys for the white swans and dark greys for the black swan. And when the coloring was done, I added highlights and details to the images using a white gel pen.

Next I cut a square panel out of a Classic Sunburst black paper using the largest Stitched Square die, and I added lots of textures to my piece of paper. I mixed copic opaque white ink with water and used a slim brush to add splatters all over the panel to bring brightness. I did the same with black soot distress ink for contrast, and finally added splatters of brushed pewter mica spray for sparkles.

Once my panel was dry, I cut a scalloped frame out of white shimmer cardstock using the largest Fancy Frames Square die, and attached that frame to my panel using 1mm foam squares.

For my greeting, I first heat embossed "When you stumble, make it part of the" from Tiny Dancers in white, on the upper part of my panel. Next I cut the word "Dance" twice using the Chloe Alphabet die set, out of black glittery cardstock and out of white cardstock. I glued each black shiny letter to its matching white letter using liquid glue, shifting them a little bit to create a white border, and then I attached the letters using 1mm foam squares.

I stuck my Tiny Dancers using 1mm foam squares for the ones in the back and 2mm foam squares for the ones on the front, glued a scattering of small silver star confetti, and finally attached my panel to a white card base.


SUNNY STUDIO SUPPLIES: Tiny Dancers stamp set - Chloe Alphabet die set - Fancy Frames Square die set - Stitched square die set - Classic Sunburst Black paper

OTHER SUPPLIES: Ohuhu markers - Graph'it brush markers - Black soot distress ink - Brushed pewter mica spray - Copic opaque white ink - Sakura white gel pen - Memento tuxedo black ink - Clear embossing ink by Lawn Fawn - Fine white embossing powder by Hero Arts - Glitter black cardstock by Concord & 9th - Silver star confetti from my stash - 110lb Neenah solar white cardstock (images)

Lawn Fawn - Magical Pull 'n Slide Card

mardi 27 mai 2025

Hi there,

I'm super happy to be back on the Lawn Fawn YouTube Channel & Blog with this magical Pull 'n Slide card featuring beautiful rainbows, two sweet unicorns and many fairies having fun up in the clouds.


I started off by stamping the images on 110lb Neenah solar white cardstock using Jet Black ink. I cut them all using the matching dies, and colored everything using my Ohuhu markers. As always, here is a detailed list of the stamp sets I used: • All The Clouds - clouds, big and small rainbows • A Little Sparkle - unicorn, fairies • My Rainbow - rainbow • Unicorn Picnic - unicorn, long cloud, fairies.

Once the coloring was done, I added highlights and details to the images using a white gel pen.


I cut three panels out of Strathmore bristol smooth cardstock using the Pull 'n Slide die set: the main panel panel, the pull tab panel, and the inside panel. I worked on the main panel first, masked the stitched details on the edges using washi tape, covered the entire panel with salvaged patina oxide ink, and then added clouds to my panel using the Stratus Cloud Background stencil along with peacock feathers oxide ink. I splattered water all over the panel and dried it with a paper towel. I mixed some peacock feathers oxide ink with water and used a slim brush to add blue splatters to the panel, and then did the same with copic opaque white ink.


Next I worked on the pull tab panel, masked the stitched details on the edges as well, and created the same cloudy background as the one I did on the main panel. And then, I cut a 4,75 x 3,5 inches panel (same measurements as the main panel) and again, I created the same background on that panel.


I assembled my Pull 'n Slide panel very easily, and I invite you to watch the process video down below to get all the details. And when it was done, I attached the images using 1mm and 2mm foam squares. I cut the decorative handle out of Mermaid cardstock and Shimmery Aqua (Gemstone pack) cardstock, folded the main piece on the score line, and then attached both pieces at the top of the pull tab panel using liquid glue.


Next I created the card base and cut three different panels: a large Small Stitched Rectangle Stackables panel out of Holographic cardstock, a large Outside In Stitched Rectangle Stackables panel out of Shimmery Aqua cardstock, and a Large Stitched Rectangle Stackables panel out of Mermaid cardstock. I layered and attached those three panels on top of each other using liquid glue, stuck my interactive panel on top using 1mm foam tape, and then the whole thing to a white card base using liquid glue.


VIDEO


LAWN FAWN SUPPLIES
- All the clouds stamp set
- A little sparkle stamp set
- My rainbow stamp set
- Unicorn picnic stamp set
- Pull 'n slide die set
- Small stitched rectangle stackables die set
- Outside in stitched rectangle stackables die set
- Large stitched rectangle stackables die set
- Everyday sentiment banner die set
- Stratus clouds backgrounds stencil
- Jet black ink
- Liquid stardust
- Mermaid cardstock
- Holographic cardstock
- Shimmery turquoise (gemstone pack)


OTHER SUPPLIES
- Ohuhu markers
- Oxide inks: salvaged patina, peacock feathers, black soot
- Copic opaque white ink
- Sakura white gel pen
- White blizzard nuvo drops
- Glossy accents by Ranger
- 110lb Neenah solar white cardstock (images)
- Strathmore bristol smooth cardstock (background)

Sunny Studio - Color My World 3D Card

jeudi 10 août 2023

Hey there,

I'm thrilled to be back on Sunny Studio's blog today with this super colorful 3D card featuring crayons that I created using stamps from Color My World. Even before figuring out which design I wanted to make for my card, I knew that I wanted to have my crayons in rainbow order.


So I pulled out all my Lawn Fawn premium dye inks, and stamped a bunch of crayons. I used the first three layers to build the colorful parts of the crayons, and then added the black details. Here are the inks I used for each crayon:

- Red: peachy keen + wild rose + guava
- Orange: peach fuzz + carrot + fate tan
- Yellow: butter + lemonade + sunflower
- Green: celery stick + freshly cut grass + jalapeno
- Aqua: kiddie pool + mermaid + peacock
- Blue: moonstone + forget me not + blue jay
- Purple: fresh lavender + grape soda + grape jelly
- Pink: ballet slippers + bubblegum + plastic flamingo
- Black details: black licorice


I cut all the crayons using the coordinating die, and then moved on to the 3D card base. I decided to use the same color combo as the real Crayola boxes, meaning that I cut all the card base pieces out of dark yellow cardstock, and the decorative pieces out of a green gingham paper from the Joyful Holiday paper pack. I built the whole card base, and then white heat embossed my "You color my world" greeting from Color My World on the front of the card.


Next step was to stick all the crayons inside the card. And to make that part quick and easy, I cut three acetate strips as wide as the card, and attached nine crayons on each strip in a rainbow order using liquid glue. And once I had my three rows of crayons attached on the acetate strips, I stuck each acetate strip inside the card using glue dots. And that's it! I hope that you like this bright and colorful 3D rainbow crayons card! Thanks so much for stopping by, and see you next week!


SUNNY STUDIO SUPPLIES
- Color my world stamp set
- Joyful holiday paper pack


OTHER SUPPLIES
- Outside the box die set by My Favorite Things
- Outside the box level up die set by My Favorite Things
- Lawn Fawn premium dye inks (listed above)
- Sunflower cardstock by Lawn Fawn
- Clear embossing ink by Lawn Fawn
- Fine white embossing powder by Hero Arts
- Transotype perfect coloring paper (images)

Sunny Studio - Jungle Friends Card

lundi 17 juillet 2023

Hello there,

I'm back today to share with you the last card I made using "old" products from Pretty Pink Posh. It's a new tropical card, these are definitely in the top 5 of the cards I like to make, it features the most adorable Jungle Friends, and just like the Monkey Friends card and Tropical Toucans card I made this month, I picked elements from other sets to help me to build them a lovely habitat.

I started off by stamping the four little guys from Jungle Friends on Transotype perfect coloring paper using an alcohol markers friendly black ink, I cut them all using the coordinating dies, and colored everything using my Spectrum Noir Illustrator markers and Graph'it brush markers.

Next I worked on the background elements. I cut a 5,5 x 4,25 inches Strathmore bristol smooth panel, and colored it using oxide inks, from the bottom to the top I used: squeezed lemonade, dried marigold and kitsch flamingo. And I wanted to add more interest to this background, so I used one of the Layered Leaves & Flowers stencils, and added darker shades of oxide inks, from the bottom to the top, I used: mustard seed, spiced marmalade and picked raspberry.


I used Nature Essentials to cut a few more pieces. I cut two tree trunks that I colored using vintage photo and ground espresso oxide inks. I also cut three grass borders, I colored two of them using antique linen and vintage photo oxide inks, and colored the remaining one using mowed lawn and rustic wilderness oxide inks.

I attached the three grass borders at the bottom of my panel and the tree trunks using 1mm and 2mm foam squares, and stuck my images as well. I white heat embossed my "You're the best" greeting from Jungle Friends in the middle of the panel, and as always I finished my card by adding highlights and details to the images using a white gel pen.


PRETTY PINK POSH SUPPLIES
- Jungle friends stamp set
- Nature essentials die set
- Layered leaves & flowers stencils


OTHER SUPPLIES
- Spectrum Noir Illustrator markers
- Graph'it brush markers
- Oxide inks: squeezed lemonade, mustard seed, dried marigold, spiced marmalade, kitsch flamingo, picked raspberry, antique linen, vintage photo, ground espresso, mowed lawn, rustic wilderness
- Sakura white gel pen
- Copic opaque white ink
- Detail black ink by Pinkfresh Studio
- Clear embossing ink by Lawn Fawn
- Fine white embossing powder by Hero Arts
- Transotype perfect coloring paper (images)
- Strathmore bristol smooth cardstock (background)

Pretty Pink Posh - Monkey Friends Slimline Card

lundi 3 juillet 2023

Hello there,

Last month I had the great pleasure to be invited by Pretty Pink Posh to celebrate their June release, and I had loads of fun creating some colorful fruity cards for the occasion: here is my set of four Citrus cards, my Watermelon card, and my Fresh Berries Scallop Box card, if you want to check them out ^^

And I'm thrilled to be back this month to announce that I'm officially joining Pretty Pink Posh design team! I can't wait to share with you my future projects! Today we're starting with the cute Monkey Friends. I stamped three of them on Transotype perfect coloring paper using an alcohol marker friendly black ink and cut them using the coordinating dies. I also picked images from Tropical Toucans and Jungle Friends to bring more greenery, and colored everything using my Spectrum Noir Illustrator markers and Graph'it brush markers.


Next I cut an 8,5 x 3,5 inches Strathmore bristol smooth panel, and created a leafy background. I first applied salvaged patina oxide ink all over the panel, and then used the Layered Leaves & Flowers stencils along with peacock feathers oxide ink to add many leaves to my panel.

Once my panel was dry, I attached all the images using 1mm foam squares, I white heat embossed my "Hang in there" greeting from Monkey Friends, and finally added highlights and details to the images using a white gel pen to complete my card.


PRETTY PINK POSH SUPPLIES
- Monkey friends stamp set
- Tropical toucans stamp set
- Jungle friends stamp set
- Layered leaves & flowers stencils


OTHER SUPPLIES
- Spectrum Noir Illustrator markers
- Graph'it brush markers
- Oxide inks: salvaged patina, peacock feathers
- Sakura white gel pen
- Copic opaque white ink
- Clear embossing ink by Lawn Fawn
- Fine white embossing powder by Hero Arts
- Detail black ink by Pinkfresh Studio
- Transotype perfect coloring paper (images)
- Strathmore bristol smooth cardstock (background)

Sunny Studio - Clean & Simple Golden Butterflies Cards

jeudi 18 août 2022

Hey there,

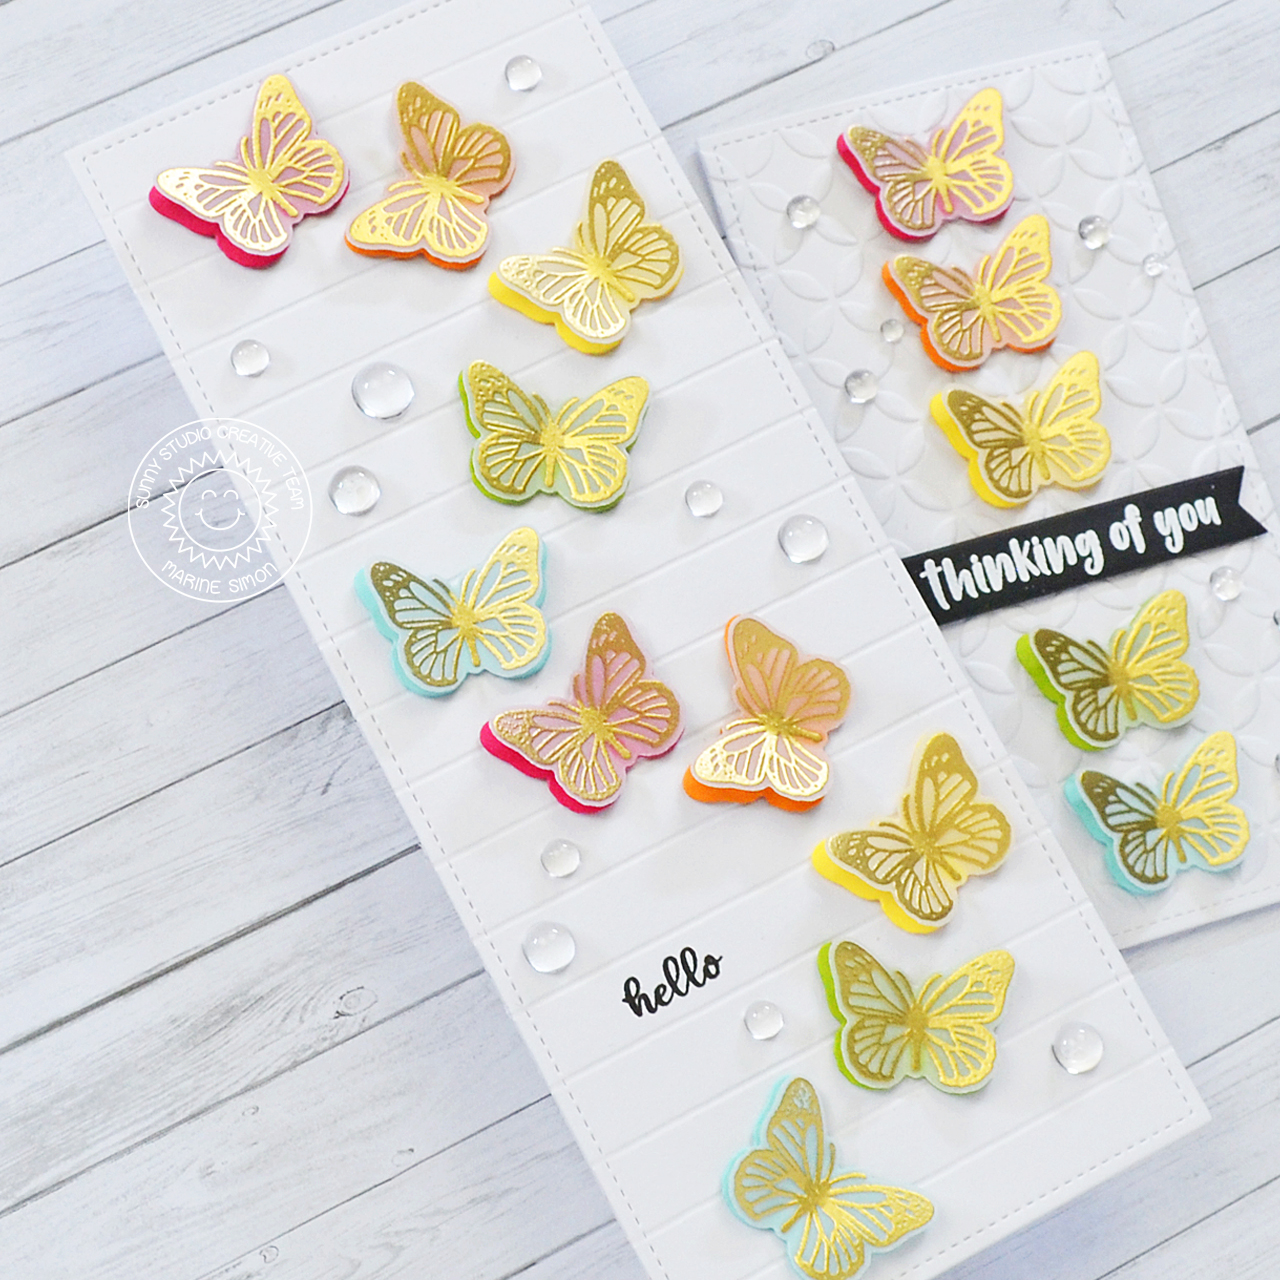
I'm thrilled to be back on Sunny Studio's blog with this duo of cute and bright cards. They feature the butterfly stamp from the Watering can stamp set, I didn't get a chance to use that stamp before, and I thought it would be nice to use it with rainbow colors.


I started by cutting a 6 x 3" mini slimline white panel, and an 8,5 x 3,5" slimline white panel. On the mini slimline panel I printed texture using the Moroccan circles embossing folder, and on the slimline panel I added texture by creating lines each quarter of an inch using a ball tool.

I gold heat embossed a bunch of butterflies on vellum, and I cut them using the coordinating die. I used that same coordinating die to cut colorful butterflies. And I white heat embossed a "Thinking of you" sentiment from Watering can on a black banner.


Next I assembled the cards. On the mini slimline panel, I added a vertical row of butterflies. I first attached plain butterflies in a rainbow order using foam squares, tucked my "Thinking of you" sentiment between two butterflies, and then stuck a golden butterfly on each plain butterfly using liquid glue.


And on the slimline panel, I stamped a simple "Hello" sentiment from Lovely lilacs, attached plain butterflies in zigzag using foam squares, and then added a golden butterfly on each plain butterfly. And I finished both cards by gluing clear droplets to bring more light.


VIDEO


SUNNY STUDIO SUPPLIES
- Watering can stamp set
- Moroccan circles embossing folder
- Lovely lilacs stamp set


OTHER SUPPLIES
- White cardstock from my stash
- Colored cardstock by The Stamp Market
- Black licorice cardstock by Lawn Fawn
- Clear embossing ink by Lawn Fawn
- Fine white embossing powder by Hero Arts
- Gold embossing powder by Lawn Fawn
- Black versafine ink
- Clear droplets by Studio Katia

World Leukemia Day Hop - Hopeful and rainbow shaker card

samedi 4 septembre 2021

 Hey there,

I'm very happy to be back with a very special card. Today is World Leukemia day, and my friend Claudia, whose daughter Gaia is fighting Leukemia, has organized an Instagram hop featuring many talented designers, and this hop has lots of sponsors as well. Please check the video below to see how this hopeful and rainbow shaker card was made.

World Leukemia Day on Sept 4th is a global campaign led collaboratively by patient groups around the world. It's the day of the year when people around the world can come together to help raise awareness about leukemia. By increasing leukemia awareness and educating the world about the signs and symptoms of this condition, we can work together to help patients with this disease receive early diagnoses, help more people, improve their quality of life after diagnosis, and give them hope! But can we really do anything? Yes, we can. By donating blood, donating bone marrow, helping research with contributions.

On this special day, cardmakers from all over the world have joined us and created a card inspired by Hope. These incredible artists have dedicated their time to awareness, visit all of our artists to see their wonderful inspiration. Here they are: - Fabiola - Floriane - Alma - Mayra - Candice - Rachel - Subhashini & Chandhini - Zubaida - Jessica - Peter - Jenn - Dhruvika - Anke - Elin - Laura - Julia - Cindy - Jayne - Tasha - Lyndsey - Silvia - Francesca - Antonella - Mona - Claudia - Me

We also have many companies that have joined us on this day and shown their big and wonderful hearts, so: * Follow us (links to our Instagram pages above) * Leave a comment on our Instagram posts and tag your friends (one per comment) for a chance to win one of 8 prizes generously raffled off by the companies that have supported us. * Visit Claudia to learn about her daughter Gaia's experience, get more information about this day of sensitivity, and learn in detail about the 8 amazing prizes.

Thank you so much to everyone!


VIDEO


SUPPLIES
- Partly Cloudy die by Hello Bluebird
- Hello friend words by Hello Bluebird
- Rainbow Sky by Hello Bluebird
- Stitched rectangle frame die by Lawn Fawn
- Rain or shine before 'n afters by Lawn Fawn
- Really Rainbow 6x6 paper pack by Lawn Fawn
- Sequins by Pretty Pink Posh
- Gold mirror cardstock from my stash
- Clear droplets by Studio Katia

Celebrating Jessica 10k Subscribers Video Hop

mardi 30 mars 2021

Hello there,

Today I'm super happy to celebrate my friend Jessica! She recently reached 10k subscribers on her YouTube channel so for the occasion, she organized a big video hop, with a bunch of crafters and lots of amazing prizes from different companies to win!

If you want to hop along, please check the description box below my my video on YouTube to watch everybody's videos. Please consider subscribing to those amazing YouTube channels and leave comments to show some support to those amazing people.

I used some Sunny Studio stamp sets to create this card. Started by stamping all the images using jet black ink by Lawn Fawn, used the coordinating dies to cut everything, and colored them all using my alcohol markers.


Next I created the background and cut an 8,5 x 3,5" Strathmore bristol smooth panel and created a very simple sky using a cloud stencil along with tumbled glass distress ink. And I also added a little bit of texture using tumbled glass and salty ocean distress inks mixed with water.


I used the same slimline die to trim the mountain border, as well as the fence border, and then moved on to the interactive part of the card. And I invite you to watch the video below to see the entire process ^^ And when it was done, I attached all my cute images on my panel using glue dots and liquid glue.


The last step was to stamp my sentiment 'Just a note to lift you up' using my misti tool. I placed the stamps directly on the balloons, and picked up the first one with the door, removed the balloon, and then stamped the three parts of my sentiment below each other using black versafine ink. And finally I added white highlights on the images as well as some dots on the green part to give the illusion of flowers.


VIDEO
(click on the picture below)


SUNNY STUDIO SUPPLIES
- Balloon rides
- Country scenes
- Spring scenes
- Holy night
- Seasonal trees
- Winter scenes


OTHER SUPPLIES
- Spectrum Noir markers
- Graph'it brush markers
- Distress inks: tumbled glass, salty ocean
- Sakura white gel pen
- Let's toast pull tab die set by Lawn Fawn
- Cloud stencil by Lawn Fawn
- Slimline die by Lawn Fawn
- Jet black ink by Lawn Fawn
- 80lbs Neenah solar white cardstock
- Strathmore bristol smooth cardstock

Celebrating Art Of Albara One Year Anniversary on IG Hop

samedi 27 mars 2021

Hi there,

Today I'm celebrating my dear friend Anne-Laure, aka Art of Albara on Instagram. It's been a year since she joined this social media so to celebrate this one year anniversary, she organized a massive hop on IG with a whole bunch of crafters and a super cool giveaway.

Please check my IG page to get all the details to this hop!

The theme for this hop was 'Create a scene'. So I took one of my latest cards as an inspiration to create today's card. I went with a dinosaur theme for this room. The little girl wants to be an archeologist when she grows up, and she's busy doing her homework about the stegosaurus.

As always I stamped the images on 80lbs neenah solar white cardstock using jet black ink, cut them all using the coordinating dies and then colored everything my alcohol markers.


When everything was colored, I created the screens for the computer. I cut a wheel out of neenah cardstock, placed the rectangle template on top and marked three windows with a pencil, and then stamped additional images on each rectangle that I colored next using the same color palette as before.


Next I created the room to set my scene, and started by stamping a wood texture on a piece of peacock cardstock using a similar ink to get a tone on tone effect. Next I cut a square reveal wheel panel as well as a small rectangle out of it to create the wall of the bedroom. To ground the scene, I cut a piece of light khaki green dotted cardstock using the reveal wheel square die again, and to finish that floor nicely, I cut a strip out of the same paper.


Next I assembled the different elements: I cut a small circle using a die from the reveal wheel die set and put the brad in the center of it, placed the brad into the reveal wheel at the back of it, and opened the brad to keep those pieces together. I flipped the wheel over and attached 2mm foam squares on the small circle, removed the backing paper, and then placed the wheel behind my peacock panel, making sure to align one of the screens with the rectangle window, and pressed onto another peacock square panel to attach the wheel only on that panel. I added a bunch of 2mm foam squares all the around the wheel, and then placed my peacock wood panel on top to finally complete the interactive part of the card.

Next I attached all the pieces to compete the scene, starting with the floor, and then all my cute images using liquid glue and glue dots.


Once everything was attached, I stuck my reveal wheel panel on a dark yellow dotted panel that I stuck on a sunflower card base, and then created my sentiment with the words 'Wish Big' in capital letters. I cut the letters two times: one time out of shimmer khaki green cardstock, and one time out of noble fir cardstock. I layered the letters and then stuck the words right below my little scene.

The final step was to add an arrow on the right side to tell the recipient of the card how to use it, and I also added highlights on the images using my white gel pen.


VIDEO
(click on the picture below)


LAWN FAWN SUPPLIES

Stamp sets
- Virtual friends
- Critters from the past
- Rawrsome
- Critters down under
- Hay there
- You're just my type
- Den sweet den
- On the beach
- Christmas dreams
- Meow you doin
- Bicycle built for
- Ocean shell-fie
- Dad + me
- Woodgrain backdrop

Die sets
- Reveal wheel
- Reveal wheel square add-on
- Reveal wheel rectangle window add-on
- Finley's ABCs
- Picket fence

Cardstock
- Peacock
- Sunflower
- Dotted tropical
- Dotted pastel
- Shimmer gemstone

Misc.
- Jet black ink

OTHER SUPPLIES
- Spectrum Noir markers
- Graph'it brush markers
- Sakura white gel pen
- 80lbs Neenah solar white cardstock