Sunny Studio - Reindeer Games DIY Swinging Card

jeudi 27 octobre 2022

Hi there,

I'm back today on Sunny Studio's blog with a new interactive card showcasing Santa and the reindeers on gift delivery duty during Christmas night. I had so much fun creating this card, and as always I searched through my Sunny Studio collection to see which images would fit in the scene I had in mind.

I used:
- the reindeers, hats presents and greetings from Reindeer games
- the snowflakes from Snowman kisses
- the nice list from North pole
- the sleigh, candy cane, sack and Santa from Santa Claus lane
- the carrots from Bunnyville (to feed the reindeers ^^)

The first thing I did was to stamp all my cute images using an alcohol marker friendly black ink, cut them all using the coordinating dies, and used alcohol markers to color everything.


Next I cut two 8,5" x 3,5" bristol panels. I used the first panel to cut a cloud border using a die from the Slimline nature borders die set. I added a little of color using salvaged patina oxide ink, and stamped my "Have a super jolly Christmas" greeting in the left hand side corner. And I used the second panel to make a bright blue sky using salvaged patina, peacock feathers and blueprint sketch oxide inks. I set everything aside to dry and then created the interactive feature using the largest die from the Scalloped circle mat 1 die. And I invite you to watch the process video down below because it's always easier to understand how an interactive card was made with images ^^


I finished the card by adding snowflakes here and there, highlights and details using a white gel pen, and finally a dot of glossy accents on Rudolph's red nose to make it glow.


VIDEO


SUNNY STUDIO SUPPLIES
- Reindeer games stamp set
- Snowman kisses stamp set
- North pole stamp set
- Santa Claus lane stamp set
- Bunnyville stamp set
- Scalloped circle mat 1 die set
- Slimline nature borders die set


OTHER SUPPLIES
- Spectrum Noir Illustrator markers
- Graph'it brush markers
- Oxide inks: salvaged patina, peacock feathers, blueprint sketch, chipped sapphire
- Copic opaque white ink
- Sakura white gel pen
- Clear embossing ink by Lawn Fawn
- Gold embossing powder by Lawn Fawn
- Extreme black ink by My Favorite Things
- Strathmore bristol smooth cardstock (background)
- Transotype perfect coloring paper (images)

Lawn Fawn - Reveal Wheel Scarecrow & Stenciled Background

 Hello there,

I'm back today on Lawn Fawn YouTube Channel & Blog to share my last Halloween card of the year. We're getting spooky and fun one last time with these pumpkins, spiders and scarecrow that can change the color of his head thanks to the Reveal Wheel.

I started off with the background. I cut a Reveal Wheel panel out of Strathmore bristol cardstock, with the Pick of the Patch add-on taped at the top, and I used oxide inks along with stencils to create my spooky woods landscape.

I first taped the Hillside stencil to divide the panel into two sections, and I used spiced marmalade, ripe persimmon, candied apple and black soot oxide inks to color the upper part. Next I taped one of the Birch Tree stencils on top of the panel and used ripe persimmon, candied apple and black soot oxide again to create tree border on that upper section. And once it was done, I added texture.

For the lower of the panel, I used vintage photo and ground espresso oxide inks along with the Hillside stencil to create a muddy ground.


Next I worked on the scarecrows head. I wanted it to change colors, so I cut four wheels out of different cardstock: N°2 pencil, Fake tan, Sticky note and Canned pumpkin. And I also cut a Paper bag wheel to make the base of the final wheel. I cut each wheel, except for the brown one, into quarters, and then I attached a quarter of each color onto the brown wheel.


Next I used the Pick of the Patch template as a guide to stamp a pumpkin face on each quarter, and then I assembled my interactive panel. I layered a Paper bag Stitched woodgrain panel on top of a Gotta Have Gingham orange panel, and cut a small circle using a die from the Reveal Wheel die set.

I put a brad into the wheel, and next the small circle at the back of the wheel. I opened the brad to keep those two pieces together, added 2mm foam squares at the back of the small circle, peeled the backing papers off and placed the wheel behind the reveal wheel panel. I lined up one of the smiley faces with the pumpkin opening, and while keeping everything in place with my hand, I placed the panel on top of the woodgrain card base and pressed firmly to stick the wheel to the woodgrain panel.

Next I added 2mm foam squares at the back of the reveal wheel panel, making sure to avoid the wheel area, and then attached the panel on the card base.


Next I stamped my images on Transotype perfect coloring paper using Jet black ink, cut them all using the coordinating dies, and then colored everything using my alcohol markers. Once everything was colored, I added faces to the Simply celebrate fall pumpkins, and next I attached all the images on my panel.


For my sentiment, I first cut a Scripty smile word out of black glittery cardstock and out of Vellum. I layered and stuck both words on top of each other, slightly off centered, and I attached the word below the pumpkins using foam squares. And I white heat embossed the words "It's Halloween" from Pick of the Patch on a Kraft Every sentiment banner that I attached to finally read "Smile, it's Halloween". And last but not least, I glued a black arrow next to the wheel to let the recipient of the card knows that they have to turn the wheel to make the smiley faces appear.


VIDEO


LAWN FAWN SUPPLIES

Stamp sets
- Simply celebrate fall
- Fangtastic friends + add-on
- Happy harvest
- Pick of the patch
- Costume party

Die sets
- Reveal wheel
- Pick of the patch add-on + template
- Large stitched rectangle stackables
- Stitched woodgrain backdrop
- Everyday sentiment banner
- Scripty smile

Papers
- Gotta have gingham rainbow 6x6 paper pack
- Paper bag
- N°2 pencil
- Fake tan
- Sticky note
- Canned pumpkin
- Chocolate bar
- Kraft
- Vellum
- Black licorice

Misc
- Birch tree stencil
- Hillside stencil
- Jet black ink
- Clear embossing ink
- White embossing powder


OTHER SUPPLIES
- Spectrum Noir Illustrator markers
- Graph'it brush markers
- Oxide inks: spiced marmalade, ripe persimmon, candied apple, black soot, vintage photo, ground espresso
- Copic opaque white ink
- Sakura white gel pen
- Strathmore bristol smooth cardstock (background)
- Transotype perfect coloring paper (images)

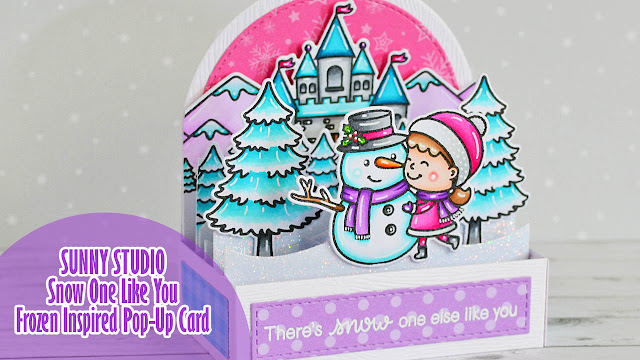
Sunny Studio - Frozen Inspired Pop-Up Card

jeudi 20 octobre 2022

Hello there,

I'm so glad to be back on Sunny Studio's blog today with this new card featuring the lovely Snow one like you stamp set. Those cute characters reminded me of Olaf and Anna from the Disney movie Frozen. So I went with cold tones to really give the card a wintery frozen look.


As always I started off by stamping the images using an alcohol marker friendly black ink, I cut them using the coordinating dies and then used my alcohol markers to color everything. And along with Snow one like you, I picked:

- the tree border from Winter scenes
- the mountain border from Country scenes
- the castle from Enchanted
- a pine tree from Seasonal trees


Once the coloring was done, I cut and assembled the different elements to build the pop-up card. I cut the main pieces out of white woodgrain cardstock, the snow borders out of white glitter cardstock, and the decorative pieces out of pattern papers from the Dots & stripes pastels paper pack + Joyful holiday paper pack. And on the decorative piece that goes on the front, I white heat embossed my "There's snow one else like you" greeting.

On the back panel, I attached the mountain borders as well as the castle. In front of the castle, I stuck the tree border, and finally I attached the pine trees and characters in the foreground using glue dots.


VIDEO


SUNNY STUDIO SUPPLIES
- Snow one like you stamp set
- Winter scenes stamp set
- Country scenes stamp set
- Enchanted stamp set
- Seasonal trees stamp set
- Dots & stripes pastels paper pack
- Joyful holiday paper pack


OTHER SUPPLIES
- Spectrum Noir Illustrator markers
- Graph'it brush markers
- Sakura white gel pen
- White woodgrain cardstock by Lawn Fawn
- Pixie dust cardstock by Lawn Fawn
- Clear embossing ink by Lawn Fawn
- Fine white embossing powder by Hero Arts
- Transotype perfect coloring paper (images)

Sunny Studio - Halloween Shaker Tags

jeudi 13 octobre 2022

Hello there,

I'm thrilled to be back on Sunny Studio's blog with this trio of spooky cute shaker tags I created using the new Mini mat & tag 3 die set, as well as a mix & match of images from different stamp sets.

As very often I started off by stamping the images using an alcohol marker friendly black ink, cut them all using the coordinating dies and then colored everything using traditional Halloween colors: green, orange, purple and black. The images are from:

Too cute to spook for the pumpkins and spiders
Garden fairy for three fairies and wands
Farm fresh for the crows


Once everything was colored, I cut all the different pieces to build the tags using dies from the Mini mat & tag 3 die set, as well as the star die from the Mini mat & tag 4 die set, and pattern papers from the Dots & stripes jewel tones paper pack + Heroic halftone paper pack.

I first attached a piece of clear acetate at the back of each black frame, as well as foam strips all around the opening. I added powder on the inside edges of the foam strips to make those edges non sticky, and then I poured a few spoons of sequins mix inside each frame. I closed the shaker tags using a plain tag panel at the back of each frame, and then I attached the topper pieces and stars.


I used black ribbon to create a handle at the top of each tag, and next I stuck the images on the tags. I also white heat embossed one "You're bewitching" and two "Trick or treat" sentiments from Bewitching on black cardstock, trimmed them into slim banners and attached them at the top of the tags. And finally I added sparkles to the fairies wings, and added highlights and details to the images using a white gel pen.


VIDEO


SUNNY STUDIO SUPPLIES
- Mini tag & mat 3 die set
- Mini tag & mat 4 die set
- Too cute to spook stamp set
- Garden fairy stamp set
- Farm fresh stamp set
- Bewitching stamp set
- Dots & stripes jewel tones paper pack
- Heroic halftones paper pack


OTHER SUPPLIES
- Spectrum Noir Illustrator markers
- Graph'it brush markers
- Sakura white gel pen
- White blizzard Nuvo drops by Tonic Studio
- Midnight tales + Spooky fun + Halloween treats sequins by Picket Fence Studio
- Clear embossing ink by Lawn Fawn
- Fine white embossing powder by Hero Arts
- Black ribbon by Stampin Up!
- Black licorice cardstock by Lawn Fawn
- Transotype perfect coloring paper (images)

Sunny Studio - Autumn Tree Infinity Shaker Card

vendredi 7 octobre 2022

Hello there,

I'm thrilled to be back on Sunny Studio's blog with this new edge to edge or infinity shaker card showcasing the gorgeous Autumn tree die, and some Squirrel friends that I turned into skunks.

I started off by stamping a few images using an alcohol marker friendly black ink: some apples and the bucket from Fall friends, as well as three cute Squirrel friends.I also cut some Autumn tree pieces: the tree trunk out of kraft cardstock, and some apples & leaves out of the same paper I stamped my images on. And I colored all those elements using my alcohol markers, starting with the squirrels that I colored in black & white to turn them into skunks.


Next I created the foliage. I cut a Scalloped circle out of a Critter country pattern paper, and added some texture: mowed lawn & rustic wilderness distress inks on the edges, splatters of rustic wilderness distress ink mixed with water, and splatters of copic opaque white ink mixed with water.

I cut a 5,5" x 4,25" bristol panel, and used stencils to create the background of my cute little scene. A hill stencil along with mowed lawn & rustic wilderness distress inks to create a hill border at the bottom, and a cloud stencil along with tumbled glass & salty ocean distress inks to create a simple sky on the upper part. I also cut a grass border using a die from the Picket fence die set and colored it using the same inks as the hill border.


Next I created the shaker, and I invite you to watch the process video (linked down below) to see exactly how it was done, it's always easier to understand with images ^^ And once my shaker panel was done, I assembled everything on top of it. I white heat embossed the "So happy we're friends" sentiment from Fall friends on the grass border, and attached that border at the bottom of the panel, directly on the plastic, using double sided tape. And next I built the tree, with the foliage, the tree trunk, and the apples & leaves, and added the skunks at the bottom of the card.


VIDEO


SUNNY STUDIO SUPPLIES
- Autumn tree die
- Squirrel friends stamp set
- Fall friends stamp set
- Scalloped circle mat 1 die set
- Picket fence die set
- Critter country 6x6 paper pack


OTHER SUPPLIES
- Spectrum Noir Illustrator markers
- Graph'it brush markers
- Distress inks: mowed lawn, rustic wilderness, tumbled glass, salty ocean
- Copic opaque white ink
- Sakura white gel pen
- Hill stencil by Lawn Fawn
- Cloudy stencil by Lawn Fawn
- Clear embossing ink by Lawn Fawn
- Fine white embossing powder by Hero Arts
- Fall harvest mix by Pretty Pink Posh
- Strathmore bristol smooth cardstock
- Transotype perfect coloring paper

Lawn Fawn - Fangtastic Magic Picture Changer Card

jeudi 6 octobre 2022

Hi there,

I'm so excited to be back on Lawn Fawn YouTube channel & blog today with this spooky Magic picture changer slimline card showcasing the cutest bats ever from Fangtastic Friends. During the Fall & Winter Release Week in August, I was asked to recreate two of my cards (this one + this one) so today I'm starting with the first one, and next time I will share a card using the same background as the second one.

I'm leaving you right away with the process video it always speaks better than words. So feel welcome to click on the thumbnail down below to have some spooky fun!


VIDEO


LAWN FAWN SUPPLIES

Stamp sets
- Fangtastic friends + add-on
- Holiday party animal

Die sets
- Magic picture changer + add-on
- Large slimline with sliders

Misc
- Nighttime sky stencil
- Yeti ink
- Jet black ink
- Clear embossing ink
- Silver embossing ink
- White embossing powder
- Post-it notes
- Fake tan cardstock
- Purple shimmery cardstock (gemstone pack)
- Purple textures dot cardstock (gemstone pack)


OTHER SUPPLIES
- Spectrum Noir Illustrator markers
- Graph'it brush markers
- Oxide inks: shaded lilac, wilted violet, villainous potion, black soot, squeezed lemonade, mustard seed
- Copic opaque white ink
- Sakura white gel pen
- Strathmore bristol smooth cardstock (background + interactive element)
- Transotype perfect coloring paper (images)

Waffle Flower - 1 stamp set, 3 cards - October 2022 Release

mercredi 5 octobre 2022

Hello there,

Today I'm thrilled to be a guest designer for Waffle Flower, and to help them promote their brand new October release! So many amazing and adorable new products that are now available at waffleflower.com. To celebrate the launch of this new release, I created three cards using one stamp set, the ever so cute Winter Fun, and one die, the gorgeous Winter Cityscape. And I also picked my sentiments from an older set which is the Classic holiday sentiments stamp set.

█     

WAFFLE FLOWER OCTOBER RELEASE BLOG HOP & GIVEAWAYS


***

For today’s hop, Waffle Flower is giving away $25 gift certificate to THREE lucky winners. You can leave a comment on this blog and along the hop (listed & linked above) by 11:59pm EST on Monday October 10th, 2022 for your chances to win. Winners will be chosen at random from the comments left on any of the posts in this blog hop and will be announced on the Waffle Flower Blog on 10/12/2022.

***

From now till October 12th, 2022, all orders placed at waffleflower.com will receive a mysterious gift (No code required!)

And for those of you who are new to Waffle Flower, they have a Last Chance section on their website that lists many goodies for 25% off until they are gone! This would be a great place to start your collection! And don’t forget to check out their monthly Flash Sales!

█     

For my first card, I started off by cutting a Winter Cityscape background out of Strathmore bristol cardstock, and I colored the different pieces using distress inks. For the sky section, I went with tattered rose + festive berrie + aged mahogany, and for the borders at the bottom, I went with tattered rose only.


For the buildings, I chose a dark grey cardstock, and emphasized the snowy wintery look by adding a little bit of white pigment ink at the top of each building, and next falling snow using copic opaque white ink mixed with water.

Once all those elements were dry, I assembled them all on a 5,5" x 4,25" card base using liquid glue, and next I stamped, die cut and colored some Winter Fun images using my alcohol markers.


I attached the images on the card using foam squares, stamped a "Merry Christmas" sentiment from Classic Holiday Sentiments at the bottom, and finally added highlights and details to the images using a white gel pen.

***

For my second card, I cut a 5,25" x 4" Strathmore bristol panel, as well as some of the Winter Cityscape elements, and used those pieces to stencil my panel. Please watch the process video down below to see how it was done ^^


I stamped, die cut and colored some cute snowmen from Winter Fun, as well as a few trees. And then I attached them all on my panel using foam squares.


I white heat embossed my "Happy holidays" sentiment from Classic Holiday Sentiments right above the buildings, and I layered my panel on a white glittery panel, next on a purple panel, and finally on a white card base. And as always I finished the card by adding white highlights and details to the images.

***

For my third and last card, I created an infinity shaker card and went with non traditional colors. I cut a 6" x 3" Strathmore bristol panel and rainbow colored it using picked raspberry, kitsch flamingo, squeezed lemonade, cracked pistachio, peacock feathers and wilted violet oxide inks. I also cut a simple white border that I colored using salvaged patina oxide ink.


Next I created the shaker pocket (please watch the process video down below to see how it was done ^^), added iridescent confetti inside of it, and then I stamped, die cut and colored some snowmen from Winter Fun.


I gold heat embossed a "Merry Christmas" sentiment from Classic Holiday Sentiments on the snow border and attached it at the bottom of the shaker panel using double sided tape, and then stuck the snowmen using foam squares. I stuck my panel on a white card base, and finished the card by adding highlights and details to the images using a white gel pen.


VIDEO


WAFFLE FLOWER SUPPLIES
- Winter fun stamp set
- Winter cityscape die
- Classic holiday sentiments stamp set


OTHER SUPPLIES
- Spectrum Noir Illustrator markers
- Graph'it brush markers
- Distress inks: tattered rose, festive berries, aged mahogany, salvaged patina, blueprint sketch, chipped sapphire, black soot
- Oxide inks: picked raspberry, kitsch flamingo, squeezed lemonade, cracked pistachio, peacock feathers, wilted violet, salvaged patina
- Copic opaque white ink
- Sakura white gel pen
- Iridescent confetti by Studio Katia
- Clear embossing ink by Lawn Fawn
- Fine white embossing powder by Hero Arts
- Gold embossing powder by Lawn Fawn
- Extreme black ink by My Favorite Things
- Strathmore bristol smooth cardstock (background elements)
- Transotype perfect coloring paper (images)