Magengo - Halloween Treat Boxes using the Scan 'n Cut machine

samedi 28 septembre 2019

Hello there,

Today I'm sharing with you two cute Halloween treat boxes I've made using cut files designed by Magengo and my Scan 'n cut machine. I encourage you to watch the video below to see how I used my machine to cut them.


I started with the Scary House. I first applied hickory smoke distress ink all over the house. Next I used a wood texture stamp and black soot oxide ink to create wood planks on the house. I also added shadows on the edges using black soot distress ink.


Next I colored the roof elements using a black alcohol marker, making sure to color the edges as well to get rid of any white spot. I also colored the windows, the door and the spider using the same marker, and I colored the inside of the windows using yellow markers.


I applied clear embossing ink on the ghost and spider web and white heat embossed those elements to give them a light shiny touch. And next I assembled everything. I applied black enamel drops on the spider to make it pop, and I also created the handle on the door.

***


Now to the Pumpkin Box. I first started by coloring the five layers that will be on the front of the box using mustard seed distress ink first. Next I applied a little bit of shadows using spiced marmalade distress ink on the edges, and finally I added a tiny little bit of rusty hinge distress ink. And I added texture to these five layers using a stencil and wild honey distress ink.

Next I applied spiced marmalade distress ink on a pumpkin element, added rusty hinge distress ink on the edges, as well as a little bit of ground espresso distress ink.

The leaves were colored using peeled paint and forest moss distress inks. And next I assembled everything. I think I'm going to put those boxes on my desk for some spooky decorations.

VIDEO
Below or here

(Special Spider Halloween Frame Vector by akshaydhameliya on pngtree.com)

SUPPLIES
- Scary House cut file by Magengo
- Pumpkin Box cut file by Magengo
- Distress inks: hickory smoke, black soot, mustard seed, spiced marmalade, rusty hinge, wild honey, ground espresso, peeled paint, forest moss
- Spectrum Noir markers
- Nordic stencil by Tim Holtz
- Clear embossing ink by Lawn Fawn
- White embossing powder by Hero Arts
- Black enamel drops by Ranger
- Strathmore bristol smooth cardstock

Hello Bluebird - Infinity Shaker Card feat. Spooky Spellers stamp set

jeudi 26 septembre 2019

Hello there,

Today I'm sharing with you the last card I've made for the Hello Bluebird September 2019 release. It features the new Spooky Spellers stamp set and the new Boo To You Words die. And it's an infinity shaker card that was inspired by Nicky, from the design team.

Make sure to check the video below to see how this card was made, and also for a quick recap of the card I've created for this release ^^


So for today's card, I started by cutting a square panel out of bristol cardstock. I covered it entirely with cracked pistachio oxide ink, added peacock feathers that I blended towards the center of my panel, and applied black soot on the edges. I splattered water that I dried using a paper towel, added drops of peacock feathers all over the panel, and finally mixed black acrylic paint with water and splattered drops on the edges of my panel.


Next step was to color the images. I stamped them on white cardstock using alcohol marker friendly ink and colored them using my spectrum noir markers. When the coloring part was done, I added white highlights on the images and cut them using the coordinating dies. I also used the coordinating dies to cut the letters to form the word Happy and glued them on the signs, as well as little hats.

I took a plastic pouch measuring a tiny bit more than my panel and put my panel inside. I put the candies inside, as well as clear sequins and black sequins and closed the pouch using strong double sided tape.


I die cut the words Boo To You twice: from black glitter cardstock and from vellum, and glued both pieces together. Next I stamped and white heat embossed the word Halloween on black cardstock, used a banner die from the Stitched Tag Builder die set to cut it and attached it at the bottom of my panel. I also stuck the images down and finally adhered my pouch panel on a black card base. And the last final touch was to add white highlights on the images and apply glossy accents on the letters.


VIDEO
Below or here


HELLO BLUEBIRD SUPPLIES
- Spooky spellers stamp + die set
- Boo To You die
- Stitched Tag Builder die set

OTHER SUPPLIES
- Spectrum Noir markers
- Oxide inks: cracked pistachio, peacock feathers, black soot
- Black acrylic paint by Pebeo
- Clear embossing ink by Lawn Fawn
- White embossing powder by Hero Arts
- Glossy accents by Ranger
- Sakura white gel pen
- Star sequins by Pretty Pink Posh
- Clear sequins by Craftin Desert Divas
- Black sequins by Rayher
- Black glitter cardstock by Toga
- Vellum by Simon Says Stamp
- Black cardstock by Simon Says Stamp
- Strathmore bristol cardstock
- Plastic pouch from my stash

Holiday Card Series 2019 - Decorating Bunnies - See Through Card

samedi 21 septembre 2019

Hi there,

I'm back with a Holiday Card showcasing the Decorating Bunnies digital stamp set designed by Isabel Cristina Stamps. I hope you will like it!


I built the inside and outside of a bunny house, so I first cut all the papers I needed: two red pattern papers as wallpaper, two black strips as baseboards, two wooden pattern panels as floors and another wooden pattern panel for the outside.


I started by attaching the baseboard and the floor on one of the red panels using double sided tape. And I stuck this red panel on a kraft card base. This card base has a thin strip on the left that will help us later to attach the second red panel. Next I assembled the other red panel, and cut a square out of this panel to create the window opening using a utility knife. When it was done, I used this red panel as a guide to cut the same square out of the outside panel.

As always, I printed my images on Neenah solar white cardstock using my Epson printer, cut them using my Scan 'n cut machine and colored them using my beloved alcohol markers.


When the coloring was done, I assembled the window. I first attached a piece of acetate at the back of my red panel, and I stuck a window on the front of this panel using liquid glue.

Next I adhered both panels together, making sure to sandwich the thin strip of the kraft card base. I assembled the bunny that will be looking at the outside through the window and attached him using glue dots. And then I adhered the rest of the images. I added curtains at the window, as well as lights on the wall. And I folded the Christmas tree in half to stuck it down in the middle of my card.


On the outside, I attached some elements: two trees cut out of a grey woodgrain cardstock, I added snow on them using a white gel pen, two hill borders for the ground and a cloud border for the snow in the trees. And finally I applied white paste using a stencil from Simon Says Stamp to create snow on the outside of my bunny house.

VIDEO

Below or here


SUPPLIES
- Decorating bunnies digital stamp set
- Puffy cloud border by Lawn Fawn
- Stitched hillside border by Lawn Fawn
- Leafy tree backdrop: landscape by Lawn Fawn
- Shadow box card theater add-on by Lawn Fawn
- Mini strings of lights by Lawn Fawn
- Falling snow stencil by Simon Says Stamp
- Sakura white gel pen
- Uniball gold gel pen
- Morning dew nuvo drops by Tonic Studio
- Gold liquid pearls by Ranger
- Black cardstock by Simon Says Stamp
- Pattern papers from Action store

Hello Bluebird - Spooky Night feat. Little Haunters stamp set

jeudi 19 septembre 2019

Hello there,

Today I'm showcasing the brand new Little Haunters stamp set from the Hello Bluebird September 2019 release. I love these cuties and I had a lot of fun coloring them.


To start, I cut a bristol panel measuring 6 x 5", and attached a large circle mask right in the middle of it. And to create my night sky, I first applied tumbled glass oxide ink along the circle mask to create a halo. Next I applied chipped sapphire oxide ink on the rest of the panel, and came back with tumbled glass to blend both colors by making circular moves to accentuate the halo effect I was looking for.

I also added black soot oxide ink to darken my background, and splattered water, as well as drops of silver paint to get a nice sparkly spooky night sky.


To ground my Halloween scene, I cut a grass border out of black cardstock using a die from the Grassy Knoll die set and applied white ink at the very top of it to create moon reflection. And I did the same thing on two trees that I cut using a die from the Halloween Tree die set and I will turn them into branches.


Next I stamped and white heat embossed my sentiment in the middle of the black grass border, stamped my images on Neenah solar white cardstock using alcohol marker friendly ink, and colored them using my Spectrum Noir markers.


When the coloring was done, I cut the images using the coordinating dies and attached the branches on my panel using foam squares, as well as the images. Next I stuck my panel down to a navy blue card base, and finally added white highlights on the images to make them pop a little bit more.

VIDEO
Below or here


HELLO BLUEBIRD SUPPLIES

OTHER SUPPLIES
- Spectrum Noir markers
- Oxide inks: tumbled glass, chipped sapphire, black soot
- White ink by Simon Says Stamp
- Silver paint by Creative Expressions
- Jet black ink by Lawn Fawn
- Sakura white gel pen
- Sakura black gel pen
- Clear embossing ink by Lawn Fawn
- White embossing powder by Hero Arts
- Navy blue cardstock from Sostrene Grene
- Black cardstock by Simon Says Stamp
- Neenah solar white cardstock
- Strathmore bristol cardstock
- Masking paper by Simon Says Stamp

Hello Bluebird - Purr-fect Halloween feat. Tabitha stamp set

mercredi 18 septembre 2019

Hi there,

I am thrilled to share with you today a new card as a member of Hello Bluebird design team! I'm such a big fan of their designs so I'm very thankful for this new adventure.

So this Halloween card features the brand new Tabitha stamp set from the september 2019 release, and I first started by cutting a frame out of a grey woodgrain cardstock using the Gallery Frame #2 and applied black soot distress inks on the elements.


Next I cut a bristol panel measuring the same size as the inside frame (4,75 x 3,5") and started by applying hickory smoke distress ink. I wanted to get a halo effect so I didn't apply it all over the panel to keep the middle white. When I was satisfied with this first layer, I applied black soot distress ink to add more contrast. And I added texture by splattering water on my panel, as well as drops of the same inks and black glitter paint.


I stamped the images on Neenah solar white cardstock using alcohol marker friendly ink, cut them using the coordinating dies, and colored them using my spectrum noir markers. Feel welcome to check the video below to see what colors I used.


When the coloring was done, I attached a black and white stripes pattern paper to a black card base and attached my elements: the distress ink panel using double sided tape, the inside frame using foam squares, and the outside frame using liquid glue.

All the images were attached using foam squares. I cut my sentiment in three parts to fit on my card and stamped it using black ink. I added white highlights on the images, and finally applied morning dew nuvo drops on the distress ink background to add some kind of spooky details.


VIDEO
Below or here


HELLO BLUEBIRD SUPPLIES

OTHER SUPPLIES
- Spectrum Noir markers
- Distress inks: hickory smoke, black soot
- Sakura white gel pen
- Sakura black gel pen
- Morning Dew Nuvo drops by Tonic Studio
- Memento tuxedo black ink
- Woodgrain cardstock by Lawn Fawn
- Black & white stripes pattern paper from my stash
- Neenah solar white cardstock
- Strathmore bristol smooth cardstock
- Black cardstock from my stash

Magengo - Fall in Love Slimline Card

samedi 14 septembre 2019

Hello there,

Today I'm sharing with you a lovely fall card showcasing the new Fall in love digital stamp set designed by Magengo. They released a bunch of new fall & halloween themed digital stamps and cut files so be sure to check their etsy shop!


I started by creating the background. I cut a long panel out of Strathmore bristol cardstock, as well as three grass borders. I first applied faded jeans distress ink at the top of my panel to create the sky, and to darken it a little bit, I applied black soot around the edges.

I always need to add texture to my cards, so I first splattered water on the paper, dabbed the excess with my paper towel, and then I mixed faded jeans and black soot distress inks with water and splattered drops on my panel. The three grass borders were colored using the same inks: peeled paint and forest moss. And like the sky, I splattered drops of the same inks on the three grass borders.


When everything was dry, I white heat embossed my sentiment in the top part of my panel, and stuck the taller grass border down using double sided tape. To add some dimension to the card, I attached the second one using foam tape, as well as the third border.

As always I printed my images on Neenah solar white cardstock, cut them using my Scan 'n cut machine, and used my spectrum noir markers to color them. When the coloring was done I assembled some leaves, nuts and pumpkin in the wooden cart using glue dots, and attached the rest of the images.


I added some white highlights on the images to make them pop a little bit more, and finally layered my panel on a white panel and a kraft card base.

VIDEO
Below or here


SUPPLIES
- Fall in love digital stamp set by Magengo
- Grassy knoll die set by Hello Bluebird
- Tree before 'n after stamp set by Lawn Fawn (for the sentiment)
- Distress inks: faded jeans, black soot, peeled paint, forest moss
- Clear embossing ink by Lawn Fawn
- White embossing powder by Lawn Fawn
- White cardstock by HobbyCraft
- Desert storm kraft cardstock by Neenah
- Sakura white gel pen

Halloween Card Series w/ Lawn Fawn - Fortune Teller Tabby Reveal Wheel Card

mardi 10 septembre 2019

Hi there,

How about visiting this cute fortune teller to know if you'll get a lot of candies on Halloween night? I had a lot of fun creating this card using the new Fortune Teller Tabby stamp set as well as some other sets.


I first started by die cutting the main panel from the reveal wheel die set with the new circle add-on.


Next I colored the background. First I used cracked pistachio in the center, just around the circle window, to get a nice halo effect behind my fortune teller. I darkened the edges using peacock feathers and blended both colors together. And to get a deeper background I added black soot on the edges. I also splattered water on the panel and dabbed it using a paper towel. And to complete my background, I added drops of peacock feathers and black soot.


Next I die cut the wheel, aligned the circle window template on top of it (I used washi tape to make sure it stays in place) and then I stamped my images in each circle using jet black ink, making sure to rotate the wheel every time. I adhered masks on my images, and applied cracked pistachio all over the wheel to match my panel. I removed the masks, and colored those images using my alcohol markers.


When the fortune teller was colored, I used the coordinating dies to cut it as well as the inside of the crystal ball.


Next I needed some elements to ground my scene, so I die cut a piece of woodgrain cardstock as well as a thin strip to create the floor and a baseboard. I glued those two pieces at the bottom of my panel, and to get a consistent design, I added black soot on the edges of the woodgrain piece. And next I adhered the fortune teller on my panel, making sure it was perfectly aligned with the circle window.


I put the brad in the wheel base, next in the wheel at the back, I added the template (it will help me align the wheel), I opened the brad to keep those pieces together, making sure the template was aligned according to the images and edges of the wheel, I flipped the wheel over and applied foam squares on the wheel base. I removed the back of the foam squares, put the wheel behind my panel, aligned the template with the crystal ball, and pressed down on the black panel to attach the wheel.


Next I removed the template and opened the brad to definitely keep the wheel in place. I adhered a bunch of small and large foam squares around the wheel, making sure not to touch it and stuck my panel down. And then I glued a small arrow that will indicate the recipient of the card to turn the wheel.


My sentiment was totally customized and made using several stamps. I prepped my paper using an anti static powder bag, stamped the words on my paper using clear embossing ink and white embossing powder, and heat set everything using my heat tool. And next I trimmed off those words into thin banners to be able to read "I predict your Halloween will be..."


I wanted the last part of my sentiment to be bold and coordinated with the little ghosts so I die cut the word "BOO" and colored the letters using the same inks as the ones  used for the background. Next I adhered those letters and the banners using foam squares.


To coordinate with the tablecloth, I added some stars at the top of my panel using peacock feathers and black soot distress inks. I layered my reveal wheel panel on a pattern paper and a card base, and to finish my project I applied black enamel drops as well as some white blizzard nuvo drops for a touch of sparkle.


VIDEO
Below or here


LAWN FAWN SUPPLIES
- Reveal wheel die set
- Reveal wheel circle add-on die set
- Reveal wheel circle template
- Fortune teller tabby stamp + die sets
- Costume party stamp + die sets
- Booyah stamp + die sets
- Harold's ABC stamp set
- Finley's ABC die set
- Purple posies pattern paper from the Really Rainbow 6x6 paper pack
- Woodgrain cardstock - Neutrals
- Peacock cardstock
- Black licorice cardstock
- Clear embossing ink
- White embossing powder

OTHER SUPPLIES
- Spectrum Noir markers
- Distress inks: cracked pistachio, peacock feathers, black soot
- Sakura white gel pen
- White blizzard nuvo drops by Tonic Studio
- Black enamel drops by Ranger
- Neenah solar white cardstock
- Strathmore bristol cardstock

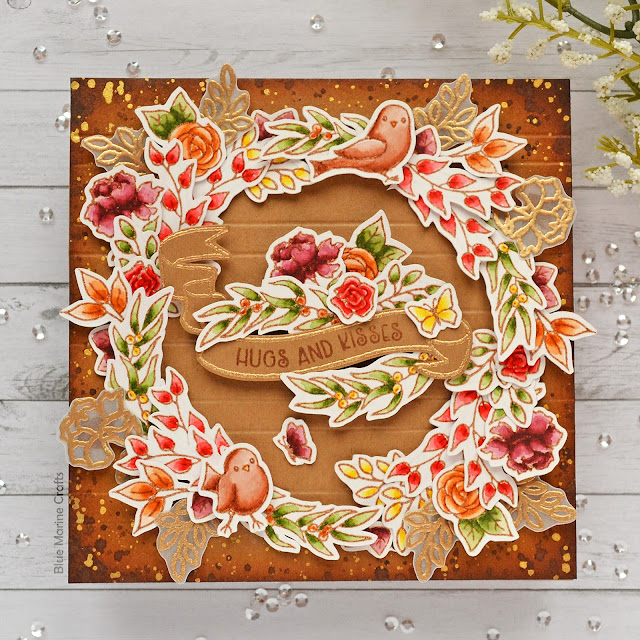
Miss Ink Stamps - Watercolored Fall Wreath

mercredi 4 septembre 2019

Hi there,

I'm back with a beautiful fall wreath showcasing the Springtime banner stamp set by Miss Ink Stamps. This set is perfect for each season, the only thing to do is to change the colors.


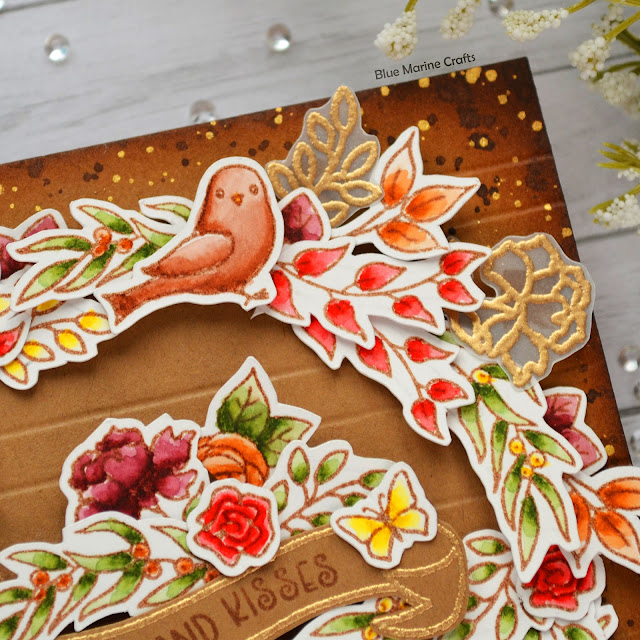
To start, I stamped a lot of leaves and flowers on Strathmore bristol cardstock using Potting Soil ink by Ranger. I chose this water resistant ink because I wanted to use my watercolor pens and I thought a brown ink would coordinate perfectly with the fall theme. I colored all the images using watercolor markers, and cut them using my Scan n Cut machine.


For my background, I cut a 4,25" square out of kraft cardstock and applied brown distress inks on the edges to add more depth. I first used vintage photo with a little bit of ground espresso, and next I splattered drops of ground espresso. And I've always thought that gold goes beautifully with fall colors, so I also splattered drops of gold paint on my panel.

And my panel was still a little bit too flat to me so I simply created a few score lines on my paper. And next I assembled the wreath using glue dots and foam adhesive squares. When the wreath was done, I decided to add more gold. So I stamped some leaves and flowers on vellum using clear embossing ink, covered the ink with gold embossing powder, heat set the images using my heat tool, and fussy cut everything.


I used the same clear embossing ink and embossing powder to create the banner, and used Potting Soil ink to stamp my sentiment (which is from the Bubbles stamp set) I also added more leaves and flowers around this banner, I glued two butterflies, and finally I stuck my panel down to a kraft card base.


And that's it. I think it would be nice to also use blues and greys to create a winter wreath. I leave with the process video, and see you next time.

VIDEO
Below or here


SUPPLIES
- Springtime banners stamp set
- Bubbles stamp set
- Arteza real brush pens
- Arteza waterbrushes
- Distress inks: vintage photo, ground espresso
- Gold paint by Creative Expressions
- Potting soil ink by Ranger
- Clear embossing ink by Lawn Fawn
- Antique gold embossing powder by Simon Says Stamp
- Kraft cardstock by Lawn Fawn

Hello Bluebird - Lovely Bats - Magic Picture Changer Card

dimanche 1 septembre 2019

Hey there,

I'm back with another interactive Halloween card featuring some Hello Bluebird stamps. I hope you will like this spooky cute little scene.


I first started by using the magic picture frame as a guide to know exactly where to start inking my panel. I wanted to create kind of a moon or halo behind the bats, so I marked the middle of the frame die and started applying inks. I first applied spun sugar, next I used shaded lilac that I applied all over the panel, I added some wilted violet on the edges to darken the sky, and finally I also applied blueprint sketch. As always I splattered water on my panel, as well as some drops of wilted violet, blueprint sketch and black soot, trying to keep the moon area as clean as possible.


Next I marked the windows of the magic picture changer dies on bristol cardstock panels. On the long panel, I stamped the bat with her wings closed, and on the small panel I stamped the bat with her wings open. I masked both of the bats, and applied spun sugar distress ink on both panels to coordinated with my sky. When it was done  removed the masks and colored both images using my spectrum noir markers.


I taped the magic picture changer dies on my panels and run them through my die cutting machine.

I folded the long panel in half, right on the score line, using my bone folder and folded the tabs as well. Applied strong double sided tape on the tabs, front and back, removed the back of the tape on the inside and folded the tabs again to stuck them down. Next I put the moving element inside the pocket panel through the slot, and put each tab into a slot. I applied some powder on the flaps and along the tabs to help the mechanism work easily, and removed the back of the tape to close the pocket.


Next I taped the magic picture changer die at the top of my distress ink panel and run it through my die cutting machine. I applied thin strong double sided right on the edges of the magic picture changer pocket, and stuck the distress ink frame down, making sure the notch was on the side of the pull tab. Next I adhered the magic picture changer element at the top of a blue card base, and attached the remaining of my sky panel right below it. And I cut a pull tab arrow out of the same blue cardstock and attached it at the end of the tab.


I cut a grass border and a tree out of black cardstock and applied white ink on the edges to add a moon reflection effect. I stamped my sentiment on the grass border using clear embossing ink, applied white embossing powder on the ink and heat set it using my heat tool. I stuck the grass border down at the bottom of my panel using foam squares, as well as the tree that I turned into a branch at the top of my panel.


I stamped a few additional images and colored them using my alcohol markers. When the coloring was done I stuck all the images down using foam squares and liquid glue. Finally I applied clear shimmer to the smoke above the cauldron, and added morning dew nuvo drops as well as five crows to make the scene more spooky.

VIDEO
Below or here

HELLO BLUEBIRD SUPPLIES
- Halloween party stamp set
- Halloween fun stamp set
- Hippos on holiday stamp set
- Halloween tree die set
- Grassy knoll die set

OTHER SUPPLIES
- Magic picture changer + add-on die sets by Lawn Fawn
- Spectrum Noir markers
- Distress inks: spun sugar, shaded lilac, wilted violet, blueprint sketch, black soot
- Jet black ink by Lawn Fawn
- Clear embossing ink by Lawn Fawn
- White embossing powder by Hero Arts
- Clear shimmer pen by Spectrum Noir
- Sakura white gel pen
- Strathmore bristol smooth cardstock
- Neenah solar white cardstock
- Blue cardstock from my stash
- Black cardstock from my stash
- Powder tool by EK Success