Sunny Studio - Fall Scenes Pop-Up Card

jeudi 29 septembre 2022

Hey there,

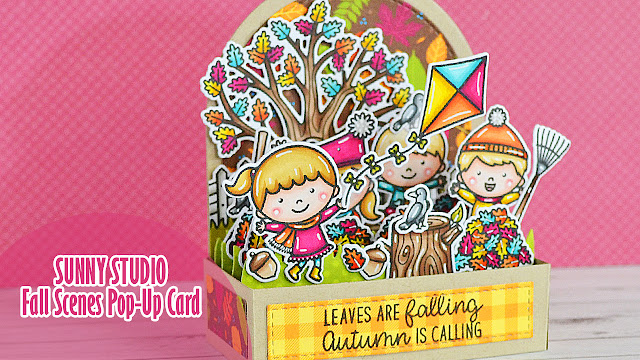
I'm happy to be back today on Sunny Studio's blog with a new pop-up card featuring the beautiful Fall scenes stamp set, so perfect to set a cute autumn scene or a Halloween scene with a spooky house.

As always I livened the scene up with additional images from different sets:

Fall kiddos for four characters
Fall friends for the acorn nut
Happy harvest for the tree trunk
Spring showers for the kite
Farm fresh for the crows
Seasonal trees for the tree trunk & bird in the nest

I first started by stamping all the images using an alcohol marker friendly black ink, I cut them all using the coordinating dies and then colored everything using my alcohol markers with brown, yellow, orange, turquoise and burgundy shades.


Next I built the pop-up card base. I cut the main pieces out of kraft cardstock, and picked three different pattern papers from the Critter country paper pack to cut the decorative pieces and grass insert pieces as well. And I also white heat embossed my "Leaves are falling, autumn is coming" sentiment from Happy harvest on the long rectangle that goes on the front.

Once the pop-up card base was done, I attached the images inside the box: the Fall scenes image on the back panel using foam squares, and all the other images on the grass borders using 3mm glue dots. And to attach the kite and give the illusion that it's floating in the air, I simply used a thin strip of clear acetate.


VIDEO


SUNNY STUDIO STAMPS
- Fall scenes stamp set
- Fall kiddos stamp set
- Fall friends stamp set
- Happy harvest stamp set
- Spring showers stamp set
- Farm fresh stamp set
- Seasonal trees stamp set
- Critter country 6x6 paper pack


OTHER SUPPLIES
- Spectrum Noir Illustrator markers
- Graph'it brush markers
- Sakura white gel pen
- Outside the box level up die set by MFT
- Outside the box grass die set by MFT
- Kraft cardstock by Lawn Fawn
- Transotype perfect coloring paper

Avery Elle - Carolers Shaker Snow Globe

dimanche 25 septembre 2022

Hello there,

I'm so happy to share with you this new holiday shaker card showcasing the adorable Carolers stamp set by Avery ElleI created a snow globe that I filled with a million iridescent confetti, and colored those lovely critters in bright tones to make them pop on the blue background and make the card even more festive.

I started off by creating the bottom of my snow globe. I white heat embossed my sentiment on a piece of kraft cardstock, and used the largest arch die from the Outside the box level-up die set by MFT to trim it and get a rectangle that will go right below the snow globe.

Next I worked on the front of the card and on the inside as well. For the front, I cut a 5,5" x 4,25" bristol panel that I colored using blueprint sketch, chipped sapphire and black soot oxide inks. And for the inside, I cut another 5,5" x 4,25" bristol panel that I colored using a Birch tree stencil by LF along with salvaged patina oxide ink. And next I cut an arch window out of the front panel.

I wanted to add a frosty look to my snow globe, so I used the arch die again to cut a window out of some copy paper to create a template, I attached that template on an acetate panel using washi tape, and used copic opaque white ink with a sponge dauber to create frost on the acetate, all along the edges. And I also added a few drops of that same white ink all over the acetate.


Once the acetate was dry, I attached my window panel on top of it using liquid glue, making sure to line up the window with the frosty arch. I added the base of the snow globe below the window, as well as a simple wavy white border that I attached at the back of the panel.

And then I created room for the shaker accessories by adding foam strips at the back of the panel and all around the window. Added powder inside the window all along the foam strips to make the edges non sticky, cleaned the excess of powder with a microfiber cloth, I added a million confetti inside the window, and finally attached the birch tree panel on the foam strips to totally close and complete the shaker panel.

Next I stamped my images, cut them all using the coordinating and colored everything using my alcohol markers. And once they were done, I attached all the images on the shaker panel using foam squares. And always I finished my card by adding white highlights and details on everything using my white gel pen.


VIDEO


AVERY ELLE SUPPLIES
- Carolers stamp set


OTHER SUPPLIES
- Spectrum Noir Illustrator markers
- Graph'it brush markers
- Outside the box level-up die set by My Favorite Things
- Birch tree stencil by Lawn Fawn
- Oxide inks: blueprint sketch, chipped sapphire, black soot
- Copic opaque white ink
- Sakura white gel
- Confetti by Studio Katia
- Clear embossing ink by Lawn Fawn
- Fine white embossing powder by Hero Arts
- Extreme black ink by My Favorite Things
- Paper bag cardstock by Lawn Fawn
- Strathmore bristol smooth cardstock (panels)
- Transotype perfect coloring paper (images)

Sunny Studio - Autumn Greenery & Pumpkin Patch Box Card Pop-Up

jeudi 22 septembre 2022

Hello there,

I'm back today on Sunny Studio's blog with this super cute pop-up box card featuring the new Autumn greenery die set, as well as three little mice picking some pumpkins under the supervision of a friendly scarecrow.

As very often I started off with the coloring. I stamped all my images using an alcohol marker friendly black ink, and cut them all using the coordinating dies. Next I colored everything using my alcohol markers with brown, pink, orange and yellow shades to make a bright and lovely autumn scene. Here are the different sets I picked my images from:

Harvest mice for three mice, pumpkins and sweater
Farm fresh for the scarecrow
Fall kiddos for one more pumpkin
Seasonal trees for a tree

Next I moved on to the pop-up box card elements. I cut two main panels out of Strathmore bristol smooth cardstock, as well as a bunch of Autumn greenery leaves that I randomly glued on the lower parts of each panel. And once the leaves were all attached, I colored both panels using squeezed lemonade, dried marigold, kitsch flamingo and picked raspberry oxide inks.


Once the panels were dry, I decorated them using pattern papers from the Critter country paper pack, and cut five grass borders using a die from the Picket fence die set to go inside the box. And next I stuck all my cute images inside the box on the grass borders using 3mm glue dots.

For my sentiment, I cut a small Scalloped oval mat 1 shape and white heat embossed my "Autumn blessings" sentiment from Happy harvest right in the center, and I attached it on the front of the box using foam squares.


VIDEO


SUNNY STUDIO STAMPS
- Autumn greenery die set
- Harvest mice stamp set
- Farm fresh stamp set
- Fall kiddos stamp set
- Seasonal trees stamp set
- Happy harvest stamp set
- Picket fence die set
- Scalloped oval mat 1 die set
- Critter country 6x6 paper pack


OTHER SUPPLIES
- Spectrum Noir Illustrator markers
- Graph'it brush markers
- Oxide inks: squeezed lemonade, dried marigold, kitsch flamingo, picked raspberry
- Copic opaque white ink
- Sakura white gel pen
- Scalloped box card pop-up die set by Lawn Fawn
- Clear embossing ink by Lawn Fawn
- Fine white embossing powder by Hero Arts
- Kraft cardstock by Hero Arts
- Strathmore bristol smooth cardstock
- Transotype perfect coloring paper

Lawn Fawn - Autumn Mix & Match Flippin' Awesome Card

mardi 13 septembre 2022

Hi there,

Today the mice family is back again on Lawn Fawn YouTube channel and blog! This time they're all busy at the sunflower farm sowing seeds and taking care of the flowers. As very often I picked a bunch of images from different sets to build my card so feel welcome to check the video and/or list of supplies down below for more information.

I stamped all the images using jet black ink, cut them all using the coordinating dies and then colored everything using my alcohol markers.

Next I moved on to the interactive part, and started by cutting the Flippin awesome main element out of speckled eggshell cardstock, as well as four squares out of bristol cardstock, the end of the Flippin awesome panel a second time, and finally four patterned squares to decorate the back of the bristol ones.

I colored the four squares and the end of the Flippin awesome panel using distress inks: tumbled glass + peacock feathers on the upper part, antique linen + gathered twigs distress inks. Once those panels were dry, I decorated the back of each one of them using the patterned squares, and I added double sided tape on the Flippin awesome panel: on the three sections in the middle, on the square section on the right and on the two small tabs as well. I folded the panel on the score lines, and then attached each square panel.


Next I colored a 5,5 x 4,25" bristol panel using a hillside stencil + sunray background stencil along with shabby shutters, peeled paint, tumbled glass and peacock feathers distress inks.

I attached all my images on the Flippin awesome element using 3mm glue dots and liquid glue, as well as a few additional ones on the upper part of the panel using foam squares, and then I attached the Flippin awesome element on the lower part of the panel.


Finally I added a few extra details. I cut the decorative handle out of sunflower cardstock for the main piece, and out of white cardstock for the small arrow in the center, and attached both pieces using liquid glue, and I stuck my "Happy Fall" black banner at the very top of the panel using foam squares.


VIDEO


LAWN FAWN SUPPLIES

Stamp sets
- Garden before 'n afters
- Berry special
- You autumn know
- Virtual friends
- Just add glitter
- A creature was stirring
- Hay there
- Let's go nuts
- Toadally awesome
- Swan soiree
- Tree before 'n afters

Die sets
- Flippin' awesome
- Large stitched rectangle stackables

Misc
- Jet black ink
- Sunrays background stencil
- Hillside stencil
- Into the woods remix 6x6 paper pack
- Speckled eggshell cardstock
- Black licorice cardstock
- Sunflower cardstock
- Clear embossing ink
- White embossing powder


OTHER SUPPLIES
- Spectrum Noir markers
- Graph'it brush markers
- Distress inks: tumbled glass, peacock feathers, black soot, antique linen, gathered twigs, shabby shutters, peeled paint, forest moss
- Copic opaque white ink
- Sakura white gel pen
- Strathmore bristol smooth cardstock

Sunny Studio - Fall & Halloween Pumpkin Patches

jeudi 8 septembre 2022

 Hey there,

I'm super excited to be back on Sunny Studio's blog today with two cards, both showcasing the brand new Pumpkin patch die set from the Fall & Winter 2022 collection. I couldn't decide if I wanted to create an autumn card or a Halloween card, so I decided to make both, using die cut pieces only.


I started by cutting all the pieces I needed to create both cards. And I knew that I wanted to use my alcohol markers to color all those bits and pieces, so I cut everything out of the same paper I always use to color my images. Besides the Pumpkin patch die set, here are the sets I picked the different dies from:

Comic strip everyday: clouds, sun/moon, tree trunks, foliage
Picket fence: grass border & fence

For the autumn card I went with traditional pumpkins using two shades of orange, I also colored some sunflowers, leaves and swirling stems, a sun and a few clouds, some colorful trees and some birds to be crows.

And for the Halloween card I went with spooky pumpkins using two shades of purple. The sunflowers turned into bright pink flowers, I didn't add any foliage on the trees, the sun turned into the moon and the birds into bats.


Once everything was colored, I created a background for each card. I cut two 5,5 x 4,25" bristol panels, as well as two grass borders using a die from the Picket fence die set. For the autumn card I went with a turquoise sky using tumbled glass & peacock feathers oxide inks, and a khaki green grass border using shabby shutters & peeled paint oxide inks. And for the Halloween card, I went with dark blue shades for the sky using blueprint sketch, chipped sapphire & black soot oxide inks, and a dark green grass border using mowed lawn & rustic wilderness oxide inks.

Before assembling the cards, I white heat embossed a sentiment at the bottom of each grass border: "Hello autumn" from Fall kiddos for the autumn card, and "Trick or treat" from Bewitching for the Halloween card. And next I attached the different elements on each panel, starting with the grass borders, and then all the bits and pieces using a combination of foam squares, glue dots & liquid glue.


VIDEO


SUNNY STUDIO SUPPLIES
- Pumpkin patch die set
- Comic strip everyday die set
- Picket fence die set
- Tropical trees backdrop die set
- Fall kiddos stamp set
- Bewitching stamp set


OTHER SUPPLIES
- Spectrum noir markers
- Graph'it brush markers
- Oxide inks: tumbled glass, peacock feathers, shabby shutters, peeled paint, blueprint sketch, chipped sapphire, black soot, mowed lawn, rustic wilderness
- Copic opaque white ink
- Liquid stardust by Lawn Fawn
- Clear embossing ink by Lawn Fawn
- Fine white embossing powder by Hero Arts
- Strathmore bristol smooth cardstock
- Transotype coloring paper

Sunny Studio - Too Cute to Spook Pop-Up Card

mercredi 7 septembre 2022

Hello there,

I'm thrilled to be back today on Sunny Studio's blog with some spooky cute inspiration showcasing the brand new Too cute to spook stamp set, super adorable with fun critters all dressed up to go trick or treating in the neighborhood. Love their happy faces and fun costumes! This set includes everything you need to create a sweet and spooky little scene.

I first started by stamping my images using an alcohol marker friendly black ink: three critters, the house, some dead trees and pumpkins, as well as two cute spiders and spider webs. I cut them all using the coordinating dies, and then colored everything using my alcohol markers.


Next I cut all the different pieces to build my pop-up card using the Mini slimline outside the box level up die set by My Favorite Things. I went with black mostly, and embossed my "Happy Halloween" sentiment from Too cute to spook in silver on the foreground element. I cut three grass borders out of dark green cardstock using the Mini slimline outside the box grass die set by My Favorite Things, and created a night sky using blueprint sketch, chipped sapphire and black soot oxide inks.


I assembled all those pieces to build the card base, and then I attached all my cute images on the grass borders using 3mm glue dots. I also wanted a couple of bats to fly in the sky, so I attached them on thin strips of acetate, and finally stuck those strips inside the box, using glue dots again.


VIDEO


SUNNY STUDIO SUPPLIES
- Too cute to spook stamp set

OTHER SUPPLIES
- Spectrum Noir markers
- Graph'it brush markers
- Oxide inks: rustic wilderness, black soot, blueprint sketch, chipped sapphire, black soot
- Copic opaque white ink
- Liquid stardust by Lawn Fawn
- Sakura white gel pen
- Mini slimline outside the box level up die set by MFT
- Mini slimline outside the box grass die set by MFT
- Clear embossing ink by Lawn Fawn
- Silver embossing powder by Lawn fawn
- Extreme black ink by MFT
- Strathmore bristol smooth cardstock
- Black licorice cardstock by Lawn Fawn
- Dark green cardstock by The Stamp Market

Sunny Studio - A Nut House for the Squirrel Friends

jeudi 1 septembre 2022

Hey there,

I'm back on Sunny Studio's blog this week with a new super cute and busy scene featuring the lovely Squirrel friends from the Fall & Winter 2022 collection. I love those sweet and fun little guys so much, I can't wait to showcase them on other projects!

So, as often happens, I started off with the coloring. I stamped the images using an alcohol marker friendly black ink, cut them all using the coordinating dies, and then colored everything using my alcohol markers. Like I said, I created a busy scene with images from different sets, so here is the supplies list: 

Squirrel friends - tree trunk, nuts and squirrels
Seasonal trees - small bird
Little birdie - branches
Balloon rides - banner
Happy harvest - sunflowers
Spring showers - butterfly net
Harvest mice - cart
Country scenes - swirling thing


Once everything was colored, I created a house for the squirrels to live in using the Nutty for you die set for the base of the house, and the Gingerbread house die set for the door and two windows. I cut the different pieces and colored them using my alcohol markers again.

Next I did the background. I cut an 8,5 x 3,5" bristol panel and used scattered straw + spiced marmalade oxide inks to create a light autumn sky. And then I created a grass border to ground the scene. I cut another 8,5 x 3,5" bristol panel and cut a slim grass border out of it using a die from the Picket fence die set. And I colored this border using shabby shutters and peeled paint oxide inks.


Once the background panel and grass border were dry, I started to assemble everything, starting with the nut house pieces, and then all the elements on the slimline panel using foam squares mostly to bring dimension to the scene.

And last but not least I created my sentiment. I white heat embossed the banner from Little birdie on vellum, along with the phrase "Nuts about you" from Squirrel friends inside of it, and I attached it at the top of the nut house using a clear foam square.


VIDEO


SUNNY STUDIO SUPPLIES
- Squirrel friends stamp set
- Seasonal trees
- Balloon rides
- Happy harvest
- Little birdie
- Spring showers
- Harvest mice
- Country scenes


OTHER SUPPLIES
- Spectrum Noir markers
- Graph'it brush markers
- Oxide inks: scattered straw, spiced marmalade, ripe persimmon, shabby shutters, peeled paint, forest moss
- Copic opaque white ink
- Sakura white gel pen
- Clear embossing ink by Lawn Fawn
- Fine white embossing powder by Hero Arts
- Brown cardstock by Lawn Fawn
- Slimline die by Lawn Fawn
- Strathmore bristole smooth cardstock