Sunny Studio - Dashing Dachshund Black Friday Free Gift w/ Purchase

jeudi 24 novembre 2022

Hey there,

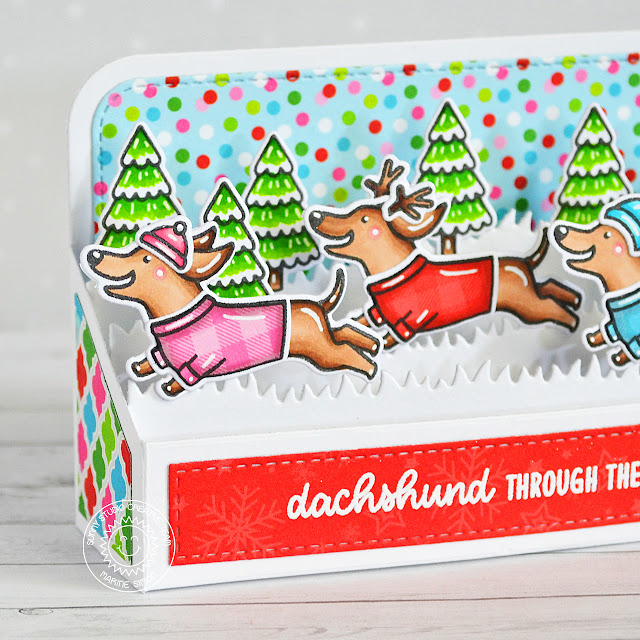
Happy Thanksgiving! I'm so happy to be back on Sunny Studio's blog with this pop-up card showcasing the ever so cute and fun Dashing Dachshund mini stamp set, which is the Black Friday free gift with purchase this year. Make sure to check Sunny Studio's blog daily during Black Friday week for more Dashing dachshund inspiration by the design team!

So, my card features three lovely pups running in the snowy grass. I didn't use a whole bunch of extra images to make my card, just the tree from Holiday Express to set a lovely scene.

I started off by building the pop-up card. I cut the back panel, the front + side pieces and the grass borders out of white cardstock, the decorative pieces out of three different papers from the Joyful Holiday paper pack, and white heat embossed my "Dachshund through the snow" greeting from Dashing Dachshund on the long decorative strip that goes on the front.


I stamped the images on white paper using an alcohol marker friendly black ink: three dachshunds, three sweaters, as well as three hats + many trees, and I stamped each sweater a second time on pattern papers from the Joyful Holiday paper pack. I colored the images using my alcohol markers, and for the sweaters I used light grey shades to bring a little bit of shadows to those images.


Once the coloring was done, I fussy cut each sweater, stuck them on the non-colored sweaters, and then attached them on the dachshunds.

I added highlights and details to the images using a white gel pen, and next I attached the images inside the box. And to do a nice and clean job, with no oozing glue on the grass borders, I first attached each image to an acetate strip, and then stuck the acetate strips inside the box at the back of the grass borders. Feel welcome to check the video to visualize the process more easily ^^


VIDEO


SUNNY STUDIO SUPPLIES
- Dashing dachshund stamp set
- Holiday express stamp set
- Joyful holiday paper pack


OTHER SUPPLIES
- Spectrum Noir Illustrator markers
- Graph'it brush markers
- Mini slimline outside the box level up die set by My Favorite Things
- Mini slimline outside the box level up grass die set by My Favorite Things
- Sakura white gel pen
- Extreme black ink by My Favorite Things
- Clear embossing ink by Lawn Fawn
- Fine white embossing powder by Hero Arts
- Transotype perfect coloring paper (images)

Lawn Fawn - Hot Foil Vellum Overlay

 Hey there,

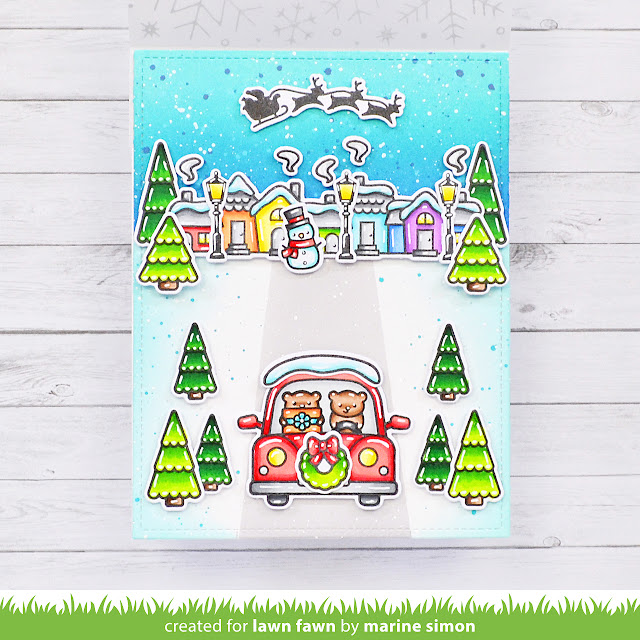
I'm back today on Lawn Fawn YouTube Channel & Blog with this cute and simple little scene that I made more interesting by adding a silver foiled vellum overlay panel on the front to hide the lower part of the scene and this way surprise the recipient of the card.

I stamped the images first using Jet black ink, I cut them all using the coordinating dies, and colored everything using my alcohol markers.


I cut a 5,5" x 4,25" bristol panel, and divided it in several parts to create a landscape. On the upper part I did the sky using salvaged patina, peacock feathers and blueprint sketch oxide inks. On the lower part, I did the road using hickory smoke oxide ink, and the snowy sides using salvaged patina oxide ink.


I cut a vellum panel longer than the Snowflake background hot foil plate, I silver foiled it, and then trimmed the sides and bottom. I scored the top part, leaving 1/4" above that score line, and then folded the score line, and before attaching this vellum panel to the landscape panel, I stuck the images on that background panel using foam squares, liquid glue and glue dots.


Next I assembled the card. I added double sided tape on the inside top section of the vellum overlay. I also cut two Simple stitched hillsides: one with my greeting and two bows that goes at the bottom of the vellum overlay, and an identical one that goes at the back. I attached the vellum overlay to the landscape panel, and finally to a white card base.


VIDEO


LAWN FAWN SUPPLIES

Stamp sets
- Winter village
- Christmas dreams
- Car critters
- Car critters Christmas add-on
- Tiny winter friends
- Simply celebrate winter
- Winter skies
- Happy village

Die sets
- Large stitched rectangle stackables
- Simple stitched hillside borders

Misc
- Snowflake background hot foil plate
- Silver foil
- Jet black ink
- Clear embossing ink
- Silver embossing ink
- Vellum


OTHER SUPPLIES
- Spectrum Noir Illustrator markers
- Graph'it brush markers
- Oxide inks: salvaged patina, peacock feathers, blueprint sketch, hickory smoke
- Sakura white gel pen
- Copic opaque white ink
- Strathmore bristol smooth cardstock (background)
- Transotype perfect coloring paper (images)

Sunny Studio - Penguin Party Interactive Card

vendredi 18 novembre 2022

 Hello there,

I'm back this week on Sunny Studio's blog with this super cute and fun interactive card showcasing Penguin Party. I went for non-traditional colors again with a pink sky, a violet Christmas tree and a penguin snow surfing on his belly!

And to make this fun little scene, I picked:
- the tree from Cozy Christmas
- the snowflakes from Snowman kisses
- one more penguin from Passionate penguins
- the North pole sign from North pole


I started off by cutting my background panel out of bristol cardstock, and I stenciled it using oxide inks: at the top I created a bright pink sky using spun sugar, kitsch flamingo and picked raspberry, and on the lower part, I created snow hills using salvaged patina.

I stamped my images using an alcohol marker friendly black ink, cut them all using the coordinating dies and then colored everything using my alcohol markers. Next I created the interactive panel, and I invite you to watch the process video down below to see how it was made, it's always easier to understand with images ^^


Once my interactive panel was done, I attached it on a Dots & stripes pastels purple panel, and then that purple panel on a white panel. And next I attached all my cute images on the interactive panel using foam squares and liquid glue.

Next I added the final details: an arrow to let the recipient of the card know that they have to go back and forth with the wheel to make the penguin surf. I also white heat embossed my "Hope your holiday is fun & festive" greeting from Penguin party on a pink banner that I attached at the bottom of the panel using foam squares, and finally I added a dot of glossy accents on each light in the Christmas tree.


VIDEO


SUNNY STUDIO SUPPLIES
- Penguin party stamp set
- Cozy Christmas stamp set
- Snowman kisses stamp set
- Passionate penguins stamp set
- North pole stamp set
- Dots & stripes pastels paper pack


OTHER SUPPLIES
- Spectrum Noir Illustrator markers
- Graph'it brush markers
- Oxide inks: salvaged patina, peacock feathers, spun sugar, kitsch flamingo, picked raspberry
- Sakura white gel pen
- Reveal wheel die set by Lawn Fawn
- Copic opaque white ink
- Extreme black ink by My Favorite Things
- Clear embossing ink by Lawn Fawn
- Fine white embossing powder by Hero Arts
- Strathmore bristol smooth cardstock (background)
- Transotype perfect coloring paper (images)

Sunny Studio - Holiday Greetings Gingerbread Shaker Card

samedi 12 novembre 2022

Hey there,

I was back this week on Sunny Studio's blog with this cute gingerbread shaker card featuring one of the gorgeous sentiments from Holiday Greetings, as well as both characters from Christmas cookies and the holly leaves from Holiday Express

I started off by cutting a Frilly frame eyelet lace panel out of kraft cardstock, and I created a giant gingerbread cookie by applying rusty hinge, vintage photo and ground espresso distress inks on that panel. I also added cookie texture all over the panel by mixing each distress ink with water to splatter droplets on the paper, as well as white ink.


Once my cookie panel was dry, I cut an opening out of it, right in the middle, using a die from the Stitched oval 2 die set, next I white heat embossed my "Season's Greetings" sentiment from Holiday greetings on a piece of acetate that then I attached at the back of my cookie panel.

Still at the back of the panel, I added foam stripes all along the oval opening, rubbed the foam strips edges with my powder tool to make those edges non sticky, cleaned the excess of powder using a microfiber cloth, and then poured some shaker accessories inside the oval window. And then I closed my shaker panel using a Joyful holiday panel that I attached to the foam strips.


Next I cut a 5,5" x 4,25" red panel from the Joyful holiday paper pack, as well as a slightly smaller vellum panel. I attached my shaker panel on top of the vellum panel, and then the vellum panel to the red panel. And to totally complete my shaker panel, I cut a white glittery frame using a die from the Stitched oval 2 die set + another one from the Scalloped oval mat 1 die set, and I attached that frame around the oval window to give the illusion of icing on the gingerbread cookie.

I stamped both characters from Christmas cookies, as well as two holly leaves from Holiday express using an alcohol marker friendly black ink, cut them using the coordinating dies and colored everything using my alcohol markers.

To finish my card, I white heat embossed the second part of my sentiment "Sending you sweet holiday wishes" on a red banner I cut out of a Joyful holiday pattern paper. The words "Sending you" are from Bear hugs, and the words "Sweet holiday wishes" are from Christmas cookies. I attached that banner below the window, as well as the images using foam squares. And finally I added highlights on the images using a white gel pen, as well as glossy accents on the holly berries.


VIDEO


SUNNY STUDIO SUPPLIES
- Holiday greetings stamp set
- Christmas cookies stamp set
- Holiday express stamp set
- Bear hugs stamp set
- Frilly frame eyelet die set
- Stitched oval 2 die set
- Scalloped oval mat 1 die set
- Joyful holiday paper pack


OTHER SUPPLIES
- Spectrum Noir Illustrator markers
- Graph'it brush markers
- Distress inks: rusty hinge, vintage photo, ground espresso
- Sakura white gel pen
- Copic opaque white ink
- Extreme black ink by My Favorite Things
- Clear embossing ink by Lawn Fawn
- Fine white embossing powder by Hero Arts
- White glittery adhesive paper by Rayher
- Iridescent confetti by Studio Katia
- Candy cane confetti by Prima Marketing
- Strathmore bristol smooth cardstock (background)
- Transotype perfect coloring paper (images)

Lawn Fawn - Reveal Wheel Monochromatic Foiled Card

jeudi 10 novembre 2022

 Hi there,

I'm so happy to be back on Lawn Fawn YouTube Channel & Blog with this new interactive card that features a whole bunch of different things: hot foil, stenciling, a monochromatic color palette and an acetate wheel to make Santa appear and disappear.

As very often I started off by stamping all my images on Transotype perfect coloring paper using Jet black ink. I cut them all using the coordinating dies, and then colored everything using my alcohol markers. I went for a black & white monochromatic color palette, with some red accents here and there. All the stamps sets I picked my images from are listed at the end of this article.


After the coloring, I silver hot foiled a piece of Black licorice cardstock using the Snowflake background hot foil plate, and from that piece of paper, I cut a Reveal wheel panel. Next I created the interactive mechanism, and I invite you to watch the process video down below to see how it was made.

Next, I cut Simple stitched wavy border out of Strathmore bristol smooth cardstock as tall as when you turn the wheel, Santa's silhouette can hide behind it. And before attaching that border, I added a little some details to it. I first created a pavement texture using the Brick stencil along with hickory smoke oxide ink. And I also added copic opaque white ink splatters, as well as black soot oxide + water splatters.


I white embossed my "Happy ho-ho-holidays" greeting from Ho-ho-holidays on a red Everyday sentiment banner, and stamped "and a very jolly new year" from the same set at the bottom of the pavement section using Jet black ink.

And then I assembled everything. I attached a Let is shine red panel to a card base, and stuck a White dotted panel on top of it. I attached the pavement border to the hot foil snowflake black panel using 2mm foam squares, and then stuck my interactive panel to the card base.


I cut a small red arrow next to the acetate wheel to let the recipient of the card know that they have to turn the wheel to make Santa's silhouette appear and disappear, and I attached the red banner at the top of the card.

I attached the images using 1mm foam squares mostly, and to finish the card I added highlights and details to the images using a white gel pen.


VIDEO


LAWN FAWN SUPPLIES

Stamp sets
- Winter village
- Happy village
-Yeti ot not
- Car critters Christmas add-on
- Tiny winter friends
- Winter skies
- Ho-ho-holidays

Die sets
- Reveal wheel
- Large stitched rectangle stackables
- Outside in stitched rectangle stackables
- Everyday sentiment banners
- Simple stitched wavy borders

Cardstock & paper
- Black licorice
- White textured dot (neutrals pack)
- Let it shine paper pack
- Acetate

Misc
- Snowflake background hot foil plate
- Brick stencil
- Clear embossing ink
- White embossing powder
- Jet black ink
- Silver foil


OTHER SUPPLIES
- Spectrum Noir Illustrator markers
- Graph'it brush markers
- Oxide inks: hickory smoke, black soot
- Sakura white gel pen
- Copic opaque white ink
- Strathmore bristol smooth cardstock (background)
- Transotype perfect coloring paper (images)
Sunny Studio - Cozy Christmas Scene

jeudi 3 novembre 2022

Hello there,

I'm super happy to be back this week on Sunny Studio's blog with this cute and simple card showcasing the adorable Cozy Christmas stamp set. For this card, I did one of my favorite things, which is gathering images from different sets to create a darling scene. So besides the ones I picked out from Cozy Christmas, I also chose:

- the fireplace, presents and stocking from Santa Claus lane
- a character from Spring showers
- the stuffed mice from Purrfect birthday
- the cookie plate from North pole


As always I stamped the images on white cardstock using an alcohol marker friendly black ink, I used the coordinating dies to cut them all and colored everything using my alcohol markers. For the armchair and lamps, I stamped the images a second time on a red pattern paper from the Joyful holiday paper pack. And it's no secret that I like to use non-traditional colors on holiday cards, but for this one I decided to stick with red, green and brown to make a warm & sweet cozy scene.

Once the coloring was done, I fussy cut the armchair and lamps I stamped on pattern paper, and glued them on the blank images.


For the background, I cut a 5,5" x 4,25" inches Dots & stripes pastels panel, as well as a piece of woodgrain cardstock and a slim stripe to make the floor. I also stamped my "Merry Christmas" sentiment from Holiday greetings on white cardstock using red ink, I cut it using the coordinating die, and then I assembled everything: I attached the woodgrain elements at the bottom of the panel using double sided tape, next the images and my greeting above the fireplace using foam squares.

Next I white heat embossed the second part of my greeting "May the season fill your home with joy" from Cozy Christmas on a slim black banner, and attached it at the bottom of the panel using foam squares again, and finally I added highlights and details to the images using a white gel pen, as well as a dot of glossy accents on each little light in the tree and holly berries.


VIDEO


SUNNY STUDIO SUPPLIES
- Cozy Christmas stamp set
- Santa Claus lane stamp set
- Spring showers stamp set
- Purrfect birthday stamp set
- North pole stamp set
- Holiday greetings stamp set
- Joyful holiday paper pack
- Dot & stripes pastels paper pack


OTHER SUPPLIES
- Spectrum Noir Illustrator markers
- Graph'it brush markers
- Extreme black ink by My Favorite Things
- Lobster ink by Lawn Fawn
- Clear embossing ink by Lawn Fawn
- Fine white embossing powder by Hero Arts
- Sakura white gel pen
- Black licorice cardstock by Lawn Fawn
- Woodgrain cardstock by Lawn Fawn
- Transotype perfect coloring paper (images)