Heffy Doodle - Double Slider Birthday Surprise Card

mardi 28 avril 2020

Hello there,

I am super happy to be back with my second card as a guest designer for Heffy Doodle! I’m an interactive card fan so I made a slider card featuring some cute otters.


To create this card, I used the Double Slider Surprise die set by Lawn Fawn and I first started by cutting all the different elements out of Strathmore bristol smooth cardstock: 2 pocket panels, 2 small panels and a track piece.


On a small panel and top of a pocket panel, I used the Cloudy Skies stencil along with tumbled glass distress ink to build a pretty and light sky. And I added texture to those clouds by splattering water first, and then drops of tumbled glass and peacock feathers distress inks mixed with water.


For the water section, I blended squeezed lemonade, cracked pistachio and peacock feathers distress inks on the same pocket panel as well as on the second small panel. I splattered water drops on those water sections, and like the sky I added more drops using cracked pistachio and peacock feathers distress inks mixed with water.


Next I built the interactive part of the card, and I invite you to watch the video at the end to see how it was done. Images are more understandable than words when it comes to assembling a lot of things ^^
All my images were stamped on neenah solar white cardstock using memento tuxedo black ink and colored using my  alcohol markers. I used a few sets to help me to create this card:

– Otter Side (otters, rock and sentiment)
– Gnome Matter What (flowers and dragonflies)
– Quack Me Up (sun and clouds)
– Big Bug Hugs (heart leaves)

When the coloring was done, I attached everything using a combination of glue dots and liquid glue. I stamped my sentiment “Have an otterly wonderful birthday” on the bottom section of the card, and attached a handle to be able to open and close it.


For the card base, I layered three different papers and attached my slider pocket on top of it using foam tape, and finally I added teeny tiny white drops in the center of each flower.

Thank you so much Lesley for having me as a guest designer, it was a great pleasure and I had an amazing time creating projects for Heffy Doodle!

VIDEO
Below or here


HEFFY DOODLE SUPPLIES
→ Otter Side stamp set ----- https://heffydoodle.com/shop/otter-side-stamps.html → Gnome Matter What stamp set ----- https://heffydoodle.com/shop/gnome-matter-what-clear-stamps.html → Quack Me Up stamp set ----- https://heffydoodle.com/shop/quack-me-up-clear-stamps.html → Big Bug Hugs stamp set ----- https://heffydoodle.com/shop/big-bug-hugs-clear-stamps.html → Cloudy Skies stencil ----- https://heffydoodle.com/shop/cloudy-skies-stencil.html

OTHER SUPPLIES
- Double slider surprise die set by Lawn Fawn - Spectrum Noir markers - Distress inks: tumbled glass, squeezed lemonade, cracked pistachio, peacock feathers - Sakura white gel pen - Memento tuxedo black ink - Neenah solar white cardstock - Strathmore bristol smooth cardstock

Hello Bluebird - In The Carrot Field

dimanche 26 avril 2020

Hello there,

Today I'm sharing with you a new card for Hello Bluebird and it features some cute bunnies harvesting carrots. Hope you'll like it!


So I started by cutting a bristol panel measuring 8,5 x 4". And I used scattered straw, tumbled glass and salty ocean distress inks to create the sky.


For the bottom of my card, I wanted to have several rows of carrots so I cut three hills using the Hill and Dale die set. And to color those hills I used gathered twigs and ground espresso distress inks. When it was done, I also added a bunch of white dots using a posca pen to bring more contrast.


Next I cut a grass border using the Grassy Knoll die set and I colored it using shabby shutters and peeled paint distress inks.


I stamped the Farmland Background on my panel using a light beige ink, and next I white heat embossed my sentiment "Wishing you a day full of happy" from the Happy Wishes stamp set at the top of my panel.

Next I attached the borders at the bottom of my panel: the grass border first using double sided tape and next the hill borders using foam tape to bring dimension to the scene.


I stamped, cut and colored my images from the Meadow Bunnies and Spring Gatherings stamp sets, and next I attached everything using foam squares and glue dots.


I cut a light blue card base and attached my panel on it and finally I added a few morning dew drops in the top section.


VIDEO
Below or here


HELLO BLUEBIRD SUPPLIES

OTHER SUPPLIES
- Spectrum Noir markers
- Distress inks: scattered straw, tumbled glass, salty ocean, gathered twigs, ground espresso, shabby shutters, peeled paint
- Sakura white gel pen
- White posca pen
- Clear embossing ink by Lawn Fawn
- White embossing powder by Hero Arts
- Jellyfish ink by Lawn Fawn
- Morning Dew nuvo drop by Tonic Studio

Lawn Fawn - A Magic Iris Shaker Card

mardi 21 avril 2020

Hey there,

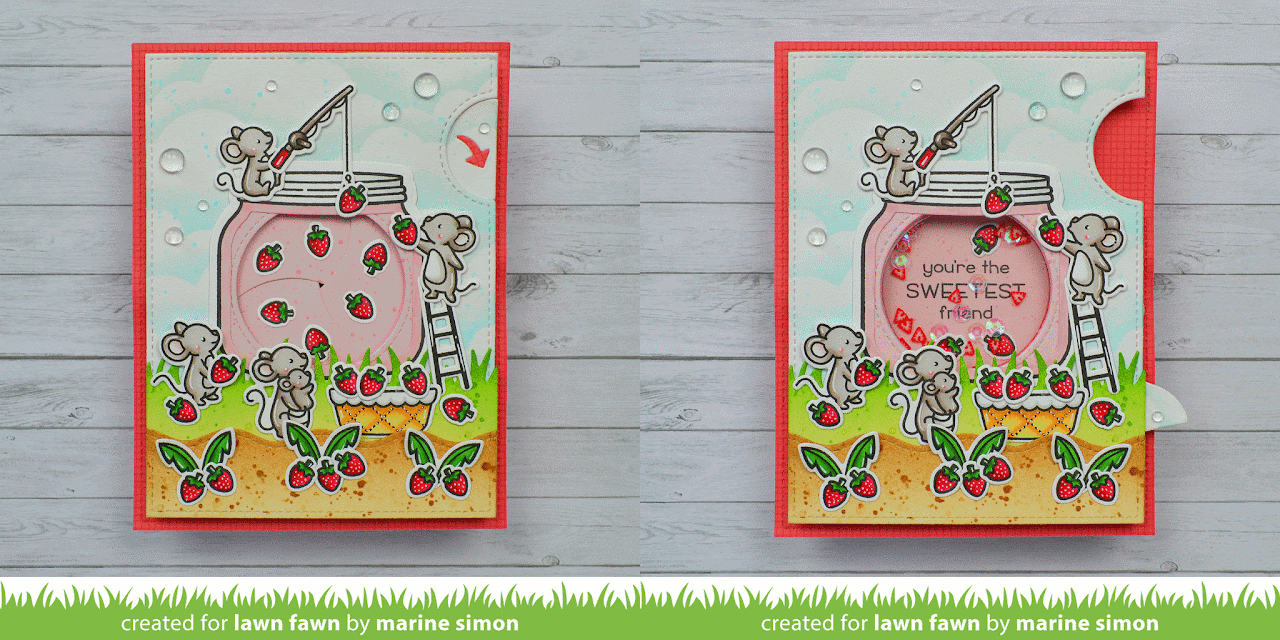
I am back with a new magic iris card. I really love to create that kind of card, but on today's project, I went next level and created a magic iris -shaker- card. Can sound impressive but it was very easy to make!

Like always, I used a bunch of stamp set die sets to create my card and you will find all the supplies at the end of this post.


I started with the coloring. I first stamped the images on white cardstock using jet black ink, I cut them all using the coordinating dies and then I colored everything using my alcohol markers.

Next I moved on to the front panel. I used the cover plate die from the magic iris add-on to cut it, as well as the arrow tab. I temporarily taped those two pieces at the back using washi tape, and next I used the cloudy stencil along with tumbled glass distress ink to create a nice and subtle background.


To ground the scene, I cut a grass border using the grassy border die, as well as a wavy border using the stitched simple wavy border die set. I colored the grass border using shabby shutters and mowed lawn distress inks, and I colored the wavy border using antique linen and vintage photo distress inks. Next I attached those two elements at the bottom of my front panel.

Next I created the magic iris shaker element, and I invite you to watch the video at the end of this post to see how I did this. It will be easier to understand with the process ^^


Next I cut a card base out of ballet slippers cardstock and attached on top of it a stitched panel that was cut out of a paper from the Really Rainbow Christmas paper pack using a die from the large stitched rectangle stackables die set.

I cut a pink circle using the cover plate die and the same pink paper as the magic iris, and I stamped my sentiment, "You're the Sweetest Friend", from the Sweet Friends stamp set on it. I placed my front panel on the card base and tucked my sentiment right in the circle in the middle to stick it to the card base.


Next I took the magic iris and on the front of it I applied double sided tape, on the three stabilizers and on the rest of the ring as well. I removed the backing paper and placed the Iris behind the front panel. I made sure to line up both the circle in the middle and the tab at the top right hand corner and I pressed down to connect everything perfectly.

Next I placed the shaker material on the sentiment: strawberry slices made out of polymer clay, sequins and colored strawberries as well. At the back of the front panel I applied enough layers of foam squares to get the same height as the foam ring, I also applied liquid glue on this foam ring, I kept the iris open and then I attached my panel to the card base, making sure to line up the window with the sentiment.


Before attaching the images, the jar still an inside, so I used the cover plate die to cut a circle out of a piece of the same pink paper and I attached the jar on this piece of pink paper, I trimmed off the excess and next I stuck everything on the card.

I cut the arrow out of the same red paper as the background and glued it on the tab, and finally, I added some clear droplets in the sky. They bring an extra touch of shine but do not compete with the rest of the scene.


VIDEO
Below or here

LAWN FAWN SUPPLIES

OTHER SUPPLIES
- Spectrum Noir markers
- Distress inks: tumbled glass, shabby shutters, mowed lawn, antique linen, vintage photo
- Sakura white gel pen
- Clear droplets by Studio Katia
- Neenah solar white cardstock
- Strathmore bristol smooth cardstock

Heffy Doodle - You are my sunshine - Magic Picture Changer Card

mardi 14 avril 2020

Hey there,

I'm so happy to be a guest designer for Heffy Doodle. I have a card for today, also on Heffy Doodle blog, and I will share a second card very soon.
So for this first card, I used three stamp sets to help me build this cute scene: Quack Me Up, Otter Side and Gnome Matter What, as well as the Grassy Lass border die set. And I also used the Magic Picture Changer die set and addon by Lawn Fawn to create an interactive card.


Like always when I create a magic picture changer card, I started with the background. And to make a cloudy and rainy sky, I first applied hickory smoke distress ink on most of the panel, and next I added black soot distress ink at the very top to darken the sky.

Next I added texture to my panel. I first splattered water on the panel and dried it using a paper towel. Next I smooshed my ink pads onto my glass mat, I added water and then I splattered drops of those inks on the panel: hickory smoke all over the paper and black soot just at the top and sides.


Next I moved on to the magic picture changer element. So I cut two pieces of Strathmore bristol cardstock: a long one for the pocket die and a short one for the moving piece die. Like always I marked the windows using a pencil, and then I moved on to the stamping. On the long panel I stamped a cloud, and on the short one I stamped the sun.

Next I masked both images and colored around them using hickory smoke only. Like the background I splattered water on those two panels, as well as hickory smoke drops using a thin brush. I removed the masks, and stamped some raindrops below the cloud using hickory smoke distress ink again. And next I quickly colored the sun and the cloud using my alcohol markers.


When the coloring was done, I taped the dies on the panels and sent them to my die cutting machine. Next I folded the tabs on the pocket panel using a bone folder and applied double sided tape on those tabs, front and back. I removed the backing paper from the inside and folded the tabs again to stick them.

Next I folded the pocket panel in half right on the score line, I applied some powder on the flaps and along the tabs as well, I put the moving piece into the pocket panel through the slit, and next I put each little flap into a small slit. Next I pulled on the tab to interlock the elements, I made sure that everything was aligned between the tabs, and finally I closed the pocket.

Next I took my background panel and cut a frame out of it, I applied double sided tape at the back of this frame along the four edges, and I stuck it on the pocket. Next I stuck the pocket on a white card base using double sided tape, as well as the remaining piece of background using foam tape.


To ground my scene, I cut two grass borders that I colored using shabby shutters and peeled paint distress inks. I first applied the light color shabby shutters on the whole element, and next I added peeled paint from the top to bring more depth to those borders. And like always I added texture by mixing the same inks with water.

One more element for my background: I cut a rectangle to create the pond and colored it using tumbled glass and broken china distress inks.

I stamped my sentiment "You are my sunshine" on the smallest grass border using black versafine ink and next I adhered everything below the interactive frame.


Next I stamped additional images on neenah solar white cardstock using memento tuxedo black ink and before coloring them, I changed the ducks into mallard ducks, using a pencil first and then my memento pen. When the coloring was done, I stuck everything on my panel using glue dots, foam squares and also liquid glue.

To complete the scene and make the sky less empty, I stamped more raindrops below each cloud using hickory smoke distress ink again. I attached the dragonflies using liquid glue and next I added white highlights on the images to make them pop a little bit more.

Next I cut the tab handle out of black cardstock and attached it at the very end of the tab using double sided tape, and finally I added a teeny tiny white nuvo drop in the center of each flower, and some morning dew nuvo drops in the sky.

VIDEO
Below or here


HEFFY DOODLE SUPPLIES
- Quack me up stamp set - Otter side stamp set - Gnome matter what stamp set - Grassy lass border die set

OTHER SUPPLIES
- Spectrum Noir markers - Distress inks: hickory smoke, black soot, shabby shutters, peeled paint, tumbled glass, broken china - Magic picture changer die set + add-on by Lawn Fawn - Sakura white gel pen - Black versafine ink - Memento tuxedo black ink - Memento black pen - Morning Dew Nuvo drops by Tonic Studio - Simply white Nuvo drops by Tonic Studio - Strathmore bristol smooth cardstock - Neenah solar white cardstock

Hello Bluebird - Party on the farm + Farmland background

lundi 13 avril 2020

Hi there,

For today's card I used the new Party on the farm stamp set and Farmland Background stamp to create a cute birthday scene.


I first started by coloring a 5,5 x 4,25" bristol panel using several distress inks: scattered straw, wild honey and spiced marmalade for the sky, and shabby shutters and peeled paint for the grass. Next I taped my panel in my misti tool in order to stamp the Farmland Background three times using potting soil ink.


I stamped the images using potting soil ink again, and I colored everything using my spectrum noir markers. When it was done, I stuck my panel on a card base and next I attached the images using a combination of foam squares and liquid glue.


I stamped my sentiment "Happy Birthday", and finally I added the last details: white blizzard nuvo drops at the top of each little hat, and glossy accents on the balloons to make then super shiny.


VIDEO
Below or here


HELLO BLUEBIRD SUPPLIES

OTHER SUPPLIES
- Spectrum noir markers
- Distress inks: scattered straw, wild honey, spiced marmalade, shabby shutters, peeled paint
- Sakura white gel pen
- Potting soil ink by Ranger
- Glossy accents by Ranger
- White Blizzard Nuvo drops by Tonic Studio
- Strathmore bristol cardstock
- Neenah solar white cardstock

Lawn Fawn - Year Ten Magic Picture Changer Card

dimanche 12 avril 2020

Hey there,

Today's card features the small Year Ten stamp set, and I also created Mexican hats myself to make this little scene cuter. Hope you'll like it!


I started with a 5,5 x 4,25" stitched panel to create the background. I used several distress inks: squeezed lemonade, spiced marmalade, abandoned coral and candied apple.


And to ground my little scene, I die cut two wavy borders and used antique linen and vintage photo distress inks to create sand borders.


Next I created the interactive part of my card. I cut two pieces of strathmore bristol cardstock: a long panel for the pocket die and a short one for the moving piece die. I marked the windows using a pencil and next I moved on to the stamping.


On the long panel, I stamped the cacti only. On the short panel, I placed the cacti and the flower on top, with the door of my misti tool I picked up the flower only, I removed the cacti and stamped the flower. And I did the same thing for the two other flowers. Next I cut masks for the flowers using the coordinating die, I placed the cacti on top and stamped it.


I also cut masks for the two cacti using the coordinating die and I used the same inks as before to create backgrounds on both panels. I removed the masks, and because of those masks, some of the lines were not connected so I simply used my memento pen to join all the lines.


And next I colored the images using my alcohol markers like always. When the coloring was done, I added white highlights on the images using my white gel pen, I taped the dies on the panels and sent everything to my die cut machine.


On the long panel, I started by folding the tabs using a bone folder in order to make them very flat. I applied double sided tape on those tabs, front and back and next I removed the backing paper from the inside and I folded the tabs again to stick them. I applied powder on the flaps and also along the tabs to help the mechanism to work nicely, I folded the pocket panel in half on the score line, next I put the moving piece into the pocket panel through the slit, and I put each flap into a small slit.


I pulled on the tab to interlock the pieces, I made sure everything was aligned between the tabs, and finally I removed the backing paper and folded the pocket panel to totally close it.


Next I took my background panel and cut a frame out of it, I applied thin double sided tape at the back of it on the four edges, and then I attached this frame to the pocket.


I cut a card base out of paper bag cardstock, and I stuck the remaining pieces of the background as well as the pocket on this card base using foam tape and double sided tape. I also attached the sand borders. And on the smaller one, I stamped "Hope your birthday is on point" using jet black ink.


Next I stamped and colored additional images. I created the hats myself by using the bottom part of a stamp from the Hats off to you stamp set. First using a pencil and I went back on the lines using my memento pen.


When the coloring was done, I fussy cut the hats and used the coordinating dies to cut the other images. And I attached everything on my panel. Next I added white highlights on the images, and finally I cut the tab handle out of chili pepper cardstock, I stuck it at the very top of the tab and for the arrow, I used sunflower cardstock.

VIDEO
Below or here


LAWN FAWN SUPPLIES

OTHER SUPPLIES
- Spectrum Noir markers - Distress inks: squeezed lemonade, spiced marmalade, abandoned coral, candied apple - Sakura white gel pen - Strathmore bristol cardstock - Neenah solar white cardstock - Memento pen

Hello Bluebird - Meadow Bunnies + Pathway Background

Hello there,

I'm back with a cute and happy card featuring a sweet little bunny from the Meadow Bunnies stamp set as well as the Pathway Background stamp. Like always, you will find my video at the end of this post.

So I first started by stamping the Pathway Background on white cardstock using an alcohol marker friendly brown ink. And I colored the whole scene using my alcohol markers, except for the sky because I knew that I wanted to use distress inks to create one. And when the coloring was done, I fussy cut the background to cut the sky out.


For the sky, I wanted to create like a sunset sky, a sky at the end of the day so I used scattered straw, tumbled glass and broken china distress inks on a 5,5 x 4,25 inches smooth white panel and I first applied scattered straw on one half of the paper. Next I applied tumbled glass on the other half towards the scattered straw section and I blended both colors together. And finally, I added more contrast to that sky by applying a little bit of broken china distress at the top.


Like always, I created texture to give more interest to my background. First some splatters of water that I dried using a paper towel, next I mixed tumbled glass and broken china distress inks with water and I created some splatters on my panel.


When the background was dry, I applied foam tape at the back of the Pathway image to create dimension and I attached it to the panel. I trimmed off the excess of paper, and next I stamped additional images: a bunny and two butterflies from the Meadow Bunnies stamp set. I used the same brown ink as before, and I colored them using my alcohol markers again.


I fussy cut the bunny and butterflies and next I placed my panel in my misti tool in order to stamp my sentiment "Oh happy day!" I stuck my panel on a card base, and then I attached the images using foam squares for the bunny and liquid glue for the butterflies.

Next I used my white gel pen to bring more light on some parts of the scene, and finally I added a few morning dew nuvo drops on the sky section for an extra touch of shine.

VIDEO
Below or here

HELLO BLUEBIRD SUPPLIES

OTHER SUPPLIES
- Spectrum Noir markers - Distress inks: scattered straw, tumbled glass, broken china - Sakura white gel pen - Morning Dew Nuvo drops by Tonic Studio - Neenah solar white cardstock - Strathmore bristol cardstock

Hello Bluebird - Picked For You

samedi 11 avril 2020

Hello there,

Hello Bluebird has a new release! I hope you got to choose your favorite sets from the shop and maybe my card will inspire you. It features the super cute Picked for you stamp set and I paired it with a the Snowy Sky Scene die from a previous release to build a cute little scene.


I first started by cutting the bottom parts of the Snowy Sky Scene die using Strathmore bristol cardstock, and I colored them using shabby shutters and peeled paint distress inks. And for the background, I used dried marigold and worn lipstick to create a pretty sky.


I stamped the images using Potting Soil ink and colored them using my alcohol markers. When it was done, I cut a card base and attached the background panel as well as the borders on it. I used foam tape to stick the bottom one to add dimension to the scene.

Next I adhered everything using a combination of liquid glue, foam squares and glue dots. Like always I added white highlights on the images and finally I added white nuvo drops in the middle of each flower.


VIDEO
Below or here


HELLO BLUEBIRD SUPPLIES


OTHER SUPPLIES
- Spectrum Noir markers
- Distress inks: dried marigold, worn lipstick, shabby shutters, peeled paint
- Sakura white gel pen
- Strathmore bristol cardstock
- Neenah solar white cardstock
- Potting Soil ink by Ranger