Sunny Studio - Garden Critters

jeudi 30 mars 2023

Hey there,

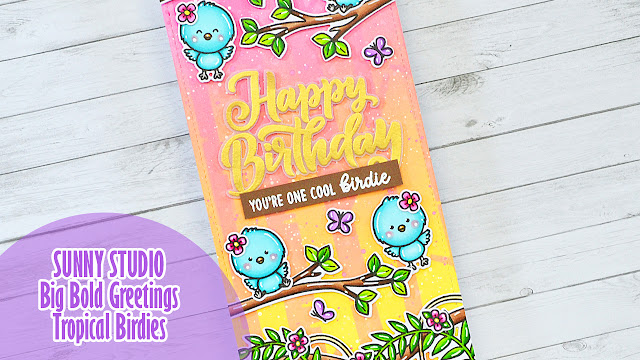
I'm super happy to be back on Sunny Studio's blog with the cutest little bugs from Garden Critters. To fit as many as I could on my card, I went for a slimline design, which is definitely my favorite size when I want to showcase a whole bunch of images. And that happens very often!


I started off by stamping all my images on Transotype perfect coloring paper using an alcohol marker friendly black ink, and I cut them all using the coordinating dies. Next I cut an 8,5 x 3,5 inches Strathmore bristol smooth panel, and placed all my non colored images on top to help me visualize the different parts of the scene I wanted to create. For this card, I wanted most of the panel to be clouds, and to have a pond and a grass border at the bottom. So I marked those different parts on my panel using a pencil, and then I colored it using stencils from my stash and oxide inks.


Once the panel was done, I colored the images using my Spectrum Noir Illustrator markers and Graph'it Brush markers. And as written above, I stamped a bunch of images from different sets:
- the bees, ladybugs and fireflies from Garden Critters
- the beehive from Just Bee-Cause
- the branch from Little Birdie
- the frog and flies from Feeling Froggy
- the cattails and water lilies from Country Scenes


I white heat embossed my "Sending bugs & kisses" greeting at the very bottom of my panel. The word "Sending" is from Bear Hugs, and the words "Bugs & kisses" are from Garden Critters. And next I stuck the images on my panel using a combination of 1mm foam squares, liquid glue and 3mm glue dots. The last final step was to add highlights and details on the images using a white gel pen.


VIDEO


SUNNY STUDIO SUPPLIES
- Garden critters stamp set
- Just bee-cause stamp set
- Little birdie stamp set
- Feeling froggy stamp set
- Country scenes stamp set


OTHER SUPPLIES
- Spectrum Noir Illustrator markers
- Graph'it brush markers
- Oxide inks: spun sugar, worn lipstick, shabby shutters, mowed lawn, salvaged patina, peacock feathers, blueprint sketch
- Copic opaque white ink
- Sakura white gel pen
- Stencils by Lawn Fawn
- Transotype perfect coloring paper (images)
- Strathmore bristol smooth cardstock (background)
- Clear embossing ink by Lawn Fawn
- Fine white embossing powder by Hero Arts
- Detail black ink by Pinkfresh Studio

Lawn Fawn - HapBee Spring Embroidery Card

mardi 28 mars 2023

Hey there,

I'm so happy to be back on Lawn Fawn YouTube Channel & Blog with this bright embroidered spring card. It was my first time doing cross stitching, I only did regular embroidery a few times in the past, so my technique was not perfect, but I'm glad the bee I cross stitched looks like a bee ^^

I started off my creating a lovely and bright spring landscape. I cut a 5,5 x 4,25 inches Large Stitched Rectangle out of Strathmore bristol smooth cardstock, and used some stencils to color it. I used the Grassy stencil and one of the Grassy Hillside stencils along with shabby shutters + mowed lawn oxide inks to color the lower part of the panel, and used the Cloudy stencil along with salvaged patina + peacock feathers oxide inks to color the upper part.

Once the panel was dry, I worked on my greeting. I did the first part using letters from Henry Jr's ABCs + a flower from Elphie Selphie to create the word "Hap*Bee". And did the second part using Henry's ABCs + a paper from the Really Rainbow paper pack to create the word "Spring", and finally read "Hap*Bee Spring".

Next I did some coloring. I stamped all my images on Transotype perfect coloring paper using Jet Black ink, cut them all using the coordinating dies, and colored everything using my Spectrum Noir Illustrator markers + Graph'it brush markers.

Next I started working on the embroidery. I picked one of the dies from Embroidery Hoop, I cut a hoop out of Speckled eggshell cardstock, and cross stitched the bee using DMC threads from my stash. And once it was done, I cut the hoop frame out of Kraft cardstock, and attached it around the bee. I also attached a Small stitched circle at the back of the design to have a base to put some liquid glue and then stick my embroidered design on the panel. I attached all the images using 2mm foam squares to be at the same height as the embroidery circle, and finished my card by adding highlights and details on the images using a white gel pen.


VIDEO


LAWN FAWN SUPPLIES

Stamp sets
- Berry special
- Bugs and kisses
- Gleeful gardens
- Easter party
- Eggstraordinary Easter
- Henry Jr's ABCs
- Butterfly kisses
- Butterfly kisses flip-flop
- Elphie selphie

Die sets
- Embroidery hoop
- Small stitched circle stackables
- Large stitched rectangle stackables

Misc
- Grassy stencil
- Grassy hillside stencil
- Cloudy stencil
- Jet black ink

Cardstock & papers
- Speckled eggshell
- White cardstock
- Kraft cardstock
- Really rainbow paper pack


OTHER SUPPLIES


- Spectrum Noir Illustrator markers
- Graph'it brush markers
- Oxide inks: shabby shutter, mowed lawn, rustic wilderness, salvaged patina, peacock feathers
- Sakura white gel pen
- Copic opaque white ink
- Strathmore bristol smooth cardstock (background)
- Transotype perfect coloring paper (images)
- DMC threads

Sunny Studio - Tropical Birthday Card

jeudi 23 mars 2023

Hello there,

I'm back on Sunny Studio's blog with this fun and bright birthday slimline card showcasing some chubby tropical birds, as well as the "Happy Birthday" sentiment from Big Bold Greetings.


I started off by stamping my images on Transotype perfect coloring paper using an alcohol marker friendly black ink, I cut them all using the coordinating dies, and colored everything using my Spectrum Noir Illustrator markers and Graph'it Brush markers. And as very often I picked the stamps from different sets to create a cute mix & match on my card. The birds are from Chickie Baby and are supposed to be chicks, but I turned them into tropical birds using turquoise shades, the butterflies are from Bunnyville, the leafy border is from Tropical Scenes, and the branch is from Little Birdie.


Next I created the background. I cut an 8,5 x 3,5 inches Strathmore bristol smooth panel, and used one of my favorite color combos: squeezed lemonade, dried marigold, kitsch flamingo and picked raspberry oxide inks. This combination is versatile and can be used on any card for any theme, but I think it fits the tropical vibe quite nicely.

Once the ink blending was done, I used a birch tree stencil from my stash and the same oxide inks to emphasize the jungle look I wanted to give to my card, and then I attached the images on the panel using 1mm foam squares and 3mm glue dots.


I created my greeting in two parts, and attached them in the middle of my panel. I first gold heat embossed "Happy Birthday" from Big Bold Greetings on vellum, and cut those words using the coordinating die. And next I white heat embossed the phrase "You're one cool birdie" on a slim brown banner. The words "You're one cool" are from Chickie Baby, and the word "Birdie" is from Little Birdie. As always I finished the card with white highlights and details on the images.


VIDEO


SUNNY STUDIO SUPPLIES
- Big bold greetings stamp set
- Chickie baby stamp set
- Little birdie stamp set
- Bunnyville stamp set
- Tropical scenes stamp set


OTHER SUPPLIES
- Spectrum Noir Illustrator markers
- Graph'it brush markers
- Oxide inks: squeezed lemonade, dried marigold, kitsch flamingo, picked raspberry
- Copic opaque white ink
- Sakura white gel pen
- Birch tree stencil by Lawn Fawn
- Clear embossing ink by Lawn Fawn
- Gold embossing powder by Lawn Fawn
- Fine white embossing powder by Hero Arts
- Detail black ink by Pinkfresh Studio
- Transotype perfect coloring paper (images)
- Strathmore bristol smooth cardstock (background)
- Vellum from my stash
- Brown cardstock from my stash

Sunny Studio - Clucky Chickens Interactive Baby Card

jeudi 16 mars 2023

Hello there,

I'm thrilled to be back today on Sunny Studio's blog with this super cute and busy interactive scene showcasing the most adorable hens and chicks from Clucky Chickens. The moment I saw this stamp set I knew that I wanted to make a Magic Picture Changer card to make one of the eggs crack open and make a sweet little chick appear inside the chicken coop.

I started off with the background. I cut a 5,5 x 4,25 inches Strathmore bristol smooth panel, and did some stenciling to create a farm landscape. At the bottom of the panel, I created a muddy/sandy border using antique linen + vintage photo oxide inks. And on the top section, I used a cloud stencil from my stash along with tumbled glass + salty ocean oxide inks to create a lovely sky. Next I cut another 5,5 x 4,25 inches bristol panel, cut a grass border out of it using a die from Picket Fence, and I colored that border using shabby shutters + mowed lawn oxide inks.


Once my landscape elements were done, I centered and stamped my "Welcome to the world little one" greeting from Inside Greetings Congrats on top of the panel, and then I created the whole interactive mechanism. Please check the video down below to watch the process from start to finish.


Next I stamped a bunch of images that I picked from different sets:
- most of the images from Clucky Chickens
- the grass from Garden Critters
- the sunflowers from Happy Harvest
- the fence from Barnyard Buddies
- the small scalloped details from Spring Scenes + Country Scenes to create birds


As always I used the coordinating dies to cut them all, and then colored everything using my alcohol markers. And once all the images were done, I attached them on my panel using 1mm + 2mm foam squares mostly, as well as glue dots and liquid glue at some places. And finally I added highlights on the images using a white gel pen.


VIDEO


SUNNY STUDIO SUPPLIES
- Clucky chickens stamp set
- Garden critters stamp set
- Happy harvest stamp set
- Barnyard buddies stamp set
- Spring scenes stamp set
- Country scenes stamp set
- Inside greetings congrats stamp set
- Picket fence die set


OTHER SUPPLIES
- Spectrum Noir Illustrator markers
- Graph'it brush markers
- Distress oxide inks: shabby shutters, mowed lawn, rustic wilderness, antique linen, vintage photo, tumbled glass, salty ocean
- Magic picture changer die set by Lawn Fawn
- Stencils by Lawn Fawn
- Copic opaque white ink
- Sakura white gel pen
- Detail black ink by Pinkfresh Studio (images)
- Black versafine ink (greeting)
- Strathmore bristol smooth cardstock (background)
- Transotype perfect coloring paper (images)

Sunny Studio - Rainbow Spring Bouquet

jeudi 9 mars 2023

Hey there,

I'm back on Sunny Studio's blog with more flowers to brighten your day! Today's card features Spring Bouquet, a beautiful layering stamp set that includes three types of flowers: daffodil, hyacinth and iris. I decided to go with hyacinths only in order to create like a field of flowers, and the first thing I did was to stamp six of them on Strathmore bristol smooth cardstock using distress oxide inks. Here are the color combinations I picked for each flower & greenery:

- Pink: spun sugar + kitsch flamingo + picked raspberry
- Orange: dried marigold + carved pumpkin + ripe persimmon
- Yellow: squeezed lemonade + mustard seed + fossilized amber
- Green: shabby shutters + mowed lawn + rustic wilderness
- Blue: tumbled glass + salty ocean + blueprint sketch
- Purple: shaded lilac + wilted violet + villainous potion
- Greenery: mowed lawn + rustic wilderness


Because Spring is coming soon, I decided to add a few bees. These are from Sunflower Fields, and again, I used distress oxide inks to stamp the different parts: mustard seed for the body, black soot for the dark details, and lost shadow for the wings. Once the flowers, leaves and bees were done, I cut everything using the coordinating dies, and moved on to the background.


To be able to fit the six flowers on my card, I went for a slimline design. I cut an 8,5 x 3,5 inches Strathmore bristol smooth panel, and I did some stenciling using distress oxide inks. On the lower part, I created a hill border using shabby shutters + mowed lawn. And on the upper part, a cloudy sky using tumbled glass + salty ocean. Next I cut another 8,5 x 3,5 inches Strathmore bristol smooth panel, and cut a slim grass border out of it using a die from Picket Fence, and I colored that grass border using shabby shutters + mowed lawn oxide inks.


Next I stamped my "I'm so thankful for your friendship" greeting from Words Of Gratitude on the grass border using black ink, I attached the border at the bottom of my slimline panel using foam squares, and then the hyacinths, leaves and bees using foam squares again. And finally I added highlights and details on the images using a white gel pen.


SUNNY STUDIO SUPPLIES
- Spring bouquet stamp set
- Sunflower fields stamp set
- Words of gratitude stamp set
- Picket fence die set


OTHER SUPPLIES
- Distress oxide inks: spun sugar, kitsch flamingo, picked raspberry, dried marigold, carved pumpkin, ripe persimmon, squeezed lemonade, mustard seed, fossilized amber, shabby shutters, mowed lawn, rustic wilderness, tumbled glass, salty ocean, blueprint sketch, shaded lilac, wilted violet, villainous potion, lost shadow, black soot
- Stencils by Lawn Fawn
- Sakura white gel pen
- Copic opaque white ink
- Black versafine ink
- Strathmore bristol smooth cardstock

Sunny Studio - Tranquil Tulips Layering Stamps Infinity Shaker Card

jeudi 2 mars 2023

Hello there,

I'm so happy to be back on Sunny Studio's blog today with a bright & beautiful bouquet showcasing Tranquil Tulips! It's no secret that I love to create little scenes with multiple images and details, but I also really love to play with the amazing layering stamp sets we have in the Sunny Studio catalogue.


I started off with the background. I knew that the flowers, watering can & shaker accessories would be very bright, and I didn't want all those elements to get lost on a too colorful background, so I picked a light pattern paper from the Subtle Grey Tones paper pack, and cut a 5,5 x 4,25 inches panel. Next I took a sheet of plastic from my stash a little bit bigger than my panel, added double sided tape along the four edges, placed my grey panel in the middle of it, and while keeping the panel in place with my left hand, I cut the four plastic corners off, and this way created four plastic tabs on each side of the grey panel. I folded and attached three of those tabs at the back of the grey panel, added a mix of sequins, jewels & confetti inside the plastic pocket, and then folded and attached the fourth tab to totally close the pocket. I attached my infinity shaker panel on a white card base using double sided tape, and then moved on to the images.

I stamped the tulips and leaves from Tranquil Tulips, as well as the watering can from Watering Can on Strathmore bristol smooth cardstock using distress oxide inks. For the tulips, I used spun sugar + kitsch flamingo + picked raspberry. For the leaves, I used shabby shutters + mowed lawn. And for the watering can, I used salvaged patina + hickory smoke. Once all the images were stamped, I used the coordinating dies to cut them all, and then I attached everything on the infinity shaker panel using foam squares.


And finally I created my greeting in two parts. I started by cutting the word "Thanks" out of gold mirror cardstock using a die from the Thank You Words die set. Next I white heat embossed the phrase "for always being there" from Words Of Gratitude on a dark grey slim banner, and then I attached both elements on the bottom left corner of my card using liquid glue and foam squares.


SUNNY STUDIO SUPPLIES
- Tranquil tulips stamp set
- Watering can stamp set
- Words of gratitude stamp set
- Thank you words die set
- Subtle grey tones paper pack


OTHER SUPPLIES
- Distress oxide inks: spun sugar, kitsch flamingo, picked raspberry, salvaged patina, hickory smoke
- Gold mirror cardstock my stash
- Strathmore bristol smooth cardstock
- Dark grey cardstock by Lawn Fawn
- Clear embossing ink by Lawn Fawn
- Fine white embossing powder by Hero Arts
- Flowers confetti + jewels from stash
- Iridescent confetti by Studio Katia