Lawn Fawn - Cat & Mice Zoom Meeting

jeudi 27 mai 2021

Hi there,

I'm super happy to be back with a new Lawn Fawn video that features a cute kitty having a zoom meeting with the mouse family. I don’t know what this is about but I’m pretty sure they’re talking about taking control of the world.

So as always I stamped all the images 80lbs Neenah solar white cardstock using jet black ink, and cut everything using the coordinating dies. And as always again I used my alcohol markers to color the images.

Once the coloring was done, I created the background. To make the wall I first thought of using a blue pattern paper from my Spiffy Speckles paper pack, but I didn’t have anymore of it, so I cut a 5,5 x 4,25" panel, and masked about an inch at the bottom using washi tape. And to create my own Spiffy Speckles paper, I applied tumbled glass oxide ink all over the paper above the washi tape. And then mixed some salty ocean oxide ink with water, and used a small brush to make teeny tiny splatters on the panel.

I let the paper dry and then moved the washi tape in order to create the floor using hickory smoke distress ink first, and then a bit of black soot distress ink to bring more contrast and depth.

Next I white heat embossed my sentiment on sunflower cardstock, and used a banner die to cut it. And I also wanted that banner to have the same stitched details as the ones on the background, so I simply used a rectangle die that I taped on the banner to add those stitched details.

I mostly used 2mm and 1mm foam squares to attach the biggest images on my panel, and also some glue dots and liquid glue for some smaller pieces.


VIDEO


LAWN FAWN SUPPLIES

Stamp sets
Virtual friends add-on
- Virtual friends
- Bubbles of joy
- Say what pets
- You’re just my type
- Meow you doin
- Really high five
- Den sweet den

Die sets
- Everyday sentiment banner
- Large stitched rectangle stackables

Misc
- Jet black ink
- Clear embossing ink
- White embossing ink
- Sunflower cardstock


OTHER SUPPLIES

- Spectrum Noir markers
- Graph'it brush markers
- Oxide inks: tumbled glass and salty ocean
- Distress inks: hickory smoke, black soot
- Sakura white gel pen
- 80lbs Neenah solar white cardstock
- Strathmore bristol smooth cardstock

Hello Bluebird - Word Buddies Jungle & Woodland

dimanche 23 mai 2021

Hey there,

Today I'm back to share two cards featuring supplies from the latest Hello Bluebird release: Word Buddies Jungle, and Word Buddies Woodland.

I started with the jungle themed card featuring Word Buddies Jungle. Stamped some koalas and sloths as well as a toucan bird, balloons, hearts and leaves using alcohol marker friendly black ink and colored those images using my Spectrum Noir and Graph'it Brush markers.


For the background, I cut a 5,5 x 4,25' panel that I colored using squeezed lemonade, twisted citron, pine needles and chipped sapphire oxide inks. Once I was happy with the blending, I added some texture: water droplets and then some contrast using some chipped sapphire oxide ink mixed with water and finally a touch of light using white acrylic paint mixed with water.


I cut one Wild About You out of a wood textured cardstock and one out of yellow cardstock, I glued the yellow one at the back of the other to create an outline and make the wood one pop on the background. Applied foam squares at the back of the whole piece and stuck it on the panel. And next I stuck all the images around that giant sentiment using a combination of glue dots, foam squares and liquid glue.

Finally I added highlights on the images using my white gel pen and then attached my panel on a green card base.

Next I moved on to the second card featuring Word Buddies Woodland. I went with bunnies, hearts, balloons and leaves that I colored using my alcohol markers again.


I cut a 5,5 x 4,25' panel and this time I wanted something more sweet so I used squeezed lemonade, dried marigold, kitsch flamingo and picked raspberry oxide inks.

Once the background was all done, I created my sentiment. I used the You Make Me Smile die four times: two times to cut the letters out of white cardstock, one time out of a light beige cardstock on the right, and one time out of an A2 panel that I used as a template in order to stick the letters perfectly straight.

I temporarily taped that template on top of my oxide ink panel and then did like a puzzle: I placed the die cut letters right on the matching ones on the panel. I attached the white ones first to create dimension and then the light beige letters on top.


Once the letters were all attached, I removed the template, and then stuck all my cute images using liquid glue and foam squares. And finally I added a few clear drops here and there to bring an extra touch of shine.


VIDEO


HELLO BLUEBIRD SUPPLIES
Word Buddies Jungle stamp set
- Portrait Pals stamp set
- More Jungle Littles stamp set
- Jungle Littles stamp set
- Word Buddies Woodland stamp set
- Banner Buddies stamp set
- Make Me Smile die
- Wild For You die


OTHER SUPPLIES
- Spectrum noir markers
- Graph'it brush markers
- Oxide inks: squeezed lemonade, twisted citron, pine needles, chipped sapphire, dried marigold, kitsch flamingo, picked raspberry
- Sakura white gel pen
- Morning Dew nuvo drops by Tonic Studio
- Woodgrain cardstock by Lawn Fawn
- Sunflower cardstock by Lawn Fawn
- Light beige cardstock by Lawn Fawn
- Smooth watercolor cardstock by Vaessen Creative

Lawn Fawn - Shake Your Tail Feathers

mardi 18 mai 2021

 Hello there,

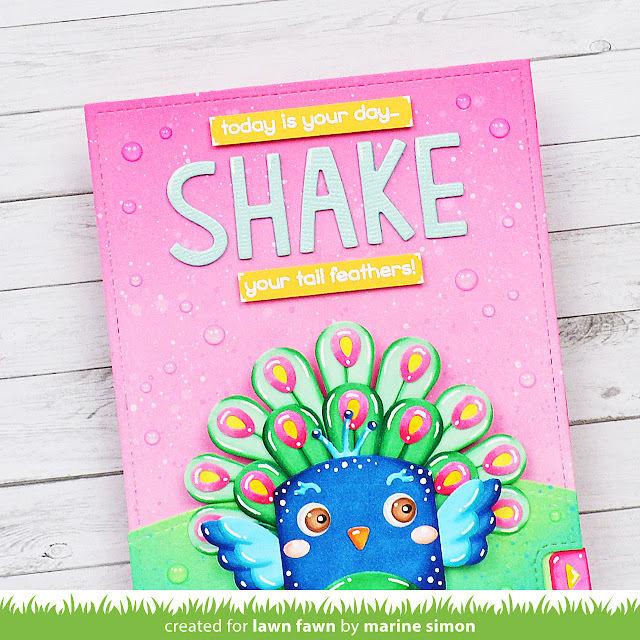
I'm back today with a new 'I only used die cuts' card for Lawn Fawn and this time I'm showcasing a super cute and colorful peacock.

So just like in the Spring Bunny card I shared last month, I colored all the pieces, all the peacock elements using my alcohol markers, and once everything was colored, I assembled the elements, starting with the tail. Next I assembled the peacock's face.


Next I moved on to the background. I cut a slimline panel and used pink oxide inks to create a super bright and sweet background: spun sugar, kitsch flamingo and picked raspberry. And after the ink blending, I added texture: water droplets first, and next I smooshed my picked raspberry ink pad on my glass surface, added a bit of water to the ink and then created a million dots on the paper using a small brush. And finally to bring more contrast I mixed some white acrylic paint with water and splattered droplets all over the panel.

I let the paper dry and then moved on to the interactive part using the Swish 'n Pop die set. And I highly recommend you to watch the video below to see the entire process.


For my sentiment, I started by cutting the word 'Shake'. Cut it one time out of blue shimmery cardstock, and two times out of mermaid cardstock. I layered the mermaid letters to create dimension and stuck the shimmery ones on top. Stuck the letters on my panel, and created the rest of my sentiment. I white heat embossed 'Today is you day' and 'Your tail feathers' on sunflower cardstock, trimmed them into thin banners that I attached above and below the word 'Shake'.

Next I added highlights on the elements using a white gel pen, and finally I added a bunch of clear droplets all over the panel to bring an extra touch of shine.
 

VIDEO
(click on the picture below)


LAWN FAWN SUPPLIES

Die sets
- Swish 'n pop
- Tiny gift box peacock and turkey addon
- Tiny gift box bunny add-on
- Little flowers
- Finley's ABCs
- Large stitched rectangle stackables
- Simple stitched hillside borders

Stamp sets
- Peacock before 'n afters

Misc.
- Mermaid cardstock
- Sunflower cardstock
- Blue shimmery 'Pastel' cardstock
- Clear embossing ink
- White embossing powder


OTHER SUPPLIES
- Spectrum Noir markers
- Graph'it brush markers
- Sakura white gel pen
- Oxide inks: spun sugar, kitsch flamingo, picked raspberry, cracked pistachio, lucky clover
- Morning Dew nuvo drops by Tonic Studio
- Strathmore bristol smooth cardstock
- 80lbs Neenah solar white cardstock

Hello Bluebird - Partly Cloudy + Singing in the Rain

mercredi 12 mai 2021

Hi there,

 I’m back with more Hello Bluebird inspiration for you and this time I’m showcasing the adorable Singing in the rain stamp set, as well as the gorgeous Partly Cloudydie and the Jane Small Alpha die set.

I started with the coloring. I stamped my image using extreme black ink by My Favorite Things, colored it using my alcohol markers, and cut it using the coordinating die.

I cut a 5,5 x 4,25" bristol panel and created the sky using tumbled glass, blueprint sketch, chipped sapphire and black soot oxide inks. After the blending, I added three different textures, and as always I started with some water droplets all the panel. I dried the paper using a paper towel, and then added more contrast: I pressed my chipped sapphire ink pad onto my glass mat, added a bit of water and used a small brush to create a whole bunch of dots on my panel. And finally a touch of light using white acrylic paint mixed with water.

Once my panel was dry, I took the Partly Cloudy die that I taped to my blue panel, and then sent it to my die cut machine. I kept all the pieces together using washi tape on the front of my panel, flipped it over and applied foam on every piece except for the thin cloud lines. I placed my cloud panel on top of a card base, and pressed firmly to connect all the pieces to that card base. I carefully removed the washi tape, and then removed the thin cloudy frame.

Next I created my sentiment in two parts. First I white heat embossed ‘After the storm comes the’ on black cardstock, and second I cut some letters out of different colored cardstock to form the word ‘Rainbow’. I attached those different elements at the top of my panel, and then stuck the girl right below.

To emphasize the rainy theme, I glued a few clear droplets here and there, and finally I applied a coat of glossy accents on the letters to give the illusion of wet letters.


VIDEO


HELLO BLUEBIRD SUPPLIES

- Singing in the rain stamp set

- Partly cloudy die

- Jane small alpha die set


OTHER SUPPLIES

- Spectrum Noir markers

- Graph'it brush markers

- Oxide inks: tumbled glass, blueprint sketch, chipped sapphire, black soot

- Sakura white gel pen

- Clear droplets by Studio Katia

- Colored cardstocks by Lawn Fawn

- Clear embossing ink by Lawn Fawn

- White embossing powder by Lawn Fawn

- Extreme black ink by My Favorite Things

- 80lbs Neenah solar white cardstock

- Strathmore bristol smooth cardstock

Hello Bluebird - Flying High Dreamy Card

vendredi 7 mai 2021

 Hey there,

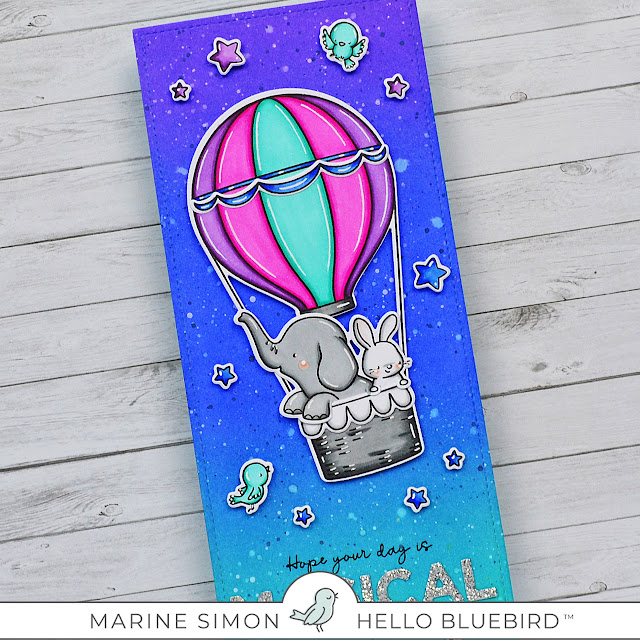
It's time, the wait is over because the new Hello Bluebird release is finally here! And it's totally gorgeous! To celebrate all the new amazing stamp and die sets, I'm sharing this video that features the super cute and lovely 'Flying High' stamp set. This new set has a beautiful hot air balloon and three different groups of critters that go inside the basket.

I started with the background, and cut an 8,5 x 3,5" panel out of Strathmore bristol cardstock. And I used peacock feathers, blueprint sketch and wilted violet oxide inks to create a sweet and dreamy sky.


When I was happy with the ink blending, and to bring more interest and life to this background, I did what I always do: I added texture, starting with splattering water droplets all over the panel. I dried the paper using a paper towel and then added more contrast. I applied my chipped sapphire ink pad onto my glass mat, I added a bit of water and then splattered a bunch of small drops on my paper. Next to make this sky even more dreamy, I added some sparkles using liquid stardust. And finally a touch of light using a little bit of white acrylic paint mixed with water to create splatters all over the panel.

Next step was to color my images. I stamped everything on 80lbs Neenah solar white cardstock using memento tuxedo black ink, and colored them using my alcohol markers.


Once the coloring was done, I cut the images using the coordinating dies, and then assembled some pieces. I glued the elephant and the bunny inside the basket, and I also attached the blue banner on the balloon and the white banner on the basket. Next I attached the balloon and two birds on the panel using foam squares.


And then, before attaching the remaining images, I created my sentiment. I cut some letters out of silver glitter cardstock to create the word 'Magical' and I stuck those letters below the basket using liquid glue. Next I stamped the 1st part of my sentiment that reads 'Hope your day is' right above the silver letters using black versafine ink, I attached the stars here and there on my panel, and finally stuck my panel on a card base.


VIDEO


HELLO BLUEBIRD SUPPLIES
- Flying high stamp set
Maverick stamp set
- Unicorn Tales stamp set
- Jane small alpha die set


OTHER SUPPLIES
- Spectrum Noir markers
- Graph'it brush markers
- Oxide inks: peacock feathers, blueprint sketch, wilted violet, chipped sapphire
- Sakura white gel pen
- Liquid stardust by Lawn Fawn
- 80lbs Neenah solar white cardstock
- Strathmore bristol smooth cardstock
- Silver glitter cardstock from my stash
- Memento tuxedo black ink