Pretty Pink Posh - Fall Cornucopia

samedi 30 septembre 2023

Hey there,

Let's wrap September up with this bright and beautiful autumn card featuring the Fall Cornucopia die set by Pretty Pink Posh. I've said it recently, I used to be uncomfortable with "only die cutting" cards, but I've been liking to create this type of cards recently, and I actually really love cutting, coloring (or not) and arranging all those big and smaller pieces on my cards.


To make today's card, I started off by creating the background using one of my all-time favorite techniques, which is stenciling a kraft panel with white pigment first, and then adding colors using oxide inks. So this is what I did here, I cut a 5,5 x 4,25 inches kraft panel, and used the Layered Woodland stencils along with white pigment ink.

I covered the whole panel with white woodland elements, cleaned my stencils, put them back onto my panel, shifting them a little bit towards the bottom right hand corner, and then applied the following oxide inks: fossilized amber, candied apple, vintage photo, ground espresso, spiced marmalade, pumice stone, frayed burlap.


I die cut several Fall Cornucopia elements out of different colored cardstock, and added a little bit of shadows on each piece using oxide inks and sponge daubers to make them more interesting and give them more character.

Next I worked on my two-part sentiment: I gold foiled the Thankful Script Hot Foil greeting on dark brown cardstock, and cut it using the Thankful Shadow die. And I white heat embossed the "Happy Fall" greeting from Sentiment Strips: Fall which I cut into a slim Sentiment Strips banner.

I cut a vellum panel slightly smaller than my Layered Woodland kraft panel, attached all my elements (die-cuts + greetings) on top of it using 1mm and 2mm foam squares, and then I stuck my vellum panel to the kraft panel using liquid glue, but only behind the greetings and images. And as always I finished my card by adding highlights and details to the die-cut elements using a white gel pen.


PRETTY PINK POSH SUPPLIES
- Fall cornucopia die set
- Layered woodland stencils
- Thankful script hot foil
- Thankful shadow die
- Sentiment strips: fall
- Sentiment strips die


OTHER SUPPLIES
- Oxide inks: fossilized amber, candied apple, vintage photo, ground espresso, spiced marmalade, pumice stone, frayed burlap
- Copic opaque white ink
- Sakura white gel pen
- Gold foil by Spellbinders
- Clear embossing ink by Lawn Fawn
- Fine white embossing powder by Hero Arts
- Kraft cardstock by Lawn Fawn
- Vellum by Lawn Fawn

Cloud 9 Crafts 5th Birthday Party

vendredi 29 septembre 2023

Hello there,

I'm thrilled to be back with those two festive and colorful cards I made to celebrate my favorite online crafty shop 5th birthday: Cloud 9 Crafts! Congratulations, Yuki, on this incredible milestone, and thank you so much for inviting me to the party! Woohoo!!

And to make this party even more fun, I'm joining a bunch of talented crafters on Instagram with a giveaway, so make sure to check my post on Instagram, and comment to get a chance to win a 20€ shopping certificate to cloud9craft.nl.

Here are the amazing crafters I'm joining today:


Giveaway closes on October 3rd at 23:59pm Amsterdam Time and is open to EU residents only.

***

So, let's get this party started, shall we?

To make my cards, I went all Mama Elephant. Despite the total cuteness of their stamp and die sets, it's a brand I never use because of a lack of time, so I was happy to work with a few of their sets for once.

 
Both cards were made using the same pattern, and I started of by stamping the images on 80lb Neenah solar white cardstock using an alcohol marker friendly black ink. I cut them all using the matching dies, and then colored everything using my alcohol markers.

I stamped, cut and colored the group of kids from Hooray Wishes twice, and the balloon words "Congrats" + "Hooray", as well as multiple balloons from Celebration Balloons. On one card I went for a pink, orange and yellow color palette, and on the other I picked a green, aqua and yellow palette.


Next I white heat embossed two different greetings from Hooray Wishes on black cardstock, and trimmed them into slim banners using a die from the Sentiment Strips die set by Pretty Pink Posh.

I cut four Combo rectangle panels out of Strathmore bristol smooth cardstock, and colored them using oxide inks and sponge daubers.

On the first two panels, I applied worn lipstick, spiced marmalade and mustard seed on the rounded edges, and on the two other panels, I used mowed lawn, salvaged patina and mustard seed. I layered and glued together each duo of panels, attached those panels on A2 white card bases, and then stuck on top of each panel a matching Spiffy Speckles panel.


I attached my images on each card using 1mm foam squares, as well as each greeting below the groups of kids, added a few golden heart sequins here and there, and finished my cards by adding highlights and details to the images using a white gel pen.

And that's it! I hope you like these simple but yet super cute and fun birthday cards! Thanks so much again, Yuki, for inviting me to this party, and happy birthday Cloud 9 Crafts!


SUPPLIES
- Hooray wishes stamp + die sets by Mama Elephant
- Celebration balloons stamp + die sets by Mama Elephant
- Combo rectangle die set by Mama Elephant
- Spectrum Noir Illustrator markers
- Graph'it brush markers
- Sakura white gel pen
- Oxide inks: worn lipstick, spiced marmalade, mustard seed, salvaged patina, mowed lawn
- Clear embossing ink by Lawn Fawn
- White embossing powder by Hero Arts
- Golden heart confetti from my stash
- Black licorice cardstock by Lawn Fawn
- Jet black ink by Lawn Fawn
- Spiffy speckles pattern papers by Lawn Fawn
- 80lb Neenah solar white cardstock (images)

Sunny Studio - Farm Fresh - Pumpkin Patch

jeudi 28 septembre 2023

Hello there,

I'm super happy to be back on Sunny Studio's blog with this new slimline autumn card mixing and matching a lot of images from different sets to make the cutest little scene.


I first started by stamping all the images on 80lb Neenah solar white cardstock using an alcohol marker friendly black ink, I cut them all using the coordinating dies, and colored everything using my Spectrum Noir Illustrator markers and Graph'it brush markers. Here is a detailed list of the sets I used:

• Farm Fresh: scarecrow, farm
• Clucky Chickens: chickens, baby chicks
• Happy Harvest: pumpkins, sunflowers
• Truckloads Of Love: truck, pumpkins
• Bunnyville: grass
• Fall Kiddos: pumpkins


Next I cut an 8,5 x 3,5 inches Strathmore bristol smooth panel, and used oxide inks to color it. On the upper part I created a sunset sky using mustard seed + spiced marmalade + ripe persimmon + lumberjack plaid, and on the lower part I did a muddy section using antique linen + vintage photo.


I white heat embossed my "Thanks for always being there" greeting from Words Of Gratitude on a Notebook Photo Corners kraft banner, attached it at the top right hand corner of my panel, and then stuck everything using 1mm and 2mm foam squares. I finished my card by adding highlights and details to the images using a white gel pen.


SUNNY STUDIO SUPPLIES
- Farm fresh stamp set
- Clucky chickens stamp set
- Happy harvest stamp set
- Truckloads of love stamp set
- Bunnyville stamp set
- Fall kiddos stamp set
- Words of gratitude stamp set
- Notebook photo corners die set


OTHER SUPPLIES
- Spectrum Noir Illustrator markers
- Graph'it brush markers
- Oxide inks: mustard see, spiced marmalade, ripe persimmon, lumberjack plaid, antique linen, vintage photo
- Copic opaque white ink
- Sakura white gel pen
- Clear embossing ink by Lawn Fawn
- Fine white embossing powder by Hero Arts
- Kraft cardstock by Lawn Fawn
- Strathmore bristol smooth cardstock (background)
- 80lb Neenah solar white cardstock (images)

Pretty Pink Posh Halloween Week - Monochromatic Mix & Match

lundi 25 septembre 2023


Hi there,

I'm kicking off Halloween Week at Pretty Pink Posh blog with this monochromatic mix & match featuring a bunch of images from different sets (listed down below) Monochromatic cards are super fun and easy to make, so I hope that my spooky little scene will inspire you to create your own, and it doesn't have to be black & white, of course, purple shades or green shades would look amazing on a Halloween card!

And there is a 15% discount on all Halloween section until Oct 1st.


I started off by stamping my images on Transotype perfect coloring paper using an alcohol marker friendly black ink, I cut them all using the matching dies, and colored everything using my Spectrum Noir Illustrator markers and Graph'it brush markers.

And each time I make a monochromatic card, my thinking process is the same: I picture the images in my head with colors, and where I would have used a light color (e.g. yellow or aqua) I'm using light shades of grey, where I would have used a medium color (e.g. pink or green) I'm using medium shades of grey, and where I would have used a dark color (e.g. black or purple) I'm using dark shades of grey. It's that simple ^^

Here are the stamp sets I used to make my card:
 Autumn Pumpkins: big pumpkins, small leaf
 Ghost Friends: ghosts, hat, bucket
 Fall Jar: big leaf
 Boo To You: bats, spider web, small pumpkin, spider
 Halloween Signs: cauldron


Next I cut a 5,5 x 4,25 inches Strathmore bristol smooth panel, and created a spooky night sky. I first masked a circle in the middle of my piece of paper, and colored the rest of the panel using hickory smoke and black soot distress inks. I mixed some black soot distress ink with water and used a small brush to add splatters on the paper, and I did the same with white ink. I removed the circle mask, let the paper dry, masked the whole panel but the circle, and then added a little bit of hickory smoke distress ink all along the rounded edges of that circle.

To add more spookiness to my night sky, I used the Spooky Sky stencils. I first added some clouds using black soot distress and a very light hand, I didn't want them to be bold black. And I added a few bats using black soot distress ink again, but this time I used a heavier hand because I wanted those bats to really pop against my night cloudy sky.

I heat embossed my "Boo To You" greeting from Ghost Friends in the middle of the moon using clear embossing ink and silver embossing powder, I attached all my images using foam squares, and as always I finished my card by adding highlights and details to the images using a white gel pen.


PRETTY PINK POSH SUPPLIES
- Autumn pumpkins stamp set
- Ghost friends stamp set
- Fall jar stamp set
- Boo to you stamp set
- Halloween signs stamp set
- Halloween wreath stamp set
- Spooky sky stencils


OTHER SUPPLIES
- Graph'it brush markers
- Distress inks: hickory smoke, black soot
- Sakura white gel pen
- Copic opaque white ink
- Clear embossing ink by Lawn Fawn
- Silver embossing powder by Lawn Fawn
- Starthmore bristol smooth cardstock (background)
- Transotype perfect coloring paper (images)

Sunny Studio - Truckloads of Love - Fall Version

jeudi 21 septembre 2023

Hello there,

Today I'm back on Sunny Studio's blog to take you to the countryside and go apple picking with the cutest mice. As you can see, they've been busy, and as very often I went through my entire Sunny Studio collection to pick the perfect images to build my scene.


I first started by stamping all the images on Transotype perfect coloring paper using an alcohol marker friendly black ink, I cut them all using the matching dies, and colored everything using my Spectrum Noir Illustrator markers. And I always like to pick a color palette for each card I make, this time I went for a green + orange + yellow + red combo. Here is a detailed list of the sets I used:

• Truckloads Of Love: truck, small apples, crates
• Harvest Mice: big mice, sweaters, cart
• Merry Mice: small mice, scarves
• Christmas Critters: mouse (in the truck)
• Seasonal Trees: trees, birdhouses, bird
• Fall Friends: big apples
• Garden Critters: grass


Next I worked on the background, and created a simple stenciled landscape on an 8,5 x 3,5 inches Strathmore bristol smooth panel. On the lower part I did two grass borders using shabby shutters and mowed lawn oxide inks, and on the upper part I did a cloudy sky using tumbled glass and broken china oxide inks.


I stamped my "Friends like you are such a blessing" greeting from Fall Friends in black in the top middle part of the panel, attached all the images using 1mm and 2mm foam squares, and as always I finished my card by adding highlights and details to the images using a white gel pen.


SUNNY STUDIO SUPPLIES
- Truckloads of love stamp set
- Harvest mice stamp set
- Merry mice stamp set
- Christmas critters stamp set
- Seasonal trees stamp set
- Fall friends stamp set
- Garden critters stamp set


OTHER SUPPLIES
- Spectrum Noir Illustrator markers
- Graph'it brush markers
- Oxide inks: shabby shutters, mowed lawn, rustic wilderness, tumbled glass, broken china
- Copic opaque white ink
- Sakura white gel pen
- Stencils by Lawn Fawn
- Detail black ink by Pinkfresh Studio
- Strathmore bristol smooth cardstock (background)
- Transotype perfect coloring paper (images)

Pretty Pink Posh Instagram Hop - Autumn Pumpkins & Hedgehog Friends

lundi 18 septembre 2023


Hello there,

Join me and Pretty Pink Posh to celebrate the changing of seasons with a showcase of amazing crafters and their fall projects. From pumpkins and acorns, to cozy mugs and shakers, you'll find all sorts of inspiration!

Please check my post on Instagram for more details about this hop.


As very often I started off by stamping my images from Autumn Pumpkins + Hedgehog Friends on Transotype perfect coloring paper using an alcohol marker friendly black ink, I cut them all using the coordinating dies, and then colored everything using my Spectrum Noir Illustrator markers and Graph'it brush markers.


I cut a slimline kraft panel using a die from the Slimline Peekaboo Windows die set, and created a subtle pattern on it using the Deco Leaves stencil using white pigment ink first, and then spun sugar oxide ink. I mix some worn lipstick oxide ink with water and used a small brush to make splatters on the panel, and I did the same with copic opaque white ink.


Next I worked on my two-part greeting. First I white heat embossed "Autumn greetings" from Autumn Pumpkins on pink cardstock and cut it using the matching die, and second I white heat embossed "So grateful for you" from Sentiment Strips: Fall on yellow cardstock and cut it using a die from Sentiment Strips. I attached everything, images + greetings, on my panel, and finally added highlights and details to the images using a white gel pen.


PRETTY PINK POSH SUPPLIES
- Autumn pumpkins stamp set
- Hedgehog friends stamp set
- Sentiment strips: fall stamp set
- Sentiment strips die
- Deco leaves stencil
- Slimline peekaboo windows die


OTHER SUPPLIES
- Spectrum Noir Illustrator markers
- Graph'it brush markers
- White pigment ink by Lawn Fawn
- Spun sugar oxide ink
- Sakura white gel pen
- Copic opaque white ink
- Clear embossing ink by Lawn Fawn
- White embossing powder by Hero Arts
- Pattern paper from the Sweater weather 12x12 paper pack by Lawn Fawn
- Colored cardstock by Lawn Fawn
- Kraft cardstock by Lawn Fawn
- Transotype perfect coloring paper (images)

Pretty Pink Posh - Fall Jar

samedi 16 septembre 2023

Hello there,

I'm so happy to share with you this lovely autumn card showcasing the Fall Jar stamp set and Layered Fall Wreath stencils, two brand new items from the Pretty Pink Posh Fall 2023 release.


I started off by stamping the images from Fall Jar on Transotype perfect coloring paper using an alcohol marker friendly black ink, I cut them all using the coordinating dies, and then colored everything using my Spectrum Noir Illustrator markers and Graph'it brush markers.

Next I used the Layered Fall Wreath stencils and some oxide inks to create a beautiful autumn background on a 5,5 x 4,25 inches kraft panel. Here are the oxide inks I used: mustard seed, peacock feathers, spiced marmalade, peeled paint, candied apple and vintage photo. Next I mixed a little bit of ground espresso oxide ink with water and used a small brush to make splatters on the panel, and I did the same with white ink.


I set the panel aside to dry, and cut a slightly smaller one out of vellum. I attached all the images on the vellum panel using foam squares, and then stuck my vellum panel on the kraft panel, making the glue invisible by adding dots of liquid glue at the back of the vellum panel, behind the images. Finally I added highlights and details to the images using a white gel pen, and attached my panel to an A2-sized kraft card base.


PRETTY PINK POSH SUPPLIES
- Fall jar stamp set
- Layered fall wreath stencils


OTHER SUPPLIES
- Spectrum Noir Illustrator markers
- Graph'it brush markers
- Oxide inks: mustard seed, peacock feathers, spiced marmalade, peeled paint, candied apple, vintage photo, ground espresso
- Sakura white gel pen
- Copic opaque white ink
- Detail black ink by Pinkfresh Studio
- White pigment ink by Lawn Fawn
- Kraft cardstock by Lawn Fawn
- Vellum by Lawn Fawn
- Transotype perfect coloring paper (images)

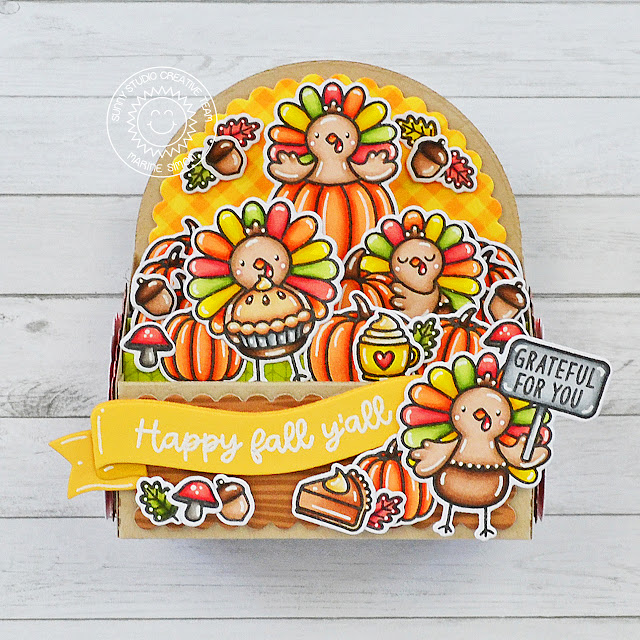
Sunny Studio - Turkey Day

jeudi 14 septembre 2023

Hello there,

I'm so happy to be back on Sunny Studio's blog today with this cute 3D card showcasing the fun turkeys from Turkey Day. I really enjoyed making them super colorful! And just this once, I didn't pick a lot of extra images from other sets, only the mushroom from Happy Harvest, as well as the acorn and the stump from Fall Friends. Nothing more, how shocking, right? ^^


I started off by stamping all the images on Transotype perfect coloring paper using an alcohol marker friendly black ink, I cut them all using the coordinating dies, and as always I used my alcohol markers to color everything. And like I said above, I went for colorful turkeys, I kept the bodies pretty neutral, but picked green, red, orange and yellow for the feather tails!


Next I worked on the card, and cut all the base elements out of kraft cardstock. I also cut some decorative pieces out of pattern papers:

• the yellow gingham back panel is from the Gingham Jewel Tones paper pack
• the green knitted insert pieces are from the Sweater Weather paper pack
• the red side pieces are from the Very Merry paper pack
• the wooden textured front piece is from the Amazing Argyle paper pack


I attached those decorative pieces of paper on the kraft base using 1mm foam squares, and then stuck all my images inside the 3D card using 3mm glue dots and liquid glue, and also on the outside using 1mm foam squares. 


I didn't want my sentiment to be lost among all those images, so I went for the Brilliant Banner 1 which I knew would stand out. I cut the two largest pieces out of yellow cardstock, and the two small pieces out of a darker yellow paper. I white heat embossed the "Happy Fall Y'all" greeting from Turkey Day on the piece with no fishtail, assembled the different elements using 1mm foam squares and liquid glue, and then attached the banner on the front of the card.


SUNNY STUDIO SUPPLIES
- Turkey day stamp set
- Happy harvest stamp set
- Fall friends stamp set
- Gingham jewel tones paper pack
- Sweater weather paper pack
- Very merry paper pack
- Amazing argyle paper pack


OTHER SUPPLIES
- Spectrum Noir Illustrator markers
- Graph'it brush markers
- Scallop box card die set by Pretty Pink Posh
- Sakura white gel pen
- Colored cardstock by Lawn Fawn
- Clear embossing ink by Lawn Fawn
- Fine white embossing powder by Hero Arts
- Detail black ink by Pinkfresh Studio
- Transotype perfect coloring paper (images)

Anjas Basteltraum - Draußen vom Walde - Outside The Forest

lundi 11 septembre 2023

Hey there,

I'm so happy to be back with the second card I made using items from the Anjas Basteltraum Winter 2023 brand new release. Today my card features the super cute Draußen vom Walde stamp set, which means "Outside the forest", and if you want to see the first card I shared last week, you can check it out right here, as well as at the end of this blog post ^^


I started off by stamping the images from Draußen vom Walde on Transotype perfect coloring paper using an alcohol marker friendly black ink, I cut them using my scan 'n cut machine, and colored everything using my alcohol markers.


Next I used the Mini Slimline Outside The Box die set by My Favorite Things to cut the different pieces to build my 3D card. I cut the base pieces out of white cardstock, and cut the decorative pieces out of pattern papers from the Happy Holidays 6x6 paper pack by Echo Park.


I assembled everything, added highlights and details on the images using a white gel pen, attached most of them inside the card using 3mm glue dots, and a couple more on the outside using 1mm foam squares.

Next I gold foiled my "Oh joy" greeting from Winter Big Scripty Words Hot Foil Plates by Lawn Fawn on white cardstock, cut it using the coordinating die, and finally stuck it on the front of my 3D card using foam squares again.


And just like last week, you can see on the first and last pictures that I built a few colorful 3D trees using the new Sommer & Winter Tanne die set to use as decorations around my cards.

Thank you so much, Anja, for having me. It was so much fun and a great pleasure to create those two cards! Love those sweet musicians and winter mice!


ANJAS BASTELTRAUM SUPPLIES
- Draußen vom Walde stamp set
- Sommer & Winter Tanne die set


OTHER SUPPLIES
- Spectrum Noir Illustrator markers
- Graph'it brush markers
- Mini slimline outside the box die set by My Favorite Things
- Winter big scripty words hot foil plates by Lawn Fawn
- Sakura white gel pen
- Gold foil by Spellbinders
- Detail black ink by Pinkfresh Studio
- Happy holidays 6x6 paper pack by Echo Park
- White cardstock by Lawn Fawn
- Transotype perfect coloring paper (images)

Waffle Flower - Under The Tree Cards

samedi 9 septembre 2023


Hi there,

I'm thrilled to be back with two more cards I made using items from the Waffle Flower September 2023 Release. Today I'm showcasing the ever so cute Under The Tree stamp set, jam-packed with adorable characters, critters and plenty of small images!

Waffle Flower is having a blog hop + giveaway to celebrate this brand new release, and it ends on Sept 11th at 11:59pm EST, so before scrolling down the page, make sure to check my previous Folk Art blog post for fun, inspiration, and chances to win some of these new release goodies!


Today's cards were made following the same steps:

1) Foil the Swag Background Foil Plate on Strathmore bristol smooth cardstock, use the Swag Coloring Stencil and distress inks (listed down below) to add colors to the panel, and trim the piece of paper into a 5,5 x 4,25 inches panel
2) Stamp the images from Under The Tree on white cardstock using black ink, color them using your favorite medium, add highlights using a white gel pen, and cut everything using the matching dies


3) Attach the images on the panel using 1mm foam squares
4) Create the greeting by using the Christmas Tree Subsentiments die cuts or Holiday Cheer stamp set, and stick it on the panel using 1mm foam squares again


Once again, I had a blast making those two cards, I really love those cute characters and critters, they're just so fun! Thanks so much, Waffle Flower, for having me, I had such a great time working with your brand new products!


WAFFLE FLOWER SUPPLIES

- Under the tree stamp set
- Under the tree matching dies
- Holiday cheer sentiments stamp set
- Holiday cheer sentiments matching die
- Christmas tree subsentiments die cuts
- Swag background foil plate
- Swag coloring stencil


OTHER SUPPLIES

Under the tree card: blue
- Distress inks: tumbled glass, peacock feathers

Under the tree card: pink
- Distress inks: spun sugar, worn lipstick

Both
- Foil by Spellbinders
- Black licorice cardstock by Lawn Fawn
- Clear embossing ink by Lawn Fawn
- Fine white embossing powder by Hero Arts
- Sakura white gel pen
- Strathmore bristol smooth cardstock (background)
- Transotype perfect coloring paper (images)