Affichage des articles dont le libellé est technique: mini slimline. Afficher tous les articles

Lawn Fawn - Seasonal Treat Cart Trio

mardi 10 septembre 2024

Hello there,

I'm super happy to be back on the Lawn Fawn YouTube Channel & Blog with this trio of mini slimline cards showcasing the Treat Cart during three different seasons: Fall, Halloween, and Christmas. My first plan was to make the Autumn card only, but I often like to offer a variety of looks for my cards, so I created two more cards to show you how versatile the Lawn Fawn stamps are, and how you can mix and match them, regardless of their original purpose.


I cut three Large Mini Slimline Strathmore bristol smooth panels, and created three identical backgrounds, I just changed the colors of distress inks to match each theme. On the Autumn card, I used peeled paint and forest moss for the grass, and salvaged patina and peacock feathers for the sky. On the Halloween card, I used mowed lawn and rustic wilderness for the grass, and wilted violet and villainous potion for the sky. For the Christmas card, I used salvaged patina and peacock feathers for the snow, and spun sugar and kitsch flamingo for the sky.


I stamped all my images on 80lb Neenah solar white cardstock using Jet Black ink, I cut them using the matching dies, and colored everything using my Spectrum Noir Illustrator markers, Ohuhu markers, and Graph'it brush markers.

Here are the stamp sets that are featured on each card: • Treat Cart - cart, banner, sign • Treat Cart Coffee Add-On - banners, coffee machine, cups, treats • Tiny Sentiments Coffee - speech bubble • Trees Before 'n Afters - trees, tiny snowflakes, tiny leaves • Kanga-rrific Add-On - grass.


And here are the additional stamp sets I used on each card:

Fall card: • So Owlsome - owl • Hay There Hayrides - bale of hay • Jump For Joy - leaves • Let's Go Nuts - squirrels, acorns • Happy Harvest - small pumpkins.

Halloween card: • Spooky Village - tiny bats • Happy Howloween - witch hats • Spooktacular - tombstones • Booyah - tiny spiders • Fangtastic Friends & Add-On - spiders • Sweet Spiders - large spider, jack o' lantern face, candy corn • Happy Harvest - small pumpkins.

Christmas card: • Frosty Family & Add-on - snowmen, hats, scarves • Snowball Fight - brick wall • Yeti Or Not - tree, present • Christmas Dreams - bow.


I attached my images on each panel using 1mm and 2mm foam squares, and then stuck each panel to a white card base. And I never do that, but for these cards I wanted to stamp an additional sentiment inside each card base. Inside the Autumn card, I stamped "Wishing you a brew-tiful fall" from Treat Cart Coffee Add-On, inside the Halloween card, I stamped "Have a treat-filled Halloween" from Sweet Spiders Add-On, and inside the Christmas card, I stamped "Wishing you a brew-tiful holiday" from Treat Cart Coffee Add-On again. I added white blizzard nuvo drops on each banner and on the Christmas tree lights, and finished my cards with highlights and details on the images using a white gel pen.


VIDEO


LAWN FAWN SUPPLIES
- Treat cart stamp set
- Treat cart coffee add-on stamp set
- Tiny sentiments coffee stamp set
- Trees before 'n afters stamp set
- Kanga-rrific add-on stamp set
- So owlsome stamp set
- Hay there hayrides stamp set
- Jump for joy stamp set
- Let's go nuts stamp set
- Happy harvest stamp set
- Spooky village stamp set
- Happy howloween stamp set
- Spooktacular stamp set
- Booyah stamp set
- Fangtastic friends stamp set
- Fangtastic friends add-on stamp set
- Sweet spiders stamp set
- Sweet spiders add-on stamp set
- Frosty family stamp set
- Frosty family add-on stamp set
- Snowball fight stamp set
- Christmas dreams stamp set
- Yeti or not stamp set
- Large mini slimline stackables die set
- Jet black ink
- Clear embossing ink
- White embossing powder


OTHER SUPPLIES
- Spectrum Noir Illustrator markers
- Ohuhu markers
- Graph'it brush markers
- Distress inks: salvaged patina, peacock feathers, peeled paint, forest moss, wilted violet, villainous potion, mowed lawn, rustic wilderness, spun sugar, kitsch flamingo
- Copic opaque white ink
- Sakura white gel pen
- White blizzard nuvo drops
- 80lb Neenah solar white cardstock (images)
- Strathmore bristol smooth cardstock (backgrounds)

Sunny Studio - Wedded Bliss Mini Slimline Shaker Card

jeudi 28 avril 2022

Hey there,

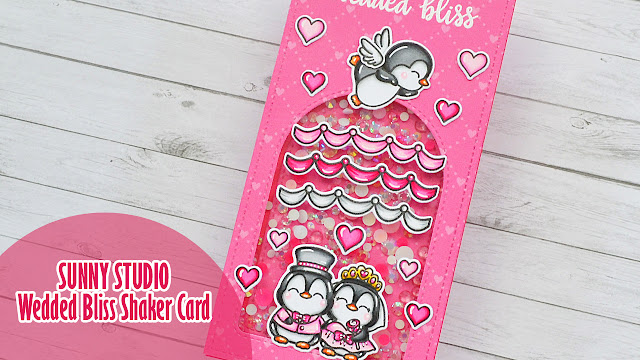
Sunny Studio Summer release is finally available at sunnystudiostamps.com and I'm super happy to be back with a shaker card showcasing the adorable Wedded bliss mini stamp set. This wedded penguin couple is just so cute!

As always I started off with the coloring. I stamped the images using an alcohol marker friendly black ink, cut them all using the coordinating dies and used my alcohol markers to color everything.

Besides the Wedded bliss penguin couple, I stamped one of the Balloon rides banners three times, as well as a bunch of hearts from Fabulous flamingos. And to create my cute penguin cherub, I picked a penguin from Passionate penguins, and stamped a bird from Little birdie two times to use his wings only.


Next I created the shaker background. I cut a 6 x 3" panel out of a Flirty flowers pattern paper, and I cut a Stitched arch out of that panel. I white heat embossed my sentiment "Wishing you wedded bliss" from Wedded bliss at the top of my mini slimline panel, and then I attached the inside arch window remaining piece on a 6 x 3" card base using the open arch window panel as a guide.

I flipped the panel over and added liquid glue all along the arch window, I attached a piece of clear acetate at the back of my panel, and then, to create room for the shaker accessories, I added two layers of foam strips all along the arch window.

I made the foam strips edges non sticky using a powder tool, cleaned the acetate with a microfiber cloth, I also added more foam strips above the window and next I added a mix of jewels inside the window, and finally I placed my card base on the foam strips to totally close my shaker panel. And next I attached the images using 3mm glue dots.


And that's it, we have a super cute mini shaker card with a happy and elegant penguin couple and a cheeky penguin cherub throwing hearts at them. Don't hesitate to watch the process video for information. Thanks for stopping by and see you next week!


VIDEO


SUNNY STUDIO SUPPLIES
- Wedded bliss stamp set
- Passionate penguins stamp set
- Balloon rides stamp set
- Fabulous flamingos stamp set
- Little birdie stamp set
- Stitched arch die set
- Flirty flowers paper pack


OTHER SUPPLIES
- Spectrum Noir markers
- Graph'it brush markers
- Mini slimline die by Lawn Fawn
- Clear embossing ink by Lawn Fawn
- Fine white embossing powder by Hero Arts
- Sakura white gel pen
- Jewels by Studio Katia

Sunny Studio - Mother's Day & Father's Day Mini Cards

jeudi 14 avril 2022

 Hello there,

I'm back on Sunny Studio blog today with two super cute mini slimline cards featuring a bunny mom with her bunny kids and a panda dad with his panda kids.

I started by stamping the images using an alcohol marker friendly black ink. I stamped the bunny from Critters on the go, as well as the bear on the scooter two times. I turned one of the bears into a panda, and used the bunny head to turn the other bear into a bunny. I also stamped the bunny heads and bear heads from Balloon rides, the cart from Harvest mice and some tiny bows from Spring showers.

I colored all the images using my alcohol markers. And to make the pandas, I first divided the bear bodies and heads into several parts using a pencil, next I used a black memento pen to trace over those lines, and I colored the legs, arms, ears and eyes in black, leaving the remaining parts white.


After the coloring, I created two identical mini slimline backgrounds. I cut two 6 x 3 inches bristol panels and created a cloudy sky on each panel using a cloud stencil from my stash along with tumbled glass and salty ocean oxide inks.

Next I cut a 6 x 3 inches panel out of a green pattern paper from the Spring Fling paper pack, and used the grass border die from Picket fence to cut two grass borders out of this green pattern paper. And I attached a grass border on each panel using foam squares.


I cut some letters using the Chloe alphabet die set to make the words "Mom" and "Dad", I also stamped the second part of my sentiment on each panel, "Thanks for always being there" from Words of gratitude, and then I attached the images using a combination of glue dots and foam squares to stick the biggest images and liquid glue for the smallest ones such as the tiny bows.


VIDEO


SUNNY STUDIO SUPPLIES
- Critters on the go stamp set
- Balloon rides stamp set
- Harvest mice stamp set
- Spring showers stamp set
- Words of gratitude stamp set
- Chloe alphabet die set
- Picket fence die set
- Spring Fling 6x6 paper pack


OTHER SUPPLIES
- Spectrum Noir markers
- Graph'it brush markers
- Oxide inks: tumbled glass and salty ocean
- Sakura white gel pen
- Copic opaque white ink
- Large stitched mini slimline die set by Lawn Fawn
- Cloudy stencil by Lawn Fawn
- Colored cardstock by Lawn Fawn
- Extreme black ink by My Favorite Things
- Strathmore bristol smooth cardstock

Sunny Studio - Edge to Edge Mini Slimline Shaker Card

jeudi 30 décembre 2021

Hey there,

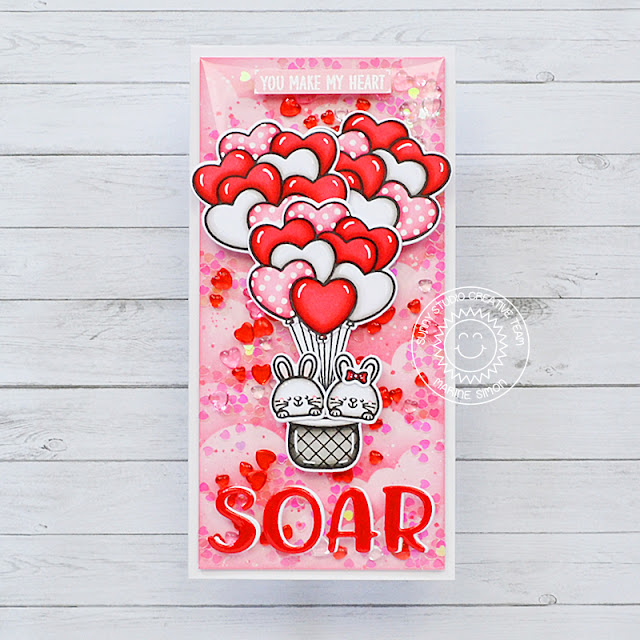
I'm thrilled to be back on Sunny Studio blog with this new edge to edge mini slimline shaker card featuring the lovely Balloon bouquet. I've created a hot air balloon using Balloon rides, and also picked the bunny from that stamp set to create a cute bunny couple.

To begin, I stamped the images using an alcohol marker friendly black ink, I cut them all using the coordinating dies and then I colored everything using my alcohol markers. I stamped the balloon bouquet three times to get a big balloon bouquet, and I went with traditional valentine colors: red, pink and white.

Next I created the background. I cut a 5-3/4 x 2-3/4 inches bristol panel that I covered with spun sugar distress ink. I used a cloud stencil along with worn lipstick distress ink to create a pretty pink cloudy sky. And I also added some texture to that cloudy sky: water droplets + a mix of worn lipstick and water + a mix of copic opaque white ink and water.


I took a plastic packaging from my stash and cut the four edges off to get two plastic sheets. I kept one of those, and added double sided tape on the four edges. I placed my cloudy panel right in the center of that plastic sheet and cut the four corners off. I attached the bottom tab at the back of the panel and did the same thing with the long sides. Through the last open side, I poured some Heart droplets and tiny heart confetti inside the pocket. And then I attached the last tab at the back of the panel to finally close it.

I cut the word "Soar" out of red cardstock and out of white cardstock using the Chloe alphabet die set. I stuck the white letters at the back of the red ones to create an outline. I also white heat embossed the phrase "You make my heart" from Balloon rides on a light pink cardstock. And I cut a 6 x 3 inches white card base.


I attached the shaker panel on the card base, and then stuck the letters at the bottom and the small banner at the top using liquid glue. I added white dots and details on the images, attached them on the pocket using glue dots, and finally I applied a coat of glossy accents on each letter.


VIDEO


SUNNY STUDIO SUPPLIES
- Balloon bouquet mini stamp set
- Balloon rides stamp set
- Chloe alphabet die set
- Heart droplet mix


OTHER SUPPLIES
- Spectrum Noir markers
- Graph'it brush markers
- Distress inks: spun sugar, worn lipstick
- Copic opaque white ink
- Sakura white gel pen
- Tiny heart confetti by Pretty Pink Posh
- Glossy accents by Ranger
- Cloudy stencil by Lawn Fawn
- Clear embossing ink by Lawn Fawn
- Fine white embossing powder by Hero Arts
- Pink + red cardstocks by The Stamp Market
- Strathmore bristol smooth cardstock

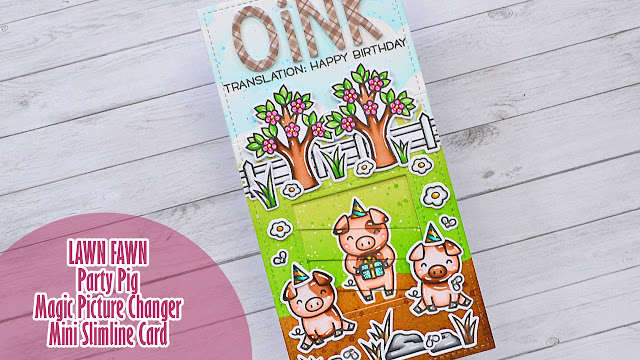
Lawn Fawn - Magic Picture Changer Mini Slimline Card

jeudi 23 décembre 2021

Hey there,

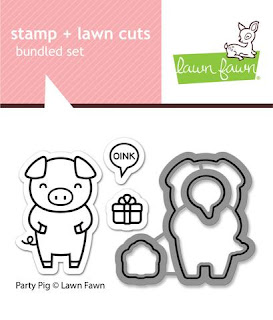
I'm so happy to be back on Lawn Fawn blog and channel with this super cute interactive birthday card showcasing Party Pig which is the new free gift that you can receive during the month of your birthday from November 2021 through October 2022. Make sure to check this link to know more about this mini free stamp set.

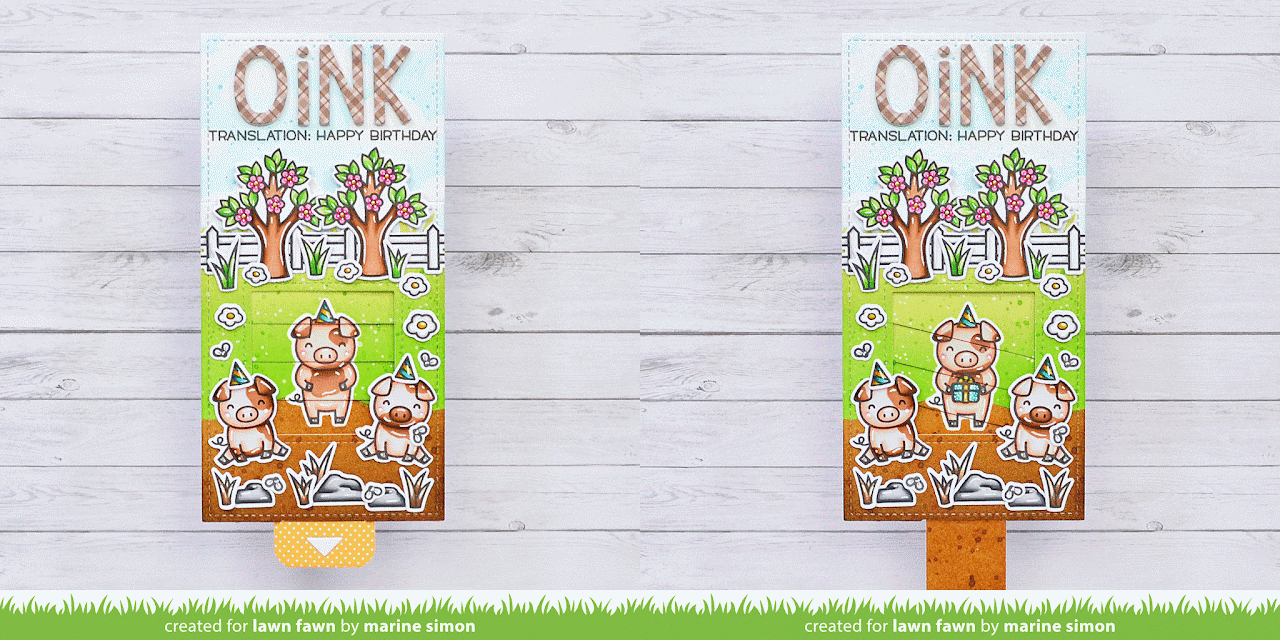
I started by stamping my image using jet black ink, I cut them all using the coordinating dies and then colored everything using my alcohol markers. And as always I picked my images from several stamp sets, so make sure to check the list of supplies or video down below for more details.

Next I cut a 6 x 3" mini slimline panel out of Strathmore smooth bristol cardstock, and created the background using stencils and distress inks. On the bottom part, I created soil using a hillside stencil + gathered twigs and ground espresso distress inks. On the middle part, I created grass using a grassy stencil + shabby shutters and mowed lawn distress. And on the top part, I created the sky using a cloudy stencil + tumbled glass and salty ocean distress inks.


Next I cut the frame out of this panel, and created the magic picture changer element. And I invite you to watch the process video down below because it's always easier to understand this part with images.

I cut a 6 x 3" card base, I attached the pocket at the bottom using double sided tape, and the sky at the top using foam tape to be at the same height as the pocket. Next, I attached everything using glue dots, foam squares and liquid glue.


Next I created the first part of my sentiment. I cut the word "Oink" three times: one time out of a brown pattern paper and two times out of white cardstock. I glued the white letters on top of each other to create dimension, and then I attached the brown letters on top.

And for the second part of my sentiment, I placed the panel in my Misti tool, with the letters, not attached yet, at the top. I placed the phrase "Translation: happy birthday" between the letters and the trees, removed the letters and stamped the phrase using jet black ink. And then I finally attached the letters right above the phrase.  And finally I cut the pull tab decorating piece and attached it at the end of the pull tab.


VIDEO


LAWN FAWN SUPPLIES

Stamp sets
Party Pig
Really high five
Hay there
Swan soirée
Toadally awesome
Butterfly kisses
Ocean shell-fie
Tree before 'n Afters

Die sets
Magic picture changer
Finley's ABCs
Large mini slimline stackables

Misc
Sweater weather 6x6 paper pack
Jet black ink
- Hillside stencil
- Cloudy stencil
- Grassy stencil


OTHER SUPPLIES
- Spectrum Noir markers
- Graph'it brush markers
- Distress inks: tumbled glass, shabby shutters, mowed lawn, gathered twigs, ground espresso
- Bristol smooth strathmore cardstock
- Sakura white gel pen
- Copic opaque white ink

Hello Bluebird - Wilderness Adventure Mini Slimline Card

mardi 14 septembre 2021

Hello there,

I'm back with more Hello Bluebird new release inspiration showcasing the adorable Wilderness Adventure, as well as the super cool Knightley LC Alpha stamp set, my sentiment is from Leaf Play (released two years ago) and I also used the Nesting Mini Slim die set that is part of the new release as well.

I started by stamping and cutting my images from Wilderness Adventure. I picked the bear, bunny and fox, as well as a whole bunch of mountains and trees to set up my scene.

Once the coloring was done, I cut a 6 x 3,5" mini slim panel using the largest die from the Nesting Mini Slim die set, and I used washi tape to divide the panel in two sections: the sky at the top and the meadow at the bottom. I used tumbled glass and faded jeans distress inks to color the sky, and shabby shutter and peeled paint distress inks to color the meadow.


Next I stamped the word 'Friends' at the very bottom of my panel using the big letters from the Knightley LC alpha stamp set and Artichoke ink by Lawn Fawn, and then I attached the images using glue dots and foam squares. And at the end I stamped the second part of my sentiment inside the card base.


VIDEO


HELLO BLUEBIRD SUPPLIES
- Wilderness adventure stamp set
- Leaf play stamp set
- Knightley LC alpha stamp set
- Nesting mini slim die set


OTHER SUPPLIES
- Spectrum Noir markers
- Graph'it brush markers
- Distress inks: tumbled glass, faded jeans, shabby shutters, peeled paint
- Sakura white gel pen
- Extreme black ink by My Favorite Things
- Artichoke ink by Lawn Fawn

Hello Bluebird - Pathway Background Mini Slimline Card

samedi 27 février 2021

 Hey there,

I'm back with another Hello Bluebird card, and this time it features the Pathway background stamp. I used this stamp as well as other images to create my scene on a mini slimline card. It's a new trend going on at the moment and I wanted to try it.

So I simply cut a Neenah solar white panel measuring 5 x 3 inches, and I stamped a part of the Pathway background on that panel. And like always I used my alcohol markers to color the entire panel. And once my mini panel was complete, I stamped additional images and used my alcohol markers again to color everything.

I attached my small panel on a 5-1/4 x 3-1/4 inches card base using foam tape, and then all my cute images on top using a combination of foam squares and glue dots. I stamped my sentiment and used a white gel pen to add highlights on the images and then I added a tiny white nuvo drop in the middle of each orange flower.


And that's it for this lovely picnic scene in the countryside. I leave you with the video, you can click on the picture below, and wish you a very nice day.


VIDEO
(click on the picture below)


HELLO BLUEBIRD SUPPLIES
- Pathway background
- Spring gatherings
- Autumn gatherings
- Fairy dance
- My snowman
- Picked for you
- Merry mice
- Field mice
- Party on the farm
- Strawberry jam


OTHER SUPPLIES
- Spectrum Noir markers
- Graph'it brush markers
- Sakura white gel pen
- 80lbs Neenah solar white cardstock
- Memento tuxedo black ink
- White nuvo drops by Tonic Studio