
Hey there,
I'm so happy to be back on Lawn Fawn blog and channel with this super cute interactive birthday card showcasing Party Pig which is the new free gift that you can receive during the month of your birthday from November 2021 through October 2022. Make sure to check this link to know more about this mini free stamp set.

I started by stamping my image using jet black ink, I cut them all using the coordinating dies and then colored everything using my alcohol markers. And as always I picked my images from several stamp sets, so make sure to check the list of supplies or video down below for more details.
Next I cut a 6 x 3" mini slimline panel out of Strathmore smooth bristol cardstock, and created the background using stencils and distress inks. On the bottom part, I created soil using a hillside stencil + gathered twigs and ground espresso distress inks. On the middle part, I created grass using a grassy stencil + shabby shutters and mowed lawn distress. And on the top part, I created the sky using a cloudy stencil + tumbled glass and salty ocean distress inks.
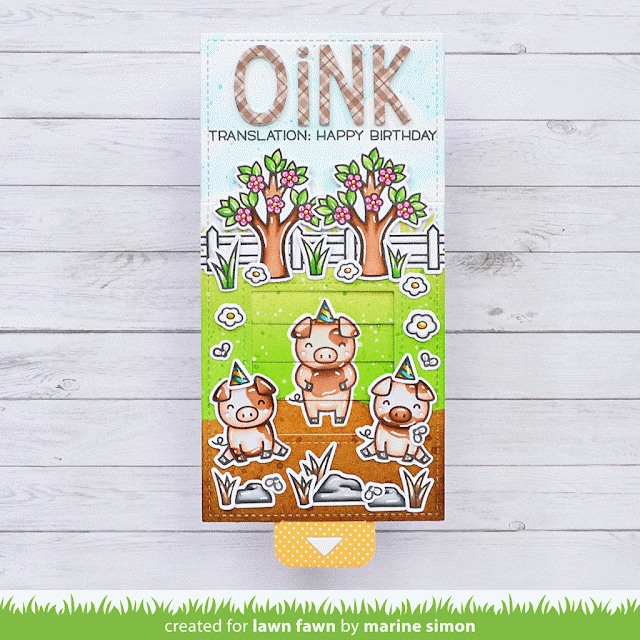
Next I cut the frame out of this panel, and created the magic picture changer element. And I invite you to watch the process video down below because it's always easier to understand this part with images.
I cut a 6 x 3" card base, I attached the pocket at the bottom using double sided tape, and the sky at the top using foam tape to be at the same height as the pocket. Next, I attached everything using glue dots, foam squares and liquid glue.

Next I created the first part of my sentiment. I cut the word "Oink" three times: one time out of a brown pattern paper and two times out of white cardstock. I glued the white letters on top of each other to create dimension, and then I attached the brown letters on top.
And for the second part of my sentiment, I placed the panel in my Misti tool, with the letters, not attached yet, at the top. I placed the phrase "Translation: happy birthday" between the letters and the trees, removed the letters and stamped the phrase using jet black ink. And then I finally attached the letters right above the phrase. And finally I cut the pull tab decorating piece and attached it at the end of the pull tab.
VIDEO
LAWN FAWN SUPPLIES
Stamp sets
Party Pig
Really high five
Hay there
Swan soirée
Toadally awesome
Butterfly kisses
Ocean shell-fie
Tree before 'n Afters
Die sets
Magic picture changer
Finley's ABCs
Large mini slimline stackables
Misc
Sweater weather 6x6 paper pack
Jet black ink
- Hillside stencil
- Cloudy stencil
- Grassy stencil
OTHER SUPPLIES
- Spectrum Noir markers
- Graph'it brush markers
- Distress inks: tumbled glass, shabby shutters, mowed lawn, gathered twigs, ground espresso
- Bristol smooth strathmore cardstock
- Sakura white gel pen
- Copic opaque white ink
Happy birthday Marine! Love the card
RépondreSupprimerHi Marine - I'm such a fan of your amazing Lawn Fawn creations! Thanks so much for all your creativity and inspiration :-) Now that it's a new year, I've decided to reorganize my crafting space. With that in mind, I must ask about your organization: How in the world are you able to pull all those stamps and dies from disparate sets on a single creation? How do you know what you have and what will work? Please share your organization secrets the the rest of us Lawn Fawnatics! Thanks so much, in advance...
RépondreSupprimer