Affichage des articles dont le libellé est theme: coffee. Afficher tous les articles

Pretty Pink Posh - Easter Bunny Mugs

mardi 24 mars 2026

Hello there,

I'm very happy to be back with this extra colorful card featuring a mash-up of new Pretty Pink Posh items, such as the Easter Bunny Mugs, with older ones, such as the Doily Borders. I've had this border die set for a long time, and it was fun to finally use it!


I started off by creating the background, and I knew that my Easter Bunny Mugs would be mostly neutrals, so that's why I went for a bright and bold background. I cut multiple Doily Borders out of pink, orange, yellow, green, blue and purple cardstock, mixed copic opaque white ink with water and added white splatters all over the borders. I did the same with liquid stardust because I can't help myself but adding sparkles to all my cards, and when my Doily Borders were dry, I attached them one below each other to a 5,5 x 4,25 inches white panel using 1mm foam squares. Next I cut a large Scallop Frame out of white cardstock, and stuck it to the colorful Doily Borders using 1mm foam squares again.


I cut the Easter Bunny Mugs items out of colored cardstock, pattern papers and vellum, added texture to each element using liquid stardust, copic opaque white ink and a white gel pen, and then I assembled my mugs using 1mm foam squares. The only items that don't belong to the Easter Bunny Mug die set are the heart cheeks, collars and bunny white snouts. I used a Valentine Bucket Additions die to cut the hearts, Spring Mug Additions dies to cut the collars and the bow ties, and a Bear Holder die to cut the bunny white snouts.


I gave both of the bunny mugs a pair of googly eyes to make them extra cute, applied glossy accents to their nose and white blizzard nuvo drops to their cheeks, and picked orange hearts from the Colorful Hearts confetti mix that I glued in the center of each bow tie. To tone down my colorful background a bit, I cut a large Eyelet Oval panel out of vellum, added white splatters to it and attached it right in the middle of my Doily Borders panel. Next I stuck the Easter Bunny Mugs using 1mm foam for one and 2mm foam squares for the other, and then stamped two Easter Banner Greetings. I white heat embossed "Spring Greetings" on blue cardstock and "Some Bunny Loves You" on purple cardstock, used a Banner Greetings 3 die to cut the first one and a Banner Greetings 1 die to cut the second one, and finally attached them both to my card using foam squares.


PRETTY PINK POSH SUPPLIES
- Easter bunny mugs die set
- Doily borders die set
- Valentine bucket additions die set
- Eyelet oval die set
- Bear holder die set
- Spring mug additions die set
- Scallop frame die set
- Banner greetings 3 die set
- Banner greetings 1 die set
- Easter banner greetings stamp set


OTHER SUPPLIES
- Copic opaque white ink
- Liquid stardust by Lawn Fawn
- White blizzard nuvo drops
- Glossy accents by Ranger
- Sakura white gel pen
- Googly eyes from Amazon
- Clear embossing ink by Lawn Fawn
- Fine white embossing powder by Lawn Fawn
- Colored cardstock by The Stamp Market
- Vellum by Lawn Fawn

Pretty Pink Posh - Coffee, Chocolate & Biscuits

mercredi 21 mai 2025

Hello there,

I'm so happy to be back with this monochromatic coffee themed shaker card featuring the Teacup Shaker die from the Pretty Pink Posh May 2025 Release, as well as previously released items I used to create a cute and lovely little scene. I usually create monochromatic cards during the Fall or Halloween seasons, so it was fun to work with all those shades of beige and brown to create this shaker card.


I started off by cutting a large Eyelet Rectangle panel out of kraft cardstock, and I created a fun background using the Layered Teacups stencils. With stencil #1 I used vintage photo oxide ink, and with stencil #2 I used ground espresso oxide ink. I splattered water all over the panel and dried it with a paper towel, mixed a little bit of ground espresso oxide ink with water and used a slim brush to add more splatters to my panel, and then I did the same with copic opaque white ink for brightness and contrast, and also with vintage photo distress spritz for sparkles. Next I cut a large Eyelet Circle panel out of vellum, added the same white ink splatters and vintage photo distress spritz splatters, and then set my two panels aside to dry.

Once they were dry, I attached my Eyelet Rectangle panel to a 5,5 x 4,25 inches dark brown panel using 1mm foam tape, next the whole thing to a white card base, and then I stuck my Eyelet Circle vellum panel to the card using a couple of 1mm foam squares in the middle.


Next I worked on the Teacup Shaker and built it following those steps:

1. Cut a Teacup Shaker frame out of brown gingham pattern paper
2. Cut a whole Teacup Shaker out dark brown cardstock, trimmed the handle and glued to the gingham teacup
3. Cut a whole Teacup Shaker out of clear acetate, and attached my gingham teacup frame to it using liquid glue
4. Flipped my teacup over and added foam strips all along the edges of the cup, following its shape, and at the back of the handle as well
5. Poured a whole bunch of Chocolate shaker beads inside the teacup
6. Cut a whole Teacup Shaker out of a beige pattern paper, peeled all the backing papers off the foam strips, and attached that beige teacup to the foam strips to totally close the Teacup Shaker.


Next I cut all the bits and pieces out of colored cardstock, and applied matching distress ink to the edges of each element to darken them a little bit more and give them more interest. I also mixed those same matching distress inks with water and added splatters to each piece, and then I did the same with copic opaque white ink and added white ink splatters on all the elements.

Here is a detailed list of the die sets I used:  Valentine Mug Additions - spoon, chocolate, coffee beans  Candy Treats - chocolate cookie  Stitched Hearts - heart waffle  Big Valentine Cupcake - whipped cream  Birthday Mug Additions - rolled cookie.

Next I attached everything to my card using 1mm and 2mm foam squares, liquid glue and 3mm glue dots. I white heat embossed "Hello friend" from Friend Greetings on brown cardstock, cut it using the matching die, added a little bit of matching distress ink on the edges, and attached it on the cup using 2mm foam squares. And to finish my card, I applied glossy accents to the hearts on the cream and spoon, and also on the chocolate.


PRETTY PINK POSH SUPPLIES
- Teacup shaker die set
- Valentine mug additions die set
- Candy treats die set
- Stitched hearts die set
- Big Valentine cupcake die set
- Birthday mug additions die set
- Eyelet circle die
- Eyelet rectangle die
- Friend greeting stamp set
- Layered teacups stencil set
- Chocolate shaker beads


OTHER SUPPLIES
- Oxide inks: vintage photo, ground espresso
- Copic opaque white ink
- Glossy accents by Ranger
- Clear embossing ink by Lawn Fawn (greeting)
- Fine white embossing powder by Hero Arts
- Kraft cardstock by Lawn Fawn
- Acetate from my stash
- Vellum by Lawn Fawn
- Pattern papers from my stash

Sunny Studio - Merry Mocha - Black Friday Gift w/ Purchase

jeudi 23 novembre 2023

Hello there,

Happy Thanksgiving! I'm super happy to be back on Sunny Studio's blog with this set of see-through shaker tags showcasing the adorable Merry Mocha mini stamp set. I love making tags throughout the year, but especially during the holiday season, and I thought this cup of mocha was the perfect size for tags. And what's better than gingerbread cookies to go with this delicious hot beverage?

*****

But first let's check out the details about Sunny Studio Black Friday offer:

The Merry Mocha Stamps used today are not available for purchase this holiday season but rather will be automatically included with all retail orders of $45 or more from Sunny Studio through November 27th at Midnight PDT. Here are all the details:

Receive free shipping on U.S. orders of $40+

+ Receive the exclusive mini "Merry Mocha" stamp set with a $45+ purchase

+ Receive the coordinating "Merry Mocha" dies with a $75+ purchase

+ 10% of retail sales will be donated to the Maui Strong Fund with the Hawaii Community Foundation

*Please note: No discount codes are needed. All offers will be applied automatically and cannot be combined with additional discounts at checkout. Purchases are based on order subtotal, prior to shipping & tax.

*****

To give my tags some kind of a vintage look, I stamped my images on a light kraft cardstock using an alcohol marker friendly black ink. As always I used the coordinating dies to cut them all, and colored everything using my alcohol markers, except for the white sections that I colored using a white colored pencil. So, along with the Merry Mocha cups, I stamped the gingerbread couple from Christmas Cookies, as well as the one from Baking Spirits Bright and the candy canes from that same set.


Next I worked on the tags. I started off by cutting six tag shapes out of a dark kraft cardstock using a die from Mini Mat & Tag 3, cut an opening inside each tag panel using another die from the same set, and then attached a piece of acetate at the back of each tag. I set three of those tags aside, and at the back of the three other tags, I attached foam strips all along the opening to create room for my shaker material. I added polymer clay candy cane slices inside that space, as well as clear glitter, and used the three tags I had put aside to close the three others.


I attached a cup of Merry Mocha, candy canes and a gingerbread cookie on each tag using 1mm foam squares, I also created three identical greetings using the "Eat Drink and Be Merry" sentiment from Merry Mocha. I white heat embossed three greetings on brown cardstock, and used the matching die to cut them. Next I cut three small tags out of the same light kraft cardstock as the images using a die from Wrap Around Box, and I stuck a greeting on each small tag using 1mm foam squares again. To finish my tags, I tied each small tag to a bigger one using white thread, and I created three red bows that I stuck at the top of each tag using 3mm glue dots.


SUNNY STUDIO SUPPLIES
- Merry mocha mini stamp set
- Christmas cookies stamp set
- Baking spirits bright stamp set
- Mini mat & tag 3 die set
- Wrap around box die set


OTHER SUPPLIES
- Graph'it brush markers
- Ohuhu markers
- White colored pencil
- Clear embossing ink by Lawn Fawn
- Fine white embossing powder by Hero Arts
- Jet black ink by Lawn Fawn
- Candy cane lane confetti by Prima Marketing
- Glitter by Studio Katia
- White thread from my stash
- Red ribbon by Flying Tiger
- Cardstocks by Lawn Fawn

Sunny Studio - Paris Afternoon Shaker Card

jeudi 24 février 2022

Hi there,

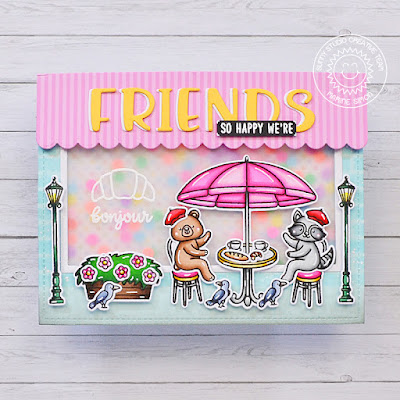
I'm back on Sunny Studio blog today with this cute and sweet bakery storefront showcasing Paris afternoon. I started off by making the storefront panel. I cut a 5,5 x 4,25" light blue panel, masked 1cm along the bottom edge using washi tape, and created a brick texture on the paper using tumbled glass distress ink and a brick stencil. Next I removed the washi tape, and applied a little bit of hickory smoke distress ink on the bottom edge to bring some texture and contrast.

I picked a rectangle die from my stash, taped it in the middle of the brick panel, right above the pavement section, and sent everything to my die cutting machine to cut a window out of this brick panel. And to finish this window nicely, I created a frame. I used the same rectangle die as before and a second one slightly bigger, I taped both dies on a piece of white cardstock and die cut a frame that I glued on the brick panel.

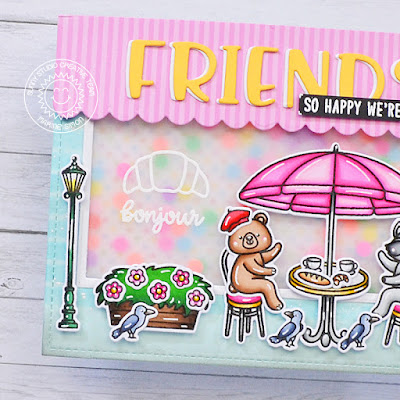
Next I cut a 5,5 x 4,25" vellum panel, and on the left side I white heat embossed the croissant and the word "Bonjour" from Paris afternoon.

I added double sided tape at the back of the brick panel and attached it on the vellum panel. I also created a simple pink awning using a paper from the Dots & stripes pastels paper pack and the roof die from the Sweet treat house add-on.


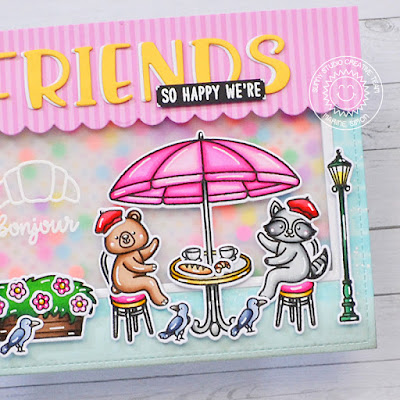
I cut a light blue card base, and stuck a piece of rainbow polka dot paper from the Spring sunburst paper pack on top. I added foam tape at the back of the brick panel, all around the rectangle window, next I poured some colorful confetti inside the vellum window and then I attached my card base to the foam to finally close and complete my shaker background. I attached the pink awning above the window using double side tape at the top and foam tape along the scalloped edges to bring dimension, and then I stamped, die cut and colored all my images using my alcohol markers.


Once the coloring was done, I cut the word "Friends" twice using the Chloe alphabet die set: out of yellow cardstock and out of white cardstock. I attached the white letters behind the yellow letters to create an outline, and I stuck those letters on the pink awning. I also white heat embossed the words "So happy we're" from Fall friends on black cardstock, and trimmed it into a slim banner that I attached below the word "Friends". And as always I finished my card by adding highlights and details to the images using a white gel pen.


VIDEO


SUNNY STUDIO SUPPLIES
- Paris afternoon stamp set
Charming city stamp set
- Critters on the go stamp set
- Farm fresh stamp set
- Fall friends stamp set
- Sweet treat  house add-on die set
- Chloe alphabet die set
- Spring sunburst paper pack
- Dots and stripes pastels paper pack


OTHER SUPPLIES
- Spectrum Noir markers
- Graph'it brush markers
- Distress inks: tumbled glass, hickory smoke
- Sakura white gel pen
- Copic opaque white ink
- Brick stencil by Lawn Fawn
- Vellum by Simon Says Stamp
- Light blue cardstock by The Stamp Market
- Clear embossing ink by Lawn Fawn
- Fine white embossing powder by Hero Arts

Miss Ink Stamps - Central Perk - Inside Shadow Box Card

mercredi 5 juin 2019

Hey there,

I'm so excited to share with you my first card as a guest designer for Miss Ink Stamps. It's a new brand and I'm very honored thay they asked me to design for them. Every first wednesday of each month, I'll share a project using one of their sets. 


For this first project, I used the Java Joe's stamp set.


I first started by stamping my images on Neenah solar white cardstock using memento tuxedo black ink. I fussy cut them and colored them using my alcohol markers. I don't know about you, but this Java Joe's stamp set reminds me of the Central Perk in Friends, so I tried to use the same colors as in the TV series.


When all the the coloring was done, I cut two pieces of dark brown cardstock (I followed a tutorial by Jennifer McGuire)


To decorate the inside, I started by attaching a wood panel. Next I cut a square out of this wood panel. I took a piece of green cardstock, positioned the same square die and a bigger one to create a frame. And to make it darker, I simply apply mowed lawn distress ink on it. And next I glued it on my panel. I also attached the floor and a baseboard. And to complete the inside, I attached a skyline pattern paper.


On the outside panel, I stuck a brick pattern paper and a piece of grey cardstock to get a nice New York style. Next I attached the inside panel into the outside panel. And finally all my images were attached using foam adhesive squares.


And this is the final result. What do you think of it? Maybe we'll find Monica Phoebe Rachel Chandler Joey and Ross inside, putting the world to rights while sipping coffees. Anyway, i hope you like this card. Thank you so much for watching and see you next time, bye.

VIDEO
Below or here


SUPPLIES
- Spectrum Noir markers
- Distress ink: mowed lawn
- Neenah solar white cardstock
- Brick pattern paper by Toga
- Grey cardstock by Bazzil
- Wood pattern papers from my stash
- Skyline pattern paper from my stash
- Green cardstock by Simon Says Stamp
- Ground coffee cardstock by Lawn Fawn
- Sakura white gel pen

Craftin Desert Divas - Coffee Tags

vendredi 8 décembre 2017

Hey there,

I'm back again to share with you four coffee tags!


They were made for the Winter Coffee Lovers Blog Hop using the new "Brewed with love" stamp set + "Inside Scalloped Octagons" die set, both from Craftin Desert Divas.


I first started by printing a coffee themed background found on internet, and from it I die cut four octagons shapes. Then I colored my images using my alcohol markers, and fussy cut them.


To frame the tags and add some contrast, I die cut four more octagons from kraft cardstock but only kept the outsides of the die cuts, inked each piece using dark brown distress ink, and glued them on the tags.


I also die cut four sun shapes from vellum and attached them in the middle of each tag using large glue dots.


Attached each image on its tag, and finally added my sentiments previously die cut using small dies from various die sets.

VIDEO
Below or here

CRAFTIN DESERT DIVAS SUPPLIES


OTHER SUPPLIES
- Kraft cardstock from Neenah
- White cardstock from HobbyCraft
- Vellum from ma stash
- Distress ink from Tim Holtz: ground espresso
- Twine from Stampin Up!
- Spectrum Noir markers

Fall Coffee Lovers Hop - Hello Fall

vendredi 15 septembre 2017

Hey there,

Here is a quite simple card, but yet very cute I think that I made for the Coffee Lovers Blog Hop using the cutest owl ever from Craftin Desert Divas. By the way, this image is a freebie for everyone through 9-22-17. Use the code: coffee in the CDD shop to get it for free.

I first started by cutting all the papers at different sizes so I could make several layers and levels. I printed the sentiment and image, and colored it using my alcohol markers.


Then I assembled everything: I attached the plaid rectangle to the largest craft rectangle, glued a long piece of ribbon at the back and attached the whole thing to a white card base. I tied a knot on the right side of the panel and attached the little owl panel on top of it using foam squares.


Added stitched lines around the front frame using a glitter pen, and glued some sequins to finish the card.

CRAFTIN DESERT DIVAS SUPPLIES


OTHER SUPPLIES
- Plaid paper from Lawn Fawn
- Craft cardstock from Neenah
- Solar white cardstock from Neenah
- Ribbon from Stampin Up!
- Glitter pen from Uniball