
Hello there,
I'm super happy to be back on Sunny Studio blog with more Christmas in July inspiration. Today I'm featuring the Wonky windows die again, I love this die, it's so perfect to make shaker cards!

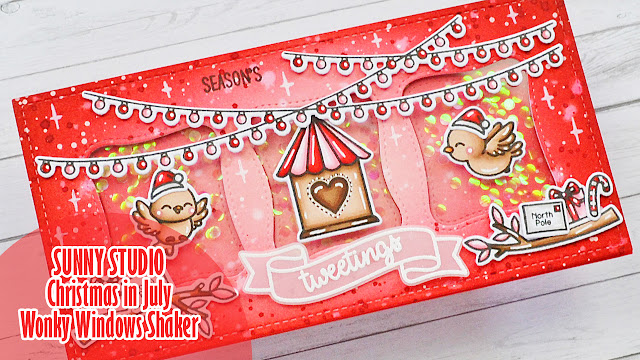
I first started by cutting a 6 x 3" bristol panel, and created a vibrant red background using tattered rose, festive berries and aged mahogany distress inks. And I added lots of texture to give this panel more interest: water splatters, white ink splatters and aged mahogany distress ink + water splatters.
And while the panel was drying, I stamped, die cut and colored my images. I like to mix and match stamps from different sets, and this is what I did on this card:
- Little birdie: the birdhouse and two birds
- Scenic route: the strings of lights
- Outback critters: the branch
- Christmas critters: the Christmas hat
- Holiday express: a present
- Penguin pals: the postcard and candy canes

Next I worked on the shaker. I started by cutting three windows out of my red panel using the Wonky windows die. I cut a 6 x 3" red card base, temporarily taped the red panel to it using washi tape, and put each window back to its original spot using liquid glue.
I removed the washi tape to lift the red panel, and then attached a piece of clear acetate at the back of it. Still at the back of the red panel, I added foam strips all around each window to create room for the shaker accessories.
I rubbed the inside edges of the foam strips with my powder tool to make those edges non sticky so the confetti don't stick to the foam. I used a microfiber cloth to remove any excess of powder from the acetate, and then I added a bunch of shiny confetti inside each window. Peeled all the backing papers off the foam strips, and finally attached the card base to the foam to complete and close the shaker.

I stuck the images on the panel using foam squares and liquid glue. And next I created my "Season's Tweetings" sentiment using elements from Little birdie. I stamped "Season's" in the upper part of the panel using black ink, and I white heat embossed "Tweetings" on vellum, along with the banner, and I attached this banner below the birdhouse using clear foam squares.
Finally I added highlights and details to the images and background using a white gel pen. And that's it, super bright and very cute with those birdies wearing Christmas hats. Thanks for stopping by, and as always feel welcome to watch the process video for more details. See you next week!
VIDEO
SUNNY STUDIO SUPPLIES
- Wonky windows die
- Little birdie stamp set
- Scenic route stamp set
- Outback critters stamp set
- Christmas critters stamp set
- Holiday express stamp set
- Penguin pals stamp set
OTHER SUPPLIES
- Spectrum Noir markers
- Graph'it brush markers
- Distress inks: tattered rose, festive berries, aged mahogany
- Copic opaque white ink
- Sakura white gel pen
- Extreme black ink by MFT
- Clear embossing ink by Lawn Fawn
- Fine white embossing powder by Hero Arts
- Strathmore bristol smooth cardstock
- Vellum by Lawn Fawn
- Confetti by Studio Katia
Aucun commentaire:
Enregistrer un commentaire